background image


Preface


This manual is designed to assist users in setting up and using the LCD Monitor. Information in this document has been carefully 
checked for accuracy; however, no guarantee is given to the correctness of the contents. The information in this document is 
subject to change without notice. This document contains proprietary information protected by copyright. All rights are reserved. 
No part of this manual may be reproduced by any mechanical, electronic or other means, in any form, without prior written 
permission of the manufacturer.  Windows is a registered trademark of Microsoft Inc. Other brand or product names are 
trademarks of their respective holders. 

 
FCC Statement Warning 

This equipment has been tested and found to comply with the limits for a Class B digital device, pursuant to Part 15 of the FCC Rules. 
These limits are designed to provide reasonable protection against harmful interference in a residential installation. This equipment 
generates, uses, and can radiate radio frequency energy, and if not installed and used in accordance with the instruction, may cause 
harmful interference to radio communications. However, there is no guarantee that interference will not occur in a particular 
installation. If this equipment does cause harmful interference to radio or television reception, which can be determined by turning 
the equipment off and on, the user is encouraged to try to correct the interference by one or more of the following measures:   


Reposition or relocate the receiving antenna.   


Increase the separation between the equipment and the receiver.   


Connect the equipment into an outlet on a circuit different from that to which the receiver is connected.   


Consult the dealer or an experienced monitor technician for help. 


Warning 

Use only shielded signal cables to connect I/O devices to this equipment. You are cautioned that changes or 
modifications not expressly approved by the party responsible for compliance could void your authority to operate 
the equipment. 


This  device  complies  with  part  15FCC  Rules.  Operation  is subject to the following two conditions(1) This device 
may not cause harmful interference. (2) This device must accept any interference received, including interference 
that may cause undesired operation. 

 
Canadian DOC Notice 


This Class B digital apparatus meets all requirements of the Canadian Interference-Causing 
Equipment Regulations.   
Cet appareil numérique de la classe B repecte toutes les exigences du Règlement sur le matériel 
brouilleur du Canada.


Содержание PX2611

Страница 1: ......

Страница 2: ......

Страница 3: ...the Display 5 Connecting the AC Power 6 Connecting the USB Hub 6 Setting Up the LCD Monitor 6 Power Management System 6 Display Controls 7 User Controls 7 Adjusting the Monitor s Display 8 Function De...

Страница 4: ...thatinterferencewillnotoccurinaparticular installation Ifthisequipmentdoescauseharmfulinterferencetoradioortelevisionreception whichcanbedeterminedbyturning theequipmentoffandon theuserisencouragedtot...

Страница 5: ...or 4 140 F Storing the LCD Monitor outside this range could result in permanent damage 6 If any of the following occurs immediately unplug your monitor and call an authorized technician Monitor to PC...

Страница 6: ...or to PC DVI D Cable Power Cord Monitor to PC Up to Down USB cable If you find that any of these items is missing or appears damaged contact your dealer immediately Register Your Planar Products Today...

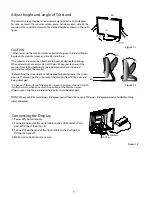
Страница 7: ...ure within the monitor Before tilting the screen back to 180 degree for packing lower the screen down to the lowest position to prevent the monitor from falling over and being damaged Do not push the...

Страница 8: ...d is connected to the LCD Monitor 2 Press the power button located on the bezel of the monitor 3 Once a signal is received the monitor should automatically adjust If not push the AUTO button located o...

Страница 9: ...nually auto adjusting the display LED 6 Green when the monitor is on Amber when in power saving mode and Dark when off 4D 1 7 A four direction key plus enter exit button Allows you to move up down lef...

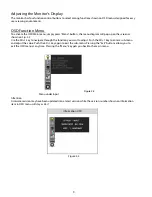
Страница 10: ...Use the 4D 1 key to navigate through the function you want to adjust Push the 4D 1 key to enter a sub menu and adjust the value Push the 4D 1 key again to exit the sub menu Pressing the Exit buttons a...

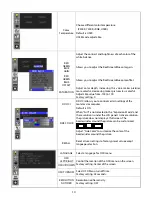
Страница 11: ...l automatically AUTO ADJUST Analog Input Only Adjust the H POSITION V POSITION H SIZE and FINE to the optimal value automatically EXPANSION MODE This function allows you to choose from different displ...

Страница 12: ...ol certain settings of the monitor via computer Default is ON SIDE COLOR When Full is not selected in the Expansion Mode and the resolution is under the LCD panel s native resolution the picture does...

Страница 13: ...ome inactive this warning appears No signal OSD shall be shown after around 0 5sec from video mode detection This OSD shall be turned off after 5 seconds automatically or by EXIT key Then change to po...

Страница 14: ...me and the resolution is 800x600 and above the monitor will auto adjust itself To manually execute the Auto Adjust function press the Auto button Target color coordinates Color Temp 9300K 7500K sRGB u...

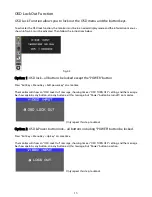
Страница 15: ...at same time The monitor will show an OSD Lock Out message showing time as OSD TURN OFF setting and the message be show again by any button also any button exit this message but Power button be turn...

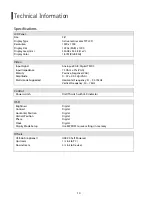
Страница 16: ...de Supported Analogue RGB Digital TMDS 75 Ohm 2 VGA Positive Negative VGA 0 0 7 0 05 Vp VGA Horizontal Frequency 31 93 75kHz Vertical Frequency 50 76 Hz Control Power switch On Off switch with LED ind...

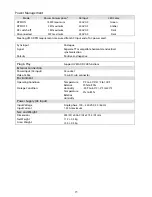
Страница 17: ...synchronization Polarity Positive and negative Plug Play Supports VESA DDC2B functions External Connection Power Input AC input AC socket Video Cable 15 pin D sub connector Environment Operating Condi...

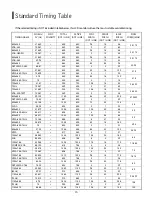
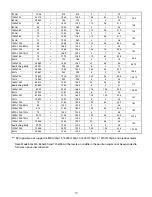
Страница 18: ...2 35 28 322 832x624 49 725 1152 832 64 32 224 APPLE MAC 800 74 55 667 624 3 1 39 57 2832 800x600 35 156 1024 800 72 24 128 SVGA 56 25 625 600 2 1 22 36 800x600 37 879 1056 800 128 40 88 VESA 600 60Hz...

Страница 19: ...75Hz 74 984 942 900 6 3 33 136 75 1680x1050 64 674 1840 1680 32 48 80 Red BLKing 60Hz 59 883 1080 1050 6 3 21 119 1680x1050 65 29 2240 1680 176 104 280 60Hz 59 954 1089 1050 6 3 30 146 25 1680x1050 82...

Страница 20: ...s no picture on LCD Monitor If there s no picture on the LCD Monitor please perform the following steps 1 Make sure the power indicator on the LCD Monitor is ON all connections are secured and the sys...

Страница 21: ......

Отзывы: