background image


 6  


z

  Do not use the monitor near water, e.g. near a bathtub, washbowl, kitchen 

sink, laundry tub, swimming pool or in a wet basement. 

z

  Do not place the monitor on an unstable cart, stand, or table. If the monitor 

falls, it can injure a person and cause serious damage to the appliance. 
Use only a cart or stand recommended by the manufacturer or sold with 
the monitor. If you mount the monitor on a wall or shelf, use a mounting kit 
approved by the manufacturer and follow the kit instructions. 

z

  Slots and openings in the back and bottom of the cabinet are provided for 

ventilation. To ensure reliable operation of the monitor and to protect it 
from overheating, be sure these openings are not blocked or covered. Do 
not place the monitor on a bed, sofa, rug, or similar surface. Do not place 
the monitor near or over a radiator or heat register. Do not place the 
monitor in a bookcase or cabinet unless proper ventilation is provided. 

z

  Do not install the monitor in a location near heat sources such as radiators 

or air ducts, or in a place subject to direct sunlight, or excessive dust or 
mechanical vibration or shock.


z

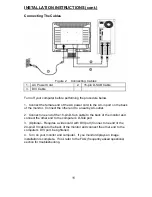
  The monitor should be operated only from the type of power source 

indicated on the label. If you are not sure of the type of power supplied to 
your home, consult your dealer or local power company. 

z

  The monitor is equipped with a three-pronged grounded plug, a plug with a 

third (grounding) pin. This plug will fit only into a grounded power outlet as 
a safety feature. If your outlet does not accommodate the three-wire plug, 
have an electrician install the correct outlet or ground the appliance safely. 
Do not defeat the safety purpose of the grounded plug. 

z

  Unplug the unit during a lightning storm or when it will not be used for long 

period of time. This will protect the monitor from damage due to power 
surges. 

z

  Do not overload power strips and extension cords. Overloading can result 

in fire or electric shock. 

z

  Never push any object into the slot on the monitor cabinet. It could short 

circuit parts causing a fire or electric shock. Never spill liquids on the 
monitor. 

z

  Do not attempt to service the monitor by yourself.  Opening or removing 

covers can expose you to dangerous voltages and other hazards. Please 
refer all servicing to qualified service personnel. 

z

  To ensure satisfactory operation, use the monitor only with UL listed 

computers which have appropriate configured receptacles marked 
between 100 - 240V AC, Min. 5A. 

z

  The wall socket shall be installed near the equipment and shall be easily 

accessible. 


PRECAUTIONS


Содержание PL2010

Страница 1: ...PL2010...

Страница 2: ...1...

Страница 3: ...ghts are reserved No part of this document may be reproduced translated to another language or stored in a retrieval system or transmitted by any means electronic mechanical photocopying recording or...

Страница 4: ...3...

Страница 5: ...ource 10 Connecting the cables 12 Tilt Adjustment 12 Attaching the optional wall mount arm not included 13 Preparing to install the optional sall mount arm not included 14 Operating Instructions Exter...

Страница 6: ...or relocate the receiving antenna 2 Increase the separation between the equipment and receiver 3 Connect the equipment into an outlet on a circuit different from that to which the receiver is connect...

Страница 7: ...source indicated on the label If you are not sure of the type of power supplied to your home consult your dealer or local power company z The monitor is equipped with a three pronged grounded plug a p...

Страница 8: ...n below it s native resolution which may slightly degrage the display quality Therefore it is highly recommended to operate the monitor at it s native resolution of 1600 x 1200 60Hz OTHER NOTES The sc...

Страница 9: ...lay capabilities The communication channel is defined in two levels DDC1 and DDC2B The DDC1 is a unidirectional data channel from the display to the host that continuously transmits EDID information T...

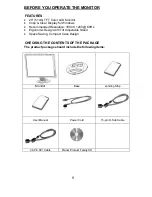
Страница 10: ...ution 1600 X 1200 60Hz Ergonomic Design with Tilt Adjustable Stand Space Saving Compact Case Design The product package should include the following items Monitor Base Landing Strip User Manual Power...

Страница 11: ...oride flexible cord according to IEC 60227 designation H05VV F 3G 0 75mm2 or H05VVH2 F2 3G 0 75mm2 shall be used As an alternate a flexible cord of synthetic rubber according to IEC 60245 designation...

Страница 12: ...nd to a nearby AC outlet 2 Connect one end of the 15 pin D Sub cable to the back of the monitor and connect the other end to the computer s D Sub port 3 Optional Requires a video card with DVI port Co...

Страница 13: ...preference Hold the stand so you do not topple the monitor when you change the monitor s angle You are able to adjust the monitor s angle from 5 to 20 Figure 3 NOTES Do not touch the LCD screen when...

Страница 14: ...screws 2 Remove the base 3 Follow the manufacturer s instructions to assemble the wall mounting arm See next page for further installation instructions NOTE The Planar PL2010 is in compliance with th...

Страница 15: ...wall mounting arm 1 Place the wall mounting arm onto the back of the monitor Line up the holes of the arm with the holes in the back of the monitor 2 Insert the 4 screws into the holes and tighten 3...

Страница 16: ...Exit 6 Power Indicator 3 Brightness 7 Power Button 4 Contrast Power Button Press this button to turn the monitor ON or OFF MENU ENTER Active OSD menu or function adjust confirm Brightness Adjust brigh...

Страница 17: ...Adjustment function is used to set the HPos VPos Clock and Focus Power Indicator Green Power On mode Amber Standby mode Osd Lock Function Option 1 OSD lock all 5 buttons are locked except the POWER bu...

Страница 18: ...ed press the MENU button to activate it If the function selected has a sub menu press or again to navigate through the sub menu functions Once the desired function is highlighted press MENU button to...

Страница 19: ...to Config Image Setup Clock Adjust picture Clock to reduce Vertical Line noise Do Auto Config H Position Adjust the horizontal position of the picture Do Auto Config Image Position V Position Adjust t...

Страница 20: ...nguage to English Deutsch N A Set OSD display language to German Fran ais N A Set OSD display language to French Espa ol N A Set OSD display language to Spain Italiano N A Set OSD display language to...

Страница 21: ...Card should be snugly seated in its slot Make sure monitor s video cable is properly connected to the computer Inspect monitor s video cable and make sure none of the pins are bent Make sure computer...

Страница 22: ...he picture has horizontal disturbances in light picture For FOCUS and CLOCK adjustment use dot pattern or win 95 98 shut down mode pattern CABLE NOT CONNECTED 1 Check that the signal cable is properly...

Страница 23: ...MHz Max Resolution 1600 x 1200 60Hz Plug Play VESA DDC1 2BTM ON Mode 60 W EPA ENERGY STAR OFF Mode 2W D Sub 15pin Input Connector DVI 24pin Analog 0 7Vp p standard 75 OHM Positive Input Video Signal D...

Страница 24: ...n External Controls Functions Contrast Brightness Focus Clock H Position V Position C1 Color C2 Color SRGB Color temperature User Input signal Selection OSD position OSD timeout Language Display infor...

Страница 25: ...M DOS 720 400 31 47 70 0 640 480 31 47 60 0 VGA 640 480 37 50 75 0 800 600 37 879 60 0 SVGA 800 600 46 875 75 00 1024 768 48 363 60 0 1024 768 56 476 70 0 1024 x 768 60 02 75 0 1024 x 768 48 780 60 0...

Страница 26: ...DDC Serial clock 8 GND B 24 Pin Color Display Signal Cable PIN NO DESCRIPTION PI N NO DESCRIPTION 1 TMDS Data 2 13 TMDS Data 3 2 TMDS Data 2 14 5V Power 3 TMDS Data 2 4 Shield 15 Ground for 5V 4 TMDS...

Страница 27: ...41G200N935 1C6275...

Отзывы: