Prepare Your Installation Location
18
EP4650/EP5550 User Manual
Prepare Your Installation Location
You should have prepared the area where you will install the unit. If custom
enclosures are part of the installation, they must be fully designed to accommodate
the installation of the displays, as well as the installed unit and ventilation and
cooling requirements.
If your installation included a lot of construction or dust, it is
highly recommended
that you clean all of the screens after the wall installation and configuration are
complete.
Power Input
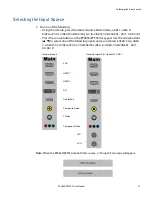
Signal Source Input
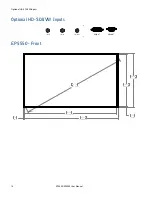
Source inputs are located on the rear of the display.
RS232C
L
AN
Disp
l
ayPort
H
D
MI 1
H
D
MI
2
D
VI-
D
VG
A
PC
A
u
dio
I
n
I
R
E
xtender
A
u
dio
O
u
t
Component
A
u
dio
I
n
S
-V
ideo
V
ideo
A
u
dio
I
n
Name
Connector
RS232C input
D-Sub 9-pin
LAN input
RJ45
DisplayPort
DisplayPort
HDMI 1 input
HDMI
HDMI 2 input
HDMI
DVI-D input
D-Sub 24-pin
VGA (PC) input
D-Sub 15-pin
PC audio in
Mini jack
IR Extender
Mini jack
Audio Out
Mini jack
Y-Pb-Pr (Y-Cb-Cr) input
RCA G/B/R
Audio In for Component input
RCA L/R
S-video input
Mini Din 4-pin
Video (composite) input
RCA
Audio In for S-Video/Video input
RCA L/R
Содержание EP4650
Страница 1: ...EP4650 EP5550 User Guide...
Страница 6: ...Table of Contents iv EP4650 EP5550 User Manual...
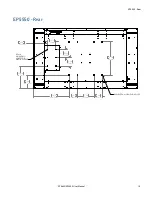
Страница 17: ...Dimensions EP4650 EP5550 User Manual 11 Dimensions EP4560 Front LQ PP LQ PP LQ PP LQ PP LQ PP LQ PP LQ PP...
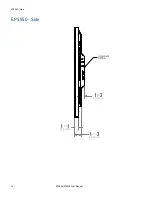
Страница 22: ...EP5550 Side 16 EP4650 EP5550 User Manual EP5550 Side LQ PP LQ PP LQ PP 237 21 6 9 7 HD SDI VW OPTION...
Страница 42: ...OSD Menus 36 EP4650 EP5550 User Manual OSD Menus Image Settings Display Settings Main PIP...
Страница 43: ...Audio Settings EP4650 EP5550 User Manual 37 Audio Settings Basic Settings...
Страница 45: ...Advanced Settings EP4650 EP5550 User Manual 39 Advanced Settings Network Settings...
Страница 76: ...Login 70 EP4650 EP5550 User Manual When you first login you will see the System Status page as shown here...

