background image

DF500 Folder Operator Guide 

11

SV40214 Rev. A

Using the Table Extension

1.    Lift the table extension up to sup port longer paper like legal 

size.

Setting the Pressure Roller

The pressure roller knob allows you to set the pressure applied to 
the first set of feed rollers.

•     For 20 lb. bond paper, 

set the knob halfway 
between "+" and "–".

•     For heavier paper, or if 

you see the feed rollers 
slipping, move the knob 
towards "+".

•     For lighter paper, or 

if the paper tends to 
bunch up under the 
feed rollers, set the knob 
towards "–".

Содержание OfficeRight DF500

Страница 1: ......

Страница 2: ...nt is operated in a com mercial environment This equipment generates uses and can radiate radio frequency energy and if not installed and used in accordance with the users manuals may cause harmful interfer ence to radio communications Operation of this equipment in a residential area is likely to cause harmful interference in which case the user will be required to correct the interference at his...

Страница 3: ...tup 9 Automatic Fold Setup 12 Operating The Folder 13 Folder Mechanics For Understanding Fold Problems 15 Total and Batch Count 20 Running a Job 23 Saving Retrieving or Deleting Jobs 24 Manual Fold Setup 28 Manual Feed 30 Operating Hints 32 Troubleshooting 36 Maintenance 40 Supplies 40 Form Handling 41 Equipment Form Specifications 43 ...

Страница 4: ...et The power cord wall plug is the primary means of discon necting the folder from the AC supply The wall outlet should be near the machine and easily acces sible DO NOT use an adapter plug on the line cord or wall outlet DO NOT remove the ground pin from the line cord Avoid using wall outlets that are controlled by wall switches DO NOT route the power cord over sharp edges or trapped between furn...

Страница 5: ...Pit ney Bowes Customer Service Representative To reduce the risk of fire and or electrical shock do not at tempt to disassemble this machine If service is required contact your Pitney Bowes Customer Service Representative To prevent overheating do not cover the vent openings All areas of the machine requiring disassembly or removal of covers should be accessed only by your Pitney Bowes Cus tomer S...

Страница 6: ...n LCD display informs you of the status of the machine and of the jobs your are running Up to ten jobs may be setup and saved for easy retrieval In addition system diagnostics are available conveniently from the control panel One feature of the DF500 is the Auto Set mode for producing common folds see below This mode allows the automatic set ting of different programmed folds and the adjustment of...

Страница 7: ... where paper is fed into the folder 4 Skew Adjustment Control used to offset skewing when feeding material 5 Fuses disconnects power to the folder when there is an overload of power consumed by the machine 6 AC Input for Power Cord connects to AC line cord 7 Power Switch turns on and off machine 8 Operator Side of Machine 9 Right Hand Cover on side allows access to fold plate 3 2 1 4 5 6 7 8 9 ...

Страница 8: ...rom exit area 4 Input Feed Deck Extension Guides allows long sheets of material to be supported Flip up to activate 5 Pre feed Adjustment Knob allows you to change the amount of feed pressure for feeding various types of material 6 Operating Guide Holder holds this DF500 Operating Guide 7 Control Panel allows user to setup and operate the folder 8 Hand Wheel Knob under cover allows for manual turn...

Страница 9: ...of fold selected 3 LCD Display displays machine and job status to opera tor 4 Dual Function Buttons used for setting paper thickness or manual feeding Also used for scrolling in certain setup menus 5 Setup Buttons sets up the folder functions 6 Main Control Buttons used to control main folder op eration 1 2 3 4 5 6 DF500 Control Panel Features ...

Страница 10: ...under each end Do not lift the unit using the paper support guides control panel or fold plate door AC Input for Power Cord Power Switch JOB 1 READY ØØØØØØ WARNING To avoid personal injury or damage to the machine two people should be used to lift the DF500 3 Install the line cord into the AC input on the side of the DF500 see below and then plug it in to a grounded 1 15 VAC outlet WARNING To avoi...

Страница 11: ...et of the paper you want to fold into the feeder Push in the pressure roller and insert the paper into the feeder see below about 2 50mm 5 Press the Enter key The DF500 will now automatically adjust itself to the thickness of the paper 6 If your fold is already setup you may now press the Trial Piece key to fold this sample sheet If you have not yet setup your fold withdraw the sheet You will feel...

Страница 12: ...the paper stack must be fanned out so that the top sheet is closest to the feed roller 1 Place a stack of paper onto the feed table Firmly grasp the upper end of the stack with your left hand and bend the en tire stack up and forward as shown 2 While still holding the stack with your left hand press down on the lower end of the stack with your right hand Now release the upper end of the stack and ...

Страница 13: ...g the Pressure Roller The pressure roller knob allows you to set the pressure applied to the first set of feed rollers For 20 lb bond paper set the knob halfway between and For heavier paper or if you see the feed rollers slipping move the knob towards For lighter paper or if the paper tends to bunch up under the feed rollers set the knob towards ...

Страница 14: ...er size is shown proceed with Select ing Fold Type below NOTE The DF500 s electronic control system will not allow you to deviate too far from the standard settings This will prevent jams caused by impossible folds Selecting Fold Type Before selecting a fold make sure you have already set the DF500 to the correct paper size length This will prevent the ma chine from setting up a fold for the wrong...

Страница 15: ...r used Light weight and large size papers lighter than 20 lb bond and larger than 8 1 2 by 1 1 must be run slower than heavy paper and smaller sheets A good value to start with is 35 1 Press the Speed key The display will typically show 2 To change the speed press the or key then press Enter 3 If you forgot to press Enter and try to start the folder the display will show This message will also app...

Страница 16: ... been loaded incorrectly 1 Press the Trial Piece key A single sheet will be folded and delivered to the stacker for you to check Startup 1 If you are happy with the trial piece press the Start key to begin the automatic feeding and folding The folded sheets will be delivered neatly shingled on the stacker table 2 Remove the folded sheets as soon as they start piling up in front of the stacker exte...

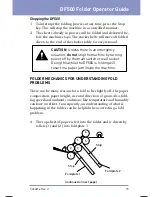
Страница 17: ...NDERSTANDING FOLD PROBLEMS There can be many reasons for a fold to be slightly off the paper composition paper weight size and direction of grain Also fold ing speed and ambient conditions like temperature and humidity can have an effect Consequently an understanding of what is happening in the folder can be helpful when correcting a fold problem A The top sheet of paper is fed into the folder and...

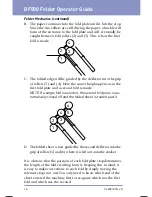
Страница 18: ...t fold plate and a second fold is made NOTE If a single fold is selected the second fold plate is au tomatically closed off and the folded sheet is routed past it 1 2 3 4 1 2 3 4 5 6 D The folded sheet is now guided by the second deflector into the grip of rollers 5 and 6 where it is fed out onto the stacker It is obvious that the position of each fold plate stop determines the length of the fold ...

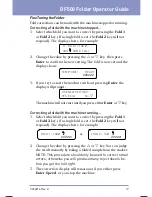
Страница 19: ...The machine will not start until you press either Enter or key Correcting a fold with the machine running 1 Select which fold you want to correct by pressing the Fold 1 or Fold 2 key If a single fold is set the Fold 2 key will not respond The display shows for example or 2 Change the value by pressing the or key You can judge the result instantly by taking a folded sample from the stacker NOTE Thi...

Страница 20: ...ribe in detail how to correct a skewed fold 1 Remove the paper from the feed table 2 Turn the skew adjustment knob to center the pointer in its slot 3 Reload the paper making sure there isn t too much clearance between the stack and the side guides 4 Set the machine for a half single fold This makes it easier to determine which way to turn the skew adjusting knob 5 Run a trial piece 6 If the fold ...

Страница 21: ...1 1 for de tails If more pressure does not help you must open the feeder gap a little If you tend to get double sheets being fed you must close the gap slightly The steps below describe in detail how to fine tune paper feeding 1 With the machine running press the or key The display will change to 2 Press the key to open the gap or the key to close the gap Typically the display will show NOTE A sym...

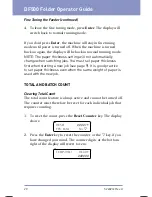
Страница 22: ... You must set paper thickness first when starting a new job see page 9 It is good practice to set paper thickness even when the same weight of paper is used with the new job TOTAL AND BATCH COUNT Clearing Total Count The total count feature is always active and cannot be turned off The counter must therefore be reset for each individual job that requires counting 1 To reset the count press the Res...

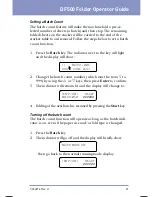
Страница 23: ... Change the batch count number which must be from 5 to 999 by using the or keys then press Enter to confirm 3 The indicator will remain lit and the display will change to 4 Folding of the next batch is resumed by pressing the Start key Turning off the batch count The batch count function will operate as long as the batch indi cator is on even if the paper size and or fold type is changed 1 Press t...

Страница 24: ... run several pieces you cannot use you may want to restore the batch count to 50 before starting a folding run Fol low the steps below to restore a batch count 1 Press the Batch key to turn batch off 2 Press the Batch key a second time batch setting mode on 3 Press Enter The batch count will be restored and the ma chine is ready to run a full batch ...

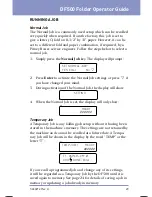
Страница 25: ... in memory or updating a job already in memory TEMP JOB 1 READY ØØØØØØ T1 PAPER 297 Ø CHG DONE Enter RUNNING A JOB Normal Job The Normal Job is a commonly used setup which can be recalled very quickly when required From the factory this job is set to give a letter C fold on 8 1 2 by 1 1 paper However it can be set to a different fold and paper combination if required by a Pitney Bowes service engi...

Страница 26: ... The speed The batch count if any You can save up to nine different jobs on the DF500 Saving A New Or Replacement Job 1 Press the Store Job key The display will prompt 2 If you don t want to save the job press the key The display will go back to running mode and the job will not be saved 3 To save the job press the Enter key If the memory space is available the display will show for a few seconds ...

Страница 27: ...ample 3 is always the lowest available job number In this case jobs 1 and 2 are already occupied while job numbers 3 to 9 are available Available job numbers are always offered in ascending order It is not possible to jump one number 7 Press Enter to save your new job under the new job number 8 If all 9 memory spaces are full and you choose not to replace an existing job the display will show 9 To...

Страница 28: ...OB 2 FOLD 1 Ø9Ø Ø Identifying A Job In Memory 1 Use the Select Job key to step through the available jobs stored in memory The appropriate indicators for paper size and fold type will light up for each job This way you can tell what kind of job is stored under each job number 2 If you want to know exactly what dimensions are stored for each fold plate press the Fold 1 or Fold 2 keys The display wi...

Страница 29: ...e correct job number is displayed 2 Press the Reset Counter key The display will prompt 3 Press Enter to delete the job 4 The memory location is now clear and another job may be stored under that number This job number will be automati cally offered when you want to store a new job without eras ing any others DELETE JOB 3 YES Enter No JOB DELETED ...

Страница 30: ...n shown to the length of your paper in millimeters 4 Press Enter and the fold will be setup automatically The dis play will first show then return to the normal running mode display TEMP JOB Ø SETTING TØ PAPER 297 Ø CHG DONE Enter TEMP JOB Ø READY ØØØØØØ 5 Run a trial piece to check the fold If necessary make correc tions as described on page 14 NOTE The DF500 s electronic control system will not ...

Страница 31: ...pe of fold you want 3 Press the Fold 1 key to set fold plate 1 Measure the length of the first fold on your sample and transfer the measurement using the or keys 4 Press Fold 2 and transfer the measurement of the second fold If your special fold is a single fold you do not need to set fold plate 2 5 Press Enter the machine will set itself automatically 6 Run a trial piece to check the fold If nece...

Страница 32: ... Automatic feeding is not possible because the paper is fed by hand one set at a time Setting The Feeder For Manual Feed 1 Press the Manual Feed key The display will show 2 Press Enter You will hear a small motor opening the feeder gap which will enable you to feed more than one sheet at a time After the motor stops the display will show 3 Press Start and start feeding your collated sets one by on...

Страница 33: ...ress the Enter key The display will show 3 Insert a sheet of paper to be fed automatically and press Enter The machine will set the feed gap to the thickness of the sample sheet and the display will return to normal running mode 4 Remove the sample sheet or press Trial Piece to feed the sheet through the machine MANUAL FEED EXIT YES Enter No INSERT ONE SHEET DONE Enter ...

Страница 34: ...ok for any paper stuck inside With the cover open either turn the fold rollers by hand or use the handwheel knob to remove any stalled paper 2 To use the handwheel knob see figure on right press in on the end of the knob and then release This will cause it to pop out to its operating position For safety reasons the knob is still disengaged in this position 3 Pull the knob out as far as it will go ...

Страница 35: ... the other end of the bar into the square hole on the opposite side frame 6 When you have finished using the manual turnover knob press it back in so that it latches into position 7 While the top cover is open the display will show Close the cover and the display will return to normal running mode showing whatever fold job etc had been there before the jam 8 If the display still shows JAM IN FOLDE...

Страница 36: ...e ma chine NOTE Some force may be needed to open the door The door will stay in its upper most position 3 Press and release the two blue lock levers on either side of fold plate assembly This will cause the fold plate assembly to drop slightly 4 Grab the silver handle and lift the fold plate assembly up and out continued on next page CAUTION Before opening the fold plate door always turn off the p...

Страница 37: ...l fold plates by sliding fold plate assembly back into folder until it is supported by the latch mechanism 7 Push up from bottom of fold plate assembly until you feel and hear the latches fully engage 8 Close fold plate compartment door 9 Turn power on The display will return to running mode and folding may be resumed CAUTION If door does not close the fold plate assembly has not been installed co...

Страница 38: ...Probable Cause Solution Folder will not run Line plug loose or pulled out attach Power switch is off Turn ON Safety cover not completely closed close Circuit breaker needs to be reset reset Forms folded improperly Need to redo setup proce dures page 17 Forms skew to one side Infeed guides not set prop erly adjust Improper stacking Form stop bracket not po sitioned properly check job setup Form gui...

Страница 39: ... Fold Plate Error The fold plate stop is prevented from travelling along its guide screw by an obstruction like an accumulation of dirt and paper dust Press Enter The fault may be cleared automatically and the display will revert to the normal running mode If this does not help turn power off and remove the fold plate assembly as described on page 33 Place the fold plate assembly on its side Worki...

Страница 40: ...acker wheels will return to their operating position and the display will show operating mode again Open the top cover and remove any paper inside Close the top cover and press Enter to clear the display message If possible adjust the fold to look more even like this Z Limit Switch F P 1 Or Limit Switch F P 2 The stop in either fold plate 1 F P 1 or fold plate 2 F P 2 has moved to the very end of ...

Страница 41: ...irection that will move the stacker rollers away from the extreme end of their travel Keep turning until the stacker rollers have moved about 3 4 20mm away from the end of their guide slots in the stacker table Refit the fold plate assembly as described on page 33 and turn power back on The stacker rollers will move to their proper position and the display will return to the running mode If the rol...

Страница 42: ...uids Liquids such as soap and water alcohol roller cleaner ink remover etc would damage the rollers anti static surface and cause fold ing problems Cleaning the outside surface of the DF500 as needed with a dampened cloth and a water based mild liquid or spray cleaner SUPPLIES To order the following item just call the PB Supply Line at 1 800 243 7824 Multipurpose Cleaning Kit Item code F902 0 WARN...

Страница 43: ...ng problems are actually due to out of speci fication material Store and Handle Material with Care Do not crash skids loaded with the material onto loading docks in transport vans or in the final storage area Block loaded skids in transport vans Do not expose cartons to the elements prolonged exposure to intense sunlight high humidity and so on can damage material Store materials in a controlled e...

Страница 44: ...stock use oldest stock first first in first out Transfer cartons from the storage area to the work area no more than several hours before use Do not remove boxes from their cartons until they are needed Allow about one hour of stabilization time for each degree of temperature change from the storage to the processing area ...

Страница 45: ... 40 000 pieces month Maximum peak operation is 40 000 piec es per day no more than once a month Sound Level 75 dBA based on folding 20 lb bond 80 g m2 paper into a letter C fold at a speed of 10 000 sheets per hour A weighted sound level at operator position Environment Amb Temperature 55 95 F 13 35 C Operation Max Wet Bulb 80 F 27 C Relative humidity 20 80 noncondense Fold Types Single half fold ...

Страница 46: ...center line within 04 06 1 0 1 5mm Multi Skew Allowance Collated sets of up to five sheets may deviate from the ideal fold life by a maximum of 1 12 2mm either side Fold Deviation Based on 20 lb 8 5 x 11 80 g m2 A4 bond paper 68 of samples will deviate from the ideal fold center line within 02 0 5mm 28 of samples will deviate from the ideal fold center line within 02 04 0 5 1 0mm 4 of samples will...

Страница 47: ... mm max 17 432 mm Form Weight Minimum 14 lb bond 53 g m2 Maximum 65 lb bond 180 g m2 Thickness The DF500 can process hand fed stapled or non stapled collations of up to five sheets of 8 1 2 by 11 20 lb 80 g m2 material Maxi mum thickness is 0 020 0 5mm Feeding Capacity The feed and stacking areas will accom modate 250 sheets of 20 lb 80 g m2 material Paper Ratio The length of the paper must be at ...

Страница 48: ...8 39 F Feed Manual 30 Feed Automatic 31 Feeder Gap Adjusting 19 Feeder Setup 9 10 1 1 Folder Mechanics 15 Fold Plates Removing 34 Fold Types Description 4 43 Fine Tuning 17 Setup Automatic 12 Setup Manual 28 29 Form Handling 41 Forms Specifications 45 G Gap Feeder Adjusting 19 Gate Fold Description 4 Setup 12 I Identifying a Job 26 J Jam Clearing 32 Jobs Deleting Job 27 Identifying Job 26 Normal J...

Страница 49: ...ving Job 26 Running Job 23 S Safety 2 Saving Job 24 Single Fold Description 4 Setup 12 Skewed Fold Adjusting 18 Specifications Equipment 43 44 Forms 45 Speed Setting 13 Standard Fold Manual Setup 28 Start Stopping Machine 14 15 Supplies 40 Symptoms Troubleshooting 36 T Table Extension 1 1 Temporary Job Setup 23 Theory Folder Mechanics 15 Total Count Clearing 20 Trial Piece Running 14 Troubleshooti...

Страница 50: ...DF500 Folder Operator Guide 48 SV40214 Rev A ...

Страница 51: ......

Отзывы: