INSTALLATION & OPERATIONAL SSHLV MANUAL
22
L20-407 rev.5 (06/19)
WARNING
The power supply must be disconnected before cleaning and servicing this appliance!
WARNING
The contents of the crumb catch and/or filter pan of any filter system must be emptied into a fireproof
container at the end of the frying operation each day. Some food particles can spontaneously combust
into flames if left soaking in certain oil/shortening materials.
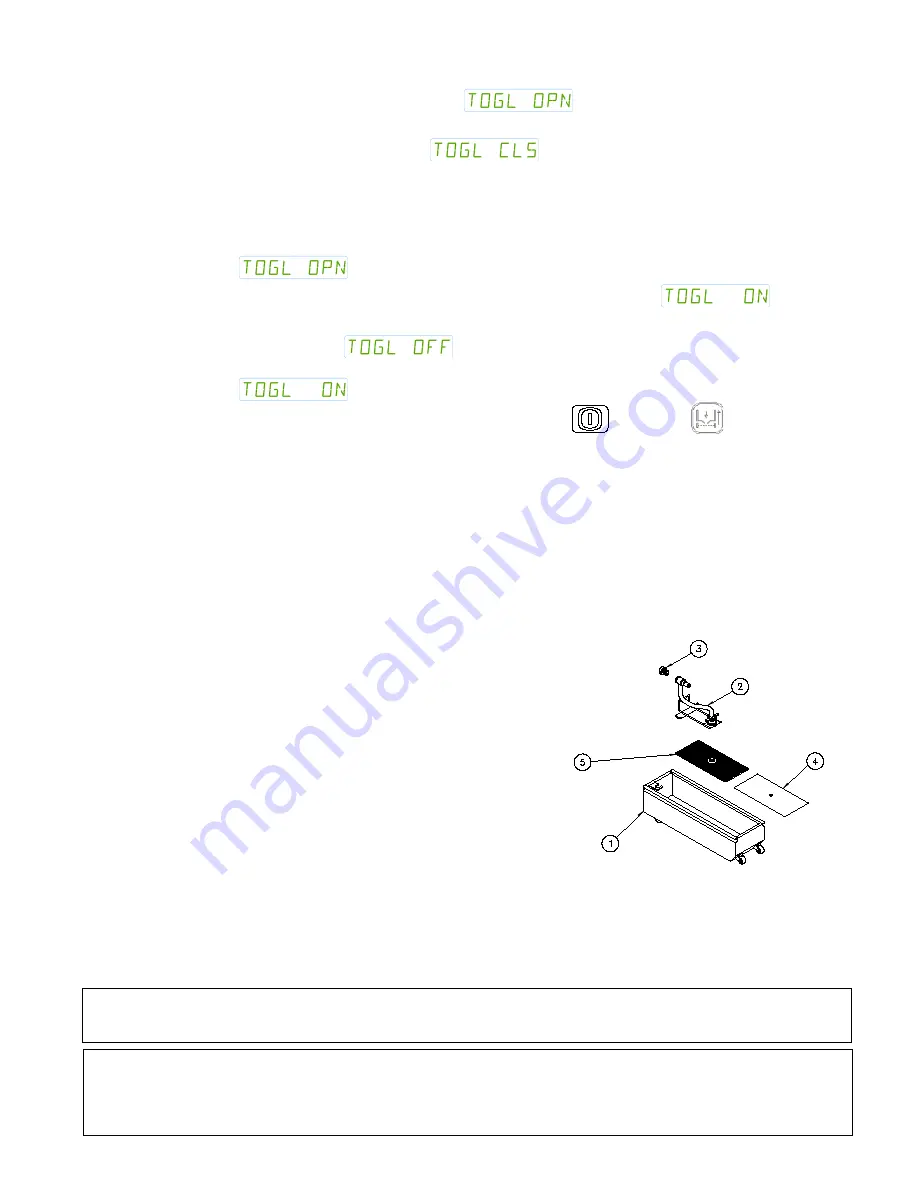
1. Filter Pan (Solo Filter style shown)
2. Filter Pickup Assembly
3. Filter Strainer Cap
4. Filter Paper
5.
Filter Screen
3. Press the #1 key. The control will display
.
4. Press the #6 key (YES). The drain valve will open and the oil will drain from the tank into the
filter pan and the control will display
5. With the oil drained into the filter pan you may clean the fry tank. Using a water dampened
clean cloth, wipe the insides of the fry pot to remove crumbs and debris. Scrub crumb ring in
frypot with abrasive pad if needed. REMOVE ALL MOISTURE from the tank before
proceeding to the next step.
6. When cleaning has been completed, press the #6 key to close the drain valve. The control will
display
.
7. To return the oil to the fry tank, press the L key. The control will display .
8. Press the #6 key (YES) to turn the filter motor on and begin returning the oil to the fry tank.
The control will display .
9. When the tank is full press the #6 key (YES) to turn the filter pump OFF. The control will
display
.
10. You can now exit the Fryer Control Menu by pressing the ON/OFF or Filter key.
You may want to reheat the oil in the fry tank and perform a full auto filter. Additional filtering procedures,
settings and control functions can be found in the Control manual that was shipped with your fryer.
9.1.2. REPLACING THE FILTER MEDIA (if equipped)
Refer to the following procedure to replace the filter media if the appliance is equipped with a filter
drawer. The diagram below shows a Solo Filter style pan and associated parts. Additional filter
types are available.
1. Detach the pickup tube from the filter pickup assembly by unscrewing it (counterclockwise),
at the knurled fitting, from the threaded fitting on the filter screen.
2. Slide off the filter paper clip and remove used filter
paper from filter screen. Clean and completely dry
pan and pan components. Replace with new filter
paper, ensuring that the hole in the paper is on the
top, so that threaded fitting in filter screen
protrudes through it.
3. Fold filter paper to the underside of the filter
screen and replace filter paper clip.
4. Re-attach filter pickup tube to the filter screen by
screwing it (clockwise) into the threaded fitting in
filter screen.
5. Reinstall the filter pickup assembly into the filter
system by placing the newly covered screen
portion of the assembly into the filter pan and
connecting the quick disconnect on the filter pickup
assembly into white donut fitting on the left-hand
side of the appliance. Ensure that it snaps tightly
and securely into donut fitting.


