background image

5 minute guide

02

8

En

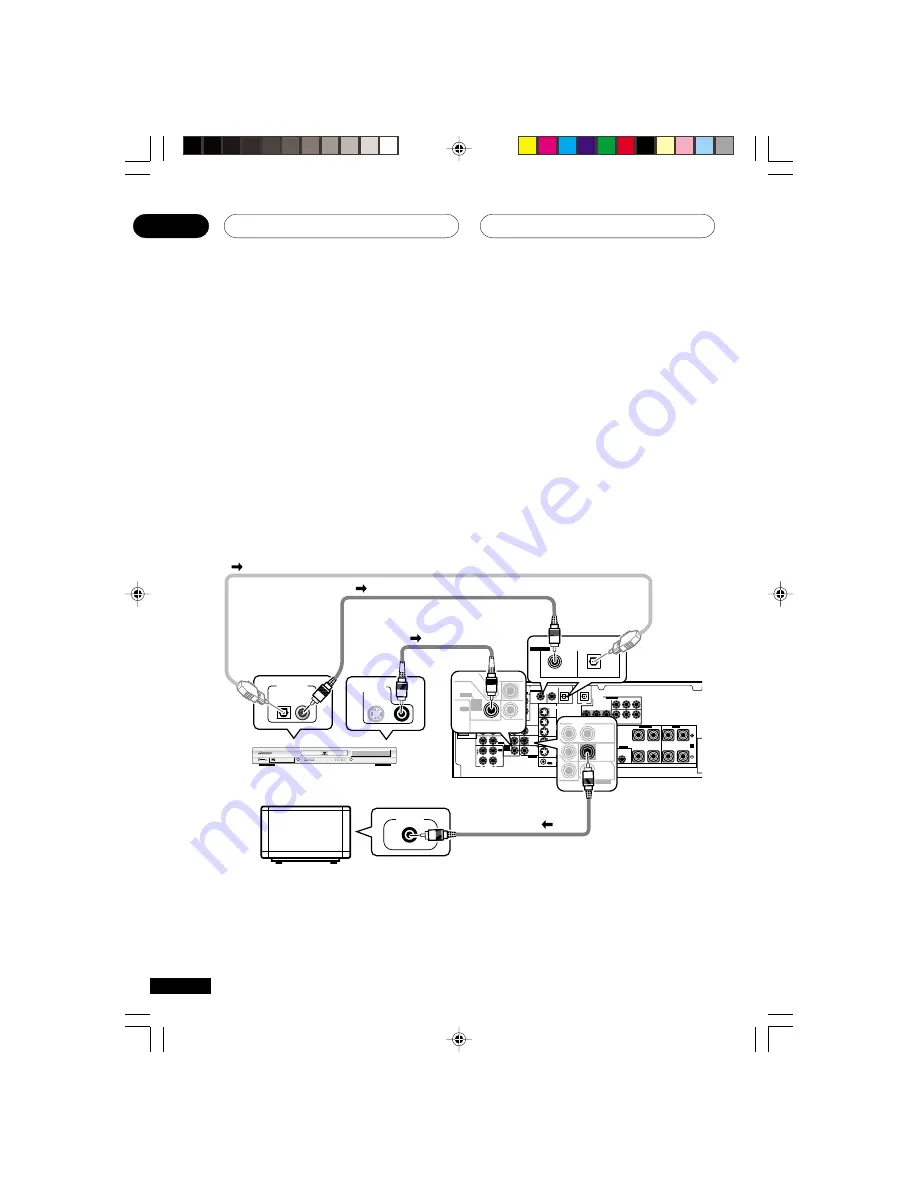
Listening to Surround Sound

This receiver was designed with the easiest possible setup in mind, so with the following quick
setup guide, you should have your system hooked up for surround sound in no time at all. In most
cases, you can simply leave the receiver in the default settings.

1

Hook up your DVD player.

For surround sound, you’ll want to hook up using a digital connection from the DVD player to the
receiver. You can do this with either a coaxial, or an optical connection (you don’t need to do both). If
you hook up using an optical cable, you should refer to 

Optical digital input setting

 on page 43 to

assign the optical input to DVD.

Use a video cord to connect the video output on your DVD to the receiver using the jacks shown
below.

2

Hook up your TV.

Use a video cord to connect your receiver to the TV using the jacks as shown below.

ASSIGNABLE

A

B

MONITOR

OUT

MONITOR OUT

FRONT

R

L

R

L

R

L

FRONT

CENTER

SURROUND

S
P
E
A
K
E
R
S

Y

P

B

P

R

Y

P

B

P

R

OUT

IN

IN

IN

S - VIDEO

VCR /

DVR

T V /

SAT

DVD /

LD

CONTROL

PREOUT

CENTER

OUT

ANTENNA

AM

LOOP

FM

UNBAL

75

R

AUDIO

L

DVD 5.1CH INPUT

IN

IN

IN

IN

IN

IN

IN

IN

IN

R

L

CENTER

SURROUND

SUB W.

CD

AUX

VCR /

DVR

TV /

SAT

DVD

/ LD

PLAY

CD-R

/ TAPE

/ MD

FRONT

PREOUT

COAX

OPT

OPT

COMPONENT

VIDEO

(DVD/ LD)

(CD)

( T V / SAT)

OUT

MONITOR
OUT

SUB
WOOFER

VIDEO

REC

¥

¥

ø

ø

ASSIGNABLE

DIGITAL IN

DIGITAL

OUT

(T V / SAT) IN

D V D

5.1CH

INPUT

( D V D / LD) IN

¥

Î

8

7

¡ ¢

4 1

STANDBY/ON

0

3

DVD PLAYER

S

IN

OUT

MONITOR
OUT

SUB
WOOFER

PREOUT

COAX

OPT

(DVD/LD)

(T V / S A T )

¥

¥

ASSIGNABLE

DIGITAL IN

VIDEO

The illustration 
shows the VSX-
D711, but DVD 
connections for 
the VSX-D811S 
are the same.

Optical cable

DVD player

TV

DIGITAL OUT

VIDEO OUT

VIDEO IN

Coaxial cable

Video cord

This receiver*

Video cord

Note: If you hook up 

using a optical cable, 

see 

Optical input 

setting

 on page 43 to 

assign the optical 

input to DVD

IN

IN

FRONT

DVD

/ LD

CD-R

REC

/ TAPE

/ MD

D V D

5.1CH

INPUT

XRB3013A.07.12

01.12.12, 4:41 PM

8

Содержание VSX-D711

Страница 1: ...AUDIO VIDEO MULTI CHANNEL RECEIVER VSX D711 VSX D811S Operating Instructions XRB3013A 01 06 01 12 12 4 40 PM 1 ...

Страница 2: ...ty card and keep it in a secure area This is for your security Thank you for buying this Pioneer product Please read through these operating instructions so you will know how to operate your model properly After you have finished reading the instructions put them away in a safe place for future reference XRB3013A 01 06 01 12 12 4 40 PM 2 ...

Страница 3: ... Surround are trademarks of Digital Theater Systems Inc Manufactured under license from Dolby Laboratories Dolby Pro Logic II and the double D symbol 2 are trademarks of Dolby Laboratorories XRB3013A 01 06 01 12 12 4 41 PM 3 ...

Страница 4: ...D811S only 24 AC outlet 25 Operating other Pioneer components 25 4 Controls and displays Front panel 26 Display 27 Remote control 29 5 Playing sources Introduction to Sound Modes 32 Stereo Direct 32 Standard mode 32 Advanced Surround modes 33 Choosing the input signal 34 Listening to multi channel playback 34 Using Stereo Direct 35 Using Advanced Surround 35 Using Loudness and Midnight listening 3...

Страница 5: ...rolling the rest of your system Setting the remote to control other components 49 Selecting preset codes directly 49 Searching for preset codes 50 Programming signals from other remote controls VSX D811S only 50 Erasing one of the remote control button settings VSX D811S only 51 Clearing all the remote control settings 51 Direct function 52 Confirming preset codes 52 Controls for TVs 53 Controls f...

Страница 6: ...atteries may result in such hazards as leakage and bursting Observe the following precautions Never use new and old batteries together Insert the plus and minus sides of the batteries properly according to the marks in the battery case Batteries with the same shape may have different voltages Do not use different batteries together When disposing of used batteries please comply with governmental r...

Страница 7: ... and the sound settings of the receiver DVD Video has become the basic source material for home theater due to its size quality and ease of use Depending on the DVD you can have up to seven different audio tracks coming from one disc all of them being sent to different speakers in your system This is what creates a surround sound effect and gives you the feeling of being there This receiver will a...

Страница 8: ...as shown below ASSIGNABLE A B MONITOR OUT MONITOR OUT FRONT R L R L R L FRONT CENTER SURROUND S P E A K E R S Y PB PR Y PB PR OUT IN IN IN S VIDEO VCR DVR TV SAT DVD LD CONTROL PREOUT CENTER OUT ANTENNA AM LOOP FM UNBAL 75 Ω R AUDIO L DVD 5 1CH INPUT IN IN IN IN IN IN IN IN IN R L CENTER SURROUND SUB W CD AUX VCR DVR TV SAT DVD LD PLAY CD R TAPE MD FRONT PREOUT COAX OPT OPT COMPONENT VIDEO DVD LD ...

Страница 9: ...er setting on page 39 to large When using the speaker on your TV as the center speaker C connect the CENTER PREOUT jack on this unit to the audio input jack on your TV In this case the center speaker shown is unnecessary AC OUTLET ASSIGNABLE A B MONITOR OUT MONITOR OUT FRONT R L R L R L FRONT CENTER SURROUND S P E A K E R S Y PB PR Y PB PR OUT IN IN IN S VIDEO VCR DVR TV SAT DVD LD CONTROL PREOUT ...

Страница 10: ...X D811S Front Speakers Center Speaker Surround Speakers Powered subwoofer L R C SR SL TV Surround back speakers SBR SBL Be sure to complete all connections before connecting this unit to the AC power source R L SURROUND BACK VSX D811S only If you are using only one surround back speaker connect the positive wire to the right channel terminal and the negative wire to the left channel terminal shown...

Страница 11: ...speaker setup and your room size Use the MULTI JOG INPUT SELECTOR dial to select and ENTER to confirm your selection See Using the Quick Setup on the next page if you re unsure about the settings 6 Play a DVD and adjust the volume to your liking There are several other sound options you can select See pages 32 33 for more on this See also Choosing your receiver setup on page 38 43 for more setup o...

Страница 12: ... select your speaker setup 3 Use the MULTI JOG INPUT SELECTOR dial to choose your speaker setup Cycle between the following choices 7 1ch 4 1ch 7 0ch 5 0ch 6 0ch 6 1ch 5 1ch 3 1ch 3 0ch 4 0ch VSX D811S only Check the table below to find the speaker setup that corresponds with your system Front Speakers 3 0 ch 3 1 ch 4 0 ch 4 1 ch 5 0 ch 5 1 ch 6 0 ch 6 1 ch 7 0 ch 7 1 ch Center Speaker Surround Sp...

Страница 13: ...rt completely L R VIDEO S VIDEO Digital audio coaxial cords Optical cables Commercially available digital audio coaxial cords standard video cords can also be used or optical cables not supplied are used to connect digital components to this receiver Be sure to insert completely Digital audio coaxial cord or standard video cord Optical cable Component video cords Use component video cords to get t...

Страница 14: ...h is marked DIGITAL OUT If you connect this to the optical input on a digital recorder currently these include MD DAT and CD R you can make direct digital recordings with this unit When connecting your equipment always make sure the power is turned off and the power cord is disconnected from the AC outlet The arrows indicate the direction of the audio signal AC OUTLET ASSIGNABLE A B MONITOR OUT MO...

Страница 15: ...D IN AC OUTLET PREOUT B R R R L R L FRONT SURROUND L L L B PR ø FRONT CENTER SURROUND BACK SURROUND IN IN DIGITAL IN DIGITAL OUT DIGITAL OUT DIGITAL OUT COAX DIGITAL OUT COAX VSX D811S Satellite tuner CD recorder CD player DVD player If you have an LD player you need to make special connections to ensure you can play 2 RF format LDs on your system If this is the case hook up your DVD or LD player ...

Страница 16: ...cks if you want to record to from digital components like an MD to from analog components See page 14 for more on digital connections When connecting your equipment always make sure the power is turned off and the power cord is disconnected from the AC outlet ANTENNA AM LOOP FM UNBAL 75 R AUDIO L DVD 5 1CH INPUT IN IN IN IN IN IN IN IN IN R L CENTER SURROUND SUB W CD AUX VCR DVR TV SAT DVD LD PLAY...

Страница 17: ...R L FRONT CENTER SURROUND R L L L SURROUND BACK S P E A K E R S Y PB PR Y PB PR OUT IN IN IN S VIDEO VCR DVR TV SAT DVD LD CONTROL OUT ANTENNA AM LOOP FM UNBAL 75 Ω R AUDIO L IN IN IN IN IN IN IN IN IN CD AUX VCR DVR TV SAT DVD LD PLAY CD R TAPE MD FRONT D V D 5 1CH INPUT PREOUT COAX OPT OPT COMPONENT VIDEO DVD LD CD TV SAT CD R TAPE MD OUT MONITOR OUT SUB WOOFER VIDEO REC ø ø ø ASSIGNABLE DIGITAL...

Страница 18: ...E QUICK SETUP VIDEO INPUT MULTI JOG DIGITAL IN DIGITAL OUT L V R VIDEO INPUT ASSIGNABLE A MONITOR OUT MONITOR OUT FRONT R L R L R FRON CENTER SURROUND S P E A K E R S Y PB PR Y PB PR OUT IN IN IN S VIDEO VCR DVR TV SAT DVD LD CONTROL PREOUT CENTER OUT ANTENNA AM LOOP FM UNBAL 75 R AUDIO L DVD 5 1CH INPUT IN IN IN IN IN IN IN IN IN R L CENTER SURROUND SUB W CD AUX VCR DVR TV SAT DVD LD PLAY CD R TA...

Страница 19: ...on Connect an external FM antenna FM UNBAL 75Ω FM ANTENNA AM LOOP ANTENNA To improve AM reception Connect a 15 18 feet length of vinyl coated wire to the AM antenna terminal without disconnect ing the supplied AM loop antenna For the best possible reception suspend horizontally outdoors Outdoor antenna AM loop antenna Assemble the antenna and connect to the receiver Attach to a wall etc if desired...

Страница 20: ...round Speakers Powered subwoofer L R C SR SL AC OUTLET ASSIGNABLE A B MONITOR OUT MONITOR OUT FRONT R L R L R L FRONT CENTER SURROUND S P E A K E R S Y PB PR Y PB PR OUT IN IN IN S VIDEO VCR DVR TV SAT DVD LD CONTROL PREOUT CENTER OUT ANTENNA AM LOOP FM UNBAL 75 R AUDIO L DVD 5 1CH INPUT IN IN IN IN IN IN IN IN IN R L CENTER SURROUND SUB W CD AUX VCR DVR TV SAT DVD LD PLAY CD R TAPE MD FRONT PREOU...

Страница 21: ...rs AC OUTLET ASSIGNABLE PREOUT A B MONITOR OUT MONITOR OUT FRONT R L R R R L R L FRONT CENTER SURROUND R L L L SURROUND BACK S P E A K E R S Y PB PR Y PB PR OUT IN IN IN S VIDEO VCR DVR TV SAT DVD LD CONTROL OUT ANTENNA AM LOOP FM UNBAL 75 Ω R AUDIO L DVD 7 1CH INPUT IN IN IN IN IN IN IN IN IN R L CENTER SURROUND R L SURROUND BACK SUB W CD AUX VCR DVR TV SAT DVD LD PLAY CD R TAPE MD FRONT D V D 5 ...

Страница 22: ...g see page 39 you can hook up a subwoofer instead of speakers to the surround back speaker terminals Connect the positive wire to the right channel terminal and the negative wire to the left channel terminal see illustration on page 11 A and B speaker systems The receiver has two speaker systems A and B A is the main system supporting the full speaker setup If you switch on both A and B speaker sy...

Страница 23: ...lling from the TV in the event of external shocks such as earthquakes If possible place the surround speakers slightly above ear level Try not to place the surround speakers further away from the listening position than the front and center speakers Doing so can weaken the surround sound effect 3 D view of speaker set up VSX D811S Surround Left Surround Right Listening Position Front Left Front Ri...

Страница 24: ... IN L R L R Connecting additional amplifiers VSX D811S only This receiver has more than sufficient power for any home use however it is possible to add additional amplifiers to every channel Make the connections shown below to add amplifiers to power your speakers Always make sure that the receiver is switched off and unplugged from the wall outlet before making or changing any connections To hear...

Страница 25: ... electrical shock Check the power cord once in a while When you find it damaged ask your nearest Pioneer authorized service center or your dealer for a replacement Connect to CONTROL IN terminal of other Pioneer products with Î mark Remote control unit CONTROL OUT OUT IN CONTROL AC outlet switched 100 W 0 8 A max Power supplied through this outlet is turned on and off by the receiver s POWER switc...

Страница 26: ...er 10 LISTENING MODE buttons STANDARD pages 32 34 Press for Standard decoding and to switch between the various Pro Logic II options ADVANCED SURROUND pages 33 35 Use to switch between the various surround modes STEREO DIRECT pages 32 35 Switches direct playback on or off Direct playback bypasses the tone controls and channel levels for the most accurate reproduction of a source DOWN UP ENTER INPU...

Страница 27: ...splay FL dimmer or brighter 20 INPUT ATT Use to attenuate lower the level of an analog input signal to prevent distortion 21 MPX page 45 Press to receive a radio broadcast in mono 22 BAND page 45 Switches between AM and FM radio bands 23 CLASS pages 46 47 Switches between the three banks classes of station presets 24 TUNER EDIT pages 46 47 Press to memorize and name a station for recall using the ...

Страница 28: ... tone balance Advanced surround and Dolby Surround effects 7 MIDNIGHT Lights during Midnight listening 8 MONITOR Lights when MONITOR is selected page 48 9 Speaker indicator Shows the speaker system currently in use 10 Character display 11 Neo 6 VSX D811S Lights during NEO 6 processing 12 ADV SURR Advanced Surround Lights when one of the Advanced Surround modes has been selected 13 LOUDNESS Lights ...

Страница 29: ...e levels of the surround sound of the receiver EFFECT buttons page 35 Adds or subtracts the amount of effect with different advanced listening modes except 5 or 6 Ch Stereo and Virtual SB Remote control TV TV INPUT MENU TV VOL MASTER VOLUME TV CONTROL AV PRE PROGRAMMED REMOTE CONTROL UNIT CHANNEL ENTER ENTER MPX RETURN DTV INFO DTV ON OFF DTV MENU D ACCESS T EDIT GUIDE ST TUNE T P SE U TUNE ST CLA...

Страница 30: ...e 46 47 Switches between the three banks classes of radio station presets DTV ON OFF Switches a digital TV on off DTV MENU Displays menus on a digital TV 6 DVD controls Press DVD first to access These controls will also function as DTV controls depending on the component you ve selected TOP MENU Displays the disc top menu of a DVD AUDIO Changes the audio language or channel SUBTITLE Displays chang...

Страница 31: ... remote control 11 RECEIVER This switches between standby and on for this receiver 12 TUNE ST ENTER Use the arrow buttons when setting up your surround sound system see pages 38 43 Also used to control DVD menus options and for deck 1 of a double cassette deck player Use the TUNE buttons to find radio frequencies and use ST to find preset stations page 45 47 13 CHANNEL Select radio station presets...

Страница 32: ...corporate Dolby Surround Depending on the source the 6 1 channel setting page 40 and the sound mode you have selected you may not get sound from the surround back speakers in your setup For more on this refer to the table on the next page Choose one of the following to add depth to a 2 channel source Pro Logic This mode gives 4 1 channel surround sound It is less sensitive to the quality of the so...

Страница 33: ...nnel source Expanded This mode is especially designed to give sound depth to stereo sources and lets you hear two channel stereo signals as simulated multi channel surround sound Use with Dolby Pro Logic for a stereo surround effect You can also use with Dolby Digital sources for a wider stereo field than the Standard modes 5 Channel Stereo VSX D711 This can be selected to give multi channel sound...

Страница 34: ...only play back Dolby Digital PCM 32kHz 44kHz 48kHz and 96 kHz and DTS digital signal formats With other digital signal formats set to ANALOG You may get digital noise when a LD or CD player compatible with DTS is playing an analog signal To prevent noise make the proper digital connections page 14 and set the signal input to DIGITAL Some DVD players don t output DTS signals For more details refer ...

Страница 35: ...ns If you switch on Midnight listening Loudness or the Tone controls when DIRECT is selected the receiver automati cally switches to STEREO Using Advanced Surround When you select one of the Advanced surround options Dolby Pro Logic Dolby Digital and DTS decoding is done automatically corresponding to the input signal Use Advanced surround to add effects to the surround sound Press ADV SURR ADVANC...

Страница 36: ...E to select the frequency you want to adjust Each press switches between BASS and TREBLE 2 Use the MULTI JOG INPUT SELECTOR dial to change the amount of bass or treble as necessary Wait about five seconds for your changes to be input automatically Playing other sources CHANNEL ENTER ENTER MPX RETURN DTV INFO DTV ON OFF DTV MENU D ACCESS T EDIT GUIDE ST TUNE T P SE U TUNE ST CLASS FL DIMMER BAND TO...

Страница 37: ...CT INPUTATT INPUT SEL MUTE MIDNIGHT LOUDNESS SIGNALSEL MULTI CONTROL EFFECT DISPLAY DISC 10 RECEIVER SOURCE 1 2 3 4 5 6 7 8 9 0 1 Press DVD or select it with the MULTI JOG INPUT SELECTOR dial front panel 2 Press SIGNAL SEL SIGNAL SELECT repeatedly to select DVD 5 1ch DVD 7 1ch To cancel playback from the multi channel inputs use the SIGNAL SEL SIGNAL SELECT button to select a different input signa...

Страница 38: ... Use or to choose the option you want to adjust It will be easiest to adjust each of the settings in turn following the order below and on the following pages The current setting is shown for each option as you cycle through the display Speaker setting page 39 Specify the number and type of speakers you have connected Surround back speaker setting VSX D811S only page 40 Specify your surround back ...

Страница 39: ... steps 3 and 4 to set other surround modes 6 When you re done press ENTER to exit The setting display is automatically exited after 20 seconds of inactivity Speaker setting Default setting S all speakers You must let the receiver know how many speakers you have and how big they are The size you choose large or small determines how much bass is sent from the receiver to the speakers In the display ...

Страница 40: ... the display Refer to the table on page 33 to see how the 6 1 channel setting affects sound output from the surround back speakers Subwoofer setting Default setting ON You can choose whether the subwoofer is used or not Use the plus PLS setting for extra bass Use or to select subwoofer ON PLS or OFF If you chose the small front speaker setting SUBWF ON is automatically set and locked When you sele...

Страница 41: ...nge Center speaker distance setting Default setting 10 ft The center speaker is normally placed directly in the front of the listening room and closer to the listening position than the front speakers This means that the sound from the center speaker will be heard before the front speakers To prevent this set the center speaker distance setting to delay the sound from the center speaker so that th...

Страница 42: ...ing played back Dual mono setting Default setting ch1 The dual mono setting can only be used when listening to Dolby Digital discs with dual mono encoding These discs are not widely used but are sometimes used when it is necessary to have one language on one channel and a different language on the other With this setting you can choose which channel in the dual mono setting you want to listen to I...

Страница 43: ...ign the coaxial digital 2 input DVD TV CD CD R VCR or OFF After you assign a component to a digital jack whenever you select that component for example a DVD player the receiver automatically changes to the digital input setting and DIGITAL shows in the display Optical digital input settings Here you tell the receiver what components you have hooked up to the optical DIGITAL IN jack s on the back ...

Страница 44: ...ame volume from each speaker when seated in the main listening position The channel level range is 10 dB 5 When you re done press TEST TONE to turn off the test tone The speaker volume can be adjusted without outputting the test tone by pressing CH SELECT and then using LEVEL TV TV INPUT MENU TV VOL MASTER VOLUME TV CONTROL AV PRE PROGRAMMED REMOTE CONTROL UNIT CHANNEL ENTER ENTER MPX RETURN DTV I...

Страница 45: ...his Automatic tuning To search for stations in the currently selected band press and hold TUNE for about a second The receiver will start searching for the next station stopping when it has found one Repeat to search for other stations Manual tuning To change the frequency one step at a time press TUNE High speed tuning Press and hold TUNE for high speed tuning Release the button at the frequency ...

Страница 46: ...RECT SIGNAL SELECT MIDNIGHT LOUDNESS TUNING MONITOR TONE QUICK SETUP VIDEO INPUT TUNER EDIT CLASS BAND MPX MULTI JOG LISTENING MODE INPUT ATT FL DIMMER MULTI JOG CHANNEL ENTER ENTER MPX RETURN DTV INFO DTV ON OFF DTV MENU D ACCESS T EDIT GUIDE TUNE T P SE U TUNE CLASS FL DIMMER BAND TOP MENU AUDIO SUB TITLE REMOTE SETUP RECEIVER CONTROL STANDARD ADV SURR STEREO ANGLE 1 4 7 8 3 LEVEL DVD VCR CD R T...

Страница 47: ...urth character To erase a station name simply repeat steps 1 3 and input four spaces instead of a name Once you have named a station preset you can press DISPLAY when listening to a station to switch the display between the name and the frequency Listening to station presets Having stored up to 30 stations see previous page preset stations can be easily recalled 1 Press TUN remote or use the MULTI...

Страница 48: ...esponding to the source component see page 34 for more on this 3 Prepare the source you want to record Tune to the radio station load the CD video DVD etc 4 Prepare the recorder Insert a blank tape MD video etc into the recording device and set the recording levels Refer to the instructions that came with the recorder if you are unsure how to do this Most video recorders set the audio recording le...

Страница 49: ... button you won t be able to control the built in tuner of this receiver using the remote Reset the remote to the built in tuner by entering the preset code 7008 4 Repeat steps 1 through 3 for the other components you want to control Setting the remote to control other components There are several ways to set your remote to control the other components in your system The easiest way to do this is ...

Страница 50: ...ransmission If the component responds by stopping or switching off go to the next step otherwise repeat this step 5 Switch the component back on or restart playback 6 Use and to scan through the last 10 codes transmitted to identify the correct code Stop when you see the component stop or switch off The LCD display on the remote shows the I D You can also verify you have the correct code by adjust...

Страница 51: ...s for another component exit and repeat steps 1 through 5 6 Press and hold the REMOTE SETUP button for three seconds to store the operation s Some commands from other remote controls cannot be learned but in most cases the remotes just need to be moved closer together or farther apart Certain buttons represent operations that cannot be learned from other remote controls These include RECEIVER REMO...

Страница 52: ...ect function off you can operate the remote control without affecting the receiver 1 Press REMOTE SETUP and hold for three seconds The LED lights steadily for two seconds 2 Press the MULTI CONTROL button for the component you want to control 3 Use the number buttons to enter either 9990 direct on or 9995 direct off The LED will light for two seconds to indicate that it s been correctly set If the ...

Страница 53: ... display the DTV menu Use as the GUIDE button for navigating Press to get information on DTV programs Use to choose the BLUE commands on a DTV menu Use to choose the GREEN commands on a DTV menu Use to choose the RED commands on a DTV menu Use to choose the YELLOW commands on a DTV menu Selects between screen formats for widescreen TVs Use to clear a TV channel selected using the number buttons Us...

Страница 54: ...EFFECT Function Select different menus from the DTV functions Select the menu screen Select or adjust and navigate items on the menu screen ENTER brings up the DTV menus Press to select or adjust and navigate items on the menu screen For TV and cable TV use this button to immediately enter a new channel CHANNEL ENTER function For satellite TV use this button to exit the menu screen Components DTV ...

Страница 55: ...or DVD DVR players Changes sides of the LD Displays menus concerning the current DVD or DVR you are using Pauses the tape Stops the tape Starts playback Fast rewinds fast forwards the tape Navigates DVD menu options Selects channels Selects tracks Displays the disc top menu of a DVD Changes the audio language or channel Displays changes the subtitles on multilingual DVDs Switches camera angles on ...

Страница 56: ...80 1103 ALLORGAN 1095 ANAM 1004 1006 1029 1054 1064 1087 1108 ANAM NATIONAL 1054 1087 1108 AMBASSADOR 1061 AMERICA ACTION 1064 AMPLIVISION 1079 AMPRO 1126 AMSTRAD 1006 1017 1103 1105 ANITECH 1006 1029 1036 AOC 1011 1013 ARCAM 1078 1079 ASBERG 1036 ASUKA 1080 ATLANTIC 1073 AUDIOSONIC 1017 1046 AUDIOVOX 1040 1064 1110 1118 AUTOVOX 1036 1073 BANG OLUFSEN 1116 BASIC LINE 1006 1080 BAYSONIC 1064 BAUR 1...

Страница 57: ...1 1032 1044 FISHER 1050 1074 1079 1096 1102 FLINT 1111 FORMENTI 1017 1075 1098 FORTRESS 1041 FRONTECH 1055 1086 1089 1109 FUJITSU 1032 1063 1073 FUNAI 1059 1063 1064 1089 1095 1096 FUTURETECH 1064 GE 1012 1022 1023 1041 1062 1090 1110 1129 1131 GEC 1017 1020 1032 1072 1079 GELOSO 1006 1075 GENEXXA 1055 1080 GIBRALTER 1010 1011 1013 GOODMANS 1016 1017 1032 1079 1103 1104 GORENJE 1102 GPM 1080 GRAET...

Страница 58: ...1011 1013 1026 1027 1078 1114 MULTITECH 1006 1036 1043 1064 1078 NAD 1051 1057 1062 NEC 1011 1013 1016 1026 1058 NECKERMANN 1017 1066 1075 1115 NEI 1017 1109 NETSAT 1017 NICAMAGIC 1078 NIKKAI 1014 1015 1017 1032 1078 1080 1089 NIKKO 1013 1040 1062 NOBLIKO 1036 1043 NORDMENDE 1046 1069 1070 1075 1091 NTC 1040 OCEANIC 1055 1077 ONWA 1064 OPTIMUS 1050 1057 1087 OPTONICA 1041 1056 OSAKI 1014 1032 1079...

Страница 59: ...1074 SONOKO 1006 1017 SONOLOR 1055 1074 1077 SONTEC 1017 SOUNDESIGN 1062 1063 1064 SOUNDWAVE 1017 1106 SQUAREVIEW 1059 STANDARD 1006 1079 1080 STARLITE 1064 STERN 1055 1073 1088 SUNKAI 1095 1099 SUPERTECH 1078 SUPREME 1001 SUSUMU 1080 SYLVANIA 1013 1025 SYMPHONIC 1059 SYSLINE 1017 TANDY 1032 1041 1055 1079 1080 TASHIKO 1016 1020 1079 TEC 1079 1086 TECHNEMA 1098 TECHNICS 1023 1087 1121 TECHNOL ACE ...

Страница 60: ...5202 TOSHIBA 5223 PIONEER 5201 5202 5208 5214 CD PLAYER Manufacturer Code AIWA 5016 5021 AKAI 5014 5020 5032 ANAM 5041 ARCAM 5021 AUDIOLAB 5021 AUDIOMECA 5021 AUDIO TON 5021 BESTAR 5022 BURMESTER 5045 CALIFORNIA AUDIO LABS 5004 CARVER 5021 5025 5046 CONDOR 5018 5022 CURTIS MATHES 5004 CYRUS 5021 DENON 5002 5006 5040 5060 DKK 5001 DUAL 5031 DYNAMIC BASS 5025 EMERSON 5038 EROICA 5053 5054 FANTASIA 5...

Страница 61: ...r Code ADC 6013 AIWA 6002 6022 6017 6018 AKAI 6015 6016 ANAM 6035 ARCAM 6005 CARVER 6002 6028 DENON 6005 6039 DUAL 6037 DYNAMIC BASS 6028 EROICA 6041 FISHER 6028 GARRARD 6036 GOLDSTAR 6036 GRUNDIG 6002 HARMON KARDON 6002 6014 INKEL 6003 JVC 6027 6030 6031 KENWOOD 6003 6004 6019 6024 6025 KYOCERA 6013 LOTTE 6034 LUXMAN 6029 MAGNAVOX 6002 MARANTZ 6002 MEMOREX 6008 6009 MITSUBISHI 6016 NAKAMICHI 6020...

Страница 62: ...06 EROICA 7005 FANTASIA 7037 FERGUSON 7042 FINE ARTS 7059 FISHER 7028 GARRARD 7032 7034 7035 GOLDSTAR 7010 GOODMANS 7027 GP AUDIO 7033 GRUNDIG 7018 7059 HARMAN KARDON 7009 7051 INKEL 7038 7040 JBL 7009 JVC 7007 7036 7042 KENWOOD 7003 7017 7025 7026 7044 7053 7063 7066 LOTTE 7037 7039 LUXMAN 7021 MAGNAVOX 7030 7042 7055 7059 MARANTZ 7004 7018 7055 7059 MCINTOSH 7020 MCS 7004 MCSILVER 7037 MICROMEGE...

Страница 63: ...034 ASA 2017 2035 ASHA 2057 ASUKA 2017 AUDIOVOX 2017 VCR UHER 7027 7042 7050 VICTOR 7007 WARDS 7002 7006 7008 YAMAHA 7016 7017 PIONEER 7002 7008 7014 7022 7042 7047 7050 7052 BAIRD 2001 2021 2037 2039 BASIC LINE 2011 2034 2059 BEAUMARK 2057 BELL HOWELL 2037 BRANDT 2047 2064 2065 BRANDT ELECTRONIC 2021 BROKSONIC 2002 2040 2046 2052 2078 BUSH 2034 2052 2059 2072 CALIX 2017 CANON 2015 CAPEHART 2011 C...

Страница 64: ...LCO 2015 2018 2052 2078 PHONOLA 2035 PILOT 2017 PORTLAND 2011 PROFEX 2066 PROFITRONIC 2057 PROLINE 2001 PROSCAN 2032 FUNAI 2001 GARRARD 2001 GE 2015 2027 2032 2057 GEC 2035 GENERAL 2011 2028 GOLDHAND 2034 GOLDSTAR 2017 2018 2053 2079 GOODMANS 2001 2017 2034 2059 2075 GO VIDEO 2077 2081 GRAETZ 2005 2021 2037 2057 GRANADA 2025 2035 2037 GRADIENTE 2001 2008 GRANDIN 2001 2017 2034 HANSEATIC 2017 HARMA...

Страница 65: ...UDYNE 2004 2035 SOLAVOX 2011 SONOLOR 2025 SONTEC 2017 STS 2022 SUNKAI 2070 SUNSTAR 2001 SUNTRONIC 2001 SYLVANIA 2001 2015 2023 2035 SYMHONIC 2001 TASHIKO 2001 TATUNG 2001 2021 2035 TEAC 2001 2021 TEC 2011 TECHNICS 2015 2042 2054 TEKNIKA 2001 2015 2007 2017 2028 TELEAVIA 2021 TELEFUNKEN 2021 2047 2058 2064 2074 TENOSAL 2034 TENSAI 2001 2066 THOMAS 2001 THORN 2016 2021 2037 TMK 2051 2057 TOTEVISION ...

Страница 66: ...UTH 4013 4015 4019 4026 ITT 4005 INVIDEO 4061 INTERVISION 4050 JVC 4048 JOHANSSON 4022 KATHREIN 4004 4006 4008 4011 4035 4041 KREISELMEYER 4008 KYOSTAR 4034 LA SAT 4043 4045 LENCO 4034 LENNOX 4050 LUPUS 4030 LUXOR 4005 4049 MANHATTAN 4037 4045 4050 MARANTZ 4011 MASPRO 4004 4023 MATSUI 4024 4048 MEDIASAT 4059 MEDIAMARKT 4015 MINERVA 4048 MORGAN S 4015 4043 NAVEX 4022 NEUHAUS 4039 NEUSAT 4057 NEWHAU...

Страница 67: ...RYUNG 3003 DECSAT 3027 EVERQUESST 3007 FILMNET 3028 FRANCE TELECOM 3030 GEC 3011 GEMINI 3007 GENERAL INSTRUMENT 3004 3020 3031 3046 GOLDSTAR 3014 3047 GRUNDIG 3035 HITACHI 3004 JASCO 3007 JERROLD 3002 3004 3005 3006 3007 3020 3031 3046 LG ALPS 3044 MEMOREX 3001 MNET 3009 3028 NOW 3041 OAK 3009 PACIFIC 3039 PANASONIC 3001 3013 PARAGON 3001 PULSAR 3001 PVP STEREO VISUAL MATRIX 3002 PIONEER 3010 3014...

Страница 68: ...ire touching the rear panel This could cause the receiver to shut off automatically Make sure the component is connected correctly refer to pages 14 19 Press MUTE on the remote control to turn muting off Adjust the MASTER VOLUME Press the MONITOR button to turn monitoring off Make sure the component is connected correctly refer to pages pages 14 19 Select the correct component use the MULTI JOG IN...

Страница 69: ...e 40 to check the surround back speaker settings Refer to the table on page 33 to make sure the 6 1 channel setting and the sound mode are set for surround back sound Move the cassette deck further from your receiver until the noise disappears Set the SIGNAL SELECT to AUTO DIGITAL or ANALOG according to the type of connections made refer to page 34 Set the digital input settings correctly refer to...

Страница 70: ... CD VCR DVR CD R TAPE MD DVD LD TV SAT 96 dB Signal to Noise Ratio EIA at 1 W 1 kHz CD VCR DVR CD R TAPE MD DVD LD TV SAT 79 dB Video Section Input Sensitivity Impedance VCR DVR DVD LD TV SAT 1 Vp p 75 Ω Output Level Impedance VCR DVR 1 Vp p 75 Ω Frequency Response VCR DVR DVD LD TV SAT MONITOR 5 Hz to 7 MHz dB Signal to Noise Ratio 55 dB Cross Talk 55 dB FM Tuner Section Frequency Range 87 5 MHz ...

Страница 71: ...ackage VSX D711 9 0 kg 19 8 lb VSX D811S 10 5 kg 23 2 lb Furnished Parts AM loop antenna 1 FM wire antenna 1 Dry cell batteries AA size IEC R6P 2 Remote control 1 Operating instructions 1 Specifications and the design are subject to possible modifications without notice due to improvements Measured pursuant to the Federal Trade Commission s Trade Regulation rule on Power Output Claims for Amplifie...

Страница 72: ...e future After all we want you listening for a lifetime EST 1924 EIA E L E C T R O NIC INDU S T R I E S A S S O C I A T I O N We Want You LISTENING For A Lifetime We Want You Listening For A Lifetime Used wisely your new sound equipment will provide a lifetime of fun and enjoyment Since hearing damage from loudnoiseisoftenundetectableuntilitistoolate thismanufacturerandtheElectronicIndustriesAssoc...

Страница 73: ...Additional information 10 73 En XRB3013A 68 74 01 12 12 5 13 PM 73 ...

Страница 74: ...Additional information 10 74 En XRB3013A 68 74 01 12 12 5 13 PM 74 ...

Страница 75: ...Additional information 10 75 En XRB3013A 68 74 01 12 12 5 13 PM 75 ...

Страница 76: ...CTRONICS USA INC CUSTOMER SERVICE DEPARTMENT P O BOX 1760 LONG BEACH CA 90801 1760 U S A For warranty information please see the Limited Warranty sheet included with your product Si ce produit doit être réparé au Canada veuillez vous adresser à un distributeur autorisée Pioneer au Canada pour obtenir le nom de la Société de Service Autorisée Pioneer le plus près de chez vous Ou encore veuillez vou...

Отзывы: