background image


Other connections

10


61


En


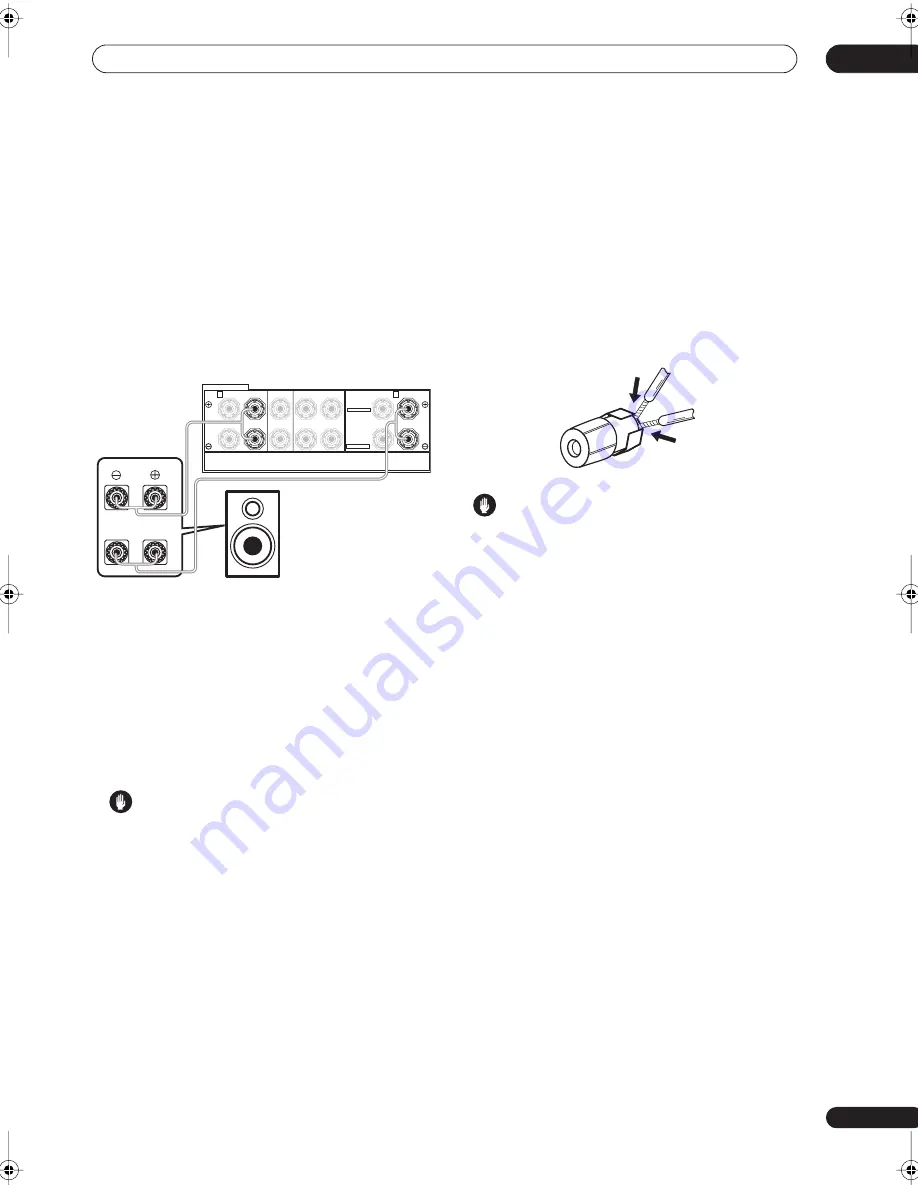
Bi-amping your front speakers


Bi-amping is when you connect the high frequency driver 
and low frequency driver of your speakers to different 
amplifiers (in this case, to both front and surround back 
terminals) for better crossover performance. Your 
speakers must be bi-ampable to do this (having separate 
terminals for high and low) and the sound improvement 
will depend on the kind of speakers you’re using.


1

Connect your speakers as shown below.


This illustration below shows the connections for bi-
amping your front left speaker. Hook up your front right 
speaker in the same way.

Since both front and surround back speaker terminals 
output the same audio, it doesn’t matter which set (front 
or surround back) is powering which part (


Hi


 or 


Low


) of 

the speaker.

• Make sure that the 


+


 / 


 connections are properly 

inserted.


2

Select the ‘Front Bi-Amp’ setting from the ‘Surr 

Back System’ menu. 


See 


Surround back speaker setting


 on page 40 to specify 

how you’re using the surround back speaker terminals.


 Caution


• Most speakers with both 


Hi


 and 


Low


 terminals have 

two metal plates that connect the 


Hi


 to the 


Low


terminals. These must be removed when you are bi-
amping the speakers or you could severely damage 
the amplifier. See your speaker manual for more 
information.

• If your speakers have a removable crossover network, 

make sure you do not remove it for bi-amping. Doing 
so may damage your speakers.


Bi-wiring your speakers


The reasons for bi-wiring are basically the same as bi-
amping, but additionally, interference effects within the 
wire could be reduced, producing better sound. Again, to 
do this your speakers must be bi-wireable (that is they 
must have separate terminals for the high and low 
frequencies). When bi-wiring, make sure you’ve selected 


Normal (SB)


 or 


Second Zone


 in 


Surround back speaker 

setting


 on page 40.


To bi-wire a speaker, connect two speaker cords 

to the speaker terminal on the receiver.


 Caution


• Make sure you use a parallel (not series, which are 

fairly uncommon) connection when bi-wiring your 
speakers. 

• Don't connect different speakers from the same 

terminal in this way.

SPEAKERS

A

B

R

L

R

L

R

L

(Single)

FRONT

CENTER

SURROUND

SURROUND BACK /

SELECTABLE

SELECTABLE

Hi

Lo

Front left 

speaker

VSX_1015.book.fm 61 ページ 2005年3月7日 月曜日 午後7時0分

Содержание VSX-1015-K

Страница 1: ...VSX 1015 S VSX 1015 K AUDIO VIDEO MULTI CHANNEL RECEIVER Operating Instructions Discover the benefits of registering your product online at www pioneer co uk www pioneer eur com ...

Страница 2: ...it should be performed only by qualified service personnel WARNING To prevent a fire hazard do not place any naked flame sources such as a lighted candle on the equipment D3 4 2 1 7a_A_En This product complies with the Low Voltage Directive 73 23 EEC amended by 93 68 EEC EMC Directives 89 336 EEC amended by 92 31 EEC and 93 68 EEC D3 4 2 1 9a_En WARNING This equipment is not waterproof To prevent ...

Страница 3: ...ug can cause severe electrical shock Make sure it is properly disposed of after removal The equipment should be disconnected by removing the mains plug from the wall socket when left unused for a long period of time for example when on vacation D3 4 2 2 1a_A_En This product is for general household purposes Any failure due to use for other than household purposes such as long term use for business...

Страница 4: ... your system Auto playback 31 Listening in surround sound 31 Standard surround sound 31 Using the Home THX modes 32 Using the Advanced surround effects 33 Dolby Pro Logic IIx Music settings 33 Neo 6 Music settings 34 Listening in stereo 34 Listening with Acoustic Calibration EQ 34 Choosing the input signal 35 Using the surround back channel Extended mode 36 Using the Virtual Surround Back mode Vir...

Страница 5: ...r front speakers 61 Bi wiring your speakers 61 Connecting additional amplifiers 62 Using this receiver with a Pioneer plasma display 62 Using the SR mode with a Pioneer plasma display 63 11 Other Settings The Input Assign menu 64 The Other Setup menu 65 Dynamic Range Control Setup 66 Dual Mono Setup 66 LFE Attenuator Setup 67 SR Setup for Pioneer plasma displays 67 12 Additional information Troubl...

Страница 6: ...hannels of surround sound including a special LFE Low Frequency Effects channel for deep realistic sound effects The built in Dolby Pro Logic IIx and DTS Neo 6 decoders not only provide full surround sound decoding for Dolby Surround sources but will also generate convincing surround sound for any stereo source Also with the addition of a surround back speaker you can take advantage of the built i...

Страница 7: ...vement in places that are very dusty in places that have hot fumes or oils such as a kitchen Loading the batteries Caution Incorrect use of batteries may result in such hazards as leakage and bursting Observe the following precautions Never use new and old batteries together Insert the plus and minus sides of the batteries properly according to the marks in the battery case Batteries with the same...

Страница 8: ... can simply leave the receiver in the default settings Important Before making or changing any connections switch off the power and disconnect the power cord from the AC outlet 1 Hook up your DVD player For surround sound you ll want to hook up using a digital connection from the DVD player to the receiver You can do this with either a coaxial recommended or an optical connection you don t need to...

Страница 9: ...ect the power cord before touching any uninsulated parts Make sure that all the bare speaker wire is twisted together and inserted fully into the speaker terminal Use good quality speaker wire to connect the speakers to the receiver SPEAKERS A B R L R L R L Single FRONT CENTER SURROUND SURROUND BACK SELECTABLE SELECTABLE SWITCHED 100W MAX AC OUTLET ASSIGNABLE CD IN IN IN IN IN IN OUT OUT CD R TAPE...

Страница 10: ...don t know how to do this 5 Use the on screen automatic MCACC setup to set up your system See Automatically setting up for surround sound MCACC on the next page for more on this 6 Play a DVD and adjust the volume to your liking Make sure that DVD LD is showing in the receiver s display indicating that the DVD input is selected If it isn t press DVD LD on the remote control to set the receiver to t...

Страница 11: ...table or a chair 3 Press RECEIVER on the remote control then press the SYSTEM SETUP button An on screen display OSD appears on your TV Use the buttons and ENTER on the remote control to navigate through the screens and select menu items Press RETURN to exit the current menu Press SYSTEM SETUP at any time to exit the System Setup menu 4 Select AUTO MCACC from the System Setup menu then press ENTER ...

Страница 12: ...up has finished Select Skip to go back to the System Setup menu The MCACC indicator on the front panel will light to show the surround settings are complete The settings made in the Auto MCACC Setup should give you excellent surround sound from your system but it is also possible to adjust these settings manually using the System Setup menu see page 40 If you are using THX Certified speakers confi...

Страница 13: ...to this receiver make sure that the player is set to output multichannel analog audio Note Depending on your DVD player or source discs you may only get digital 2 channel stereo and analog sound In this case the receiver must be set to a multichannel listening mode see Listening in surround sound on page 31 if you need to do this if you want multichannel surround sound Playing a source Here are th...

Страница 14: ...damaged if bent around sharp corners You can also use a standard RCA video cable for coaxial digital connections Video cables Standard RCA video cables These cables are the most common type of video connection and should be used to connect to the composite video terminals They have yellow plugs to distinguish them from cables for audio S video cables S video cables give you clearer picture reprodu...

Страница 15: ...Be careful not to arrange cables in a manner that bends the cables over the top or around this unit If the cables are laid on top of the unit the magnetic field produced by the transformers in this unit may cause a humming noise to come from the speakers ...

Страница 16: ...s make sure the power is turned off and the power cord is disconnected from the AC outlet The arrows indicate the direction of the signal Note If your digital connections are different from the default settings you should refer to The Input Assign menu on page 64 to assign the jacks to the proper component s If you have a have a DVD Audio or SACD compatible player see Connecting multichannel analo...

Страница 17: ...d off and the power cord is disconnected from the AC outlet The arrows indicate the direction of the signal SPE A ASSIGNABLE CD IN IN IN IN IN IN OUT OUT CD R TAPE MD VIDEO1 DVR VCR DVD LD TV SAT CONTROL MONITOR VIDEO1 DVR VCR TV SAT TV SAT DVD LD DVD LD IN IN IN IN VIDEO VIDEO AUDIO VIDEO VIDEO S VIDEO S VIDEO IN IN OUT OUT ANTENNA AM LOOP R L PLAY PLAY REC REC Y PB PR Y PB PR Y Y PB PB PR PR Y Y...

Страница 18: ...are accessed via the front panel using the VIDEO2 button There are standard audio video jacks as well as an S video jack and an optical input Hook them up the same way you made the rear panel connections ASSIGNABLE CD IN IN IN OUT CD R TAPE MD VIDEO1 CONTROL MONITOR VIDEO1 DVR VCR TV SAT TV SAT DVD LD DVD LD IN IN IN IN VIDEO VIDEO VIDEO VIDEO S VIDEO S VIDEO IN IN OUT OUT ANTENNA AM LOOP FM UNBAL...

Страница 19: ...e connector shut Using external antennas To improve FM reception Use an F connector to connect an external FM antenna using a coaxial 75Ω cable To improve AM reception Connect a 5 6m length of vinyl coated wire to the AM antenna terminal without disconnecting the supplied AM loop antenna For the best possible reception suspend horizontally outdoors ASSIGNABLE CD IN IN IN IN IN IN OUT OUT CD R TAPE...

Страница 20: ... If you only have one surround back speaker hook it up to the surround back left Single terminal If you are planning on bi amping your front speakers or setting up a separate speaker system in another room read through Surround back speaker setting on page 40 and make sure to connect your speakers as necessary these connections are explained in Other connections on page 60 If you are using a THX c...

Страница 21: ... the center channel is localized at the TV screen Also make sure the center speaker does not cross the line formed by the leading edge of the front left and right speakers It is best to angle the speakers towards the listening position The angle depends on the size of the room Use less of an angle for bigger rooms Surround and surround back speakers should be positioned 60 cm 90 cm higher than you...

Страница 22: ...wer consumption to the AC outlet in order to avoid overheating and fire risk This can also cause the receiver to malfunction Since a subwoofer or power amplifier can exceed the 100W maximum when playing sources at a high volume this type of equipment should not be connected to the AC outlet Note This unit should be disconnected by removing the power plug from the wall socket when not in regular us...

Страница 23: ...you also have at least one set of analog audio or video jacks connected to another component for grounding purposes Note If you want to control all your components using this receiver s remote control refer to Controlling the rest of your system on page 54 If you have connected a remote control to the CONTROL IN jack using a mini plug cable you won t be able to control this unit using the remote s...

Страница 24: ... L R MULTI JOG MULTI JOG TUNING STATION BAND MPX TONE ACOUSTIC EQ DIALOG ENHANCEMENT MULTI CH IN SIGNAL SELECT EXTENDED MODE SPEAKERS MIDNIGHT LOUDNESS MULTI JOG MULTI JOG 10 12 14 15 17 18 20 11 19 22 21 24 23 16 13 MASTER VOLUME DVD LD TV SAT DVR VCR VIDEO1 CD CD R TAPE MD STANDBY ON MULTI JOG TUNER VIDEO2 VSX 1015 AUDIO VIDEO MULTI CHANNEL RECEIVER LISTENING MODE SELECT ENTER 1 10 2 3 4 5 6 7 8...

Страница 25: ...ws information page 52 13 MIDNIGHT LOUDNESS Use Midnight when listening to movie soundtracks at low volume Use Loudness to boost the bass and treble at low volume page 38 14 TONE When the STEREO mode is selected press this button to access the bass and treble controls which you can then adjust with the MULTI JOG dial 15 ACOUSTIC EQ Press to select an Acoustic Calibration EQ setting page 34 16 DIAL...

Страница 26: ...und on page 31 for more on this Neo 6 When one of the Neo 6 modes of the receiver is on this lights to indicate Neo 6 processing see Listening in surround sound on page 31 for more on this 6 Listening mode indicators THX Lights when one of the Home THX modes is selected VIR SB Lights during Virtual surround back processing ADV SURR Lights when one of the Advanced Surround modes has been selected A...

Страница 27: ...page 38 14 TUNER indicators page 49 STEREO Lights when a stereo FM broadcast is being received in auto stereo mode MONO Lights when the mono mode is set using the MPX button TUNED Lights when a broadcast is being received 15 Character display Displays various system information for example the reason an operation is not possible may flash in the display 16 SR Lights when the SR control mode has be...

Страница 28: ... MENU Displays the disc top menu of a DVD T EDIT Press to memorize and name a station for recall page 50 GUIDE Displays the guides on a digital TV SYSTEM SETUP Press RECEIVER first to access Use to access the System Setup menu see page 40 CLASS Switches between the three banks classes of radio station presets page 50 MENU Displays the disc menu of DVD Video discs It also displays TV menus BAND Swi...

Страница 29: ...d disk and DVD controls for DVD HDD recorders 9 RECEIVER CONTROL buttons THX Press to select a Home THX listening mode page 32 STANDARD Press for Standard decoding and to switch between the various Pro Logic IIx and Neo 6 options page 31 ADV SURR Use to switch between the various surround modes page 33 STEREO Switches between direct and stereo playback Direct playback bypasses the tone controls an...

Страница 30: ...irming preset codes on page 56 13 RECEIVER Switches the remote to control the receiver used to select the green commands above the number buttons INPUT ATT etc Also use this button to set up surround sound page 11 page 40 14 VOL Use to set the listening volume 15 MUTE Mutes the sound or restores the sound if it has been muted adjusting the volume also restores the sound Operating range of remote c...

Страница 31: ...round feature is canceled if you connect headphones or select the multichannel analog inputs Listening in surround sound Using this receiver you can listen to any source in surround sound However the options available will depend on your speaker setup and the type of source you re listening to If you connected surround back speakers see also Using the surround back channel Extended mode on page 36...

Страница 32: ...mode see Listening in surround sound above for an explanation of each process 2 Pro Logic IIx MOVIE THX 2 PRO LOGIC THX Neo 6 CINEMA THX THX GAMES MODE With multichannel sources you can select according to format THX CINEMA Gives you cinema quality sound from your home theatre system using all the speakers in your setup 2 Pro Logic IIx MOVIE THX Especially suited to movie sources this allows you t...

Страница 33: ...nded mode on page 36 If you press ADV SURR when the headphones are connected the PhonesSurround mode will automatically be selected You can t use the Advanced Surround effects with 88 2 96kHz PCM or DTS 96kHz 24 bit sources Tip When an Advanced Surround listening mode is selected the effect level can be adjusted in the range of 10 to 90 by pressing EFFECT CH SEL until EFFECT shows in the display T...

Страница 34: ...ing the Acoustic Calibration Equalization set in Automatically setting up for surround sound MCACC on page 11 or Acoustic Calibration EQ on page 43 Refer to these pages for more on Acoustic Calibration Equalization While listening to a source press ACOUSTIC EQ Press repeatedly to select between ALL CH ADJ No special weighting is given to any one channel FRONT ALIGN All speakers are heard in accord...

Страница 35: ... DTS and WMA9 Pro digital signal formats including DTS 96kHz 24 bit With other digital signal formats set to ANALOG You may get digital noise when a LD or CD player compatible with DTS is playing an analog signal To prevent noise make the proper digital connections page 16 and set the signal input to DIGITAL Some DVD players don t output DTS signals For more details refer to the instruction manual...

Страница 36: ...6 1 encoded sources for example Dolby Digital EX or DTS ES Extended OFF Maximum 5 1 playback Note You must have surround back speakers connected and set to LARGE or SMALL in the Speaker Setting on page 46 and the Surround back speaker setting on page 40 must be set to Normal SB to hear the surround back channel You can t use the surround back channel with headphones the STEREO DIRECT mode You can ...

Страница 37: ...ied to 6 1 encoded sources for example Dolby Digital EX or DTS ES VirtualSB OFF Virtual Surround Back mode is switched off Note You can t use the Virtual Surround Back mode with headphones or with the THX or STEREO DIRECT modes You can only use the Virtual Surround Back mode if the surround speakers are on and the Surr Back setting is set to NO in the Speaker Setting on page 46 You can t hear the ...

Страница 38: ...TI JOG dial to change the amount of bass or treble as necessary The bass and treble can be adjusted from 6 to 6 dB Wait about five seconds for your changes to be input automatically Note You can only use the tone controls when STEREO DIRECT is selected DIRECT will switch to STEREO when the tone controls are used RECEIVERCONTROL SHIFT THX SLEEP DIALOG E AUTOSURR STANDARD ADV SURR STEREO MPX AUDIO C...

Страница 39: ...s selected only the volume and channel levels can be set You can t listen to your speaker B Second Zone system during playback from the multichannel inputs Using the sleep timer The sleep timer switches the receiver into standby after a specified amount of time so you can fall asleep without worrying about the receiver being left on all night Use the remote control to set the sleep timer Press SHI...

Страница 40: ... Setup Specify the size number distance and overall balance of the speakers you ve connected see Manual speaker setup on page 45 Input Assign Specify what you ve connected to the digital and component video inputs see The Input Assign menu on page 64 Other Setup Make customized settings to reflect how you are using the receiver see The Other Setup menu on page 65 Surround back speaker setting Defa...

Страница 41: ...olume to the middle position 1 Select MANUAL MCACC from the System Setup menu See Making receiver settings from the System Setup menu above if you re not already at this screen 2 Select the setting you want to adjust If you re doing this for the first time you might want to make these settings in order Fine Ch Level Make fine adjustments to the overall balance of your speaker system see Fine Chann...

Страница 42: ... help you make detailed adjustments that you may not achieve using the Manual speaker setup below 1 Select Fine Ch Distance from the Manual MCACC setup menu 2 Adjust the distance of the left channel from the listening position 3 Select each channel in turn and adjust the distance as necessary Use cursor left right to adjust the delay of the speaker you selected to match the reference speaker The d...

Страница 43: ...djusted automatically for the following settings ALL CH ADJUST A flat setting where all the speakers are set individually so no special weighting is given to any one channel FRONT ALIGN All speakers are set in accordance with the front speaker settings no equalization is applied to the front left and right channels You will return to the Acoustic Cal EQ setup menu after the Acoustic Calibration Eq...

Страница 44: ...ttons to select the next channel The front speakers can t be adjusted if you selected FRONT ALIGN The OVER indicator shows in the display if the frequency adjustment is too drastic and might distort If this happens bring the level down until OVER disappears from the display Tip Changing the frequency curve of one channel too drastically will affect the overall balance If the speaker balance seems ...

Страница 45: ...e doing this for the first time you may want to adjust these settings in order Speaker Setting Specify the size and number of speakers you ve connected page 46 Crossover Network Specify which frequencies will be sent to the subwoofer see Crossover Network below Channel Level Adjust the overall balance of your speaker system page 47 Speaker Distance Specify the distance of your speakers from the li...

Страница 46: ...t deeper bass the bass frequencies that would normally come out the front and center speakers are also routed to the subwoofer If you did not connect a subwoofer choose NO the bass frequencies are output from other speakers Note If you selected Second Zone or Front Bi Amp in Surround back speaker setting on page 40 you can t adjust the surround back settings If you select SMALL for the front speak...

Страница 47: ... Manual Move the test tone manually from speaker to speaker and adjust individual channel levels Auto Adjust channel levels as the test tone moves from speaker to speaker automatically 3 Confirm your selected setup option The test tones will start after you press ENTER 4 Adjust the level of each channel using the cursor left right buttons If you selected Manual use cursor up down to switch speaker...

Страница 48: ...s 3 When you re finished press RETURN You will return to the Manual SP Setup menu Tip For best surround sound make sure the surround back speakers are the same distance from the listening position Surround Back Speaker Position For the most effective results when using the THX Select2 Cinema and THX MusicMode listening modes see Using the Home THX modes on page 32 with the Advanced Speaker Array A...

Страница 49: ...ors don t light when tuning to an FM station because the signal is weak press the MPX button to switch the receiver into mono reception mode This should improve the sound quality and allow you to enjoy the broadcast Tuning directly to a station Sometimes you ll already know the frequency of the station you want to listen to In this case you can simply enter the frequency directly using the number ...

Страница 50: ...ss ENTER to confirm a character If no character is input a space is input The name is stored when ENTER is pressed after choosing the fourth character Tip To erase a station name simply repeat steps 1 3 and input four spaces instead of a name Once you have named a station preset you can press TUNER DISPLAY when listening to a station to switch the display between name and frequency Listening to st...

Страница 51: ...ic ROCK M Rock music EASY M Middle of the road music also called soft rock LIGHT M Light classical music CLASSICS Serious classical music OTHER M Other music not fitting any of the above categories WEATHER Weather reports FINANCE Stock market reports commerce trading etc CHILDREN Programs for children SOCIAL Social affairs RELIGION Programs concerning religion PHONE IN Public expressing their view...

Страница 52: ... tuner to pick up traffic information when it is broadcast EON NEWS Sets the tuner to pick up news when it is broadcast OFF Switches off the EON feature When set to TA or NEWS the EON indicator in the display lights it flashes when receiving an EON broadcast The indicator in the display lights when the current station carries the EON service Note The EON function does not work when listening to AM...

Страница 53: ...the recording device and set the recording levels Refer to the instructions that came with the recorder if you are unsure how to do this Most video recorders set the audio recording level automatically check the component s instruction manual if you re unsure 5 Start recording then start playback of the source component Note The receiver s volume balance tone bass treble loudness and surround effe...

Страница 54: ...Press the MULTI CONTROL button for the component you want to control The LCD on the remote displays the component you want to control You can t assign the RECEIVER button 3 Use cursor left right to select PRESET then press ENTER 4 Use cursor up down to select the first letter of the brand name of your component then press ENTER This should be the manufacturer s name for example P for Pioneer 5 Use...

Страница 55: ...lay shows OK Certain buttons represent operations that cannot be learned from other remote controls The buttons available are shown below 6 To program additional signals for the current component repeat steps 4 and 5 To program signals for another component exit and repeat steps 1 through 5 7 Press the RECEIVER button to exit and store the operation s Note Some commands from other remote controls ...

Страница 56: ...e time using your receiver to playback a different component This could let you for example use the remote control to set up and listen to a CD on the receiver and then use the remote control to rewind a tape in your VCR while you continue to listen to your CD player When direct function is on any component you select using the MULTI CONTROL buttons will be selected by both the receiver and the re...

Страница 57: ...between standby and on Cable TV Satellite TV TV Use to choose the A commands on a Satellite TV menu Satellite TV Use to choose the RED B commands on a Satellite TV TV menu Satellite TV TV Use to choose the CYAN E commands on a Satellite TV TV menu Satellite TV TV Use to choose the GREEN C commands on a Satellite TV TV menu Satellite TV TV Use to choose the YELLOW D commands on a Satellite TV TV me...

Страница 58: ... fast forward playback CD MD CD R VCR DVD LD DVR player Cassette deck Hold down for fast reverse playback CD MD CD R VCR DVD LD DVR player Cassette deck Stops playback on some models pressing this when the disc is already stopped will cause the disc tray to open CD MD CD R VCR DVD LD DVR player Cassette deck REC SHIFT Starts recording To prevent accidental recording this button must be pressed twi...

Страница 59: ...s the DVD player setup screen DVD DVR Player CH Selects channels VCR DVD DVR Player Selects tracks CD MD CD R Cassette deck AUDIO Changes the audio language or channel DVD DVR Player SUBTITLE Displays changes the subtitles on multilingual DVDs DVD DVR Player HDD SHIFT CH Switches to the hard disk controls when using a DVD HDD recorder DVR Player DVD SHIFT CH Switches to the DVD controls when using...

Страница 60: ...ond Zone setting only Use the SPEAKERS button on the front panel to select a speaker system setting As mentioned above if you have selected Normal SB the button will simply switch your main speaker system A on or off Press repeatedly to choose a speaker system option SP A Sound is output from speaker system A and the same signal is output from the pre out terminals SP B Sound is output from the tw...

Страница 61: ...inals Caution Most speakers with both Hi and Low terminals have two metal plates that connect the Hi to the Low terminals These must be removed when you are bi amping the speakers or you could severely damage the amplifier See your speaker manual for more information If your speakers have a removable crossover network make sure you do not remove it for bi amping Doing so may damage your speakers B...

Страница 62: ... a Pioneer plasma display using an SR cable you will need to point the remote control at the plasma display remote sensor to control the receiver In this case you won t be able to control the receiver using the remote control if you switch the plasma display off N N N N N N UT UT R E MD EO1 R R D V AT CONTROL MONITOR VIDEO1 DVR VCR TV SAT TV SAT DVD LD DVD LD IN IN IN IN VIDEO VIDEO AUDIO VIDEO VI...

Страница 63: ...receiver with your Pioneer plasma display even easier These features include On screen displays when making receiver settings such as speaker setup MCACC setup and so on On screen volume display On screen display of listening mode Automatic video input switching on the plasma display Automatic volume muting on the plasma display See also SR Setup for Pioneer plasma displays on page 67 for more on ...

Страница 64: ...oked up 1 Select Digital Input from the Input Assign menu 2 Select the number of the digital input to which you ve connected your digital component The numbers correspond with the numbers beside the inputs on the back of the receiver 3 Select the component that corresponds with the one you connected to that input Select between DVD LD TV SAT DVR VIDEO1 CD R CD or OFF Use the cursor left right butt...

Страница 65: ... component video MONITOR output 4 When you re finished press RETURN You will return to the Input Assign menu The Other Setup menu The Other Setup menu is where you can make customized settings to reflect how you are using the receiver 1 Switch on the receiver and your TV Use the RECEIVER button to switch on 2 Press RECEIVER on the remote control then press the SYSTEM SETUP button An on screen disp...

Страница 66: ...istening at higher volume MID Mid setting MAX Dynamic range is reduced loud sounds are reduced in volume while quieter sounds are increased 3 When you re finished press RETURN You will return to the Other Setup menu Dual Mono Setup Default setting CH1 You can specify how dual mono encoded Dolby Digital soundtracks should be played Dual mono is not widely used but is sometimes necessary when two la...

Страница 67: ...the receiver is switched to one of the inputs that use the plasma display DVD LD or another one of functions below the volume on the plasma display is muted so only sound from the receiver is heard 3 Assign any input source connected to the plasma display to the corresponding input number This matches the receiver s input source with a numbered video input on the plasma display For example assign ...

Страница 68: ...t s convenient go to Acoustic Calibration EQ on page 43 and lower the 40 Hz and 125 Hz equalizer levels using the manual setting Turning the digital safety feature on may allow you to turn up the volume a little more To switch between SAFETY ON and SAFETY OFF put the receiver into standby then press the STANDBY ON button while holding down the SYSTEM SETUP button on the front panel The unit does n...

Страница 69: ...FF Set to Extended ON see Using the surround back channel Extended mode on page 36 The source is not a 6 1 channel playback source Switch the Extended mode to Extended ON see Using the surround back channel Extended mode on page 36 and choose a surround listening mode see Listening in surround sound on page 31 The surround back speakers are disconnected Check Connecting the speakers on page 20 to ...

Страница 70: ...he DTS signal output is turned off Make sure the player s settings are correct and or the DTS signal out is on Refer to the instruction manual supplied with the DVD player The digital output level is turned down on a CD player or other component equipped with digital output level adjustment capability The DTS signal has been altered by the player and cannot be read Set the digital volume level of ...

Страница 71: ...adjusted This is not a malfunction If the levels in Channel Level on page 47 have been adjusted the maximum volume will change accordingly Symptom Cause Remedy Symptom Cause Remedy No image is output when an input is selected The video connections are incorrect Make sure the video component is connected correctly see page 18 You are using component video connections and the component video inputs ...

Страница 72: ...a malfunction See also the operating instructions that came with your DVD player During playback of a DTS 96 24 source the display doesn t show 96kHz The receiver s input signal type is set to analog Set the receiver to AUTO or DIGITAL see Choosing the input signal on page 35 When playing Dolby Digital or DTS sources the receiver s format indicators do not light No digital connection or the digita...

Страница 73: ...iver in standby press STANDBY ON while holding down the SIGNAL SELECT button The display shows the new setting PAL or NTSC Symptom Cause Remedy Cannot be remote controlled The remote control batteries have worn out Replace the batteries see Loading the batteries on page 7 Too far away or improper angle of operation Operate within 7 meters and a 30º angle of the remote sensor on the front panel see...

Страница 74: ...nerated by bass management in the receiver Dolby Surround is an encoding system which embeds surround sound information within a stereo soundtrack which a Dolby Pro Logic decoder can then use for enhanced surround listening with greater sound detail Manufactured under license from Dolby Laboratories Dolby Pro Logic and the double D symbol are trademarks of Dolby Laboratories DTS The DTS technologi...

Страница 75: ...cessively bright and harsh when played back over audio equipment in the home because film soundtracks were designed to be played back in large movie theaters using very different professional equipment Re Equalization restores the correct tonal balance for watching a movie soundtrack in a small home environment Timbre Matching The human ear changes our perception of a sound depending on the direct...

Страница 76: ...hown in the diagram will provide the largest sweet spot If for practical reasons you have to place the Surround Back speakers apart you will need to go THX Audio Set up screen and choose the setting that most closely corresponds to the speaker spacing which will re optimize the surround sound field ASA is used in three new modes THX Select2 Cinema THX MusicMode and THX Games Mode THX Select2 Cinem...

Страница 77: ...se 5 Hz to 100 MHz dB FM Tuner Section Frequency Range 87 5 MHz to 108 MHz Usable Sensitivity Mono 15 2 dBf IHF 1 6 µV 75 Ω 50 dB Quieting Sensitivity Mono 20 2 dBf Stereo 41 2 dBf Sensitivity DIN Mono 1 1 µV S N 26 dB Stereo 50 µV S N 46 dB Signal to Noise Ratio Mono 76 dB at 85 dBf Stereo 72 dB at 85 dBf Signal to Noise Ratio DIN Mono 62 dB Stereo 58 dB Distortion Stereo 0 6 1 kHz Alternate Chan...

Страница 78: ...OPE NV Haven 1087 Keetberglaan 1 B 9120 Melsele Belgium TEL 03 570 05 11 PIONEER ELECTRONICS ASIACENTRE PTE LTD 253 Alexandra Road 04 01 Singapore 159936 TEL 65 6472 7555 PIONEER ELECTRONICS AUSTRALIA PTY LTD 178 184 Boundary Road Braeside Victoria 3195 Australia TEL 03 9586 6300 PIONEER ELECTRONICS DE MEXICO S A DE C V Blvd Manuel Avila Camacho 138 10 piso Col Lomas de Chapultepec Mexico D F 1100...

Отзывы: