Pioneer Super Tuner IIID AVH-P5000DVD Скачать руководство пользователя страница 2

+

+

+

+

+

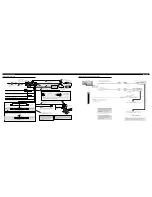
Connection method

1. Clamp the lead.

2. Clamp firmly with 

needle-nosed pliers.

Note: 

•  The position of the parking brake switch depends on the vehicle model. For details, 

consult the vehicle Owner’s Manual or dealer.

Light green 
Used to detect the ON/OFF status of the parking brake. This 
lead must be connected to the power supply side of the parking 
brake switch.

Blue/white
Connect to system control terminal of the power 
amp or auto-antenna relay control terminal 
(max. 300 mA 12 V DC).

Ground side

Power supply side

Parking brake 
switch

When you connect the separately sold multi-
channel processor (e.g., DEQ-P8000) to this 
unit, do not connect anything to the speaker 
leads and system remote control 
(blue/white).

Yellow 
Connect to the constant 12 V supply terminal.

Fuse (10 A)

Fuse resistor

Red 
Connect to terminal controlled by ignition switch (12 V DC).

Black (chassis ground) 
Connect to a clean, paint-free metal location.

Fuse resistor

Orange/white 
Connect to lighting switch terminal.

Left

Right

Front speaker

Front speaker

Rear speaker or 
Subwoofer (4 

)

White

Gray

Gray/black

White/black

Green

Violet

Green/black

Violet/black

With a 2 speaker system, do not connect 
anything to the speaker leads that are not 
connected to speakers.

Note:

•  Change the initial setting of this unit (refer to the 

Operation Manual). The subwoofer output of this unit 
is monaural.

Violet

Violet/black

Not used.

Green

Green/black

When using a subwoofer of 70 W (2 

), be sure to connect with Violet and Violet/black leads of this unit. 

Do not connect anything to Green and Green/black leads. 

Subwoofer (4 

×

 2

Rear speaker or 
Subwoofer (4 

)

Dock connector
Connect to separately sold iPod.

Interface cable (e.g., CD-I200) 
(sold separately)

80 cm (2 ft. 7 in.)

Yellow/black
If you use an equipment with Mute function, wire this lead to the Audio Mute lead on 
that piece of equipment. If not, keep the Audio Mute lead free of any connections.

IP-BUS input 
(Blue)

IP-BUS cable

Tuner box (supplied)

This product

1.5 m (4 ft. 11 in.)

20 cm (7-7/8 in.)

USB cable (supplied)
Connect to separately sold 
USB device.

USB input

Antenna cable 
(supplied)

Multi-CD player 
(sold separately)

Gray

Wired remote input  
Hard-wired remote control adaptor 
can be connected (sold separately).

80 cm (2 ft. 7 in.)

+

+

+

+

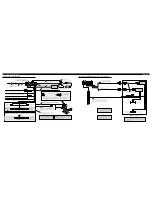
Note:

• Change the initial setting of this unit (refer to the Operation

Manual). The subwoofer output of this unit is monaural.

This product

Power amp  
(sold separately)

Power amp  
(sold separately)

Connect with RCA cables 
(sold separately)

Rear speaker

or subwoofer

Rear speaker
or subwoofer

Perform these connections when 
using the optional amplifier.

System remote control

Front speaker

Front speaker

Left

Right

Front output  
(FRONT OUTPUT)

Rear output or subwoofer output 
(REAR/SUBWOOFER/DEQ OUTPUT)

15 cm (5-7/8 in.)

15 cm (5-7/8 in.)

Blue/white
Connect to system control terminal of the power 
amp or auto-antenna relay control terminal 
(max. 300 mA 12 V DC).

When you connect the separately sold multi-
channel processor (e.g., DEQ-P8000) to this 
unit, do not connect anything to the speaker 
leads and system remote control 
(blue/white).

When you connect the multi-channel 
processor to this unit, refer to multi-channel 
processor’s installation manual for the 
connection method.

Connecting the power cord

When connecting to separately sold power amp

Connecting the Units

ENGLISH

Содержание Super Tuner IIID AVH-P5000DVD

Страница 1: ... malfunction Vehicles with a 12 volt battery and negative grounding Speakers with 50 W output value and 4 ohm to 8 ohm impedance value To prevent short circuit overheating or malfunc tion be sure to follow the directions below Disconnect the negative terminal of the battery before installation Secure the wiring with cable clamps or adhe sive tape To protect the wiring wrap adhesive tape around the...

Страница 2: ...d Green black leads Subwoofer 4 Ω 2 Rear speaker or Subwoofer 4 Ω Dock connector Connect to separately sold iPod Interface cable e g CD I200 sold separately 80 cm 2 ft 7 in Yellow black If you use an equipment with Mute function wire this lead to the Audio Mute lead on that piece of equipment If not keep the Audio Mute lead free of any connections IP BUS input Blue IP BUS cable Tuner box supplied ...

Страница 3: ...ternal video component and the display It is necessary to set AV INPUT to VIDEO in SYSTEM MENU when connecting the external video component It is necessary to set AV INPUT to S DVD in SYSTEM MENU when connecting a multi DVD player When using a display connected to rear video output This product s rear video output is for connection of a display to enable passengers in the rear seats to watch the D...

Страница 4: ...unauthorized parts may cause malfunctions Consult with your dealer if installation requires drilling of holes or other modifications of the vehicle Do not install this unit where it may interfere with operation of the vehicle it may cause injury to a passenger as a result of a sudden stop Do not install the display where it may i obstruct the driver s vision ii impair the performance of any of the...

Страница 5: ...se détachent Pas de position ACC Position ACC O N S T A R T O F F ACC O N S T A R T O F F Raccordements des appareils FRANÇAIS ATTENTION PIONEER ne vous recommande pas d installer ou d entretenir vous même cet écran car ces travaux peuvent présenter un risque d électrocution ou d autres dangers Confiez tous les travaux d installation et d entretien de votre écran au personnel de service Pioneer ag...

Страница 6: ...z rien aux conducteurs vert et vert noir Caisson de grave 4 Ω 2 Enceinte arrière ou caisson de grave 4 Ω Câble d interface par ex CD I200 vendu séparément 80 cm Jaune noir Si vous utilisez un équipement avec une fonction de mise en sourdine raccordez ce conducteur au conducteur de mise en sourdine audio de cet équipement Sinon laissez le conducteur de mise en sourdine audio non raccordé Entrée IP ...

Страница 7: ...me le montre l illustration Assurez le maintien du conducteur de masse à la borne qui est placée à l arrière de l appareil 2 Reliez le câble à fibres optiques à la boîte de raccordement de câble à fibres optiques Installation de la boîte de raccordement de câble à fibres optiques Pour installer la boîte de rac cordement de câble à fibres optiques au moyen de la bande autoagrippante Installez la bo...

Страница 8: ... ceux du côté de l appareil 1 Utilisez uniquement des vis de pression 4 mm 3 mm Lors de l installation dans une cavité peu profonde utilisez les perçages suivants Dans ce cas collez du ruban adhésif de masquage sur les parties qui dépassent du tableau de bord 1 1 Ruban adhésif de masquage 1 1 182 53 Bague de caoutchouc Vis Tableau de bord Support latéral Vis 2 mm 3 mm Manchon de montage Remarque V...

Отзывы: