background image

42

En

Additional Information

English

Additional Information

5

1

15 11

6

10

Explanation of terms

Aspect ratio

The TV screen’s width to height ratio is referred to as the aspect
ratio. The aspect ratio on a standard TV is 4:3 and on a wide or
High Definition TV it is 16:9.

G ON SYNC

This setting is a video signal in the form of a synchronization
signal added to the G (GREEN) signal of the R.G.B signal.

VGA

VGA is the acronym for “Video Graphics Array”
(generally indicates a 640 dot x 480 line resolution)

WVGA

WVGA is the acronym for “Wide Video Graphics Array”  
(generally indicates a 848 dot x 480 line resolution)

XGA

XGA is the acronym for “eXtended Graphics Array”
(generally indicates a 1024 dot x 768 line resolution)

WXGA

WXGA is the acronym for “Wide eXtended Graphics Array”
(generally indicates a 1280 dot x 768 line resolution

SXGA

SXGA is the acronym for “Super eXtended Graphics Array”
(generally indicates a 1280 dot x 1024 line resolution)

SXGA+

SXGA+ is the acronym for “Super eXtended Graphics Array plus”
(generally indicates a 1400 dot x 1050 line resolution)

DVI

DVI is the acronym for “Digital Visual Interface”
An interface standard proposed by the Digital Display Working Group
(DDWG) for digital displays.

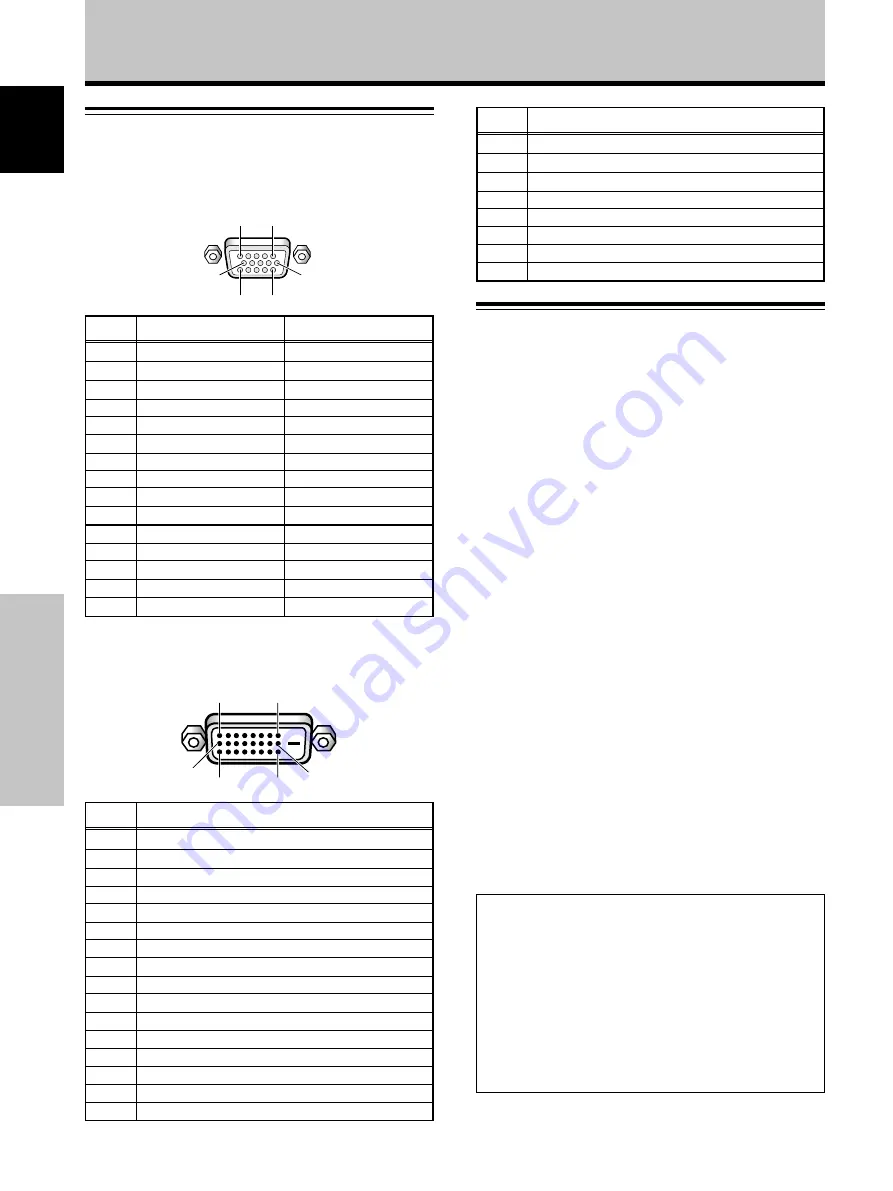
Appendix 2: INPUT1/2 pin assignments

Appendix 2

-1/2:

INPUT1 (Mini D-sub 15 pin female connector) pin
allocation

Input

Output

1

2

3

4

5

6

7

8

9

10

11

12

13

14

15

R

G

B

NC (No connection)

GND

GND

GND

GND

DDC + 5V

GND

NC (No connection)

DDC SDA

HD or H/V SYNC

VD

DDC SCL

+
+
+
+
+
+
+
+

NC (No connection)

+
+

NC (No connection)

+
+

NC (No connection)

Pin No.

Apple and Macintosh are registered trademarks of Apple

Computer, Inc.

Microsoft is a registered trademark of Microsoft Corporation.

NEC and PC-9800 are trademarks of NEC Corporation.

VESA and DDC are registered trademarks of Video Electronics

Standards Association.

Power Management and Sun Microsystems are registered

trademarks of Sun Microsystems, Inc.

VGA and XGA are registered trademarks of International

Business Machines Co., Inc.

Appendix 2

-2/2:

INPUT2 (DVI female connector) pin allocation.

1

8

24

17

9

16

Signal Assignment

1

2

3

4

5

6

7

8

9

10

11

12

13

14

15

16

T.M.D.S. Data2–

T.M.D.S. Data2+

T.M.D.S. Data2/4 Shield

NC (No connection)

NC (No connection)

DDC Clock

DDC Data

NC (No connection)

T.M.D.S. Data1–

T.M.D.S. Data1+

T.M.D.S. Data1/3 Shield

NC (No connection)

NC (No connection)

+5V Power

GND

Hot Plug Detect

Pin No.

Signal Assignment

17

18

19

20

21

22

23

24

T.M.D.S. Data0 –

T.M.D.S. Data0+

T.M.D.S. Data0/5 Shield

NC (No connection)

NC (No connection)

T.M.D.S. Clock Shield

T.M.D.S. Clock+

T.M.D.S. Clock–

Pin No.

Published by Pioneer Corporation.
Copyright © 2005 Pioneer Corporation.
All rights reserved.

Содержание PDP 434CMX

Страница 1: ......

Страница 2: ......

Страница 3: ...sonable protection against harmful interference in a residential installation This equipment generates uses and can radiate radio frequency energy and if not installed and used in accordance with the instructions may cause harmful interference to radio communications However there is no guarantee that interference will not occur in a particular installation If this equipment does cause harmful int...

Страница 4: ...on an unstable cart stand tripod bracket or table The product may fall causing serious injury to a child or adult and serious damage to the product Use only with a cart stand tripod bracket or table recommended by the manufacturer or sold with the product Any mounting of the product should follow the manufacturer s instructions and should use a mounting accessory recommended by the manufacturer CA...

Страница 5: ...the nearest Pioneer Authorized Independent Service Company or if you wish to purchase replacement parts operating instructions service manuals or accessories please call the number shown below 8 0 0 8 7 2 4 1 5 9 Please do not ship your product to Pioneer without first calling the Customer Support Division at the above listed number for assistance Pioneer Electronics USA Inc Customer Support Divis...

Страница 6: ...nge of colors and exceptional color accuracy It also increases contrast by limiting ambient light reflections in bright viewing environments Newly developed image processing technology P U R E Drive including ACE III Advanced Continuous Emission that reproduces images with higher definition and quality The newly developed fully digital image processing circuitry P U R E Drive with ACE III Advanced...

Страница 7: ...ce of a minute number of inactive light cells PDP 504CMX PDP 434CMX Image processing technology P U R E Drive including ACE Advanced Continuous Emission II reproduces images with higher definition and quality The newly developed fully digital image processing circuitry P U R E Drive including ACE Advanced Continuous Emission II designed exclusively for Pioneer s high definition Plasma Displays all...

Страница 8: ... of the Plasma Display with its connected components Depending on the connections made this section may or may not be necessary The remainder of the sections in this manual is dedicated to the basic operations associated with selecting a source component up to the more complex operations associated with adjusting the Plasma Display picture to match the requirements of specific components and perso...

Страница 9: ...mount of green in the picture B LEVEL Adjust the amount of blue in the picture H ENHANCE Sharpens the image in the horizontal direction V ENHANCE Sharpens the image in the vertical direction To reset PICTURE mode settings to the default If settings have been adjusted excessively or the picture on the screen no longer appears natural it may prove more beneficial to reset the PICTURE mode to default...

Страница 10: ...3 AA R6 batteries x 2 4 Cleaning cloth for screen 5 Speed clamps x 2 6 Bead bands x 2 Before Proceeding 7 Display stands x 2 8 Washers x 2 9 Hex hole bolts x 2 0 Remote control unit holder These Operating Instructions Warranty Use as a holder for the remote control unit When attaching to the rear of the main unit be careful not to cover the vents ...

Страница 11: ...emselves are used in the same way on these models page 11 Operation panel on the main unit 7 STANDBY ON button Press to put the display in operation or standby mode page 19 8 INPUT button Press to select the input page 19 9 MENU button Press to open and close the on screen menu pages 16 to 33 0 ADJUST buttons Use these buttons to move the onscreen cursor between selection options and to perform an...

Страница 12: ...st various settings on the unit pages 16 to 33 5 SET button Press to adjust or enter various settings on the unit pages 16 to 33 6 SUB INPUT button During multi screen display use this button to change inputs to subscreens page 23 7 SPLIT button Press to switch to multi screen display page 23 8 MUTING button Press to mute the volume page 20 9 AUTO SET UP button When using computer signal input aut...

Страница 13: ...he remote control unit CAUTION Insert batteries so that the plus and minus sides are aligned according to the markings in the battery case When not using the remote control unit for a long period of time 1 month or more remove the batteries from the remote control unit to prevent leaking of battery fluid If battery liquid has leaked thoroughly wipe the inside of the case until all liquid is remove...

Страница 14: ... INPUT1 page 13 7 DIGITAL RGB INPUT2 DVI D jack Use to connect a computer Note This unit does not support displaying of copyguard protected video signals page 12 Illustration depicts PDP 505CMX PDP 504CMX model 8 AUDIO INPUT2 Stereo mini jack Use to obtain sound when INPUT2 is selected Connect a component s audio output jack to the panel s INPUT2 page 13 9 AUDIO OUTPUT Stereo mini jack Use to outp...

Страница 15: ...ccessories manufactured by PIONEER PIONEER is not responsible for accident or damage caused by the use of parts and accessories manufactured by other companies For custom installations please consult a qualified installer or with the dealer where the unit was purchased Wall mount installation of the unit This unit is designed with bolt holes for wall mount installation etc The installation holes a...

Страница 16: ... removed or reattached by anyone other than the professional installation technician or service personnel If handles must be removed due to specific installation conditions the mounting screws should be stored carefully together with the handles To ensure safety the mounting screws should be tightened to a minimum torque of 2N m 20 kgf cm when reattaching the handles When moving the display it sho...

Страница 17: ...e refer to the computer s instruction manual or consult the computer maker or your nearest dealer NOTICE INPUT1 supports Microsoft Plug Play VESA DDC 1 2B components See Appendix 2 1 2 page 42 when using INPUT1 See Appendix 1 pages 38 and 40 for information regarding signals and display formats supported by INPUT1 To an external monitor When connecting to ANALOG RGB OUT INPUT1 ANALOG RGB IN D Sub ...

Страница 18: ...TPUT Making connections to the audio inputs on this unit This unit features two audio inputs and one audio output The following chart shows the video inputs and the corresponding audio input terminals Twist exposed wire strands together Push tab to the open position and insert the wire Then close tab firmly to secure the wire in place INPUT1 INPUT2 Audio input jacks Sound output Stereo mini jack L...

Страница 19: ...y the power cord provided For the Plasma Display a three core power cord with a ground terminal is used for efficiency protection Always connect the power cord to a three pronged grounded outlet making sure that the cord is properly grounded If you use a power source converter plug use an outlet with a ground terminal and screw down the ground line NO Do not use a power supply voltage other than t...

Страница 20: ...ace Please attach carefully To attach the speed clamps to the main unit Connect the speed clamps using the 6 holes marked with below depending on the situation As viewed from the rear of the display Installation and Connections 1 2 To remove speed clamps Using pliers twist the clamp 90 and pull it outward In some cases the clamp may have deteriorated over time and may get damaged when removed 2 Bu...

Страница 21: ... UP MODE INACTIVE AUTO FUNCTION OFF AUDIO OUT FIXED STANDARD LANGUAGE ENGLISH ENTER SET EXIT MENU PICTURE SCREEN SETUP OPTION 5 Use the 5 buttons to select LANGUAGE then press the SET button SET SET EXIT MENU ENGLISH LANGUAGE 6 Use the 2 3 buttons to select the desired language Each time an 2 3 button is pressed the option cycles through the available languages in the order shown below SET SET EXI...

Страница 22: ...SYNC with WXGA inputs manually set the SIGNAL FORMAT to WXGA 5 Press the SET button The setting is stored in memory and the screen returns to that shown in step 3 6 When the setup is completed press the MENU button to exit the menu screen Note Set SIGNAL FORMAT for each input INPUT1 and INPUT2 Settings after connections On screen setup is necessary when components are connected to either INPUT1 or...

Страница 23: ...ggle between the following options 5 When setup is complete press the MENU button to exit the menu screen Reminders The CLAMP POSITION setting is supported only for INPUT1 When setting this option confirm that the component s signal output is used For details consult the device s Operating Instructions 3 AUTO LOCKED 2 1 Press the MENU button to display the menu MENU INPUT1 ENTER SET EXIT MENU PICT...

Страница 24: ...ollowing message appears 5 8 8 5 1 2 6 8 4 k H z f V 7 8 1 6 H z f H X INPUT1 FULL CAUTION UNSUPPORTED SIGNAL 0 2 0 k H z f V 7 7 1 5 H z f H INPUT1 FULL CAUTION OUT OF RANGE 4 Use VOLUME buttons on the remote control unit or the main unit to adjust the sound volume If no audio connections are made to this unit this step is not necessary 5 When viewing is finished press the STANDBY ON button to pu...

Страница 25: ...nagement function is active the SCREEN MGT message also appears in the lower left corner of the screen Operation Adjusting sound volume Press the VOLUME buttons Press the or button to decrease or increase the volume of sound from the speakers 5 VOLUME Muting the sound MUTING Press the MUTING button on the remote control Press the MUTING button again to restore the sound Muting is automatically can...

Страница 26: ...rce that you are viewing Although these modes are designed for full display of a picture on a wide screen it is our hope that you make use of them with the full understanding of our intentions Screen size selection There are four display modes Select the mode that best shows the size and range of the image Press the SCREEN SIZE button to select the size SCREEN SIZE SCREEN SIZE Main unit operating ...

Страница 27: ... ZOOM Supported only on PDP 434CMX The ZOOM setting is available only during input from a computer 1280 x 1024 input only A portion of the display does not appear on the screen Use the 5 buttons to adjust the vertical position of the video image on the screen Moving the screen position upward or downward Press the 5 buttons When playing a PARTIAL or ZOOM image 1280 x 1024 input only from a compute...

Страница 28: ...remote control s SUB INPUT button to select the subscreen input source To exchange the main screen and subscreen inputs Press the remote control s SWAP button In 2 SCREEN mode The right and left sides of the display switch what was previously the main screen becomes the sub screen and vice versa In PinP or PoutP mode What was previously the main screen image appears in reduced size as the subscree...

Страница 29: ...ton to exit the menu screen Note The POWER MANAGEMENT function must be set individually for each input INPUT1 INPUT2 To return to operating mode To return to normal operation from the POWER MANAGEMENT function s Standby mode either operate your computer or press the INPUT button on the panel or using the remote control To change the position of the subscreen in PinP mode Press the remote control s...

Страница 30: ...RE mode settings to the default If settings have been adjusted excessively or the picture no longer appears natural it may prove more beneficial to reset the PICTURE mode to the default setting instead of continuing to make adjustments 1 In step 2 in the previous procedure use the 5 buttons to select PICTURE RESET then press the SET button SET SET EXIT MENU PICTURE RESET YES NO 2 Use the 2 3 butto...

Страница 31: ...ignals In such cases set the AUTO SETUP MODE to INACTIVE and use the manual adjustment methods explained in the section entitled Adjusting screen POSITION CLOCK and PHASE manual adjust AUTO SET UP AUTO SET UP Main operating panel Remote control When the automatic setup mode is selected the unit automatically adjusts to the optimum image settings whenever the power is turned ON the input source is ...

Страница 32: ...the setting press the MENU button to return to the normal screen image Note Optimum settings may not be possible for low luminance and certain other signals In such cases set the AUTO SETUP MODE to INACTIVE and use the manual adjustment methods explained in the following section Adjusting screen POSITION CLOCK and PHASE manual adjust 3 INACTIVE ACTIVE 2 1 Press the MENU button to display the menu ...

Страница 33: ...licker of screen letters or color misalignment This setting adjusts the phase of the internal clock signal adjusted by the CLOCK setting Reminders The CLOCK and PHASE adjustment items are supported only for INPUT1 When the CLOCK frequency is changed the POSITION command s horizontal H option may require readjustment If the adjustment items in the SCREEN mode are altered excessively the picture may...

Страница 34: ...ENTER SET EXIT MENU PICTURE SCREEN SETUP OPTION 3 Use the 5 buttons to select ORBITER MENU INPUT1 ENERGY SAVE SCREEN MGT OFF ORBITER OFF MASK CONTROL ON AUTO SET UP MODE INACTIVE AUTO FUNCTION OFF AUDIO OUT FIXED STANDARD LANGUAGE ENGLISH PICTURE SCREEN SETUP OPTION 4 Press the SET button to activate the setting The factory default setting is OFF Pressing the button causes the setting to toggle be...

Страница 35: ...led screen management settings consult your professional installation technician 1 Press the MENU button to display the menu screen MENU INPUT1 PICTURE SCREEN SETUP OPTION 0 0 0 0 0 0 CONTRAST 0 BRIGHTNESS R LEVEL G LEVEL B LEVEL H ENHANCE V ENHANCE PICTURE RESET 2 Use the 2 3 buttons to select OPTION MENU INPUT1 ENERGY SAVE SCREEN MGT OFF ORBITER OFF MASK CONTROL ON AUTO SET UP MODE INACTIVE AUTO...

Страница 36: ...ent operation while set to ONCE or REPEAT if the display s MAIN POWER switch is turned OFF the screen management program ends This part of the display changes to show the OFF message To continue with screen management program use the 2 3 buttons to select ONCE or REPEAT again 6 Use the 5 buttons to select TIME TO ACTIVATE SET MENU RETURN EXIT SCREEN MGT REPEAT STATUS 01H00M TIME TO ACTIVATE START ...

Страница 37: ...uce an optimum image appearance 5 When finished with the setting press the MENU button to return to the normal screen image Note The ENERGY SAVE setting affects all input sources 3 STANDARD MODE2 2 MODE1 2 3 AUTO MODE3 2 MENU 2 3 5 SET MENU 5 SET 2 3 Main operating panel Remote control Automatic input switching AUTO FUNCTION This display is equipped with an optional AUTO FUNCTION selector When ena...

Страница 38: ...e changes in response to operation of the VOLUME controls 5 When finished with the setting press the MENU button to return to the normal screen image Reminders The AUDIO OUT setting affects all input sources On the PDP 505CMX only VARIABLE is supported 3 FIXED VARIABLE 2 3 OFF INPUT1 2 4 Press the SET button to select INPUT1 The factory default setting is OFF Each time the SET button is pressed th...

Страница 39: ...ts Vents Vents Vents Vents Troubleshooting What may at first seem to be an malfunction may be remedied with a quick inspection Please check to see if a warning is shown on the screen If displayed refer to the table below and check the mode If there is no warning shown check to see if the issue is listed on page 35 of this manual The problem may be caused by something other than this panel Please a...

Страница 40: ... display is too small Letters broken or jumbled A sharp sound periodically heard from the cabinet Bright portions of an image appear to be losing intensity Speckles snow or noise appear on screen Stripes appear on the screen Sound heard from within the unit Fan is not moving Fan speed changes ON green indicator fails to light Panel is making sounds noises Confirm that the correct screen size is se...

Страница 41: ...n one or more of the pixels may fail to light or may light erratically This is an inevitable by product of the manufacturing process and not a malfunction Concerning infrared light In principle the plasma panel radiates infrared light Depending upon the installtion site s environment wireless headphones may may experience noise or infrared remote controls for other nearby tdevices may fail to func...

Страница 42: ... x 653 H x 300 D mm 42 1 8 W x 25 23 32 H x 11 13 16 D in Weight 32 5 kg 71 lbs 11 oz including display stand 33 1 kg 73 lbs Operating temperature range 0 to 40 C Additional Information Input output Video INPUT1 Input Mini D sub 15 pin socket connector RGB signal G ON SYNC compatible RGB 0 7 Vp p 75 Ω no sync HD VS VD TTL level positive and negative polarity 2 2 kΩ G ON SYNC 1 Vp p 75 Ω negative s...

Страница 43: ...z 56Hz 60Hz 70Hz 60Hz 72Hz 75Hz 75 1Hz 66Hz 76Hz 60Hz 60Hz 75Hz 85Hz 60Hz 75Hz 85Hz 60Hz 65Hz 70Hz 75Hz 85Hz 640x400 720x400 640x480 848x480 800x600 832x624 1024x768 1280x768 1152x864 1152x870 1152x900 1280x960 1280x1024 1400x1050 1600x1200 NEC PC 9800 NEC PC 9800 Apple Macintosh 13 1072x600 Apple Macintosh 16 1376 x 768 indicates Apple Macintosh 19 Apple Macintosh 21 Sun Microsystems LO Sun Micro...

Страница 44: ...68 1152x864 1280x960 1280x1024 1400x1050 1072x600 1376x768 1280x768 1280x768 1280x768 1280x768 1280x768 1280x768 1280x768 1280x768 640x480 848x480 800x600 1024x768 1280x768 31 5kHz 31 0kHz 35 2kHz 37 9kHz 48 4kHz 45 1kHz 47 8kHz 53 7kHz 60 0kHz 64 0kHz 65 3kHz 1280x768 Optimal picture but adjustments to picture position refresh rate phase etc may be necessary Picture enlarged but some fine details...

Страница 45: ...24 8kHz 31 5kHz 37 9kHz 31 5kHz 35 0kHz 37 9kHz 37 5kHz 43 3kHz 31 0kHz 35 2kHz 37 9kHz 48 1kHz 46 9kHz 53 7kHz 49 7kHz 48 4kHz 56 5kHz 60 0kHz 60 2kHz 68 7kHz 45 1kHz 47 8kHz 56 1kHz 53 7kHz 64 9kHz 67 5kHz 68 7kHz 61 8kHz 71 7kHz 60 0kHz 64 0kHz 80 0kHz 91 2kHz 65 3kHz 82 3kHz 93 9kHz 75 0kHz 81 3kHz 87 5kHz 93 8kHz 106 3kHz 768x768 768x768 768x768 768x768 768x768 768x768 768x768 768x768 768x768...

Страница 46: ...0 848x480 800x600 1024x768 1024x768 Additional Information Appendix 1 4 4 PDP 434CMX INPUT2 Optimal picture but adjustments to picture position refresh rate phase etc may be necessary Picture enlarged but some fine details are harder to see Simple reproduction without fine details Resolution Dot x Line Vertical DOT BY DOT FULL ZOOM Remarks Screen size Dot x line Horizontal 4 3 Not available Comput...

Страница 47: ...plays Appendix 2 INPUT1 2 pin assignments Appendix 2 1 2 INPUT1 Mini D sub 15 pin female connector pin allocation Input Output 1 2 3 4 5 6 7 8 9 10 11 12 13 14 15 R G B NC No connection GND GND GND GND DDC 5V GND NC No connection DDC SDA HD or H V SYNC VD DDC SCL NC No connection NC No connection NC No connection Pin No Apple and Macintosh are registered trademarks of Apple Computer Inc Microsoft ...

Страница 48: ...ivent Remarques sur l installation Ce produit est vendu en assumant qu il sera installé par un personnel suffisamment expérimenté et qualifié Faites toujours réaliser le montage et l installation par un spécialiste ou par votre revendeur PIONEER ne peut être tenu responsable pour tout dommage causé par une erreur d installation ou de montage une mauvaise utilisation ou un désastre naturel Remarque...

Страница 49: ...Fr Cet appareil numérique de la classe B est conforme à la norme NMB 003 du Canada Cet appareil a été testé est trouvé conforme avec les limites des appareils numériques de classe B conformément à l article 15 du règlement FCC Ces limites sont conçues pour offrir une protection raisonnable contre les interférences nuisibles dans une installation résidentielle Cet appareil génère utilise et peut ém...

Страница 50: ...té de lignes électriques aériennes lumières électriques ou autres circuits d alimentation ou dans un endroit où il peut tombé sur une telle ligne électrique ou circuit Lors de l installation d un système d antenne extérieure faites très attention de ne pas toucher de telles lignes électriques ou circuits car un tel contact pourrait entraîner la mort SURCHARGE Ne surchargez pas les prises murales l...

Страница 51: ...Centre de Service Autorisé Pioneer le plus près de chez vous Vous pouvez aussi contacter le Service à la clientèle de Pioneer Pioneer Électroniques du Canada Inc Service à la clientèle 300 Allstate Parkway Markham Ontario L3R OP2 905 479 4411 1 877 283 5901 Pour obtenir des renseignements sur la garantie veuillez vous reporter au feuillet sur la garantie restreinte qui accompagne le produit S021_E...

Страница 52: ...ait office de filtre couleur pour augmenter le spectre de la lumière émise par le plasma de manière à acquérir une gamme plus complète de couleurs et une précision exceptionnelle de celles ci Il accroît aussi le contraste en limitant les reflets de lumière ambiante dans un milieu très clair Nouvelle technologie du traitement de l image P U R E Drive comportant le circuit ACE Advanced Continuous Em...

Страница 53: ...nombre de cellules lumineuses inactives PDP 504CMX PDP 434CMX Technologie de traitement d image P U R E Drive comportant le circuit ACE Advanced Continuous Emission II restitue des images d une qualité et d une définition plus hautes Le nouveau circuit de traitement d image totalement numérique P U R E Drive comprend le circuit ACE Advanced Continuous Emission II conçu uniquement pour les écrans p...

Страница 54: ...ssaires pour que l écran à plasma fonctionne correctement avec les autres composants raccordés En fonction des raccordements réalisés il peut être utile de lire cette section Les autres sections de ce mode d emploi abordent des opérations de base telle le choix d une source et des opérations plus détaillées telles que l affichage d image correspondant aux appareils utilisés et aux goûts personnels...

Страница 55: ...églez le contraste en fonction de l éclairage ambiant de manière que l image soit bien visible LUMINOSITÉ Réglez la luminosité de manière que les parties sombres de l image soient bien visibles NIV ROUGE Pour régler la quantité de rouge dans l image NIV VERT Pour régler la quantité de vert dans l image NIV BLEU Pour régler la quantité de bleu dans l image AGRAND HOR Pour accroître la netteté de l ...

Страница 56: ...les AA R6 4 Chiffon de nettoyage pour l écran 5 2 colliers rapides 6 2 serre câble Avant de commencer 7 2 supports pour l écran 8 2 rondelles petite 9 2 boulons hexagonaux 0 Support pour télécommande Le présent mode d emploi Carte de garantie Utilisez ce support pour y ranger la télécommande Si vous fixez ce support à l arrière de l écran veiller à ne pas obstruer les ouïes d aération ...

Страница 57: ...cette touche pour mettre l écran en service ou en veille page 19 8 Touche INPUT Appuyez sur cette touche pour choisir le signal d entrée page 19 9 Touche MENU Appuyez sur cette touche pour ouvrir ou fermer les menus s affichant sur l écran pages 16 à 33 0 Touches ADJUST réglage Utilisez ces touches pour déplacer le curseur de l écran entre les options de sélection et effectuer des ajustements Des ...

Страница 58: ...OSITION HORLOGE et PHASE horloge phase aux valeurs optimales page 26 0 Touche STANDBY ON Appuyez sur cette touche pour mettre l écran en service ou en veille page 19 Touche DISPLAY Appuyez sur cette touche pour afficher le nom de l entrée et de mode de fonctionnement actuels page 20 Touche POINT ZOOM Utilisez cette touche pour choisir et agrandir une partie de l écran page 22 Touche SWAP Lors d un...

Страница 59: ...piles Pour éviter que le boîtier de télécommande ne soit endommagé par une fuite de l électrolyte des piles retirez en les piles si vous envisagez de ne pas l utiliser pendant un mois environ Si les piles ont fuit nettoyez soigneusement le logement et utilisez un jeu de piles neuves Lorsque vous diposez de piles batteries usées veuillez vous conformer aux normes gouvernementales ou environnemental...

Страница 60: ... prise stéréo Utilisez cette prise pour disposer des sons appliqués sur INPUT1 Branchez sur cette prise la sortie son de l appareil relié à INPUT1 page 13 Cette illustration présente le modèle PDP 505CMX PDP 504CMX 7 DIGITAL RGB INPUT2 prise DVI D A utiliser pour raccorder un ordinateur Remarque Cet appareil ne prend pas en compte l affichage de signaux vidéo protégés contre la copie page 12 8 AUD...

Страница 61: ...upport ou la fixation PIONEER vendus séparément Dans toute la mesure du possible utilisez des pièces et des accessoires fabriqués par PIONEER PIONEER ne pourra être tenue responsable des accidents et dommages qui résulteraient de l utilisation de pièces ou d accessoires fabriqués par des tiers Pour effectuer une installation personnalisée consultez le revendeur ou un technicien compétent Accrochag...

Страница 62: ...écran il doit toujours être transporté par deux personnes saisissant les poignées arrière comme illustré ici NON N essayez jamais de déplacer l écran à plasma en ne le tenant que par une de ses poignées Lors de l installation de l écran à plasma n utilisez pas ses poignées pour le suspendre à une paroi ni comme moyen d éviter qu il ne bascule voir l illustration Perçage b Appareil Perçage b Axe Pe...

Страница 63: ...evendeur NOTICE La prise INPUT1 prend en compte les composants à approche Plug Play VESA DDC 1 2B de Microsoft Consultez le Supplément 2 1 2 page 42 lors de connexions sur INPUT1 Consultez le Supplément 1 pages 38 et 40 pour des informations sur les signaux et les formats d affichage pris en compte par INPUT1 Installation et raccordements Pour le raccordement à ANALOG RGB OUT INPUT1 ANALOG RGB IN ...

Страница 64: ... audio de cet écran à plasma Cet écran à plasma est doté de deux entrées audio et d une sortie audio Le tableau qui suit donne pour chaque entrée vidéo les entrées audio correspondantes Torsadez les brins mis à nu Soulevez la languette puis introduisez le conducteur Abaissez la languette pour maintenir le conducteur en place Raccordement audio pour un appareil ordinateur relié à INPUT1 ANALOG RGB ...

Страница 65: ... prise secteur ATTENTION N utilisez que le cordon fourni L écran à plasma doit être alimenté par un cordon à deux conducteurs plus un conducteur de masse Veillez à ce que la prise possède une broche de mise à la terre et qu elle soit convenablement câblée En cas d utilisation d un adaptateur le conducteur de masse doit tout de même être relié à la terre NON Alimentez l écran à plasma à partir de l...

Страница 66: ...ifficile Fermez les soigneusement Fixation des colliers rapides à l écran à plasma Engagez les colliers rapides dans les trous 6 repérés par sur l illustration ci dessous Pour retirer les colliers rapides A l aide d une pince tordez le collier de 90 puis tirez le vers vous Avec le temps le collier peut se détériorer et il peut être nécessaire de la remplacer après que vous l avez retiré Vue de l a...

Страница 67: ...TER OFF MASK CONTROL ON AUTO SET UP MODE INACTIVE AUTO FUNCTION OFF AUDIO OUT FIXED STANDARD LANGUAGE ENGLISH ENTER SET EXIT MENU PICTURE SCREEN SETUP OPTION 5 Utilisez les touches 5 pour sélectionner LANGUAGE puis appuyez sur la touche SET SET SET EXIT MENU ENGLISH LANGUAGE 6 Utilisez les touches 2 3 pour sélectionner la langue souhaitée A chaque pression sur les touches 2 3 les langues disponibl...

Страница 68: ... SET SORTIE MENU TYPE DE SIGNAL VGA 1 Si le signal d entrée a une fréquence de rafraîchissement de 31 5 kHz horizontal 60 Hz vertical une pression sur 2 3 modifie alternativement comme suit le mode d affichage 2 Si le signal d entrée a une fréquence de rafraîchissement de 48 4 kHz horizontal 60 Hz vertical ou de 56 1 kHz horizontal 70 Hz vertical une pression sur 2 3 modifie alternativement comme ...

Страница 69: ...suit le mode choisi 5 Appuyez sur la touche MENU pour abandonner la page de menu lorsque la mise en oeuvre est terminée Remarques La mise en œuvre POSITION CLAMP est prise en compte seulement pour INPUT1 Lorsque vous effectuez ce réglage veillez à vérifier la sortie du signal du composant utilisé Pour plus de détails consultez le mode d emploi du composant 1 Appuyez sur la touche MENU pour affiche...

Страница 70: ... suivant est affiché 5 8 8 5 1 2 6 8 4 k H z f V 7 8 1 6 H z f H X ENTRÉE1 PLEIN ÉCRAN ATTENTION SIGNAL NON RECONNU 0 2 0 k H z f V 7 7 1 5 H z f H ENTRÉE1 PLEIN ÉCRAN ATTENTION FREQ HORS STANDARD 4 Utilisez les touches VOLUME de la télécommande ou de l écran à plasma pour régler le niveau d écoute Si aucune signal sonore n est appliqué à l écran à plasma cette opération est inutile 5 Lorsque vous...

Страница 71: ...touche DISPLAY Le nom de l entrée choisie le format de l image et les fréquences de rafraîchissement seront affichés pendant 3 secondes environ 0 6 0 4 6 0 8 4 0 k H z f V 5 3 1 H z f H X ENTRÉE1 POINT PAR POINT Remarques Il se peut que les fréquences de rafraîchissement affichées soient légèrement différentes des valeurs réelles Lorsque vous utilisez la fonction Agrandissement partiel de l image ...

Страница 72: ...PLEIN ÉCRAN L image a le format 16 9 et remplit l écran A L illustration concerne une entrée 640 x 480 640 points 1024 points 768 lignes 480 lignes L illustration concerne une entrée 640 x 480 640 points 1280 points 768 lignes 480 lignes Le format d image change comme suit chaque fois que la touche SCREEN SIZE est actionnée PDP 505CMX PDP 504CMX ou PDP 434CMX ou Consultez le Tableau des compatibil...

Страница 73: ...ement sur le PDP 434CMX Le format ZOOM n est possible que si le signal d entrée provient de l ordinateur 1280 x 1024 uniquement Une portion de l affichage n apparaît pas sur l écran Utilisez les touches 5 pour ajuster la position verticale de l image vidéo sur l écran Changement de la position de l image Appuyez sur les touches 5 Lorsque vous reproduisez une image PARTIEL ou ZOOM entrée 1280 x 102...

Страница 74: ...a touche SUB INPUT de la télécommande pour sélectionner la source d entrée du sous écran Pour permuter les entrées à l écran principal et au sous écran Appuyez sur la touche SWAP de la télécommande Lorsque le mode 2 SCREEN est sélectionné Les côtés droit et gauche de l affichage permutent Ce qui était affiché sur l écran principal apparaît sur le sous écran et vice versa Lorsque le mode PinP ou Po...

Страница 75: ...imentation GESTION D ALIM qui lui permet de passer automatiquement en mode Veille quand aucun signal de synchronisation n est détecté Un message d avertissement apparaît avant l action de cette fonction Remarque Coupez toujours d interrupteur principal de l écran à plasma lorsque vous prévoyez de ne pas l utiliser pendant une longue période Panneau de commande de l écran à plasma Télécommande INPU...

Страница 76: ...e sens vertical Pour rétablir les valeurs par défaut des paramètres de l option IMAGE Si les réglages effectués ne vous conviennent pas il peut être souhaitable de rétablir les valeurs par défaut des différents paramètres de l option IMAGE plutôt que de continuer à modifier les réglages 1 Au cours de l opération 2 ci dessus utilisez les touches 5 pour choisir l option RÉINIT IMAGE puis appuyez sur...

Страница 77: ...ains autres types Dans ces cas réglez le mode PARAMÉTRAGE AUTO sur INACTIF et utilisez les méthodes de réglage manuel expliquées dans la section suivante Réglage de la POSITION de l écran de l HORLOGE et de la PHASE Réglage manuel Panneau de commande de l écran à plasma AUTO SET UP AUTO SET UP Télécommande Lorsque le mode de paramétrage automatique est sélectionné l appareil sera automatiquement a...

Страница 78: ...che MENU pour repasser à l image de l écran normal Remarque Il se peut que les réglages optimaux ne soient pas obtenus avec des signaux à faible luminance ou certains autres types Dans ces cas réglez le mode PARAMÉTRAGE AUTO sur INACTIF et utilisez les méthodes de réglage manuel expliquées dans la section suivante Réglage de la POSITION de l écran de l HORLOGE et de la PHASE Réglage manuel 3 INACT...

Страница 79: ...cintillement et des erreurs de couleur Ce réglage agit sur la phase du signal de l horloge interne dont la fréquence a été réglée au moyen du paramètre HORLOGE Remarques Les paramètres de réglage HORLOGE et PHASE sont pris en compte uniquement pour ENTRÉE1 Si la fréquence HORLOGE est changée il se peut que l option H de la commande POSITION doive être retouchée Si les paramètres de l option ÉCRAN ...

Страница 80: ...RÉE SORTIE IMAGE ÉCRAN SETUP OPTION 3 Utilisez les touches 5 pour sélectionner ORBITER MENU ENTRÉE1 ÉCONOM D ÉNERGIE GESTION ÉCRAN ARRÊT ORBITER ARRÊT CONTRÔLE MASQUE MARCHE PARAMÉTRAGE AUTO INACTIF MODE AUTO ARRÊT SORTIE AUDIO FIXE STANDARD LANGUAGE FRANÇAIS IMAGE ÉCRAN SETUP OPTION 4 Appuyez sur la touche SET pour valider le réglage Le réglage par défaut effectué en usine est ARRÊT À chaque pres...

Страница 81: ...RETOUR GESTION ÉCRAN STATUS DÉLAI ACTIVATION DÉMARRAGE ARRÊT 01HR00MN 5 Utilisez les touches 2 3 pour sélectionner UNE FOIS ou RÉPÉTITION Le réglage par défaut effectué en usine est ARRÊT À chaque pression sur la touche le réglage change comme suit UNE FOIS Le programme de gestion d écran est exécuté une fois seulement RÉPÉTITION Le programme de gestion d écran est exécuté de façon répétée par cyc...

Страница 82: ...PÉTITION STATUS 00HR10MN DÉLAI ACTIVATION DÉMARRAGE Autres démarches Réglages d économie d énergie ÉCONOM D ÉNERGIE Cette fonction permet une atténuation de la luminosité de l écran un moyen de réduire la consommation de courant et d éviter la détérioration de l écran 1 Appuyez sur la touche MENU pour afficher la page de menu MENU ENTRÉE1 IMAGE ÉCRAN SETUP OPTION 0 0 0 0 0 0 CONTRASTE 0 LUMINOSITÉ...

Страница 83: ...3 La luminosité reste à un niveau fixe quel que soit le signal d entrée ce qui contribue à réduire la détérioration de l écran par rémanence d images virtuelles etc AUTO La luminosité se règle automatiquement en fonction des conditions de l éclairage ambiant de manière à produire des images optimales 5 Une fois terminés ces réglages appuyez sur la touche MENU pour repasser à l écran normal Remarqu...

Страница 84: ...4CMX seulement Au besoin le niveau du signal fourni à la prise AUDIO OUTPUT peut être réglé sur FIXE ou VARIABLE lié à la fonction VOLUME 1 Appuyez sur la touche MENU pour afficher la page de menu MENU ENTRÉE1 IMAGE ÉCRAN SETUP OPTION 0 0 0 0 0 0 CONTRASTE 0 LUMINOSITÉ NIV ROUGE NIV VERT NIV BLEU AGRAND HOR AGRAND VER RÉINIT IMAGE 2 Utilisez les touches 2 3 pour choisir OPTION MENU ENTRÉE1 ÉCONOM ...

Страница 85: ...e indication est affichée sur l écran consultez le tableau ci dessous Dans le cas contraire et si vous pensez que cet appareil est défectueux procédez aux vérifications de la page 35 Il peut arriver aussi que le défaut provienne d un autre élément de l installation assurez vous que ce n est pas le cas Si en dépit de ces contrôles vous n êtes pas en mesure d obtenir un fonctionnement satisfaisant c...

Страница 86: ...actères affichés sont déformés Un son aigu est parfois émis par l écran à plasma Les portions lumineuses de l image semblent manquer d intensité Les taches ou du bruit se forment sur l écran Des rayures se forment sur l écran L écran à plasma émet des bruits Le ventilateur ne fonctionne pas Changement de vitesse du ventilateur Le témoin ON vert ne s allume pas Sons bruits de l écran Le format d im...

Страница 87: ...hez immédiatement la fiche du cordon d alimentation et consultez votre revendeur ou un centre de service Informations complémentaires Précautions relatives à l utilisation Persistance des images Afficher pendant une longue période la même image fixe peut entraîner une persistance de cette image Cela se produit dans les cas suivants 1 Persistance d image due à une charge électrique Si une image fix...

Страница 88: ... à 40 C Entrée sortie Vidéo INPUT1 Entrée Mini D sub 15 broches connecteur femelle Signal RVB Compatible G ON SYNC RVB 0 7 Vcc 75 Ohms pas de synchro HD VS VD Niveau TTL polarités positive et négative 2 2 kOhms G ON SYNC 1 Vcc 75 Ohms synchro négative Compatibilité Microsoft Plug Play VESA DDC1 2B Sortie Mini D sub 15 broches connecteur femelle 75 Ohms avec tampon INPUT2 Entrée Connecteur DVI D à ...

Страница 89: ...z 85Hz 60Hz 56Hz 60Hz 72Hz 75Hz 85Hz 74 6Hz 60Hz 70Hz 75Hz 74 9Hz 85Hz 56Hz 60Hz 70Hz 60Hz 72Hz 75Hz 75 1Hz 66Hz 76Hz 60Hz 60Hz 75Hz 85Hz 60Hz 75Hz 85Hz 60Hz 65Hz 70Hz 75Hz 85Hz 640x400 720x400 640x480 848x480 800x600 832x624 1024x768 1280x768 1152x864 1152x870 1152x900 1280x960 1280x1024 1400x1050 1600x1200 NEC PC 9800 NEC PC 9800 Apple Macintosh 13 1072x600 Apple Macintosh 16 1376 x 768 Indique ...

Страница 90: ...0x768 1280x768 1280x768 1280x768 1280x768 1280x768 1280x768 640x480 848x480 800x600 1024x768 1280x768 31 5kHz 31 0kHz 35 2kHz 37 9kHz 48 4kHz 45 1kHz 47 8kHz 53 7kHz 60 0kHz 64 0kHz 65 3kHz 1280x768 Image optimale Un réglage de la position de l image de la fréquence de rafraîchissement de la phase etc peut s avérer nécessaire L image sera agrandie mais certains petits détails seront difficiles à v...

Страница 91: ...ls ne sont pas reproduits 24 8kHz 31 5kHz 37 9kHz 31 5kHz 35 0kHz 37 9kHz 37 5kHz 43 3kHz 31 0kHz 35 2kHz 37 9kHz 48 1kHz 46 9kHz 53 7kHz 49 7kHz 48 4kHz 56 5kHz 60 0kHz 60 2kHz 68 7kHz 45 1kHz 47 8kHz 56 1kHz 53 7kHz 64 9kHz 67 5kHz 68 7kHz 61 8kHz 71 7kHz 60 0kHz 64 0kHz 80 0kHz 91 2kHz 65 3kHz 82 3kHz 93 9kHz 75 0kHz 81 3kHz 87 5kHz 93 8kHz 106 3kHz 768x768 768x768 768x768 768x768 768x768 768x7...

Страница 92: ...n de l image de la fréquence de rafraîchissement de la phase etc peut s avérer nécessaire L image sera agrandie mais certains petits détails seront difficiles à voir La reproduction est simple Les détails ne sont pas reproduits Définition Points x Lignes Vertical POINT PAR POINT PLEIN ÉCRAN ZOOM Remarques Format d image points x lignes Horizontal 4 3 Non disponible Tableau des compatibilités de si...

Страница 93: ...Agencement des broches INPUT1 Connecteur femelle mini D sub à 15 broches Entrée Sortie 1 2 3 4 5 6 7 8 9 10 11 12 13 14 15 R G B Réservé pas de connexion Masse Masse Masse Masse DDC 5 V Masse Réservé pas de connexion DDC SDA HD ou H V SYNC VD DDC SCL Réservé pas de connexion Réservé pas de connexion Réservé pas de connexion No broche Apple et Macintosh sont des marques déposées par Apple Computer ...

Страница 94: ... reserved 2005 パイオニア株式会社 禁無断転載 153 8654 東京都目黒区目黒1丁目4番1号 PIONEER CORPORATION 4 1 Meguro 1 Chome Meguro ku Tokyo 153 8654 Japan PIONEER ELECTRONICS USA INC P O BOX 1540 Long Beach California 90801 1540 U S A TEL 1 310 952 2111 PIONEER ELECTRONICS OF CANADA INC 300 Allstate Parkway Markham Ontario L3R OP2 Canada TEL 1 905 479 4411 ...

Отзывы: