background image

!

Remove the batteries if the remote control is
not used for a month or longer.

!

Do not attempt to recharge the supplied bat-
teries.

!

Do not mix new and used batteries.

!

If the event of battery leakage, wipe the remote
control completely clean and install new bat-
teries.

!

When disposing of used batteries, please
comply with governmental regulations or en-
vironmental public institution

s rules that

apply in your country/area.

Using the remote control

Point the remote control in the direction of the

front panel to operate.

Important

!

Do not store the remote control in high tem-
peratures or direct sunlight.

!

The remote control may not function properly
in direct sunlight.

!

Do not let the remote control fall onto the
floor, where it may become jammed under the
brake or accelerator pedal.

!

When the remote control is not in use, attach
it firmly to the provided mounting base.

!

If you press

FUNCTION

on the remote control

while pressing

BAND

at the same time, the re-

mote control will not function properly. To can-
cel this setting, press

AUDIO

on the remote

control while pressing

BAND

at the same

time to return to the previous setting.

Resetting the microprocessor

The microprocessor must be reset under the

following conditions:

!

Prior to using this unit for the first time

after installation

!

If the unit fails to operate properly

!

When strange or incorrect messages ap-

pear on the display

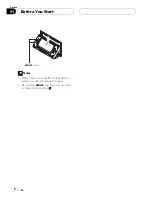
%

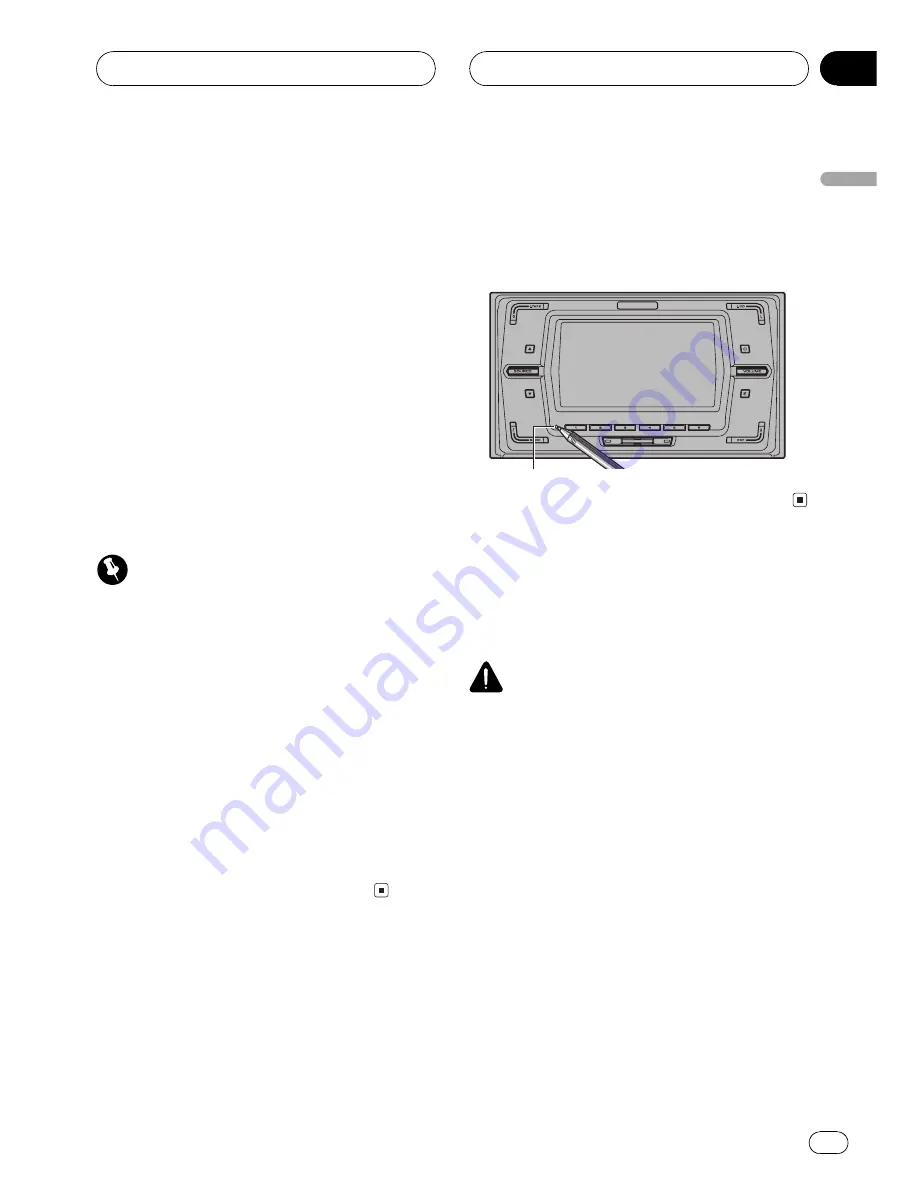
Press RESET on the head unit with a

pen tip or other pointed instrument.

RESET

button

Setting the display angle

You can adjust front panel angle for easier op-

eration.

WARNING

!

Do not use with the front panel left open. If
you do leave it open, it may result in injury in
the event of an accident.

!

Be careful not to catch your finger in the front
panel when it is opening or closing.

%

Press ANGLE to change the angle.

Each press of

ANGLE

changes the angle.

Before You Start

En

5

English

Section

01

Содержание FH-P6200

Страница 1: ...Operation Manual Multi CD control DSP High power CD Cassette player with FM AM tuner FH P6200 English Español ...

Страница 2: ...ion 14 Repeating play 15 Skipping blank tape sections 15 Using Dolby noise reduction 15 Built in CD Player Playing a CD 16 Introduction of advanced built in CD player operation 17 Repeating play 17 Playing tracks in a random order 18 Scanning tracks of a CD 18 Pausing CD playback 18 Using disc title functions 19 Entering disc titles 19 Displaying disc titles 19 Using CD TEXT functions 20 Displayin...

Страница 3: ...g 9 band graphic equalizer 34 Using the position selector 34 Using automatic sound levelizer 35 Initial Settings Adjusting initial settings 36 Setting the clock 36 Setting the FM tuning step 36 Setting the AM tuning step 37 Switching the auxiliary setting 37 Switching the dimmer setting 37 Switching the RCA output setting 37 Selecting the digital attenuator 38 Adjusting display contrast 38 Switchi...

Страница 4: ... you can hear sounds outside of the car Protect this product from moisture If the battery is disconnected or dis charged the preset memory will be erased and must be reprogrammed If this unit does not operate properly con tact your dealer or nearest authorized Pio neer Service Station About the demo mode The demonstration automatically starts when power to this unit is turned off while the igni ti...

Страница 5: ...ly to the provided mounting base If you press FUNCTION on the remote control while pressing BAND at the same time the re mote control will not function properly To can cel this setting press AUDIO on the remote control while pressing BAND at the same time to return to the previous setting Resetting the microprocessor The microprocessor must be reset under the following conditions Prior to using th...

Страница 6: ...ANGLE button Notes While a disc or a cassette is left partially in serted you cannot operate the angle By pressing ANGLE and hold you can open or close the front panel Before You Start En 6 Section 01 ...

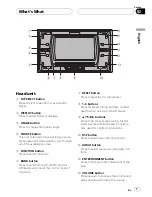
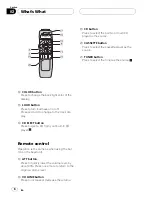
Страница 7: ...trol mode of functions 7 RESET button Press to reset the microprocessor 8 1 6 buttons Press for preset tuning and disc number search when using a multi CD player 9 a b c d buttons Press to do manual seek tuning fast for ward reverse and track search controls Also used for controlling functions a DSP button Press to select sound field functions b AUDIO button Press to select various sound quality c...

Страница 8: ... as when using the but ton on the head unit h ATT button Press to quickly lower the volume level by about 90 Press once more to return to the original volume level i VOLUME button Press to increase or decrease the volume j CD button Press to select the built in or multi CD player as the source k CASSETTE button Press to select the cassette player as the source l TUNER button Press to select the tu...

Страница 9: ...ulti CD player Sources off Notes In the following cases the sound source will not change When a unit corresponding to each source is not connected to this unit When no disc is set in this unit When no cassette is set in this unit When no magazine is set in the multi CD player When the AUX auxiliary input is set to off refer to page 37 External unit refers to a Pioneer product such as one available...

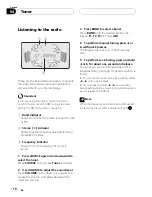
Страница 10: ...ME to adjust the sound level Press VOLUME on the head unit upward to in crease the volume and press downward to lower the volume 3 Press BAND to select a band Press BAND until the desired band is dis played F1 F2 F3 for FM or AM 4 To perform manual tuning press c or d with quick presses The frequencies move up or down step by step 5 To perform seek tuning press and hold c or d for about one second...

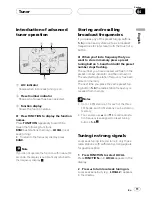
Страница 11: ...ind a frequency that you want to store in memory press a preset tuning button 1 6 and hold until the preset number stops flashing The number you have pressed will flash in the preset number indicator and then remain lit The selected radio station frequency has been stored in memory The next time you press the same preset tun ing button 1 6 the radio station frequency is recalled from memory Notes ...

Страница 12: ...tations memory lets you automa tically store the six strongest broadcast fre quencies under preset tuning buttons 1 6 and once stored there you can tune in to those fre quencies with the touch of a button 1 Press FUNCTION to select BSM Press FUNCTION until BSM appears in the display 2 Press a to turn BSM on BSM begins to flash While BSM is flashing the six strongest broadcast frequencies will be s...

Страница 13: ...losed automatically and play back will start Cassette loading slot You can eject a cassette tape by pressing TAPE EJECT 3 Use VOLUME to adjust the sound level Press VOLUME on the head unit upward to in crease the volume and press downward to lower the volume 4 To perform fast forward or rewind press c or d FF or REW appears in the display To cancel fast forward or rewind and return to playback pre...

Страница 14: ...tion of advanced cassette player operation 1 4 2 3 1 2B indicator Shows when Dolby B NR is turned on 2 B SKIP indicator Shows when blank skip is turned on 3 REPEAT indicator Shows when repeat play is turned on 4 Function display Shows the function status Press FUNCTION to display the function names Press FUNCTION repeatedly to switch be tween the following functions REPEAT repeat play B SKIP blank...

Страница 15: ...ION until B SKIP appears in the display 2 Press a to turn blank skip on B SKIP ON appears in the display Long peri ods of silence between songs will be skipped 3 Press b to turn blank skip off B SKIP OFF appears in the display The com plete cassette tape will play Using Dolby noise reduction When you listen to tapes that have been re corded with Dolby B NR turn Dolby B NR on 1 Press FUNCTION to se...

Страница 16: ...VOLUME on the head unit upward to in crease the volume and press downward to lower the volume 4 To perform fast forward or reverse press and hold c or d 5 To skip back or forward to another track press c or d Pressing d skips to the start of the next track Pressing c once skips to the start of the cur rent track Pressing again will skip to the pre vious track Notes The built in CD player plays one...

Страница 17: ...ration 2 1 1 REPEAT indicator Shows when repeat play is turned on 2 Function display Shows the function status Press FUNCTION to display the function names Press FUNCTION repeatedly to switch be tween the following functions REPEAT repeat play RANDOM random play T SCAN scan play PAUSE pause To return to the playback display press BAND Note If you do not operate the function within about 30 seconds...

Страница 18: ...play in order Scanning tracks of a CD Scan play lets you hear the first 10 seconds of each track on the CD 1 Press FUNCTION to select T SCAN Press FUNCTION until T SCAN appears in the display 2 Press a to turn scan play on T SCAN ON appears in the display The first 10 seconds of each track is played 3 When you find the desired track press b to turn scan play off T SCAN OFF appears in the display T...

Страница 19: ...al phabet in A B C X Y Z numbers and sym bols in 1 2 3 order Each press of b will display a letter in the reverse order such as Z Y X C B A order 5 Press d to move the cursor to the next character position When the letter you want is displayed press d to move the cursor to the next position and then select the next letter Press c to move backwards in the display 6 Move the cursor to the last posit...

Страница 20: ...discs Press DISPLAY Press DISPLAY repeatedly to switch between the following settings Play time DISC TITLE disc title D ARTIST disc artist name TRK TITLE track title T ARTIST track artist name If specific information has not been recorded on a CD TEXT disc NO XXXX will be displayed e g NO TA NAME Scrolling titles in the display This unit can display the first 10 letters only of DISC TITLE D ARTIST...

Страница 21: ... 7 to 12 press and hold the corresponding numbers such as 1 for disc 7 until the disc number ap pears in the display You can also sequentially select a disc by pressing a b 4 To perform fast forward or reverse press and hold c or d 5 To skip back or forward to another track press c or d Pressing d skips to the start of the next track Pressing c once skips to the start of the cur rent track Pressin...

Страница 22: ...play ranges for the multi CD player MCD multi CD player re peat TRK one track repeat and DSC disc re peat 1 Press FUNCTION to select REPEAT Press FUNCTION until REPEAT appears in the display 2 Press c or d to select the repeat range Press c or d until the desired repeat range ap pears in the display MCD Repeat all discs in the multi CD player TRK Repeat just the current track DSC Repeat the curren...

Страница 23: ...has automatically returned to the playback display select SCAN again by press ing FUNCTION Note After track or disc scanning is finished normal playback of the tracks will begin again Pausing CD playback Pause lets you temporarily stop playback of the CD 1 Press FUNCTION to select PAUSE Press FUNCTION until PAUSE appears in the display 2 Press a to turn pause on PAUSE ON appears in the display Pla...

Страница 24: ...k be gins of those tracks from your playlist within the previously selected MCD or DSC ranges If no tracks in the current range are pro grammed for ITS play then ITS EMPTY is dis played 4 Press b to turn ITS play off ITS P OFF appears in the display Playback will continue in normal order from the cur rently playing track and CD Erasing a track from your ITS playlist When you want to delete a track...

Страница 25: ...TITLE IN is displayed press FUNCTION repeatedly the following functions appear in the display TITLE IN disc title input ITS ITS program ming When playing a CD TEXT disc on a CD TEXT compatible multi CD player you cannot switch to TITLE IN The disc title will have already been re corded on a CD TEXT disc 3 Press 1 numbered button to select the desired character type Press 1 numbered button repeated...

Страница 26: ...for a disc NO TITLE will be displayed 3 Press a to play your favorite CD title That selection will begin to play Using CD TEXT functions You can use these functions only with a CD TEXT compatible multi CD player Some discs have certain information encoded on the disc during manufacture These discs may contain such information as the CD title track title artist s name and playback time and are call...

Страница 27: ...osts bass levels to give play back a fuller sound Listen to each of the ef fects as you select through them and use the one that best enhances the playback of the track or CD that you are listening to 1 Press FUNCTION to select COMP Press FUNCTION until COMP appears in the display If the multi CD player does not support COMP DBE NO COMP is displayed when you at tempt to select it 2 Press a or b to...

Страница 28: ...ess BAND Note If you do not operate the audio function within about 30 seconds the display is automatically re turned to the source display Using balance adjustment You can select a fader balance setting that provides an ideal listening environment in all occupied seats 1 Press AUDIO to select FADER Press AUDIO until FADER appears in the dis play If the balance setting has been previously ad juste...

Страница 29: ...t the phase of sub woofer output Press c to select reverse phase and PHASE REV is displayed Press d to select normal phase and PHASE NOR is displayed Adjusting subwoofer low pass filter settings When the subwoofer output is on you can ad just the cut off frequency and the output level of the subwoofer 1 Press AUDIO to select 80Hz Press AUDIO until 80Hz appears in the dis play When the subwoofer ou...

Страница 30: ...elect cut off frequency Each press of c or d selects cut off frequen cies in the following order 50 63 80 100 125 Hz Only frequencies higher than those in the se lected range are output from the front or rear speakers Adjusting high pass filter attenuation slope When the high pass filter is on you can adjust the continuity of sound between speaker units 1 Press AUDIO to select the slope setting Pr...

Страница 31: ...ntil SLA ap pears in the display When selecting the FM tuner as the source you cannot switch to SLA 3 Press a or b to adjust the source vo lume Each press of a or b increases or decreases the source volume SLA 4 SLA 4 is displayed as the source volume is increased or decreased Notes If you do not operate the SLA function within about 30 seconds the display is automatically returned to the source d...

Страница 32: ...lizer POSI position selector ASL automatic sound levelizer To return to the display of each source press BAND Note If you do not operate the DSP function within about 30 seconds the display is automatically re turned to the source display Using sound field control and BBE sound SFC sound field control incorporate three programs for reproducing typical sound fields of a studio jazz club or club Thi...

Страница 33: ...eases the level of BBE 4 4 is displayed as the level is increased or decreased Using the graphic equalizer The graphic equalizer lets you adjust the equalization to match car interior acoustic characteristics as desired Recalling equalizer curves There are seven stored equalizer curves which you can easily recall at any time Here is a list of the equalizer curves Display Equalizer curve S BASS Sup...

Страница 34: ...memorized in CUSTOM1 A CUSTOM2 curve can be created com mon to all sources If you make adjust ments when the CUSTOM2 curve is selected the CUSTOM2 curve will be up dated 1 Recall the equalizer curve you want to adjust See Recalling equalizer curves on the previous page 2 Press DSP to select 9 band graphic equalizer Press DSP until 50Hz appears in the display If 9 band graphic equalizer has been pr...

Страница 35: ...on press the same button again Using automatic sound levelizer During driving noise in the car changes ac cording to the driving speed and road condi tions The automatic sound levelizer ASL monitors such varying noise and automati cally increases the volume level if this noise becomes greater The sensitivity variation of volume level to noise level of ASL can be set to one of five levels 1 Press D...

Страница 36: ...by holding down FUNCTION until the unit turns off Setting the clock Use these instructions to set the clock 1 Press FUNCTION to select clock Press FUNCTION repeatedly until clock ap pears in the display 2 Press c or d to select the segment of the clock display you wish to set Pressing c or d will select one segment of the clock display Hour Minute As you select segments of the clock display the se...

Страница 37: ...this unit 1 Press FUNCTION to select AUX Press FUNCTION repeatedly until AUX ap pears in the display 2 Press a or b to turn AUX on or off Pressing a or b will turn AUX on or off and that status will be displayed e g AUX ON Switching the dimmer setting To prevent the display from being too bright at night the display is automatically dimmed when the car s headlights are turned on You can switch dim...

Страница 38: ...y contrast adjustment lets you adjust the display for easier viewing when lighting conditions change 1 Press FUNCTION to select CONTRAST Press FUNCTION repeatedly until CONTRAST appears in the display 2 Press c or d to adjust the contrast Each press of c or d increases or decreases the contrast 7 7 is displayed as the contrast is in creased or decreased Switching the telephone muting attenuation S...

Страница 39: ...is performed by adjusting the level of three colors such as red green and blue 1 Press COLOR and hold until Red ap pears in the display 2 Press c or d to select the color to ad just Each press of c or d selects colors in the fol lowing order Red red Green green Blue blue 3 Press a or b to adjust the level of color Each press of a or b increases or decreases the level of color 4 0 is displayed as t...

Страница 40: ... case numbers and symbols Alphabet lower case You can select to input numbers and symbols by pressing 2 numbered button 3 Press a or b to select a letter of the al phabet Each press of a will display a letter of the al phabet in A B C X Y Z numbers and sym bols in 1 2 3 order Each press of b will display a letter in the reverse order such as Z Y X C B A order 4 Press d to move the cursor to the ne...

Страница 41: ...with loose torn or warped labels Cassette tapes longer than C 90 90 minute tapes can cause the tape to jam in the cas sette player Do not use tapes longer than C 90 Cassette tapes exposed to high tempera tures may warp and jam the cassette player Keep cassettes out of direct sunlight or places where there are high tempera tures Store unused tapes in a tape case where there is no danger of them bec...

Страница 42: ... the moisture Road shocks may interrupt CD playback CD R CD RW discs When CD R CD RW discs are used play back is possible only for discs which have been finalized It may not be possible to play back CD R CD RW discs recorded on a music CD re corder or a personal computer because of disc characteristics scratches or dirt on the disc or dirt condensation etc on the lens of this unit Playback of disc...

Страница 43: ...inear Frequency characteristics 5 20 000 Hz 1 dB Signal to noise ratio 94 dB 1 kHz IEC A net work Dynamic range 92 dB 1 kHz Number of channels 2 stereo Cassette player Tape Compact cassette tape C 30 C 90 Tape speed 4 8 cm sec Fast forward rewinding time Approx 100 sec C 60 Wow flutter 0 09 WRMS Frequency response Metal 30 19 000 Hz 3 dB Stereo separation 45 dB Signal to noise ratio Metal Dolby B ...

Страница 44: ...apore 159936 TEL 65 6472 1111 PIONEER ELECTRONICS AUSTRALIA PTY LTD 178 184 Boundary Road Braeside Victoria 3195 Australia TEL 03 9586 6300 PIONEER ELECTRONICS OF CANADA INC 300 Allstate Parkway Markham Ontario L3R OP2 Canada TEL 905 479 4411 PIONEER ELECTRONICS DE MEXICO S A de C V Blvd Manuel Avila Camacho 138 10 piso Col Lomas de Chapultepec Mexico D F 11000 TEL 55 9178 4270 Published by Pionee...

Отзывы: