background image

53

OPERA

TION

DUAL MONO Setting

The dual mono setting can only be used when listening to Dolby Digital discs that have dual mono software
encoded in them. Dual mono software usually is used to put two different soundtracks on one DVD. With this
setting you can choose which channel in the dual mono setting you want to listen to. Thus, it is useful for
soundtracks that have one language on one channel and a different language on the other. Remember this
setting is only applicable if you are using Dolby Digital software with a dual mono soundtrack and want to isolate
one of the channels therein. Otherwise, just ignore this function.

.

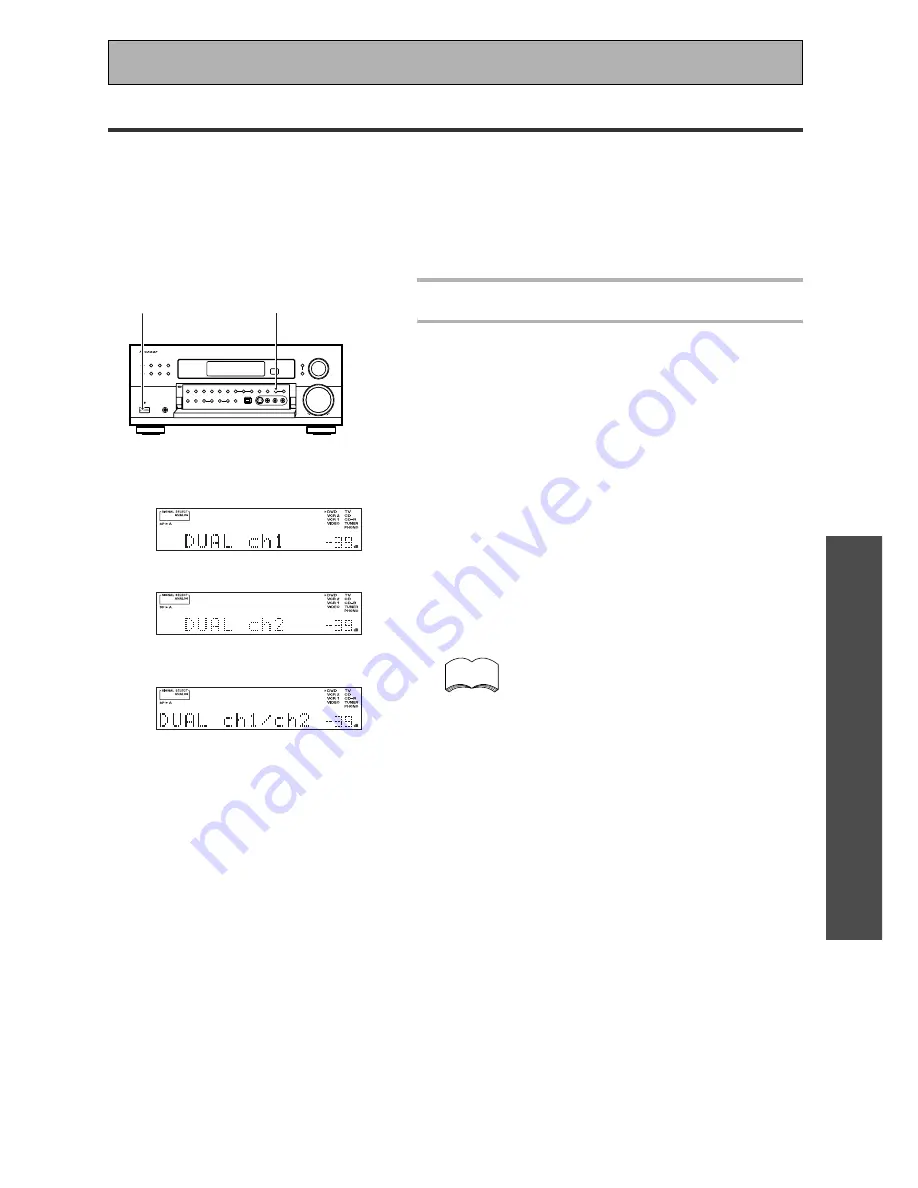
1 Turn the receiver ON.

2 Hold down the RETURN button for 3

or 4 seconds. The receiver will cycle
through the three different dual mono
settings for as long as you hold the
button down.

Take your finger off the button when the mode that
you want to use is displayed.

The different settings are: DUAL ch1, where you only
hear channel 1; DUAL ch2, where you only hear channel
2; and DUAL ch1/ch2, where you hear both channels, but
independently from different speakers.

The display will show dual mono for a while then revert
to the sound mode you are in but you will still be
listening to dual mono.

DUAL ch1 setting

DUAL ch2 setting

DUAL ch1/ch2 setting

Basic Playback

2

1

When DUAL MONO is
playing with ch 1 selected
the L will blink. When
playing with ch 2 selected
the R will blink. When
playing with ch 1/2 selected
the L and R will blink.

memo

The default setting is DUAL ch1.

Содержание Elite VSX-35TX

Страница 1: ...VSX 35TX Operating Instructions AUDIO VIDEO MULTI CHANNEL RECEIVER ...

Страница 2: ...These limits are designed to provide reasonable protection against harmful interference in a residential installation This equipment generates uses and can radiate radio frequency energy and if not installed and used in accordance with the instructions may cause harmful interference to radio communications However there is no guarantee that interference will not occur in a particular installation ...

Страница 3: ...nt where they exit from the product OUTDOOR ANTENNA GROUNDING If an outside antenna or cable system is connected to the product be sure the antenna or cable system is grounded so as to provide some protection against voltage surges and built up static charges Article 810 of the National ElectricalCode ANSI NFPA70 provides information with regard to proper grounding of the mast and supporting struc...

Страница 4: ...uy at your local stereo store Also hook up the video connection of your DVD player the analog audio for recording the audio on DVDs use regular RCA stereo cords and your TV it s easiest to use a regular composite RCA video cords as shown below It is important that you hook up your TV or monitor in order to see a video image as well as the on screen displays OSDs shown by this receiver for more on ...

Страница 5: ...listen to digital soundtracks you won t hear any dialog Use the instructions on p 33 34 in order to do this Follow the diagram below to hook up an additional amplifier in order to use surround back speakers These speakers are important to hear all the sound channels on new eight channel home theater DVDs The diagram below also explains how to hook up a subwoofer which provides realistic bass sound...

Страница 6: ... l n I Mu l t i Compo a Ch I n e n n t Mu l t i m Ro o EX I T 4 Digital in Select should be selected if it isn t use the 5 buttons to select it Press ENTER You should see the following display on your TV D i g i t a l i DVD LD D i g i t a l i D i g i t a l 1 n Se l e c t D i g i t a l i CD CD D i g i t a l 2 D i g i t a l i R D i g i t a l 3 D i g i t a l i TV SAT D i g i t a l 4 EX I T AV PRE PRO...

Страница 7: ...tter Surround Sound 1 Turn on the receiver your TV and the DVD player 2 Set the remote control slide switch to USE Press the DVD LD button on the remote control You should see DVD LD in the display on the receiver 3 Press the STANDARD button for the basic surround sound setting 4 Play a DVD 5 Choose the Digital 3 you hooked up your DVD player to on p 4 5 and assign DVD LD to it 1 Use the 5 buttons...

Страница 8: ... Dolby Digital Dolby Pro Logic and DTS Digital Theater Systems sources which are the standards of home theater today It also offers component video terminals for the sharpest video transmission available to the consumer Advanced Theater Modes DSP Surround Modes Advanced Theater modes enhance the sound of either film or music so a more dramatic effect can be achieved The four modes are each designe...

Страница 9: ... Midnight Mode 49 Listening the Loudness Mode 49 Adjusting Bass and Treble 50 MULTI CHANNEL IN Playback 51 96kHz 24bit Performance 51 Direct Playback 52 Adjusting the Brightness of the Display 52 DUAL MONO Setting 53 Using the Tuner 54 Automatic and Manual Tuning 54 Direct Access Tuning 55 Memorizing Frequently Used Stations 56 Recalling Memorized Stations 57 Remote Control of Other Components 58 ...

Страница 10: ...l tell you how to setup and use the unit PREPARATION First carry out the tasks below in this Before You Start section to prepare the remote control then connect the receiver to your other components as described in Connecting Your Equipment p 12 Take special care to connect your digital equipment like DVDs and LDs properly to be able to take advantage of the receiver s surround sound systems p 13 ...

Страница 11: ...nlight or fluorescent light is shining onto the remote sensor The receiver located near a device emitting infrared rays Operated simultaneously with another remote control which uses infrared rays 30 30 23 feet 7 m Installing the Receiver Please note Do not place objects directly on top of this unit This would prevent proper heat dispersal When installing in a rack shelf etc be sure to leave more ...

Страница 12: ... up your digital compo nents to analog audio jacks If you want to record to from digital components like an CD R to from analog components you must hook up your digital equipment with these analog connections See p 13 15 for more on digital connections Before making or changing the connections switch off the power and disconnect the power cord from the AC wall outlet The arrows indicate the direct...

Страница 13: ... DAT and CD R you can make direct digital recordings with this unit Before making or changing the connections switch off the power and disconnect the power cord from the AC wall outlet The arrows indicate the direction of the audio signal Connecting Your Equipment for DVD LD player hook up see p 15 not a PCM only output CD recorder OUTPUT PLAY INPUT REC DIGITAL TV tuner DVD player OUTPUT DIGITAL O...

Страница 14: ...ting Your Equipment If you hook up your DVD player using component video connections be sure to select component video output on your DVD player as well See you DVD manual for details Front video connections are accessed via the front panel input selector as VIDEO If your video components have S video jacks you could use S video cords not supplied to connect them on the back of the receiver These ...

Страница 15: ...itch off the power and disconnect the power cord from the AC wall outlet The arrows indicate the direction of the audio signal Connecting Your Equipment Be sure to make either a digital coaxial or digital optical connection pictured as DIGITAL jack 1 or DIGITAL jack 3 in this diagram as well but you DON T need to make both Make sure the RF demodulator digital in switch is set correctly optical or ...

Страница 16: ...d disconnect the power cord from the AC wall outlet The arrows indicate the direction of the TV signal 7 Analog audio video cords Use audio video cords not supplied to connect the video components and a video cord to connect the monitor TV Connect red plugs to R right white plugs to L left and the yellow plugs to VIDEO Be sure to insert completely 7 Digital audio coaxial cords Optical cables Comme...

Страница 17: ...ome cases you may want to have you source material DVD etc decoded externally If you find you need a multi channel external decoder hook one up as shown below but for most people this component is unnecessary For more on this see p 51 Before making or changing the connections switch off the power and disconnect the power cord from the AC wall outlet Connecting Your Equipment The COMPONENT VIDEO OU...

Страница 18: ...ntennas Connecting Your Equipment 3 8 in 10 mm 7 AM loop antenna 1 Assemble the antenna 2 Twist exposed wire strands together and insert 3 Attach to a wall etc if desired and face toward the direction providing the best reception 7 To improve AM reception Connect a 15 18 feet 5 6 meter length of vinyl coated wire to the AM antenna terminal in addition to the supplied AM loop antenna For best possi...

Страница 19: ... the speakers Before making or changing the connections switch off the power and disconnect the power cord from the AC wall outlet The receiver has two speaker systems A B A is the main system supporting the full complement of surround sound speakers If you switch on both A B speaker systems only front speakers and the sub woofer will be audible No sound will come from the center or surround speak...

Страница 20: ...ront and center speakers Speaker placement If you have a multiple speaker arrangement the placement of the speakers is extremely important To achieve the best possible surround sound install your speakers as shown below Make sure all speakers are installed securely to prevent accidents and improve sound quality Be sure to consult your speaker manuals for the best placement of the speakers Some spe...

Страница 21: ...ll outlet After connecting all your components plug the receiver s power cord into a standard wall power outlet Caution Power consumption of any equipment connected to the switched power outlets should not exceed 100W 0 8 A To avoid overheating fire risk and possible malfunction do not connect high wattage appliances such as heaters irons monitors or TV sets to this units AC outlets Disconnect the...

Страница 22: ...s See p 41 42 86 87 THX CINEMA Cycles through the THX CINEMA THX SURROUND EX or THX AUTO sound modes Use when listening THX certified sources if you have THX certified speaker setup or want to re create a THX style sound environment It is also appropriate for Dolby Digital Dolby Pro Logic or DTS sources Those with surround back speakers can use all three THX modes those without should use the THX ...

Страница 23: ...unction mode and sound mode When you press the SETUP button 13 you can use it to perform SETUP operations turn to select push to enter The source indicators show the current component DVD LD DVD player or LaserDisc player TV SAT TV or satellite tuner CD Compact Disc player CD R TAPE1 MD CD recorder tape deck or Mini Disc recorder connected to CD R TAPE 1 MD inputs outputs TUNER The built in tuner ...

Страница 24: ...ONTROL buttons The following buttons are used to control the TV only and can be used no matter what function the remote control is set to TV button Press to turn the power of the TV on off TV FUNC button Press TV FUNC to select the TV for remote control operation TV VOL button Use to adjust the TV volume Remote Control 1 USE SETUP slide switch Use to put the remote into receiver SETUP or receiver ...

Страница 25: ...ress to select a source The button will cycle through all the possible sources 5 2 3 ENTER buttons Use to operate the on screen menu on your TV screen and enter commands when setting up surround sound speakers levels settings and other set up features see p 28 40 They also can be used to operate DVD players DTVs and other components after you have input the components preset codes Specific use of ...

Страница 26: ... when INPUT ATT is used to reduce the level of the analog source signal 1 Speaker indicators Light to indicate the current speaker system A and or B 2 SIGNAL SELECT indicators Light to indicate the input signal you selected ANALOG Lights when analog signals are assigned DIGITAL Lights when digital audio signals are selected AUTO Lights when the receiver is set to select the input signal automatica...

Страница 27: ...or example if you use composite video cords to hook up your DVD player to the receiver use composite video cords to hook up the receiver to your TV If you use S video cords to hook up your DVD player and the receiver use S video cords to hook up the receiver to your TV 2 Always make sure your TV is set to the appropriate input channel for example video 1 Your TV may have a number of input channels...

Страница 28: ...ith Digital In and adjust and make all the necessary adjustments here and then move on to the other entries in this menu and decide if you need to make these adjustments It is likely you will not need to bother with any of the other things on this menu AV PRE PROGRAMMED AND LEARNING REMOTE CONTROL UNIT S0URCE DVD LD TV SAT VCR2 CD TV VOL TV FUNC MENU ENTER STEREO DIRECT DSP THX LIGHT DTS MUTE TV V...

Страница 29: ...nnel Level See p 36 37 Use to balance the volumes of your different speakers Crossover Network See p 38 This feature lets you select which bass frequencies will be sent to the subwoofer or front speakers Bass Peak Level See p 39 Dolby Digital and DTS audio sources include ultra low bass tones Set the bass peak level as needed to prevent the ultra low bass tones from distorting the sound from the s...

Страница 30: ...e Digital Ins are set 4 When you ve finished assigning digital ins select EXIT Dig In End on the front panel with the 5 buttons or the MULTI JOG dial and press ENTER to go to Multi In Set If you want to change a setting before proceeding use the arrow buttons to go back ASSIGN SETUP MENU Digital In Select In order to be able to use your digital equipment properly you need to assign digital inputs ...

Страница 31: ...ons or the MULTI JOG dial to select the setting you want BYPASS or ADJUST ADJUST Use the ADJUST setting when you want to be able to control each channel level individually BYPASS This setting is good for getting the cleanest possible signal In this setting you won t be able to change each channel individu ally We recommend using BYPASS and the default setting is BYPASS 3 Press the ENTER button and...

Страница 32: ...because one function cannot be assigned twice 4 When you ve finished assigning component ins select EXIT Comp In End on the front panel if not already selected Press ENTER to move to Multi Room set up If you want to set up the Multi Room feature see page 81 If you don t want to set up this feature use the button or the MULTI JOG dial to move to Assign End and press ENTER You will go to Surround Se...

Страница 33: ...d a complete set of THX speakers select THX and skip step 4 FREE t Sp ea k e r Se t t i ng THX Su bwo f o e r Su r r o und Su r r Ba c k F r o n t LARGE LARGE LARGE LARGE x 2 YES Cen t e r EX I T 4 Specify the type of speakers you connected See the explanations on the next page for the meaning of each size 1 Use the 5 or buttons or MULTI JOG dial to move the cursor to the speaker you want to adjus...

Страница 34: ...n the size and shape of your room you may actually experience a decrease in the amount of bass due to what is called low frequency cancellations If you have a subwoofer listen to the bass response with the FRONT speakers set to LARGE and SMALL alternatively and let your ears judge which sounds best The safest option in this case is to route all the bass sounds to the subwoofer by selecting SMALL f...

Страница 35: ...e selected Press ENTER button again to send the information to the receiver and go to the Channel Level setup If you want to change a setting before proceeding use the arrow buttons or MULTI JOG dial to go back Channel Delay Adding a slight delay to some speakers is necessary to achieve a surround sound effect You need to figure out the distance from your listening position to your speakers to add...

Страница 36: ... the speaker levels by ear at a more leisurely pace The test tone is output in the following order 3 After pressing ENTER it will take a moment for the volume to get to the reference position 0 dB and the TEST TONE will be output These settings will be displayed on your TV FL CT FR SR SL SW SBL SBR AV PRE PROGRAMMED AND LEARNING REMOTE CONTROL UNIT S0URCE DVD LD TV SAT VCR2 CD TV VOL TV FUNC MENU ...

Страница 37: ...osition and adjust the level of each speaker to 75 dB SPL C weighted slow mode 5 Press ENTER to go to the Crossover Network setup menu If you want to change a setting before proceeding use the 5 buttons or MULTI JOG dial to go back When sounding the TEST TONE for the SURROUND BACK speakers you must use the external amplifier you hooked up with your SURROUND BACK see p 19 21 so the amplfier must be...

Страница 38: ... speakers to SMALL in Speaker Setting sends the respective channel s bass frequencies to the subwoofer or LARGE speakers The present function lets you determine which frequencies will be sent to the subwoofer or LARGE speakers 1 Use the 5 buttons to select 80 Hz 100 Hz or 150 Hz 80 Hz Sends bass frequencies below 80 Hz to the subwoofer or LARGE speakers 100 Hz Sends bass frequencies below 100 Hz t...

Страница 39: ...button The MASTER VOLUME returns to its previous position 3 EXIT Bass Peak Level End on the front panel should be selected press the ENTER button to go to the D Range Control setup Bass Peak Level The LFE Low Frequency Effect channel in Dolby Digital or DTS program sources can produce heavy ultra low bass tones that may exceed the capabilities of your speaker system The following steps show you ho...

Страница 40: ... want to exit the Setup menu now use the button or the MULTI JOG dial to move to Setup End and press ENTER The receiver returns to its normal operating state Dynamic Range Control This feature makes it possible to enjoy full surround sound effects on Dolby Digital sources even at low volumes It does this by compressing the dynamic range Dynamic range is the difference between the loudest and the s...

Страница 41: ...ailed information see p 86 87 You will only be able to access the second two modes if you have hooked up SURROUND BACK speaker s For more detailed information see p 19 21 33 34 The display will show you what kind of source Dolby Digital DTS etc is being played STANDARD Use this mode with sources that do not have SURROUND BACK channels If you don t have SURROUND BACK speaker s switched on see p 33 ...

Страница 42: ...rocessing These functions switch on automatically when the source you are playing is encoded with DTS or Dolby Digital There are four Advanced Theater settings that use DSP Digital Signal Processing to create different types of sound environments If you have SURROUND BACK speakers or even just one speaker switched on see p 33 34 then 7 1 will appear after the name of all of these modes in the disp...

Страница 43: ...msec for the listener to enjoy the visceral power of dance music THEATER 1 Reproduces theater sound field effects without losing the localization of each channel Theater effects can be enjoyed without losing Dolby Digital Pro Logic effects when used in combination those formats with movies bearing the DOLBY SURROUND trademark THEATER 2 Simulates the acoustic environment of a theater while maintain...

Страница 44: ... using SURROUND BACK speakers HALL 1 7 1 HALL 2 7 1 JAZZ 7 1 7CH STEREO THEATER 2 7 1 THEATER 1 7 1 DANCE 7 1 When not using SURROUND BACK speakers HALL 1 HALL 2 JAZZ 5CH STEREO THEATER 2 THEATER 1 DANCE For STEREO Press STEREO STEREO DIRECT Each press changes the STEREO mode as follows STEREO DIRECT memo AV PRE PROGRAMMED AND LEARNING REMOTE CONTROL UNIT S0URCE DVD LD TV SAT VCR2 CD TV VOL TV FUN...

Страница 45: ...ECT STEREO or DSP modes should serve the listener best Make sure you connect your DVD LD or LD player with the RF demodulator If your player has an 2 RF output this will ensure you can use all LDs Refer to p 15 If you are not able to get sound from the receiver the problem may well lie with the SIGNAL SELECT button You need to make sure the input is set to the appropriate ANALOG or DIGITAL setting...

Страница 46: ...from the receiver the problem may well lie with the SIGNAL SELECT button You need to make sure the input is set to the appropriate ANALOG or DIGITAL setting Refer to p 47 for more on this memo Basic Playback AV PRE PROGRAMMED AND LEARNING REMOTE CONTROL UNIT S0URCE DVD LD TV SAT VCR2 CD TV VOL TV FUNC MENU ENTER STEREO DIRECT DSP THX LIGHT DTS MUTE TV VOLUME VCR 1 DVR CD R TAPE 1 TUNER TV CONT REC...

Страница 47: ... ANALOG This receiver can only playback Dolby Digital PCM 32kHz 44kHz 48kHz and 96kHz and DTS digital signal formats If you have some equipment that outputs digital audio in a format other than these you ll have to connect and playback via the receiver s analog inputs make sure that SIGNAL SELECT is set to ANALOG When an LD or CD with DTS is played back with the SIGNAL SELECT set in ANALOG digital...

Страница 48: ...Playback To reduce extraneous noise switch on DIGITAL NR This noise reduction can be used with sound every mode except THX MULTI CHANNEL IN and DIRECT Basic Playback AV PRE PROGRAMMED AND LEARNING REMOTE CONTROL UNIT S0URCE DVD LD TV SAT VCR2 CD TV VOL TV FUNC MENU ENTER STEREO DIRECT DSP THX LIGHT DTS MUTE TV VOLUME VCR 1 DVR CD R TAPE 1 TUNER TV CONT RECEIVER USE SETUP MULTI OPERATION CLASS DTV ...

Страница 49: ... you press MIDNIGHT when in DIRECT mode the receiver switches to STEREO mode memo Basic Playback Listening the Loudness Mode The LOUDNESS mode allows you to boost the bass in a signal It is useful for listening to music at low volumes Press the LOUDNESS button Each press switches LOUDNESS mode between on and off You can t use the LOUDNESS mode with the MULTI CH IN THX or DIRECT mode If you press L...

Страница 50: ...e adjust modes The button cycles though the possibilities in the following order TONE Front TONE Center TONE SurrBack TONE Surround When not using SURROUND BACK speakers TONE Front TONE Center TONE Surround 3 Use the BASS or TREBLE buttons to adjust the low or high frequencies of each channel A few seconds after you finish adjusting the tone the receiver will revert to the sound mode it was in at ...

Страница 51: ...re able to use MULTI CH IN playback and the TAPE 2 MONITOR In 96kHz 24 bit mode you can t use the STANDARD ADVANCED THEATER THX or DSP modes AV PRE PROGRAMMED AND LEARNING REMOTE CONTROL UNIT S0URCE DVD LD TV SAT VCR2 CD TV VOL TV FUNC MENU ENTER STEREO DIRECT DSP THX LIGHT DTS MUTE TV VOLUME VCR 1 DVR CD R TAPE 1 TUNER TV CONT RECEIVER USE SETUP MULTI OPERATION CLASS DTV ON OFF DTV MENU MPX DIREC...

Страница 52: ...tion of two channel stereo sources but won t let you add any effects to the sound None of the tone controls or other sound modes can be used with DIRECT playback If the receiver is in a different mode than STEREO to start with the first push of the STEREO button will put it in STEREO mode After that the button will toggle the receiver between STEREO and DIRECT mode For more on this button see the ...

Страница 53: ...er ON 2 Hold down the RETURN button for 3 or 4 seconds The receiver will cycle through the three different dual mono settings for as long as you hold the button down Take your finger off the button when the mode that you want to use is displayed The different settings are DUAL ch1 where you only hear channel 1 DUAL ch2 where you only hear channel 2 and DUAL ch1 ch2 where you hear both channels but...

Страница 54: ...e press TUNING repeatedly To change frequencies quickly hold down TUNING and release when you reach the frequency you desire 5 Adjust the MASTER VOLUME buttons on the remote control or the MASTER VOLUME on the front panel MPX Mode If the TUNED or STEREO indicators do not light when tuning an FM station because the station is too far away or the broadcast signal is weak press MPX on the remote cont...

Страница 55: ...ation you want Example To tune station 106 00 FM press 1 0 6 0 0 To cancel before inputting the frequency Press DIRECT ACCESS button and enter the frequency again 6 Adjust the MASTER VOLUME buttons on the remote control or the MASTER VOLUME on the front panel Using the Tuner AV PRE PROGRAMMED AND LEARNING REMOTE CONTROL UNIT S0URCE DVD LD TV SAT VCR2 CD TV VOL TV FUNC MENU ENTER STEREO DIRECT DSP ...

Страница 56: ...irect Access Tuning on p 54 and 55 2 Press the MEMORY button to activate the memory function 3 Press the CLASS button repeatedly to select a class number Each press switches the display CLASS A CLASS B CLASS C 4 Press the STATION buttons repeatedly to select a channel 0 9 within the respective class The station is memorized automatically after 5 seconds If you want to escape from MEMORY mode Press...

Страница 57: ... To select channel 0 press 0 For example If 99 50 MHz FM was memorized in class A at channel 7 To skip through each channel in order Press STATION repeatedly Using the Tuner 2 4 3 AV PRE PROGRAMMED AND LEARNING REMOTE CONTROL UNIT S0URCE DVD LD TV SAT VCR2 CD TV VOL TV FUNC MENU ENTER STEREO DIRECT DSP THX LIGHT DTS MUTE TV VOLUME VCR 1 DVR CD R TAPE 1 TUNER TV CONT RECEIVER USE SETUP MULTI OPERAT...

Страница 58: ...e control can operate your other components VCR TV LD CD etc after you program it to do so In this way instead of fumbling with many different controls and buttons you only need to use one remote control If your component s are listed in the remote control s memory simply follow the steps below If your component s are not listed or if you want the remote to learn additional operations you can use ...

Страница 59: ...the first code may not correspond to your component Repeat steps 4 through 6 to assign preset codes for as many components as necessary If you can t get your component to respond to any of the codes you can still program the component into the remote control using the procedure in the next section 7 Press the REMOTE SETUP button to exit the preset recall setup mode The remote control and TV return...

Страница 60: ...nd f m r o t l r o o i p n t g t i n a h a c e e t h r o u t b t o t a n u t b t o n s h o s h t b l d e u up d l i e ca d e x t VD D e l 2S e c t h t e em i t Rem e S o e t u p t he t u M t l i Co n t l r o u M t l i Co n i i nk t s r a t s n g b l 4 Press the MULTI CONTROL button for the component you want to control Each button can be set to control one of the following compo nents The selected...

Страница 61: ...rent component repeat steps 5 and 6 To program operations for another component repeat steps 4 through 6 7 Press the REMOTE SETUP button to exit the learning setup mode The remote control and TV return to their previous operation modes When you re done setting up remember to set the slide switch back to USE To erase programmed commands see p 78 AV PRE PROGRAMMED AND LEARNING REMOTE CONTROL UNIT S0...

Страница 62: ...ns on menu screens and to change settings ENTER Use to implement settings selected with the cursor buttons or to set items highlighted in a menu for DVD only 8 3 Press to start playback 9 8 Press to pause playback 0 4 4 Press to return to the beginning of the current chapter track Press repeatedly to return to the beginning of previous chapters tracks Press to advance to the beginning of the next ...

Страница 63: ...7 5 2 3 ENTER 5 2 3 Use to navigate through options on menu screens and to change settings ENTER Use to implement settings selected with the cursor buttons or to set items highlighted in a menu for DVD video recorder only 8 3 Press to start playback 9 8 Press to pause playback 0 CHANNEL Use to change channels on the VCR s tuner ENTER TV VCR Use this button to switch the VCR between its tuner for w...

Страница 64: ...6 10 Use when selecting chapter track numbers higher than 10 7 3 Press to start playback 8 8 Press to pause playback 9 4 4 Press to return to the beginning of the current track Press repeatedly to return to the beginning of previous tracks Press to advance to the beginning of the next track Press repeatedly to advance to the beginning of following tracks 0 DISC Use to switch between discs in file ...

Страница 65: ...s 6 10 You can also use this button when selecting track numbers higher than 10 7 3 Press to start playback 8 8 Press to pause playback 9 4 4 Press to return to the beginning of the current track Press repeatedly to return to the beginning of previous tracks Press to advance to the beginning of the next track Press repeatedly to advance to the beginning of following tracks 0 DISC DISP CHARA Allows...

Страница 66: ...TV s preset code but some operations may need to be learned by the receiver see Setting Up the Remote Control to Control Other Components on p 58 61 To perform these operations press the TV SAT button to set the remote to the SAT operation mode For more information on individual commands consult the manual that came with the component Remote Control of Other Components AV PRE PROGRAMMED AND LEARNI...

Страница 67: ... select the TV for remote control operation TV VOL button Use to adjust the TV volume 5 5 2 3 ENTER 5 2 3 Press to select or adjust items on the menu screen ENTER Press to activate the selected function 6 CHANNEL Use to select a TV channel 7 DISC CH ENTER Use to select the channel specified with the number buttons not all models require this step 8 MENU Press to select the TV menu For Digital TVs ...

Страница 68: ...odels the functions may differ The following operations are available from the receiver s remote control after you recall a cassette deck s preset code but some operations may need to be learned by the receiver see Setting Up the Remote Control to Control Other Components on p 58 61 To perform these operations press the CD R TAPE 1 button to set the remote to the TAPE operation mode For more infor...

Страница 69: ... TV SA T DV DV D P TA 1 E LD VCR2 V I DEO PHONO CD R VCR1 CD TV SA 4 Use the MULTI JOG dial 5 buttons to select the function that you want to rename 5 Press the MULTI JOG dial press ENTER Fun c t i on e R R n ame T DVD LD VCR2 V I DEO PHONO CD R VCR1 CD TV SA T DV DV D P TA 1 E LD VCR2 V I DEO PHONO CD R VCR1 CD TV SA EX I T SETUP MULTI JOG Turn to select Push to enter Using Other Functions You sh...

Страница 70: ...go back a step You can press the SETUP button SYSTEM SETUP button on the remote control to exit the process altogether 9 Use the MULTI JOG dial 5 buttons to select EXIT Rename End on the receiver s display 10 Press the MULTI JOG dial press ENTER twice SETUP RETURN MULTI JOG Turn to select Push to enter Using Other Functions If you start this process but want to stop it without inputting the inform...

Страница 71: ...analog manner 1 Select the source component Set SIGNAL SELECT according to the source component s signal ANALOG or DIGITAL Press the SIGNAL SELECT button on the remote control or use the button on the front panel and choose ANALOG 2 Start recording with a recorder 3 Playback the source to be recorded Record monitor TAPE 2 MONITOR If you connect a cassette deck with a record monitor function to the...

Страница 72: ...be connected to the receiver with digital inputs as well See p 13 if you have not made these connections The receiver s volume channel level tone BASS TREBLE and LOUDNESS and surround effects have no effect on the recorded signal 1 Prepare the source you want to record and put the receiver in that function Set SIGNAL SELECT to DIGITAL Press the SIGNAL SELECT button on the remote control or use the...

Страница 73: ... 3 F s t o mm c a as h nd b n t o u t e b n e ea l r ne d s x V D e D x V D e D ou 4 Y n c e r a p s t e a t i h r o p c c r es f c 5 a o s n m ds m o 2 Rem e S o MENU e t u p t t i a o n r e op t h e u t b t o n t l r o u M t l i C o n To cancel here press REMOTE SETUP 3 Select a MULTI CONTROL button for this MULTI OPERATION Each MULTI CONTROL button can be used for one Multi Operation If a Multi...

Страница 74: ...uct 3 Press the DVD LD button then 3 play to start playing the DVD player 4 Press the ADVANCED button to put the receiver in that sound mode When you employ MULTI OPERATIONs see below these four tasks will be performed in the same order 7 Press the REMOTE SETUP button to exit the Multi operation setup mode The remote control and TV return to their previous operation modes When you re done setting ...

Страница 75: ...ton will blink 4 Press the MULTI CONTROL button for the component whose operation you want to start SYSTEM OFF with for example TV CONT button The selected button will light steadily 5 Press the operation for example TV POWER you want to input 6 Repeat steps 3 and 4 to input SYSTEM OFF for the components and commands you want to input You can repeat this process for up to five commands For example...

Страница 76: ...y pressing its MULTI CONTROL button 4 Set the DIRECT FUNCTION of each external source to NO by pressing 2 5 Press the REMOTE SETUP button to exit the DIRECT FUNCTION mode When you re done setting up remember to set the slide switch back to USE The default setting is all YES If you have turned a DIRECT FUNCTION to NO and want to turn it back to YES follow the directions above and press 1 in step 3 ...

Страница 77: ...re than 3 seconds The MULTI CONTROL buttons will blink 3 times and all multi operation settings will be erased When you re done setting up remember to set the slide switch back to USE Using Other Functions S0URCE DVD LD TV SAT VCR2 CD TV VOL TV FUNC MENU ENTER MUTE TV VOLUME VCR 1 DVR CD R TAPE 1 TUNER TV CONT RECEIVER USE SETUP MULTI OPERATION CLASS DTV ON OFF DTV MENU MPX DIRECT ACCESS CHANNEL S...

Страница 78: ...her Functions S0URCE DVD LD TV SAT VCR2 CD TV VOL TV FUNC MENU ENTER STEREO DIRECT DSP DTS MUTE TV VOLUME VCR 1 DVR CD R TAPE 1 TUNER TV CONT RECEIVER USE SETUP MULTI OPERATION CLASS DTV ON OFF DTV MENU MPX DIRECT ACCESS CHANNEL STATION TUNING DISC 10 EXIT GUIDE TV CONTROL FUNCTION REMOTE SETUP SYSTEM SETUP INPUT ATT MIDNIGHT MULTI CH INPUT DIGITAL NR EFFECT CH SEL SIGNAL SELECT BAND SYSTEM OFF 1 ...

Страница 79: ...ts correspond Also if you switch the power of the receiver OFF when you turn it back on the video and audio inputs will reset so that they correspond This function allows you to listen to one sound source while you watch a different video source on your TV The sound source is set in the normal fashion as is explained on p 45 You then alter the video input with the VIDEO SELECT button DVD LD VCR1 V...

Страница 80: ...ode the input selector on the front panel of the VSX 35TX is able to change the input even though the receiver is off MULTI ROOM connections On the VSX 35TX connect the IR receiver sensor to the MULTI ROOM SOURCE REMOTE IN jack then connect a separate amplifier and speakers and TV monitor to the MULTI ROOM SOURCE AUDIO and MONITOR OUT jacks All of this equipment should be placed in your sub room a...

Страница 81: ... a l I n Se l e c t Se l e c t n ne l n I Mu l t i Compo a Ch I n e n n t Mu l t i m Roo EX I T Mu l t i m oo R o l V um L e e v e l R e I Re i v c e r o o p i t n s i i s h s c h e n o e t o i v um w l e l l l be o ud VAR I LE AB EX I T P ION A C UT I ON f I t h e I F XED E E R 5 VOLUME LEVEL should be selected if it isn t use the 5 buttons to select it and press ENTER Mu l t i m oo R o l V um L ...

Страница 82: ...R from a different company select OTHERS 9 EXIT should be selected if it isn t use the 5 buttons to select it and press ENTER to exit MULTI ROOM set up and return to the ASSIGN SETUP MENU operations D i g i t a l I n Se l e c t Se l e c t n ne l n I Mu l t i Compo a Ch I n e n n t Mu l t i m Ro o EX I T You can leave the MULTI ROOM set up mode any time by pressing the SYSTEM SETUP button When you ...

Страница 83: ...ECTOR to adjust the VOLUME The volume can be adjusted in a range of 82dB to 0dB If you slelcted FIXED in the SETUP MODE on the previous page you won t be able to adjust the volume The display will appear as shown above 5 When in TUNER function press the CONTROL button and use the INPUT SELECTOR to tune in the station The display will appear as shown below Turn the input selector until you get TUNE...

Страница 84: ...sub room s volume level but can t be used when set to FIXED CLASS button for selecting the desired class STATION button for recalling memorized radio stations the tuner is selected automatically Number button 0 9 AV PRE PROGRAMMED AND LEARNING REMOTE CONTROL UNIT S0URCE DVD LD TV SAT VCR2 CD TV VOL TV FUNC MENU ENTER STEREO DIRECT DSP THX LIGHT DTS MUTE TV VOLUME VCR 1 DVR CD R TAPE 1 TUNER TV CON...

Страница 85: ... MULTI ROOM PRE OUT jacks connected to a SUB room amplifier which bears the PIONEER Î mark and has a remote sensor both the IR receiver and the amplifier may receive remote control commands making correct operation impossible In this case place the IR receiver and amplifier apart from each other and point the remote control directly at the IR receiver during operation If you plan to leave the MULT...

Страница 86: ...r disc raises the important question of compatibility with existing laser discs Dolby Digital tracks on laser discs record signals using the space of one analog audio channel so it will maintain compatibility with existing discs and players As shown in the following figure the digital audio sounds of Dolby Digital discs can be played back as currently done Analog sounds are played back by using th...

Страница 87: ... set the maximum peak levels appropriate to your system Set this function according to the Bass Peak Level instructions on p 39 Loudspeaker Position Time Synchronization This feature allows you to adjust for the difference in the distance from each individual loudspeaker to the listening position Doing this ensures that all the speakers operate in precise synchronization improving the seamless nat...

Страница 88: ...5 SAT 200 SAT 207 DTV 445 446 424 441 401 406 408 414 405 413 411 415 403 404 417 414 408 426 403 410 426 412 427 425 420 408 432 433 405 409 426 428 430 429 408 414 431 407 408 401 406 436 434 416 417 404 408 457 458 459 409 420 421 422 423 424 408 407 410 412 425 435 402 418 419 411 409 408 432 433 402 418 419 441 400 456 DVR 821 801 806 803 804 807 805 810 809 808 811 812 802 813 800 800 Device...

Страница 89: ...e noise in radio broadcasts Broadcast stations cannot be selected automatically Subwoofer output is very low When playing an LD the SIGNAL SELECT is on DIGITAL but there is still no sound When playing a Dolby Digital DTS source the 5 1 Channel indicator doesn t light Remedy Connect the power plug to the wall outlet Plug in again If it still doesn t work call a service center Disconnect the power p...

Страница 90: ...SIGNAL SELECT to AUTO or according to the type of connections made see p 47 Set the digital input settings correctly see p 30 Make digital connections see p 13 and set SIGNAL SELECT to AUTO see p 47 Refer to the instruction manual supplied with the DVD player Set the digital volume level of the player to full or to the neutral position Turn the speakers ON Use the STANDARD mode to get the best res...

Страница 91: ... no problem The indicator won t light when the track is not a Dolby Digital DTS track Symptom You can t get DIGITAL to come up when using the SIGNAL SELECT button When using THX AUTO mode the receiver is not playing in the EX mode The Dolby Digital DTS indicator doesn t light up even when playing a Dolby Digital DTS source If the unit does not operate normally due to external effects such as stati...

Страница 92: ...Ω Frequency Response VCR 1 DVR VCR 2 VIDEO DVD LD TV SAT Luminance signal Y 5 Hz to 10 MHz dB Signal to Noise Ratio Luminance signal Y 65 dB 0 3 0 3 Component Video Section Input Sensitivity Y 1 Vp p 75 Ω PB PR 0 7 V Output Level Impedance Y 1 Vp p 75 Ω PB PR 0 7 V Frequency Response Y 5 Hz to 20 MHz dB PB PR 5 Hz to 13 MHz dB VIDEO Section Composite Input Sensitivity Impedance VCR 1 DVR VCR 2 VID...

Страница 93: ... T R I E S A S S O C I A T I O N We Want You LISTENING For A Lifetime We Want You Listening For A Lifetime Used wisely your new sound equipment will provide a lifetime of fun and enjoyment Since hearing damage from loud noise is often undetectable until it is too late this manufacturer and the Electronic Industries Association s Consumer Electronics Group recommend you avoid prolonged exposure to ...

Страница 94: ...94 Techno Tidbits Problem solving ...

Страница 95: ...95 Techno Tidbits Problem solving ...

Страница 96: ...lstate Parkway Markham Ontario L3R OP2 905 479 4411 1 877 283 5901 Should this product require service in Canada please contact a Pioneer Canadian Authorized Dealer to locate the nearest Pioneer Authorized Service Company in Canada Alternatively please contact the Customer Service Department at the following address Pioneer Electronics of Canada Inc Customer Service Department 300 Allstate Parkway...

Отзывы: