background image

conditioner or heater may prevent correct auto

TA and EQ.

#

Press

SOURCE

to turn the source on if this

unit is turned off.

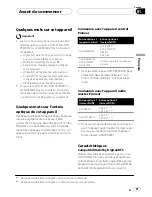
4 Select the position for the seat on

which the microphone is placed.

Refer to

Using the position selector

on page 9.

#

If no position is selected before you start auto

TA and EQ,

FRONT-L

is selected automatically.

5 Press SOURCE and hold until the unit

turns off.

6 Press and hold EQ to enter the auto TA

and EQ measurement mode.

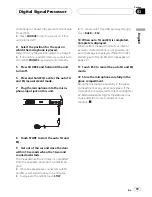
7 Plug the microphone into the micro-

phone input jack on this unit.

8 Touch START to start the auto TA and

EQ.

9 Get out of the car and close the door

within 10 seconds when the 10-second

count-down starts.

The measurement tone (noise) is outputted

from the speakers, and auto TA and EQ be-

gins.

#

When all speakers are connected, auto TA

and EQ is completed in about nine minutes.

#

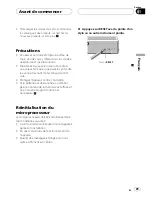
To stop auto TA and EQ, touch

STOP

.

#

To cancel auto TA and EQ part way through,

touch

BACK

or

ESC

.

10 When auto TA and EQ is completed,

Complete is displayed.

When correct measurement of car interior

acoustic characteristics is not possible, an

error message is displayed. (Refer to

Under-

standing auto TA and EQ error messages

on

page 22.)

11 Touch ESC to cancel the auto TA and EQ

mode.

12 Store the microphone carefully in the

glove compartment.

Store the microphone carefully in the glove

compartment or any other safe place. If the

microphone is subjected to direct sunlight for

an extended period, high temperatures may

cause distortion, color change or mal-

function.

Digital Signal Processor

En

19

English

Section

03

Содержание DEQ-P800 - Equalizer / Crossover

Страница 1: ...Operation Manual Mode d emploi Multi channel AV processor Processeur AV multi canaux DEQ P8000 English Français ...

Страница 2: ...control 10 Using the down mix function 10 Using the direct control 11 Using the Dolby Pro Logic B 11 Adjusting the Music mode 11 Setting the speaker setting 12 Correcting the subwoofer s phase 12 Selecting a cross over frequency 13 Adjusting the speaker output levels 13 Adjusting the speaker output levels using a test tone 14 Using the time alignment 14 Selecting the time alignment adjustment mode...

Страница 3: ...al and leave it there Taking a minute to do this now will help to prevent hearing damage or loss in the future After all we want you listening for a lifetime We Want You Listening For A Lifetime Used wisely your new sound equipment will provide a lifetime of fun and enjoyment Since hearing damage from loud noise is often undetectable until it is too late this manufacturer and the Electronic Indust...

Страница 4: ... correctly Otherwise this unit may not operate properly Connection with the Pioneer head unit Optical 1 input head unit Optical 2 input DVD player AVH P6600DVD AVX P8DVD AVX P7300DVD SDV P7 XDV P90 AVH P6500DVD DVH P5000MP DVH P7000 Optical 2 input is not available Only the system with AVH P6600DVD can use both optical 1 input and optical 2 input Otherwise optical 2 input is not available Connecti...

Страница 5: ... or distributor from where you purchased this unit for after sales service including warranty conditions or any other information In case the necessary infor mation is not available please contact the companies listed below Please do not ship your unit to the companies at the addresses listed below for repair without advance contact U S A Pioneer Electronics USA Inc CUSTOMER SUPPORT DIVISION P O B...

Страница 6: ...THIS PRODUCT WILL INCREASE EYE HAZARD Keep this manual handy as a reference for operating procedures and precautions Always keep the volume low enough so that you can hear sounds from outside the vehicle Protect this unit from moisture If the battery is disconnected or dis charged the preset memory will be erased and must be reprogrammed Resetting the microprocessor The microprocessor must be rese...

Страница 7: ...it is turned on by selecting a source Press to cycle through all the available sources 3 ATT button Press to quickly lower the volume level by about 90 Press once more to return to the original volume level 4 EQ button Press to select various equalizer curves 5 Joystick Use to adjust the selected audio function and turn it on or off substitute for the touch panel key 5 4 1 2 3 What s What En 7 Eng...

Страница 8: ...will be can celled When playing discs recorded with more than 96 kHz sampling frequency audio is outputted from front speaker only When selecting the FM tuner as the source you cannot switch to SLA When playing other than the DVD disc you cannot switch to D R C When neither FRONT L nor FRONT R is se lected in POSITION you cannot switch to TIME ALIGNMENT To return to the previous display touch BACK...

Страница 9: ...nd DSP and then touch POSITION 2 Touch c d a b to select a listening po sition Touch one of these c d a b to select a lis tening position as listed in the table Key Display Position c FRONT L Front seat left d FRONT R Front seat right a FRONT Front seats b ALL All seats To cancel the selected listening position touch the same key again Note When you make adjustments for listening posi tion the spe...

Страница 10: ... to the same source level adjustment volume automatically AUX auxiliary input and AV video input are set to the same source level adjustment vo lume automatically Using the dynamic range control The dynamic range refers to the difference be tween the largest and softest sounds The dy namic range control compresses this difference so that you can clearly hear sounds even at low volume levels The dy...

Страница 11: ...ct the desired mode MOVIE The Movie mode suitable for movie playback MUSIC The Music mode suitable for music playback MATRIX The Matrix mode for when FM radio reception is weak OFF Turn Dolby Pro Logic B off MUSIC ADJUST Adjust the Music mode You can operate MUSIC ADJUST only when MUSIC has been selected Adjusting the Music mode You can adjust the Music mode with the fol lowing three controls Pano...

Страница 12: ...F Set the front or rear speaker to LARGE if the speaker is capable of reproducing bass content or if no subwoofer is installed 1 Touch A MENU and DSP and then touch NEXT 2 Touch SPEAKER SETTING 3 Touch or to select the speaker to be adjusted Each time you touch or selects the speaker in the following order FRONT front speakers CENTER center speaker REAR rear speakers SUB WOOFER subwoofer PHASE sub...

Страница 13: ... reproduced through the subwoo fer If the installed speakers include one whose size has been set to SMALL you can select a frequency under which sounds are repro duced through a LARGE speaker or subwoo fer 1 Touch A MENU and DSP and then touch NEXT 2 Touch CROSS OVER 3 Touch or to select the speaker to be adjusted Each time you touch or selects the speaker in the following order FRONT front speake...

Страница 14: ...aker over which you hear the test tone are shown in the display FRONT L front speaker left CENTER center speaker FRONT R front speaker right REAR R rear speaker right REAR L rear speaker left SUB WOOFER subwoofer Check each speaker output level If no adjust ments are needed perform step 5 to stop the test tone You can also start the test tone output by mov ing the joystick up The settings do not a...

Страница 15: ...speaker and the selected position An adjusted time alignment is memorized in CUSTOM 1 Touch A MENU and DSP and then touch NEXT 2 Touch TIME ALIGNMENT and then touch ADJUSTMENT You cannot select ADJUSTMENT when neither FRONT L nor FRONT R is selected in POSITION 3 Touch the speaker to be adjusted You cannot select speakers whose size is set at OFF 4 Touch a or b to adjust the distance be tween the ...

Страница 16: ...or the center and then reproducing a 5 1 ch audio Dolby Digital or DTS and ad justing the center speaker output to the balance you have already got among the other speakers 1 Touch A MENU and DSP and then touch NEXT twice 2 Touch PRESET EQ 3 Touch or to select the desired item Each time you touch or selects the item in the following order FRONT speakers LOW bands Low cen ter frequency L equalizer ...

Страница 17: ...not be operated when DVH P7000 DVH P5000MP or AVH P6500DVD is con nected to this unit The auto time alignment is automatically ad justed for the distance between each speaker and the listening position The auto equalizer automatically measures the car interior acoustic characteristics and then creates the auto equalizer curve based on that information WARNING To prevent accidents never carry out a...

Страница 18: ...in the following circumstances However the distance has been calculated by computer to be the optimum delay to give accurate results for the circum stances so please continue to use this value When the reflected sound within a vehi cle is strong and delays occur When delays occur for low sounds due to the influence of the LPF on active subwoofers or external amps Auto TA and EQ changes the audio s...

Страница 19: ...ent tone noise is outputted from the speakers and auto TA and EQ be gins When all speakers are connected auto TA and EQ is completed in about nine minutes To stop auto TA and EQ touch STOP To cancel auto TA and EQ part way through touch BACK or ESC 10 When auto TA and EQ is completed Complete is displayed When correct measurement of car interior acoustic characteristics is not possible an error me...

Страница 20: ...select low setting and LOW ap pears in the display Touch to select high setting and HIGH appears in the display Resetting the audio functions This function cannot be operated when DVH P7000 DVH P5000MP or AVH P6500DVD is con nected to this unit You can reset all audio functions except vo lume 1 Touch A MENU and INITIAL and then touch NEXT 2 Touch AUDIO RESET 3 Touch RESET Ready to reset Are you su...

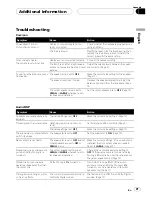
Страница 21: ...ize settings Page 12 Time alignment is not available Listening position is not set cor rectly Set listening position correctly Page 9 Their size settings is at OFF Make the correct size settings Page 12 The subwoofer is not available to switch its phase The subwoofer is set to OFF Set the subwoofer to ON Page 12 Bass content is not heard The subwoofer is set to OFF and yet other speakers are set t...

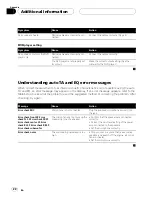
Страница 22: ... table below to see what the problem is and the suggested method of correcting the problem After checking try again Message Cause Action Error check MIC Microphone is not connected Plug the supplied microphone securely into the jack Error check front SP Error check FL SP Error check FR SP Error check center SP Error check RL SP Error check RR SP Error check subwoofer The microphone cannot pick up ...

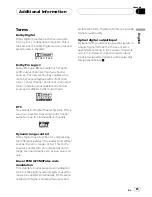
Страница 23: ...ontrol Dolby Digital has a function for compressing the difference between the loudest and softest sounds Dynamic range control This control ensures sounds with an increased dynamic range are heard clearly even at low volume le vels Linear PCM LPCM Pulse code modulation This stands for linear pulse code modulation which is the signal recording system used for music CDs and DVDs Generally DVDs are ...

Страница 24: ...5 Load impedance 4 W Preout max output level 5 0 V Decoder Linear PCM Dolby Digital Dolby Pro Logic B DTS Subwoofer Crossover frequency 63 80 100 125 160 200 Hz Level 10dB Speaker setting Time alignment 0 200 inch 1 inch step Level 10dB Equalizer Band 3 band Frequency 40 50 63 80 100 125 160 200 250 315 400 500 630 800 1k 1 25k 1 6k 2k 2 5k 3 15k 4k 5k 6 3k 8k 10k 12 5k Hz Gain 12dB Crossover freq...

Страница 25: ... nombre inférieur de canaux 34 Utilisation du contrôle direct 34 Utilisation du Dolby Pro Logic B 34 Réglage du mode Musique 35 Paramétrage de la configuration de haut parleurs 36 Correction de la phase du haut parleur d extrêmes graves 36 Sélection d une fréquence de croisement 37 Réglage des niveaux de sortie des haut parleurs 38 Régler les niveaux de sortie des haut parleurs en utilisant une to...

Страница 26: ...des pertes de sen sibilités d écoute dans le futur Après tout nous voulons que vous écoutiez pendant toute votre vie Nous voulons que vous écoutiez pendant toute votre vie Utilisé avec sagesse votre nouvel équipement sonore sera une source de plaisir pendant toute votre vie Comme les dommages de l ouïe provenant d un bruit fort ne sont souvent détectables que lorsqu il est trop tard ce fabricant e...

Страница 27: ...it ne pas fonctionner correcte ment Connexion avec l appareil central Pioneer Entrée optique 1 appareil central Entrée optique 2 lecteur DVD AVH P6600DVD AVX P8DVD AVX P7300DVD SDV P7 XDV P90 AVH P6500DVD DVH P5000MP DVH P7000 L entrée optique 2 n est pas dis ponible Seul le système avec AVH P6600DVD peut utiliser les deux entrées optiques 1 et 2 Sinon l entrée optique 2 n est pas dispo nible Conn...

Страница 28: ...Pioneer Veuillez contacter le revendeur ou le distribu teur chez qui vous avez acheté cet appareil pour le service après vente y compris les conditions de garantie ou pour toute autre in formation Au cas où les informations néces saires ne sont pas disponibles veuillez contacter les sociétés indiquées ci dessous N expédiez pas l appareil pour réparation à l une des adresses figurant ci dessous san...

Страница 29: ...z l appareil contre l humidité Si la batterie est débranchée ou déchar gée le contenu de la mémoire est effacé et une nouvelle programmation est nécessaire Réinitialisation du microprocesseur Le microprocesseur doit être réinitialisé dans les conditions suivantes Avant la première utilisation de cet appareil après son installation En cas d anomalie de fonctionnement de l appareil Quand des message...

Страница 30: ...urce Appuyez sur cette touche pour parcourir les différentes sources dispo nibles 3 Touche ATT Appuyez sur cette touche pour diminuer ra pidement le niveau du volume d environ 90 Appuyez à nouveau pour revenir au ni veau de volume initial 4 Touche EQ Appuyez sur cette touche pour choisir les di verses courbes d égalisation 5 Joystick Utilisez le joystick pour régler la fonction audio sélectionnée ...

Страница 31: ... noms de fonctions effleurez NEXT Pour revenir au groupe précédent de noms de fonctions effleurez PREV Quand vous jouez des disques enregistrés avec une fréquence d échantillonnage supérieure à 96 kHz vous ne pouvez pas utiliser les fonctions audio Le réglage de la courbe d égalisation POSITION AUTO EQ et AUTO TA seront égale ment annulés Quand vous jouez des disques enregistrés avec une fréquence...

Страница 32: ... qui sont conçus pour une utilisation avec une audio 2 canaux par exemple JAZZ HALL ou CLUB nous recommandons de mettre Dolby Pro Logic B hors service Utilisation du sélecteur de position Une façon d assurer un son plus naturel consiste à positionner de façon précise l i mage stéréo en vous plaçant exactement au centre du champ sonore La fonction sélecteur de position vous permet de régler automat...

Страница 33: ...tions d amplitude so nore lorsque vous passez d une source à l autre Les réglages sont basés sur le niveau du si gnal FM qui lui demeure inchangé 1 Comparez le niveau du volume du syn toniseur FM au niveau de la source que vous voulez régler 2 Effleurez A MENU puis DSP puis effleu rez SLA 3 Effleurez a ou b pour régler le volume de la source Chaque effleurement de a ou b augmente ou diminue le vol...

Страница 34: ... pour en vérifier l effica cité En contrôle direct toutes les fonctions audio sont verrouillées excepté VOLUME Si la source est une source audio LPCM 2 canaux ou Dolby Digital 2 canaux et si vous sélectionnez DIRECT ON le son n est diffu sé que par les haut parleurs avant gauche droit 1 Effleurez A MENU puis DSP puis effleu rez DIGITAL DIRECT 2 Effleurez a pour mettre en service le contrôle direct...

Страница 35: ...ENU puis DSP puis effleu rez NEXT 2 Effleurez DOLBY PRO LOGIC B 3 Effleurez MUSIC puis MUSIC ADJUST Vous pouvez utiliser MUSIC ADJUST seule ment quand vous avez sélectionné MUSIC 4 Effleurez ou pour sélectionner PANORAMA panorama Chaque effleurement de ou sélectionne les éléments dans l ordre suivant PANORAMA panorama DIMENSION di mension CENTER WIDTH largeur centre 5 Effleurez pour mettre en serv...

Страница 36: ...r d extrêmes graves a été configuré sur ON 4 Effleurez ou pour choisir la taille appropriée pour le haut parleur sélection né Chaque effleurement de ou sélectionne une des tailles dans l ordre suivant OFF hors service SMALL petite LARGE grande Vous ne pouvez pas choisir OFF quand FRONT haut parleurs avant a été sélectionné Vous pouvez choisir ON ou OFF quand SUB WOOFER haut parleur d extrêmes grav...

Страница 37: ...s graves Si les haut parleurs installés comprennent un haut par leur dont la taille a été définie comme SMALL vous pouvez choisir une fréquence en dessous de laquelle les sons sont reproduits par un haut parleur LARGE ou le haut parleur d extrê mes graves 1 Effleurez A MENU puis DSP puis effleu rez NEXT 2 Effleurez CROSS OVER 3 Effleurez ou pour choisir le haut parleur à régler Chaque effleurement...

Страница 38: ...té de test Une tonalité de test très pratique vous permet d obtenir facilement un équilibre global cor rect entre les haut parleurs 1 Effleurez A MENU puis DSP puis effleu rez NEXT 2 Effleurez TEST TONE 3 Effleurez START pour démarrer l émis sion de la tonalité de test La tonalité de test est émise Elle passe de haut parleur à haut parleur dans la séquence suivante à des intervalles d environ deux...

Страница 39: ...ME ALIGNMENT 3 Effleurez n importe quelle des touches suivantes du clavier tactile pour sélection ner l alignement temporel INITIAL Alignement temporel initial ré glage usine AUTO TA Alignement temporel créé par les fonctions auto TA et EQ Reportez vous à la page 42 TA et EQ Auto alignement tem porel automatique et égalisation automa tique CUSTOM Alignement temporel ajusté que vous créez pour vous...

Страница 40: ...sion pour passer à la fonction égalisation Appuyez sur EQ et maintenez l appui jusqu à ce que le nom de la courbe apparaisse sur l af fichage Pour basculer sur la fonction SFC appuyez et maintenez la pression sur EQ à nouveau 2 Appuyez sur EQ pour sélectionner l é galisation Appuyez de manière répétée sur EQ pour choi sir l un des réglages d égalisation suivants SUPER BASS POWERFUL NATURAL VOCAL F...

Страница 41: ...fleurement de ou augmente ou diminue le niveau de l égaliseur Les va leurs 06 06 s affichent tandis que le ni veau augmente ou diminue 8 Effleurez puis effleurez ou pour sélectionner le facteur Q désiré Chaque effleurement de ou fait basculer entre les facteurs Q suivants WIDE large NARROW étroit Vous pouvez régler les paramètres de chaque bande des autres haut parleurs de la même façon Remarque V...

Страница 42: ...sance délivrant une puissance de sortie supérieure à la puis sance d entrée maximum admissible par le haut parleur Si le microphone est placé dans une position inadéquate la tonalité de mesure peut devenir forte et la mesure peut prendre longtemps ce qui entraîne une décharge de la batterie As surez vous de placer le microphone à l empla cement spécifié Avant d utiliser la fonction TA et EQ auto E...

Страница 43: ...ur FLAT Reportez vous à la page 40 Un réglage sur filtre passe haut sera ef fectué automatiquement pour le haut parleur avant central et arrière Si vous effectuez un réglage TA et EQ auto alors qu un réglage précédent existe déjà ce réglage sera remplacé Exécution du réglage TA et EQ auto 1 Arrêtez la voiture dans un endroit aussi calme que possible fermez toutes les por tières les vitres et le to...

Страница 44: ...e en environ neuf minutes Pour arrêter le réglage TA et EQ auto effleurez STOP Pour annuler le réglage TA et EQ auto en cours d exécution effleurez BACK ou ESC 10 Quand le réglage TA et EQ auto est ter miné Complete s affiche Si une mesure correcte des caractéristiques acoustiques de l habitacle de la voiture est im possible un message d erreur s affiche Re portez vous à la page 47 Comprendre les ...

Страница 45: ...age bas et LOW apparaît sur l afficheur Appuyez sur pour choisir le réglage haut et HIGH apparaît sur l afficheur Réinitialisation des fonctions audio Cette fonction ne peut pas être utilisée quand un lecteur DVH P7000 DVH P5000MP ou AVH P6500DVD est connecté à cet appareil Vous pouvez réinitialiser toutes les fonctions audio sauf le volume 1 Effleurez A MENU puis INITIAL puis ef fleurez NEXT 2 Ef...

Страница 46: ... la taille du haut parleur central sur OFF Page 36 Audio DSP Symptôme Causes possibles Action corrective Les haut parleurs ne sont pas disponibles pour le réglage Leur réglage de taille sont sur OFF Effectuez les réglages de taille corrects Page 36 L alignement temporel n est pas disponible La position d écoute n est pas réglée correctement Réglez la position d écoute correctement Page 32 Leur rég...

Страница 47: ...es d erreur du réglage TA et EQ auto Si une mesure correcte des caractéristiques acoustiques de l habitacle de la voiture n est pas pos sible avec le réglage TA et EQ auto un message d erreur peut s afficher sur l écran Si un message d erreur s affiche sur l écran reportez vous au tableau suivant pour voir quel est le problème et la méthode suggérée pour le corriger Après avoir vérifié réessayez M...

Страница 48: ...ode musique est également disponible pour les sources 2 canaux en plus du mode cinéma DTS Acronyme de Digital Theater Systems DTS est un système surround fournissant un son multi canaux à partir d un maximum de 6 ca naux indépendants Entrée sortie numérique optique L émission et la réception des signaux audio sous forme numérique minimise les risques de détérioration de la qualité sonore pendant l...

Страница 49: ...eau de sortie max de l étage préamp 5 0 V Décodeur PCM Linéaire Dolby Digital Dolby Pro Logic B DTS Haut parleur d extrêmes graves Fréquence de transition 63 80 100 125 160 200 Hz Niveau 10dB Réglage du haut parleur Alignement temporel 0 200 pouces 1 pouce pas Niveau 10dB Égaliseur Bande 3 bandes Fréquence 40 50 63 80 100 125 160 200 250 315 400 500 630 800 1k 1 25k 1 6k 2k 2 5k 3 15k 4k 5k 6 3k 8...

Страница 50: ...ide Victoria 3195 Australia TEL 03 9586 6300 PIONEER ELECTRONICS OF CANADA INC 300 Allstate Parkway Markham Ontario L3R OP2 Canada TEL 1 877 283 5901 PIONEER ELECTRONICS DE MEXICO S A de C V Blvd Manuel Avila Camacho 138 10 piso Col Lomas de Chapultepec Mexico D F 11000 TEL 55 9178 4270 HÒ ý Plø lø ð q ï µ44_13 ûq 02 2521 3588 HÒûP Plø w Î LFm à 9 901 6 ûq 0852 2848 6488 Published by Pioneer Corpo...

Отзывы: