


1
Display the
“
AV Sound Settings
”
screen.
=
For details, refer to
Displaying the screen for
AV sound settings
on page 174.
2
Touch [EQ].
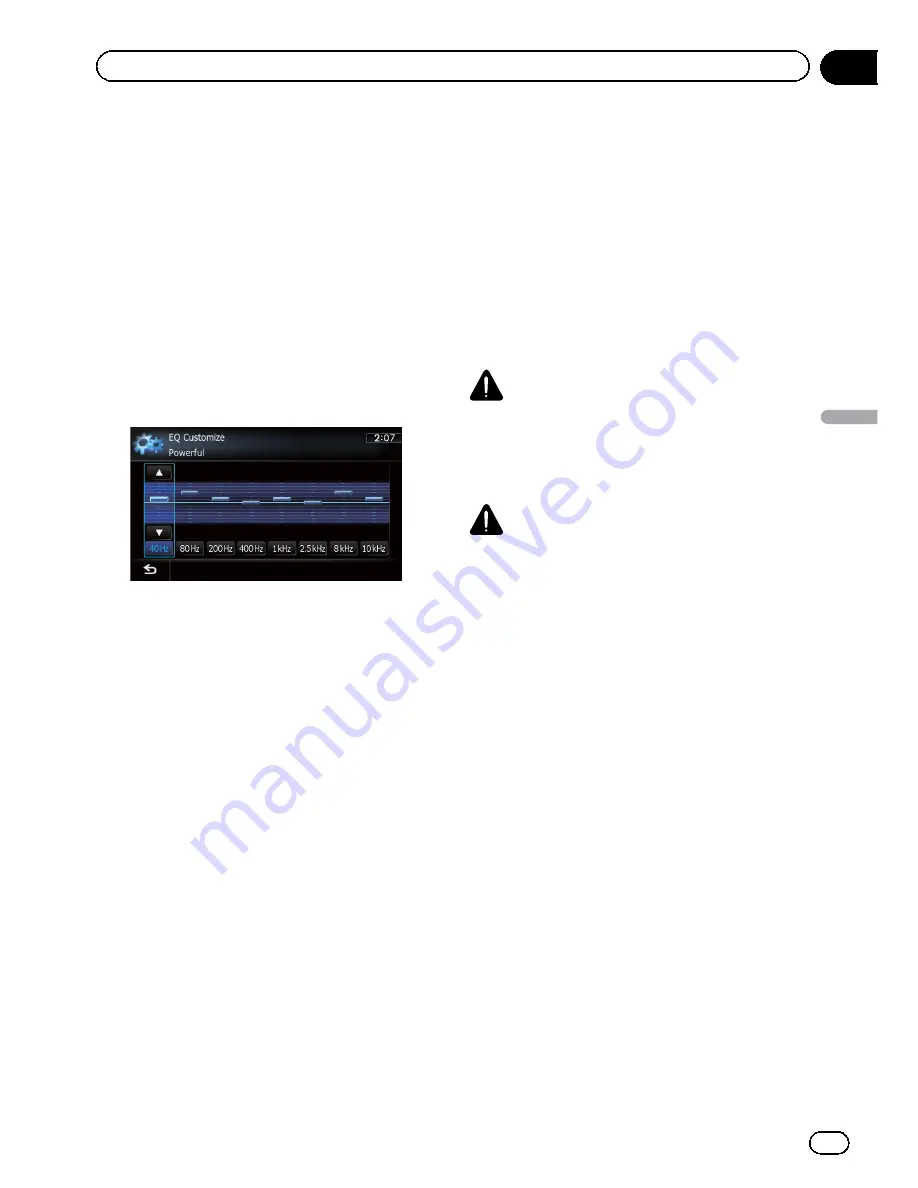
3
Touch one of the keys to select a curve
that you want to use as the basis of custo-
mizing.
4
Touch [Customize].
5
Touch the frequency that you want to
adjust the level.
6
Touch [
a
] or [
b
] to adjust the level of
the equalizer band.
Each time you touch [
a
] or [
b
], the level of
the equalizer band increases or decreases.
Using the auto-adjusted equalizer
You can set the auto-adjusted equalizer to suit
the vehicle
’
s acoustics. To use this function,
the vehicle
’
s acoustics must be measured in
advance.
=
For details of the operations, refer to
Adjust-
ing the equalizer curve automatically (Auto
EQ)
on this page.
p
To manually adjust the equalizer curve, set
“
Auto EQ
”
to
“
Off
”
.
1
Display the
“
AV Sound Settings
”
screen.
=
For details, refer to
Displaying the screen for
AV sound settings
on page 174.
2
Touch [EQ].
3
Touch the key next to
“
Auto EQ
”
to
turn the auto-adjusted equalizer on or off.
4
Select the equalizer curve.
Adjusting the equalizer curve
automatically (Auto EQ)
By measuring the vehicle
’
s acoustics, the
equalizer curve can be adjusted automatically
to suit the interior of the vehicle.
WARNING
A loud tone (noise) may be emitted from the
speakers when measuring the vehicle
’
s acous-
tics. Never perform the Auto EQ measurement
while driving.
CAUTION
!
Thoroughly check the conditions before per-
forming Auto EQ, as the speakers may be da-
maged if this is performed under the following
conditions:
—
When the speakers are incorrectly con-
nected. (For example, when a rear speaker
is connected as a subwoofer output.)
—
When a speaker is connected to a power
amp delivering output higher than the
speaker
’
s maximum input power capabil-
ity.
!
If the microphone for acoustical measure-
ment (sold separately) is not placed in an ap-
propriate location, the measurement tone may
become loud and measurement may take a
long time, resulting in battery drainage. Be
sure to place the microphone in the specified
location.
En
177
Chapter
32
Customizing
pr
eferences
Customizing preferences
Содержание AVIC-X930BT
Страница 22: ...Screen switching overview 2 5 6 1 1 3 4 En 22 Chapter 03 How to use the navigation menu screens ...
Страница 246: ...Section _C_o_n_n_e_ct_i_ng_th_e_sy_s_t_e_m G En CD ...
Страница 267: ...Section D Installation Adjusting the microphone angle The microphone angle can be adjusted En ...
Страница 270: ...En 2 ...
Страница 271: ...En 3 ...
Страница 272: ...En 4 ...
Страница 273: ...En 5 ...
Страница 274: ...En 6 ...
Страница 295: ...En 27 Chapter 04 Instructions for upgrading Instructions for upgrading ...
Страница 296: ...Screen switching overview 7 1 2 3 2 4 5 6 En 28 Chapter 05 How to use the navigation menu screens ...
Страница 346: ...En 78 Chapter 14 Using Applications ...
Страница 411: ...En 143 ...
Страница 440: ......


