


5 Installation
22
Version: 1.3.0
MP144E
N472 Linear Actuator
Installing an N472 with clamping shank
1.
Optional: Apply a small amount of lubricant to the contact surface of the movable part
of the mechanical mounting.
2.
Remove the mounting nut from the clamping shank of the N-472.
3.
Position the N-472 in the mechanical mounting of your application.
4.
Manually screw the mounting nut of the N-472 a few turns into the thread of the
clamping shank.
5.
Align the base body with the mechanical mounting.
6.
Clamp the N-472 firmly in the mounting:
−
Hold the base body and hand-tighten the mounting nut of the N-472 with the hook
wrench.
7.
Check that the linear actuator is affixed firmly in the mounting.
8.
Optional: Manually turn the screw head of the linear actuator's fine-threaded screw
into the desired position to avoid longer travel to this position.
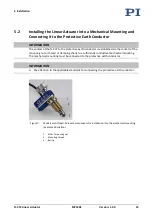
5.3
Preparing a VacuumCompatible N472 for Connection to the
Controller
Figure 10: Vacuum compatible N-472: Connecting to a vacuum feedthrough
1
Vacuum-side connection for the cables of the N-472
2
Vacuum feedthrough
3
Connector for the N472B0001 motor / sensor cable (p. 12)
4
Motor / sensor connector D-sub 15 (m), see "Pin Assignment" (p. 50)
Содержание N--472 10 Series
Страница 8: ......
Страница 18: ......
Страница 20: ......
Страница 28: ......
Страница 34: ......
Страница 36: ......
Страница 38: ......
Страница 40: ......
Страница 51: ...10 Technical Data N 472 Linear Actuator MP144E Version 1 3 0 47 Figure 18 N 472 21x dimensions travel range...
Страница 53: ...10 Technical Data N 472 Linear Actuator MP144E Version 1 3 0 49 Figure 20 N 472 22x dimensions travel range...
Страница 56: ......