background image

9 SENDING  PRIN-
TABLE FILE TO 
THE PRINTER

9.2 STARTING A PRINTER 

FROM A BROWSER

.

Now you have your printer installed and configured. 

There are 2 ways to start a print:

1.  Save to USB Save the file as .cws or .zip format 

on a USB stick and insert it in the front socket. 
Then wait for 10 seconds and press Print to 
refresh and the printable files will show on the 
screen. Select your file and press ‘Print’.

2. Print from your web browser on your PC. These 

instructions are described below.

Please read these software instructions to help you 
start printing.

1.  Make sure your printer is turned on and 

connected to a network. If the LED at the front 
button is illuminated then the printing screen is 
turned on.

2. Download the desktop software called 

“Printflow3D_opener” for your operating system 
from www.photocentric3d.com/printflow.

3.  Move the Printflow3D_opener.exe onto your 

desktop, double click and start the software.  

17

18

9.1. SETTING UP A 

NETWORK CONNECTION

The LCHR supports two different types of network 
connection: Ethernet and WiFi. 
To set up ethernet, simply plug the ethernet cable 
into the back of the printer and connect it to your 
router.

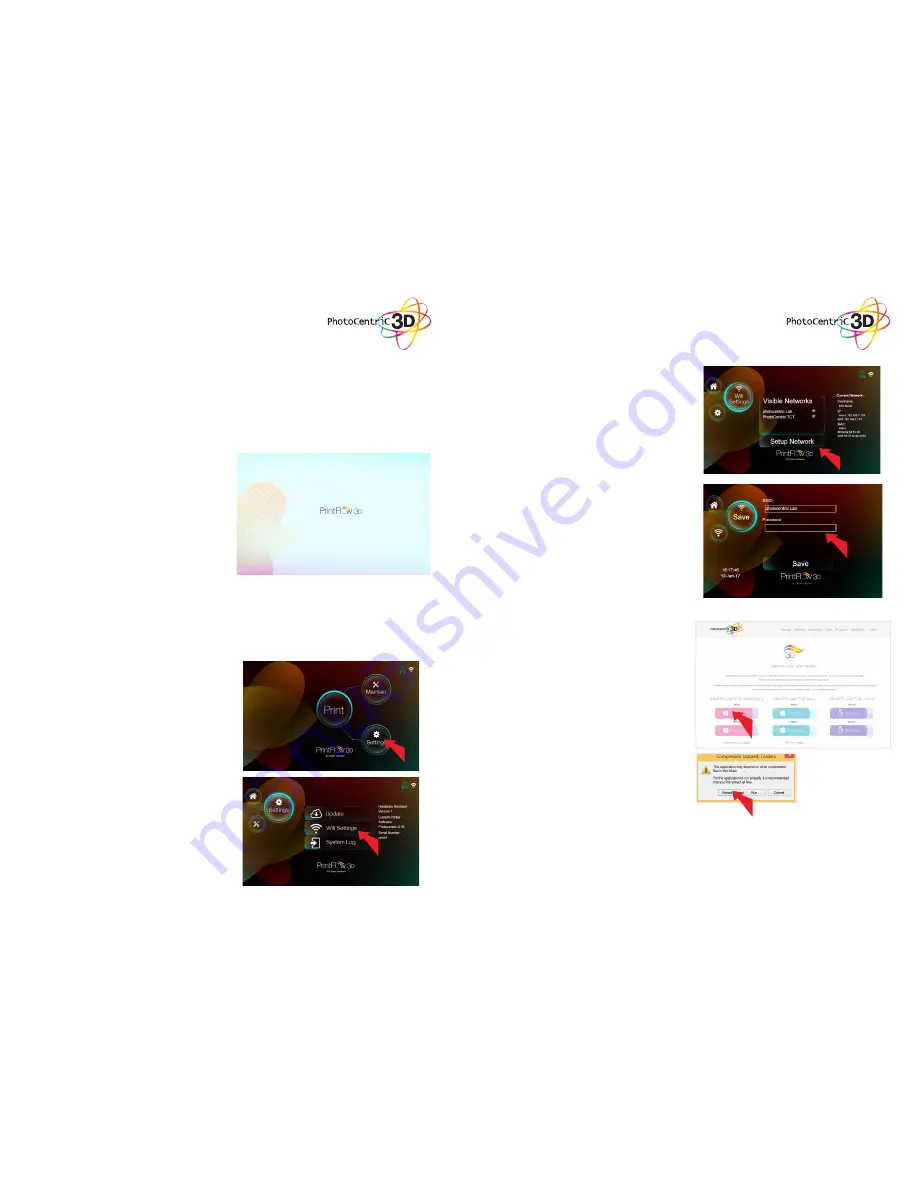
Steps to set-up Wifi:

1.  Power on the printer with the rocker switch at 

the back of the printer.

2.  Click “Settings” on the touchscreen on the front 

of the printer.

3.  Once booted click “Wifi Settings”.
4.  Wait untill your desired Wifi network shows.

5.  Select the desired network and press the 

button “Setup Network”. 

6.  Enter your Wifi Password and press “Accept”.
7.  Finish by pressing “Save”.
8.  Press “Home” to get back to the main screen.

Содержание Liquid Crystal HR

Страница 1: ...THE NEXT GENERATION OF 3D PRINTING IS HERE LCHR USER MANUAL DISPOSAL INSTRUCTIONS Do not throw this electronic device into the waste when discarding To minimize pollu tion and ensure utmost protection...

Страница 2: ...ion Workshop installation instructions 8 1 Installing Creation Workshop 8 2 Quickstart Instructions Creation Workshop 9 Sending a printable file to the printer 9 1 Setting up network connection 9 2 St...

Страница 3: ...ology i Low cost We use high resolution low cost LCD screens that are widely available in monitors ta blets mobile phones and televisions These pro vide phenomenal value for money which we pass onto y...

Страница 4: ...ctrical net work with an input of 110 or 240 V AC 50 60 Hz and has an operational voltage of 12 V Do not allow anything to rest on the power cord Do not locate this product where people will walk on t...

Страница 5: ...d in the ancillary box Make sure it is level 3 Connect the USB wifi dongle supplied in the back of the printer 4 Connect the B end of the power supply cable to the power supply and insert into the bac...

Страница 6: ...after the other Press 10 and the platform will lift 10mm pour the amount of resin you need into the vat then press 10 to return it to the screen and you are homed 2 THE HOMING PROCEDURE NOTE If you ha...

Страница 7: ...he paper Place the hood back on to protect the resin in the vat from light 4 WASHING Now you have set up your printer lets make your very first print Your LCHR has been shipped with a default test pri...

Страница 8: ...strength increases slowly with more light Full strength is achieved with 30 mins in a UV unit or 60 mins under a normal 60W table lamp Then remove from water and dry 30 mins post exposure 5 HARDENING...

Страница 9: ...oning Ring B VAT Top Flange A Retaining Flange C Metal Retaining Base Flange D 7 Place the main vat tray over the film and gently press down Screw the four corners first loosley Tighten the M3 bolts w...

Страница 10: ...s large objects 3 If you find your object to be slightly overexposed then simply reduce the exposure time Always click Apply Changes to save if you had to change any values If you don t click this you...

Страница 11: ...reen is turned on 2 Download the desktop software called Printflow3D_opener for your operating system from www photocentric3d com printflow 3 Move the Printflow3D_opener exe onto your desktop double c...

Страница 12: ...w should look like this 6 Consult the section 2 the homing procedure to home your printer 9 3 STARTING A PRINT FROM THE TOUCHSCREEN To start a print from a touchscreen you can either use print files a...

Страница 13: ...ons only become active once you have sliced your object Clicking this button allows you to view the 3D objects within their boundary box You can add supports in this function Clicking this button acce...

Страница 14: ...t on the build platform Any model that does not fit within the build platform will be moved outside the build area This tabs provides you with information about your model A model can be scaled reduce...

Страница 15: ...g polygons check the boxes under support general and generate only on downward Adaptive supports You can add supports to areas in the model that are unsupported There are 2 algorithms to help you acco...

Страница 16: ...igured to export images a progress bar will appear here Otherwise just the gcode for the scene will be generated and the images will be rendered during build time 12 Slicing a Model Once you have load...

Отзывы: