Страница 1: ...DUOMAT 7 DUOMAT 7 1 DUOMAT 7 2 Installation Instructions Translation of original installation instructions...
Страница 2: ......
Страница 3: ...nual for the entire end product These instructions are only intended to be used by the end product manufacturer They should not be given to the operator of the end product The factual information cont...
Страница 4: ...l The construction of the DUOMAT 7 has been inspected by the German Inspection Authority T V Product Service The T V Product Service also monitors the production of the DUOMAT 7 The official German T...
Страница 5: ...Proper and intended usage 9 2 2 Safety notices within the installation instruction and the operating instructions for the entire machine 10 2 3 Selection and qualification of personnel 11 2 4 Notice o...
Страница 6: ...0 9 Maintenance 33 9 1 Maintenance 33 9 2 Cleaning and care 34 10 Disposal 35 10 1 Packaging material 35 10 2 Drive components 35 10 3 Batteries 35 Declaration of incorporation 36 EU Declaration of Co...
Страница 7: ...instructions will help you to minimize danger repair costs and down times They will also help you to maximize the reliability and lifespan of the end product CAUTION The notices in these instructions...
Страница 8: ...ice explanations WARNING WARNING indicates a hazardous situation which if not avoided could result in serious injury or death CAUTION CAUTION indicates a hazardous situation which if not avoided could...
Страница 9: ...the part of the end product manufacturer against the manufacturer NOTICE General ESD protective measures must be observed in accordance with DIN EN 61340 5 1 Improper usage Be sure to follow the notic...
Страница 10: ...systems in medical applications This DewertOkin product is in compliance with the safety requirements found in IEC 60601 1 We strongly recommend that the end product including all its components which...
Страница 11: ...s can be categorized as follows Construction measures before the installation refer to the Ensuring operational reliability dur ing installation section in the chapter Installation Safety fundamentals...
Страница 12: ...pecifications are located on the drive s ratings plate The ratings plates shown are examples the specifications for your drive may differ from this il lustration Figure 2 Ratings plates examples DUOMA...
Страница 13: ...DUOMAT 7 Safety Notices 43170 6 0 13 Use in dry rooms only Protection class II Follow all special disposal instructions Follow the special assembly instructions Conformity mark...
Страница 14: ...nuals containing all information and instructions needed for these systems Only a DewertOkin device should be used to control the drive since they have already been ver ified to work together 3 1 Layo...
Страница 15: ...process The Combination Possibilities Chapter describes the different possible combinations of drives and handsets hand held remote controls You can also ask your supplier or dealer for additional inf...
Страница 16: ...D Lever for operating the mechanical reset function 4 1 1 Optional rechargeable battery AG7 battery The DUOMAT 7 with rechargeable battery features an electrical reset function for the moveable re cl...
Страница 17: ...ns DUOMAT 7 DUOMAT 7 1 DUOMAT 7 2 Protection category IPX4 Stroke distance3 87 69 standard Colors Refer to sales brochure Length x width 750 mm x 175 mm 750 mm x 190 mm with mechanical reset option Ax...
Страница 18: ...Technical Specifications DUOMAT 7 18 43170 6 0 Figure 6 Dimensions of DUOMAT 7 in mm Figure 7 Dimensions of DUOMAT 7 with mechanical reset option in mm 750 175 750 190...
Страница 19: ...tall the drive in the end product so that it is properly aligned This will help pre vent shear stress Do not position the drive at a slanted angle when installing it in the end product A slanted angle...
Страница 20: ...ring installation section CAUTION Electrical components should be connected or disconnected only when the mains power cord and the battery plug when present are unplugged 1 Move your product into a po...
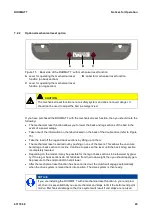
Страница 21: ...to the symbols on the DUOMAT 7 as described in Figure 4 Abbildung 9 Installing the double drive C End product D Brackets 6 Push the drive in so that the brackets D fit into the slots A 7 Close the shu...
Страница 22: ...con nection is unplugged WARNING Only personnel with the following training are qualified to work on the power cord or to replace the power cord someone who has completed training in electronic motor...
Страница 23: ...a grounding lug to the optional grounding bolt The optional grounding bolt protection class I can be used to connect the end product with the grounding conductor on the mains power supply refer to Fi...
Страница 24: ...the DUOMAT 7 A Battery B Battery compartment for optional battery C Battery socket D Battery cable E Shield cover 1 First place the battery in the lower part of the compartment B Then push the battery...
Страница 25: ...y plug back on the battery socket C 4 Put the shield cover E back on Tighten the two screws on the cover as shown in Figure 13 Routing electrical cables When routing the cables be sure that the cables...
Страница 26: ...r injury 2 Unplug the mains power plug and the battery plug when present 3 Remove the screws on the shield cover and take off the shield cover if present 4 Disconnect all additional components such as...
Страница 27: ...ittent operations The DUOMAT 7 has been designed for intermittent operations Intermittent operation is an opera tional mode where the drive must pause after a specified maximum period of operation pow...
Страница 28: ...re first use The battery operated reset function is fully enabled only after the battery has been fully charged Depending on the version the battery is loaded in one of several methods automatically u...
Страница 29: ...to Figure 15 Take the load off the leg and back sections by lifting up on them The mechanical reset is carried out by pushing on one of the levers This allows the unencum bered leg or back section to...
Страница 30: ...nal operating signals An additional feature is available only for the CARE and HOSP models an LED illuminates when buttons are pressed and a signal tone sounds when the button is released The chapter...
Страница 31: ...rcuit breaker on the transformer has been triggered or is defective The drive system should be allowed to pause for 20 to 30 minutes The thermal fuse on the trans former may have been triggered or may...
Страница 32: ...ent The continuous alarm tone is only available in the CARE and HOSP models It is not available in the CARE L or HOSP L models LED signal Meaning Measure Action The LED on the handset does not illumin...
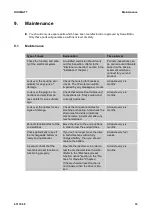
Страница 33: ...all electrical cables and connections are firmly seated and correctly positioned At least every six months Look over the cables for any signs of damage Check the connecting cables for pinching or she...
Страница 34: ...ng system or with a high pressure cleaner Do not allow fluids to penetrate the drive Damage to the unit could result 1 Always disconnect the mains power plug before you start to clean the drive 2 Use...
Страница 35: ...tal and plastic parts You should observe all corresponding national and regional environmental regulations when disposing of the DUOMAT 7 The disposal of the end product is regulated in Germany by Ele...
Страница 36: ...EG entspricht You may only operate this incomplete machine after you have confirmed that the end product into which this machine will be installed complies with the Machinery Directive 2006 42 EC Der...
Страница 37: ...ischen Parlaments und des Rates vom 8 Juni 2011 zur Beschr nkung der Verwendung bestimmter gef hrlicher Stoffe in Elektro und Elektronikger ten RoHS Directive 2011 65 EU of the European Parliament and...
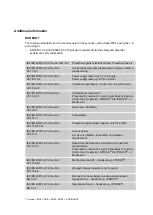
Страница 38: ...601 1 Section 7 1 Labelling general IEC EN60601 1 Section 7 2 Labelling inscriptions IEC EN60601 1 Abschnitt 8 Protection against electrical danger leakage currents IEC EN60601 1 Section 11 1 Overheat...
Страница 39: ...such as Control box Supervisor IPROXX SE IPROXX or Meditouch IEC EN 60601 2 52 Section 201 9 2 1 Noise level 65dB A IEC EN 60601 2 52 Section 201 11 1 1 Temperature IEC EN 60601 2 52 Section 201 11 6...
Страница 40: ......
Страница 41: ......
Страница 42: ......
Страница 43: ......
Страница 44: ...DewertOkin GmbH Weststra e 1 32278 Kirchlengern Germany Tel 49 0 5223 979 0 Fax 49 0 5223 75182 http www dewertokin de Info dewertokin de ID No 43170...