background image

108594_en_04

PHOENIX CONTACT

57

A 1

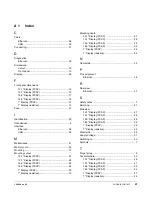
Index

C

Cable

Ethernet.................................................................  38

USB .......................................................................  39

Connecting..................................................................  31

D

Diagnostics

Ethernet.................................................................  39

Dimensions

Cutout....................................................................  19

Front panel ............................................................  13

Display ........................................................................  35

F

Front panel dimensions

10.1" Display (PCAP) ............................................  15

12.1" Display (PCAP) ............................................  16

15.6" Display (PCAP) ............................................  17

18.5" Display (PCAP) ............................................  18

7" Display (PCAP) .................................................  14

7" Display (resistive) ..............................................  13

Fuse ............................................................................  41

I

Identification................................................................  33

Intended use .................................................................  8

Interface

Ethernet.................................................................  38

USB .......................................................................  39

M

Maintenance ...............................................................  41

Memory card ...............................................................  40

Mounting .....................................................................  12

Mounting cutout

10.1" Display (PCAP) ............................................  21

12.1" Display (PCAP) ............................................  22

15.6" Display (PCAP) ............................................  23

18.5" Display (PCAP) ............................................  24

7" Display (PCAP) .................................................  20

7" Display (resistive) ..............................................  19

Mounting depth

10.1" Display (PCAP) ............................................  27

12.1" Display (PCAP) ............................................  28

15.6" Display (PCAP) ............................................  29

18.5" Display (PCAP) ............................................  30

7" Display (PCAP) .................................................  26

7" Display (resistive)..............................................  25

N

Nameplate ..................................................................  33

P

Pin assignment

Ethernet.................................................................  38

R

Rear view

Ethernet.................................................................  37

S

Safety notes ..................................................................  7

Servicing .....................................................................  41

Side view

10.1" Display (PCAP) ............................................  27

12.1" Display (PCAP) ............................................  28

15.6" Display (PCAP) ............................................  29

18.5" Display (PCAP) ............................................  30

7" Display (PCAP) .................................................  26

7" Display (resistive)..............................................  25

Standards ...................................................................  44

Supply Voltage............................................................  31

Switching on ...............................................................  33

Symbols ........................................................................  7

T

Target group .................................................................  9

Technical data ............................................................  43

10.1" Display (PCAP) ............................................  49

12.1" Display (PCAP) ............................................  51

15,6" Display (PCAP) ............................................  53

18.5" Display (PCAP) ............................................  55

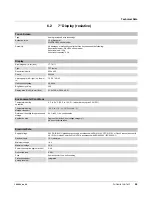
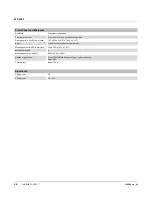
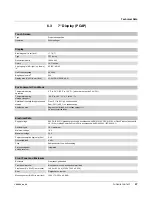
7" Display (PCAP) .................................................  47

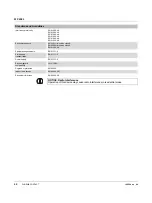
7" Display (resistive)..............................................  45

Содержание 1065546

Страница 1: ...Web Panels with TFT Display User manual...

Страница 2: ...splay UM EN WP 4XXXX Revision 04 2020 04 01 This user manual is valid for Designation Order No WP 4000 WP 4070W P US 01 WP 4101W P US 01 WP 4156W P US 01 WP 4185W P US 01 WP 4070 WXPS WP 4070 WVRS WP...

Страница 3: ...ve the purpose of technical progress The receipt of technical documentation in particular user documentation does not consti tute any further duty on the part of Phoenix Contact to furnish information...

Страница 4: ...PHOENIX CONTACT...

Страница 5: ...Device 11 2 2 Mounting the Device 12 2 2 1 Front Panel Dimensions 13 2 2 2 Mounting Cutout 19 2 2 3 Side View Mounting Depth 25 2 3 Connecting the Device 31 2 3 1 Supply Voltage 31 2 3 2 Grounding 32...

Страница 6: ...HOENIX CONTACT 108594_en_04 6 Technical Data 43 6 1 General 43 6 2 7 Display resistive 45 6 3 7 Display PCAP 47 6 4 10 1 Display PCAP 49 6 5 12 1 Display PCAP 51 6 6 15 6 Display PCAP 53 6 7 18 5 Disp...

Страница 7: ...with the device Observe the accident prevention rules and regulations that apply to the operating site Installation and operation must only be carried out by qualified and trained personnel This symb...

Страница 8: ...ical applications without additional security appliances Please take additional protective measures according to the IT security requirements and the standards applicable to your application for insta...

Страница 9: ...with a Linux operating system License information for the indi vidual Linux packages can be found in the web based management of the operating device 1 7 Retrieving the source code This product conta...

Страница 10: ...WP 4000 10 PHOENIX CONTACT 108594_en_04...

Страница 11: ...ommissioning 2 1 Unpacking the Device Unpack all parts carefully and check the contents for any visible damage in transit Also check whether the shipment matches the specifications on your delivery no...

Страница 12: ...stalled horizontally please note that additional sources of heat beneath the operating device may result in heat accumulation Make sure to allow sufficient heat dissipation Please observe the permissi...

Страница 13: ...Installation and Commissioning 108594_en_04 PHOENIX CONTACT 13 2 2 1 Front Panel Dimensions 2 2 1 1 7 Display resistive Figure 2 2 Front panel dimensions in mm 203 147...

Страница 14: ...WP 4000 14 PHOENIX CONTACT 108594_en_04 2 2 1 2 7 Display PCAP Figure 2 3 Front panel dimensions in mm 185 5 146 2...

Страница 15: ...Installation and Commissioning 108594_en_04 PHOENIX CONTACT 15 2 2 1 3 10 1 Display PCAP Figure 2 4 Front panel dimensions in mm 262 7 199 3...

Страница 16: ...WP 4000 16 PHOENIX CONTACT 108594_en_04 2 2 1 4 12 1 Display PCAP Figure 2 5 Front panel dimensions in mm 302 229...

Страница 17: ...Installation and Commissioning 108594_en_04 PHOENIX CONTACT 17 2 2 1 5 15 6 Display PCAP Figure 2 6 Front panel dimensions in mm 278 436...

Страница 18: ...WP 4000 18 PHOENIX CONTACT 108594_en_04 2 2 1 6 18 5 Display PCAP Figure 2 7 Front panel dimensions in mm 329 485...

Страница 19: ...tion and Commissioning 108594_en_04 PHOENIX CONTACT 19 2 2 2 Mounting Cutout 2 2 2 1 7 Display resistive Figure 2 8 Mounting cutout dimensions in mm A Mounting Cutout B Front Panel A B 195 0 5 203 139...

Страница 20: ...WP 4000 20 PHOENIX CONTACT 108594_en_04 2 2 2 2 7 Display PCAP Figure 2 9 Mounting cutout dimensions in mm A Mounting Cutout B Front Panel 185 5 146 2 175 136 A B...

Страница 21: ...Installation and Commissioning 108594_en_04 PHOENIX CONTACT 21 2 2 2 3 10 1 Display PCAP Figure 2 10 Mounting cutout dimensions in mm A Mounting Cutout B Front Panel 252 262 7 189 199 3 A B...

Страница 22: ...WP 4000 22 PHOENIX CONTACT 108594_en_04 2 2 2 4 12 1 Display PCAP Figure 2 11 Mounting cutout dimensions in mm A Mounting Cutout B Front Panel A B 229 292 302 219...

Страница 23: ...Installation and Commissioning 108594_en_04 PHOENIX CONTACT 23 2 2 2 5 15 6 Display PCAP Figure 2 12 Mounting cutout dimensions in mm A Mounting Cutout B Front Panel 260 0 5 278 425 0 5 436 A B...

Страница 24: ...WP 4000 24 PHOENIX CONTACT 108594_en_04 2 2 2 6 18 5 Display PCAP Figure 2 13 Mounting cutout dimensions in mm A Mounting Cutout B Front Panel 311 0 5 329 475 0 5 485 A B...

Страница 25: ...CONTACT 25 2 2 3 Side View Mounting Depth 2 2 3 1 7 Display resistive Figure 2 14 Side view mounting depth dimensions in mm 1 Mounting Bracket 2 Threaded Pin 3 Mounting Surface Thickness 1 mm to 6 mm...

Страница 26: ...NTACT 108594_en_04 2 2 3 2 7 Display PCAP Figure 2 15 Side view mounting depth dimensions in mm 1 Mounting Bracket 2 Threaded Pin 3 Mounting Surface Thickness 1 mm to 6 mm 4 Circumferential Seal 5 Fro...

Страница 27: ...594_en_04 PHOENIX CONTACT 27 2 2 3 3 10 1 Display PCAP Figure 2 16 Side view mounting depth dimensions in mm 1 Mounting Bracket 2 Threaded Pin 3 Mounting Surface Thickness 1 mm to 6 mm 4 Circumferenti...

Страница 28: ...ACT 108594_en_04 2 2 3 4 12 1 Display PCAP Figure 2 17 Side view mounting depth dimensions in mm 1 Mounting Bracket 2 Threaded Pin 3 Mounting Surface Thickness 1 mm to 6 mm 4 Circumferential Seal 5 Fr...

Страница 29: ...594_en_04 PHOENIX CONTACT 29 2 2 3 5 15 6 Display PCAP Figure 2 18 Side view mounting depth dimensions in mm 1 Mounting Bracket 2 Threaded Pin 3 Mounting Surface Thickness 1 mm to 6 mm 4 Circumferenti...

Страница 30: ...ACT 108594_en_04 2 2 3 6 18 5 Display PCAP Figure 2 19 Side view mounting depth dimensions in mm 1 Mounting Bracket 2 Threaded Pin 3 Mounting Surface Thickness 1 mm to 6 mm 4 Circumferential Seal 5 Fr...

Страница 31: ...or UL 61010 an 4 A or smaller fuse either standard or electronic or circuit breaker must be installed between the 24 V DC external power supply and the operating device The fuse circuit breaker must b...

Страница 32: ...ut 2 3 2 Grounding The grounding is performed with a slip on sleeve noiseless ground functional earth ground 1 Strip approx 5 mm 0 197 off the wires 2 Fit the stripped wires with a slip on sleeve 3 Pl...

Страница 33: ...on of the operating device can be read from the options in the orderkey on the nameplate Please also pay attention to the further information in the user manual of your software op tion at phoenixcont...

Страница 34: ...108594_en_04 P29 Processor ARM Cortex A53 4x 1 2 GHz P31 Processor ARM Cortex A53 4x 1 2 GHz TPM R34 Main memory 1 GB LPDDR3 M76 Master storage 8 GB eMMC Flash O00 Options No options Table 2 2 Orderke...

Страница 35: ...n variant NOTICE Damage Pointed or sharp objects such as pens or fingernails can lead to irreparable damages of the touch screen Exclusively therefore use the fingertips or the aids indicated in the t...

Страница 36: ...1 Position of the status LEDs The status LEDs have the following functions Table 3 1 Status LEDs LED Color State Designation Function 1 Green Flashing Heartbeat The bootloader and the im age has been...

Страница 37: ...nterfaces Figure 4 1 Rear view Ethernet 1 Female Connector X5 Ethernet 2 Female Connector X9 X10 USB Host Type A 3 Status LED LD1 Heartbeat 4 Status LED LD2 Power 5 Slot for microSD microSDHC Memory C...

Страница 38: ...nt of the Ethernet interface Pin Designation Function 1 Tx Transmitted Data Positive Polarity 2 Tx Transmitted Data Negative Polarity 3 Rx Received Data Positive Polarity 4 n c Not Connected 5 n c Not...

Страница 39: ...On ACT LNK Connected Flashing Sending receiving ethernet data telegram 2 Yellow On SPD 10 100 Operation in 100 MBit s mode Off Operation in 10 MBit s mode or disconnected NOTICE Using hardware not sui...

Страница 40: ...mory card until it snaps into place Figure 4 3 Inserting the memory card 4 1 3 2 Ejecting the memory card To remove push the memory card into the operating device until it clicks The memory card bounc...

Страница 41: ...ns 5 2 Fuse A semiconductor fuse is used to protect the device Once the fuse has been tripped the de vice must be disconnected from the supply voltage to allow the semiconductor fuse to re generate At...

Страница 42: ...WP 4000 42 PHOENIX CONTACT 108594_en_04...

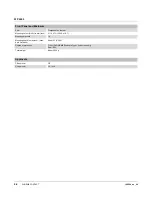
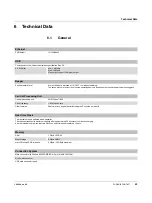
Страница 43: ...Central Processing Unit Central processing unit ARM Cortex A53 Clock frequency 1 2 GHz quad core Other features Real time clock typical deviation is approx 2 minutes per month Real time Clock The real...

Страница 44: ...mit value class A EN 55032 limit value class A EN 61000 6 4 Equipment requirements EN 61131 2 Storage and transportation EN 61131 2 Power supply EN 61131 2 Electromagnetic compatibility 2014 30 EU Deg...

Страница 45: ...x 152 4 3 598 x 6 0 Environmental Conditions Temperature during operation 0 C to 50 C 32 F to 122 F with order key option P29 P31 Temperature during storage transport 25 C to 70 C 13 F to 158 F Relati...

Страница 46: ...H x W x D in mm Inch 147 x 203 x 5 5 787 x 7 992 x 0 197 Seal Circumferential rubber seal on the rear Mounting cutout H x W in mm Inch 139 x 195 5 7472 x 7 677 Mounting brackets 6 Mounting depth in m...

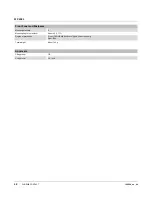
Страница 47: ...sation Rear 20 to 85 no condensation Application area Degree of pollution 2 overvoltage category II No direct solar radiation Electrical Data Supply voltage 24 V DC SELV Limited energy circuit in acco...

Страница 48: ...4 Mounting brackets 6 Mounting depth in mm Inch About 45 1 771 Degree of protection Front IP65 NEMA Enclosure Type 4 indoor use only Rear IP20 Total weight About 760 g Front Panel and Enclosure Approv...

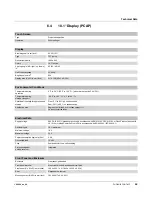
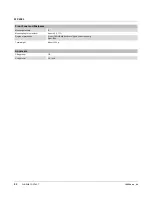
Страница 49: ...ensation Rear 20 to 85 no condensation Application area Degree of pollution 2 overvoltage category II No direct solar radiation Electrical Data Supply voltage 24 V DC SELV Limited energy circuit in ac...

Страница 50: ...4 Mounting brackets 6 Mounting depth in mm Inch About 45 1 771 Degree of protection Front IP65 NEMA Enclosure Type 4 indoor use only Rear IP20 Total weight About 1270 g Front Panel and Enclosure Appro...

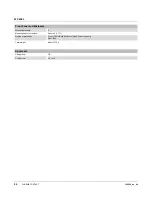
Страница 51: ...ondensation Rear 20 to 85 no condensation Application area Degree of pollution 2 overvoltage category II No direct solar radiation Electrical Data Supply voltage 24 V DC SELV Limited energy circuit in...

Страница 52: ...4 Mounting brackets 8 Mounting depth in mm Inch About 45 1 771 Degree of protection Front IP65 NEMA Enclosure Type 4 indoor use only Rear IP20 Total weight About 1650 g Front Panel and Enclosure Appro...

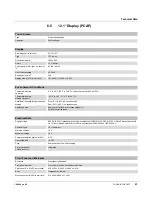
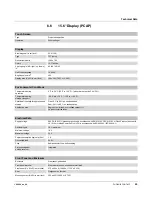
Страница 53: ...ondensation Rear 20 to 85 no condensation Application area Degree of pollution 2 overvoltage category II No direct solar radiation Electrical Data Supply voltage 24 V DC SELV Limited energy circuit in...

Страница 54: ...Mounting brackets 12 Mounting depth in mm Inch About 53 2 086 Degree of protection Front IP65 NEMA Enclosure Type 1 indoor use only Rear IP20 Total weight About 4000 g Front Panel and Enclosure Appro...

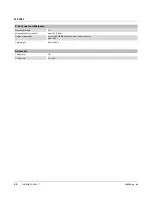
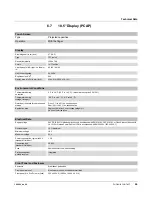
Страница 55: ...ge Front 5 to 95 no condensation Rear 20 to 85 no condensation Application area Degree of pollution 2 overvoltage category II No direct solar radiation Electrical Data Supply voltage 24 V DC SELV Limi...

Страница 56: ...n mm Inch 311 x 475 12 244 x 18 7 Mounting brackets 12 Mounting depth in mm Inch stan dard field bus About 53 2 086 Degree of protection Front IP65 NEMA Enclosure Type 1 indoor use only Rear IP20 Tota...

Страница 57: ...22 15 6 Display PCAP 23 18 5 Display PCAP 24 7 Display PCAP 20 7 Display resistive 19 Mounting depth 10 1 Display PCAP 27 12 1 Display PCAP 28 15 6 Display PCAP 29 18 5 Display PCAP 30 7 Display PCAP...

Страница 58: ...WP 4000 58 PHOENIX CONTACT 108594_en_04 Touchscreen 35 U Unpacking 11 V Version 33...

Отзывы: