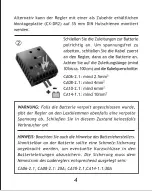


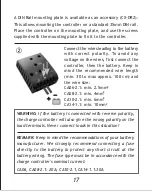
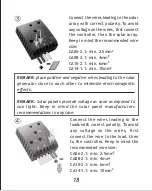


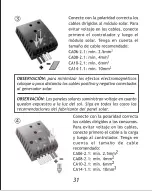

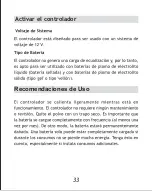
Connect the wires leading to the solar
array with correct polarity. To avoid
any voltage on the wires, first connect
the controller, then the solar array.
Keep in mind the recommended wire
size:
CA06-2.1: min. 2.5mm
2
CA08-2.1: min. 4mm
2
CA10-2.1: min. 6mm
2
CA14-1.1: min. 10mm
2
18
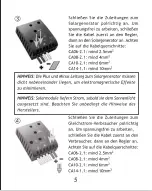
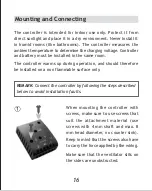
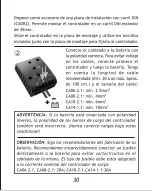
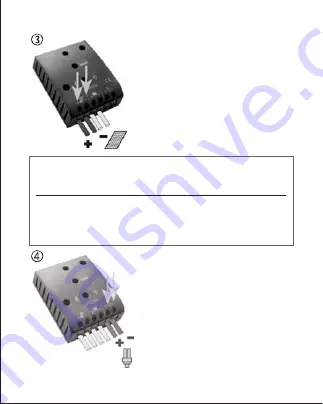
Connect the wires leading to the
loads with correct polarity. To avoid
any voltage on the wires, first
connect the wire to the load, then
to the controller. Keep in mind the
recommended wire size:
CA06-2.1: min. 2.5mm
2
CA08-2.1: min. 4mm
2
CA10-2.1: min. 6mm
2
CA14-1.1: min. 10mm
2
REMARK:
place positive and negative wires leading to the solar
generator close to each other to minimize electromagnetic
effects.
REMARK:
Solar panels provide voltage as soon as exposed to
sun light. Keep in mind the solar panel manufacturers
recommendations in any case.
Содержание CA06-2.1
Страница 2: ...Phocos CA CID 181802511...
Страница 3: ...1 13 14 26 27 39 40 52 53 65 66 77 CONTENTS...
Страница 4: ...Phocos CA Solar Laderegler Bedienungsanleitung Deutsch 1...
Страница 5: ...Funktionsbeschreibung 2...
Страница 6: ...3 Montage und Anschluss...
Страница 7: ...4...
Страница 8: ...5...
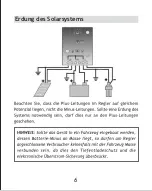
Страница 9: ...6 Erdung des Solarsystems...
Страница 10: ...7 Inbetriebnahme Hinweise zum Betrieb...
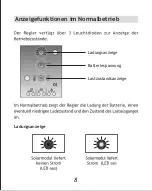
Страница 11: ...8 Anzeigefunktionen im Normalbetrieb Ladungsanzeige Batteriespannung Lastzustandsanzeige Ladungsanzeige...
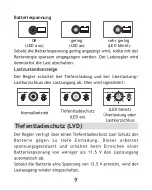
Страница 12: ...9 Tiefentladeschutz LVD OK LED aus gering LED an sehr gering LED blinkt Batteriespannung...
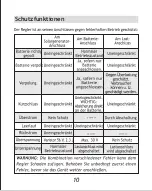
Страница 13: ...10 Schutzfunktionen...
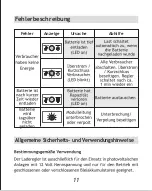
Страница 14: ...11 Allgemeine Sicherheits und Verwendungshinweise Fehlerbeschreibung Fehler Anzeige Ursache Abhilfe...
Страница 15: ...12 Sicherheitshinweise Haftungsausschluss...
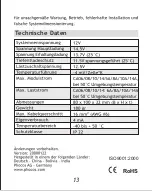
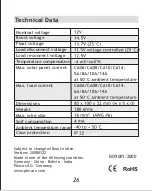
Страница 16: ...13 Technische Daten RoHS ISO9001 2000...
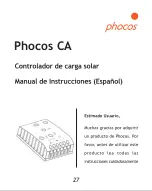
Страница 30: ...Phocos CA 27...
Страница 31: ...28...
Страница 32: ...29...
Страница 33: ...30...
Страница 34: ...31...
Страница 35: ...32 Toma de tierra del Sistema Solar...
Страница 36: ...33 Activar el controlador Recomendaciones de Uso...
Страница 37: ...34...
Страница 38: ...35 Visualizaci n del estado del consumo OK bajo LED encendida muy bajo LED haciendo flashes...
Страница 39: ...36 Caracter sticas de Seguridad...
Страница 40: ...37 Generales sobre Seguridad y Manejo...
Страница 41: ...38 Recomendaciones Generales de Seguridad...
Страница 42: ...39 RoHS ISO9001 2000...
Страница 43: ...Phocos CA 40...
Страница 44: ...Description des fonctions 41...
Страница 45: ...42 Montage et Connexion...
Страница 46: ...43...
Страница 47: ...44...
Страница 48: ...45...
Страница 49: ...46 Recommandations d utilisation...
Страница 50: ...47...
Страница 51: ...48 OK...
Страница 52: ...49...
Страница 53: ...50 Erreur Affichage Cause...
Страница 54: ...51...
Страница 55: ...52 Fiche technique RoHS ISO9001 2000...
Страница 56: ...Phocos CA 53...
Страница 57: ...54...
Страница 58: ...55 Montando e Conectando...
Страница 59: ...56...
Страница 60: ...57...
Страница 61: ...58...
Страница 62: ...59 Iniciando o Controlador...
Страница 63: ...60...
Страница 64: ...61 OK...
Страница 65: ...62...
Страница 66: ...63 Erro Mostrador...
Страница 67: ...64...
Страница 68: ...65 RoHS ISO9001 2000...
Страница 69: ...Phocos CA 66...
Страница 70: ...67...
Страница 71: ...68...
Страница 72: ...69...
Страница 73: ...70...
Страница 74: ...71...
Страница 75: ...72...
Страница 76: ...73...
Страница 77: ...74...
Страница 78: ...75...
Страница 79: ...76...
Страница 80: ...77 RoHS ISO9001 2000...


