background image

50

Erreur

Affichage

Cause

Содержание CA06-2.1

Страница 1: ...nfo australia phocos com Phocos Rep Office Brazil Brazil Info brazil phocos com Phocos Rep Office Eastern Africa Kenya Info easternafrica phocos com Phocos Eastern Europe S R L Romania Info easterneur...

Страница 2: ...Phocos CA CID 181802511...

Страница 3: ...1 13 14 26 27 39 40 52 53 65 66 77 CONTENTS...

Страница 4: ...Phocos CA Solar Laderegler Bedienungsanleitung Deutsch 1...

Страница 5: ...Funktionsbeschreibung 2...

Страница 6: ...3 Montage und Anschluss...

Страница 7: ...4...

Страница 8: ...5...

Страница 9: ...6 Erdung des Solarsystems...

Страница 10: ...7 Inbetriebnahme Hinweise zum Betrieb...

Страница 11: ...8 Anzeigefunktionen im Normalbetrieb Ladungsanzeige Batteriespannung Lastzustandsanzeige Ladungsanzeige...

Страница 12: ...9 Tiefentladeschutz LVD OK LED aus gering LED an sehr gering LED blinkt Batteriespannung...

Страница 13: ...10 Schutzfunktionen...

Страница 14: ...11 Allgemeine Sicherheits und Verwendungshinweise Fehlerbeschreibung Fehler Anzeige Ursache Abhilfe...

Страница 15: ...12 Sicherheitshinweise Haftungsausschluss...

Страница 16: ...13 Technische Daten RoHS ISO9001 2000...

Страница 17: ...Solar Charge Controller User Manual English Phocos CA Dear customer Thank you very much for buying this Phocos product Please read the instructions carefully and thoroughly before using the product 14...

Страница 18: ...ommendations at the end The manual gives important recommendations for installing using and programming as well as a troubleshooting guide for potential problems with the controller The charge control...

Страница 19: ...ontroller is intended for indoor use only Protect it from direct sunlight and place it in a dry environment Never install it in humid rooms like bathrooms The controller measures the ambient temperatu...

Страница 20: ...ed wire length min 30 to max approx 100 cm and the wire size CA06 2 1 min 2 5mm2 CA08 2 1 min 4mm2 CA10 2 1 min 6mm2 CA14 1 1 min 10mm2 17 WARNING If the battery is connected with reverse polarity the...

Страница 21: ...loads with correct polarity To avoid any voltage on the wires first connect the wire to the load then to the controller Keep in mind the recommended wire size CA06 2 1 min 2 5mm2 CA08 2 1 min 4mm2 CA1...

Страница 22: ...any grounding is required always do this on the positive wires 19 REMARK If the device is used in a vehicle which has the battery negative on the chassis loads connected to the regulator must not hav...

Страница 23: ...ries with solid electrolyte gel or fleece type The controller warms up slightly during normal operation The controller does not need any maintenance or service Remove dust with a dry tissue It is impo...

Страница 24: ...In normal operation mode the controller displays the charging status the status of battery voltage and the status of the load output Charge display Charge display Battery voltage display Load status d...

Страница 25: ...Load status display LED flashing Overload or Short circuit of load LED off Normal operation LED on Low voltage disconnect The controller is equipped with a low voltage disconnection function to protec...

Страница 26: ...ort circuit Unrestricted Unrestricted CAUTION Battery mustbeprotected by fuse Unrestricted Overcurrent No protection Controller switches off load No connection Unrestricted Unrestricted Unrestricted R...

Страница 27: ...acity LED on Loads are not supplied Error Reason Recomendation Solar array faulty or wrong polarity Change battery Remove faulty connection reverse polarity Battery is empty again after a short time B...

Страница 28: ...e recommend connecting a fuse slow acting type directly to the battery Batteries can produce flammable gases Avoid making sparks using fire or any naked flame under any circumstances Make sure that th...

Страница 29: ...ina Bolivia India Phocos AG Germany www phocos com Nominal voltage Boost voltage Float voltage Load disconnect voltage Load reconnect voltage Temperature compensation Max solar panel current Max load...

Страница 30: ...Phocos CA 27...

Страница 31: ...28...

Страница 32: ...29...

Страница 33: ...30...

Страница 34: ...31...

Страница 35: ...32 Toma de tierra del Sistema Solar...

Страница 36: ...33 Activar el controlador Recomendaciones de Uso...

Страница 37: ...34...

Страница 38: ...35 Visualizaci n del estado del consumo OK bajo LED encendida muy bajo LED haciendo flashes...

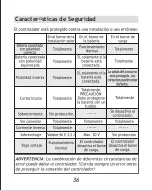
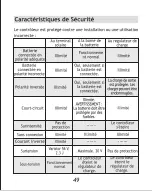
Страница 39: ...36 Caracter sticas de Seguridad...

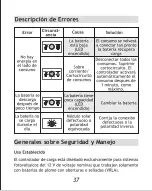
Страница 40: ...37 Generales sobre Seguridad y Manejo...

Страница 41: ...38 Recomendaciones Generales de Seguridad...

Страница 42: ...39 RoHS ISO9001 2000...

Страница 43: ...Phocos CA 40...

Страница 44: ...Description des fonctions 41...

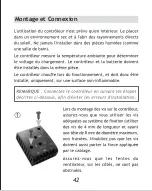
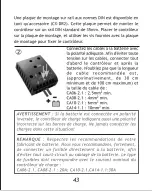
Страница 45: ...42 Montage et Connexion...

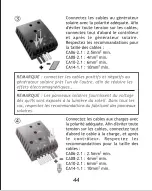
Страница 46: ...43...

Страница 47: ...44...

Страница 48: ...45...

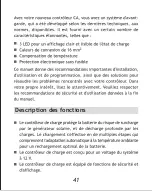
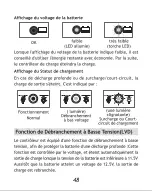
Страница 49: ...46 Recommandations d utilisation...

Страница 50: ...47...

Страница 51: ...48 OK...

Страница 52: ...49...

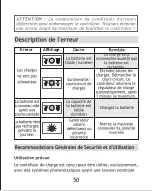
Страница 53: ...50 Erreur Affichage Cause...

Страница 54: ...51...

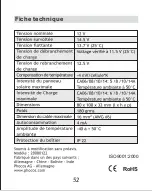
Страница 55: ...52 Fiche technique RoHS ISO9001 2000...

Страница 56: ...Phocos CA 53...

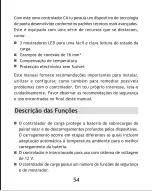
Страница 57: ...54...

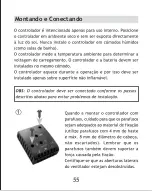
Страница 58: ...55 Montando e Conectando...

Страница 59: ...56...

Страница 60: ...57...

Страница 61: ...58...

Страница 62: ...59 Iniciando o Controlador...

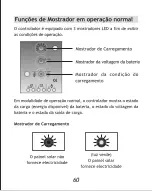
Страница 63: ...60...

Страница 64: ...61 OK...

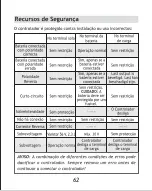
Страница 65: ...62...

Страница 66: ...63 Erro Mostrador...

Страница 67: ...64...

Страница 68: ...65 RoHS ISO9001 2000...

Страница 69: ...Phocos CA 66...

Страница 70: ...67...

Страница 71: ...68...

Страница 72: ...69...

Страница 73: ...70...

Страница 74: ...71...

Страница 75: ...72...

Страница 76: ...73...

Страница 77: ...74...

Страница 78: ...75...

Страница 79: ...76...

Страница 80: ...77 RoHS ISO9001 2000...

Отзывы: