background image

• Press the Headset button on the headset again.

X

 The LEDs of the Phone and the Do-not-disturb buttons

on the docking station turn off, and the status light glows
green.

To reject a Skype call:

• Press the Phone button on the docking station twice

or

• Press the Headset button on the headset twice.

NOTE

• To mute the microphone during a Skype call,

move the microphone boom to an upright po-
sition.

• If you receive a Skype call while you are in a

recording session and you accept the call, you
need to press the Record button again after
finishing the call in order to continue recording.

Automatically stop recording during Skype
calls:

Using the latest firmware (see 

Upgrading the firmware [20]

),

you can activate a function to automatically stop recording
when you receive calls. To activate this function:

• Hold the Record button and the Do-not-disturb button

on the docking station for 3 seconds.

• The Record button LED on the docking station lights up

green for a short moment.

To turn this function off again:

• Hold the Record button and the Do-not-disturb button

on the docking station for 3 seconds.

• The Record button LED on the docking station lights up

red for a short moment.

Control other applications

Using Speech Control (Philips Device Control Center) you
can also control other applications (e.g. Microsoft Teams or
Zoom) with your device.

1.

Download and install the latest version of 

Speech Con-

trol (Philips Device Control Center)

.

2. Download the desired Application Control Profile 

from

our website

.

3. Start Philips Device Control Center:

• If the option to start the Philips Device Control Center

automatically was selected during installation, open
the program by clicking the   icon in the notification
area of the Windows task bar.

• To manually start the program, open the Windows

start menu in Windows and select Philips Speech
Control > Philips Device Control Center.

NOTE

Make sure that you're using the 

latest version

of Philips Device Control Center

.

4. Go to the 

Application control

 tab.

5. Click 

Import

 and choose the downloaded profile from

our website.

NOTE

You are not limited to pre-defined Application
Control Profiles, you can also create your own
profiles to further customize the settings accord-
ing to your needs.

Status light

Use the status light in order to indicate to your colleagues if
you are available or busy. This way, you can work more pro-
ductively due to less interruptions.

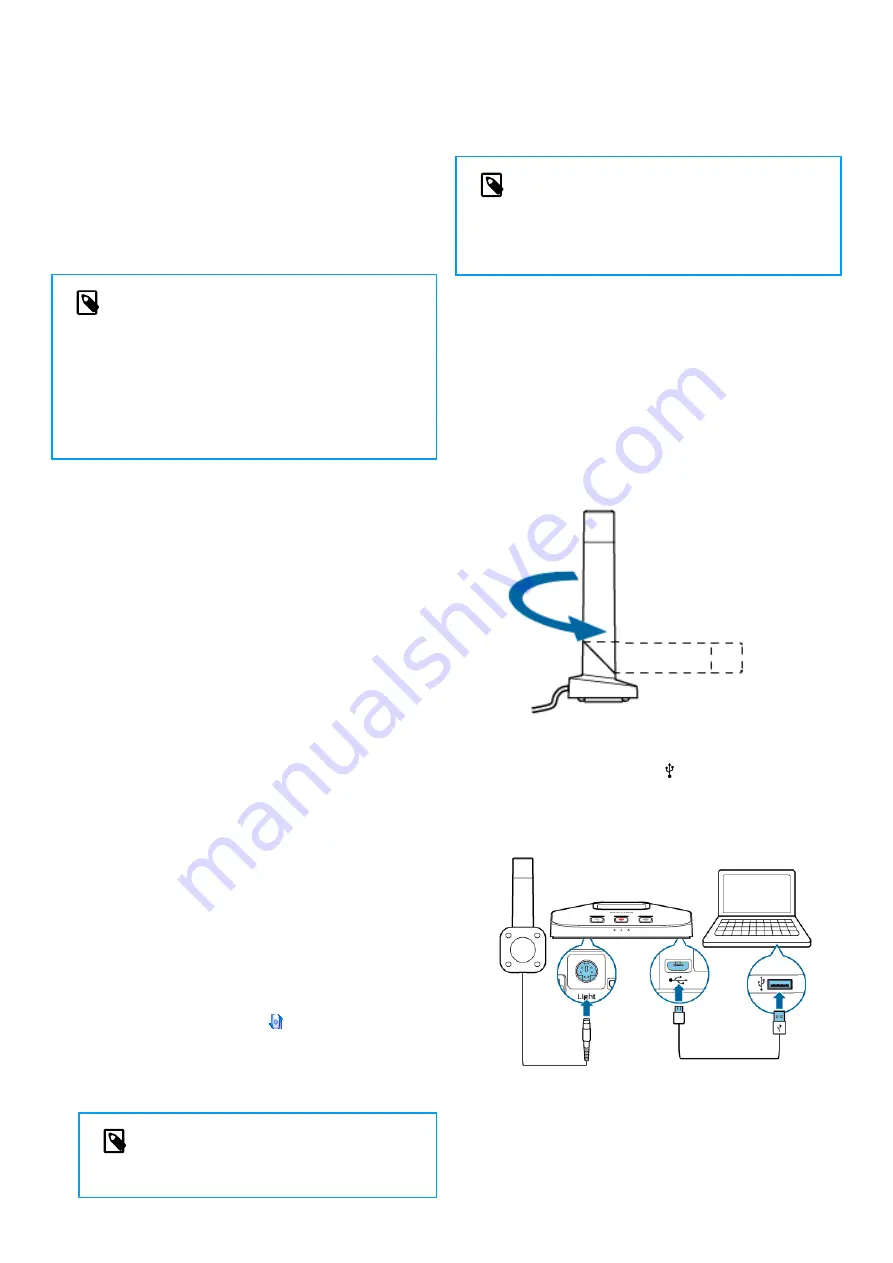
Mount the status light on your computer

1.

Turn the status light into the starting position as dis-
played in the illustration below . Then hold it at the bot-
tom part and pull the upper part in your direction until it
reaches a horizontal position.

2. Connect the docking station to your computer via the

supplied USB cable. Make sure you use the USB port for
PC connection marked with   on the docking station.
Then connect the status light to the status light port on
the docking station.

3. Remove the sticker from the magnet on the bottom of

the status light.

18

Содержание SpeechOne psm6000

Страница 1: ...User manual SpeechOne ...

Страница 2: ...yles 15 Create a recording 17 Skype calls 17 Control other applications 18 Status light 18 Use the remote control PSM6500 PSM6800 19 Hands free dictating with a Philips foot control 19 Upgrading the firmware 20 Power down your SpeechOne 22 5 Button modes 23 Switch between button modes on the docking station 23 Switch between button modes on the remote control PSM6500 PSM6800 24 Event mode 25 Keybo...

Страница 3: ...ufacturer of the medical device to determine if they are adequately shielded from external RF energy or if you have any questions Switch off your device in health care facilities when any reg ulations posted in these areas instruct you to do so Hospi tals or health care facilities may be using equipment that could be sensitive to external RF energy Implanted medical devices This device contains co...

Страница 4: ...n be recycled and reused For recycling information please contact your local waste management facilities or visit www recy cle philips com This appliance contains a rechargeable NiMH battery which must be disposed of properly Contact your local town or city officials for battery dispos al information You can also call 1 800 822 8837 or visit www call2recycle org for battery drop off locations For ...

Страница 5: ...CAUTION This symbol warns of damage to the device and possible data loss Damage can be caused by im proper handling 5 ...

Страница 6: ...2 Your SpeechOne Product highlights Wireless recording Studio quality microphone High speed wireless charging All day battery life Modern ergonomic design Lossless audio transmission Skype support 6 ...

Страница 7: ...ion Headset Docking sta tion Status light Ear cushion Head cushion Headband cushion Headset attach ment Neckband Micro USB ca ble Quick start guide Remote control PSM6500 PSM6800 Product key for SpeechExec soft ware PSM6800 7 ...

Страница 8: ...f your SpeechOne 1 Microphone 2 Microphone boom 3 Status LED 4 Headset button 5 Speaker 6 Detachable magnetic ear cushion 7 Head cushion pad 8 Detachable magnetic head cushion 9 Headband 10 Headband attachment 8 ...

Страница 9: ... 2 Record button 3 Do not disturb button 4 Battery and pairing LEDs 5 Button LEDs 6 Magnetic pad for headset charging 7 Micro USB port for PC connection 8 Remote control port 9 Foot control port 10 Status light port 11 Micro USB port for charging 9 ...

Страница 10: ...Insert overwrite button 4 End of letter priority button 5 Record button 6 Rewind button 7 Fast forward button 8 Play pause button 9 Touch navigation left mouse button 10 Left mouse button 11 Right mouse button 12 Programmable function buttons 13 Command button 14 Left mouse button 10 ...

Страница 11: ...docking station NOTE If you charge your device via docking station make sure that the micro USB connector is con nected to the USB port for charging marked with 5V DC X During charging the battery LEDs on the docking station subsequently light up in a loop until the headset is either removed or fully charged X When charging is complete all three battery LEDs on the docking station glow white CAUTI...

Страница 12: ...s Battery LED Battery status more than 7 hours recording time left 7 hours or less recording time left 2 5 hours or less recording time left Pairing Once you have connected your SpeechOne to a docking station you can dictate wirelessly and use the dictation headset on different workstations without any further pair ing effort NOTE If you use several docking stations make sure to keep a minimum dis...

Страница 13: ...uch as smartphones or lap tops If the distance is less than 50 cm 18 inches there might be interferences between the dock ing station and other wireless devices Going out of range When the wireless connection is lost a voice prompt will notify you about this If you have a SpeechExec application running on your computer the software will be stopped In this case move closer to the docking station to...

Страница 14: ...our computer or op tionally to the power outlet via the supplied USB cable Make sure you use the USB port for PC connection marked with on the docking station 5 Place the SpeechOne on the docking station and wait for about 4 seconds X The SpeechOne should be detected and be auto matically paired with the docking station 14 ...

Страница 15: ...t wearing comfort you can wear the headset in the following ways Wearing with the headband attachment To adjust your headset perfectly to your head and achieve the best wearing comfort you can use the supplied head band attachment 1 Rotate the microphone boom if you want to change the wearing side 2 Attach one of the two head cushions to the head cush ion pad and one to the headband attachment 3 L...

Страница 16: ...ably over the center of your ear 5 X The microphone should be aligned with your mouth Wearing with the neckband 1 Detach the headband from the microphone boom by pulling it up at the junction 2 Attach the neckband to the microphone boom by pressing it down at the junction 3 Pull the neckband over your ears X The speaker should be aligned with the center of your ear Attaching the headband cushion 1...

Страница 17: ...ord button on the docking station once or press the Headset button on the headset once 3 To finish a recording press the Record button on the docking station again or press the Headset button on the headset again NOTE If you receive a Skype call while you are in a re cording session and you accept the call you need to press the Record button again after fin ishing the call in order to continue rec...

Страница 18: ...ion of Speech Con trol Philips Device Control Center 2 Download the desired Application Control Profile from our website 3 Start Philips Device Control Center If the option to start the Philips Device Control Center automatically was selected during installation open the program by clicking the icon in the notification area of the Windows task bar To manually start the program open the Windows sta...

Страница 19: ...the docking station for 3 seconds until you hear a short beep sound X Pressing the Do not disturb button on the docking sta tion you can switch the status light to red do not disturb or turn it off To reactivate the green status light Wear the headset and hold the Do not disturb button on the docking station for 3 seconds until you hear a short beep sound X Pressing the Do not disturb button on th...

Страница 20: ...e Philips foot controls 2310 and 2320 have three pedals By default the foot controls 2310 and 2320 have the fol lowing configuration ACC2310 ACC2320 Foot control ACC2330 The Philips foot control 2330 has four pedals By default the foot control 2330 has the following configuration ACC2330 Upgrading the firmware Your device is controlled by an internal program called firm ware As a part of ongoing p...

Страница 21: ... of the Windows task bar To manually start the program open the Windows start menu in Windows and select Philips Speech Control Philips Device Control Center NOTE Make sure that you re using the latest version of Philips Device Control Center 3 On the Device tab click on Firmware upgrade 4 Click on the desired upgrade version from the Available firmware versions list If the Available firmware vers...

Страница 22: ...own your SpeechOne If the SpeechOne is not used for more than 6 hours it auto matically turns off to save battery life You can also power down your SpeechOne manually 1 Remove the headset from the docking station 2 Hold the Pairing button of your SpeechOne headset for 9 seconds 3 The status LED of your SpeechOne headset is no longer illuminated indicating that you turned off the device To turn the...

Страница 23: ...our current mode is indicated as follows Mode Button LEDs Function of Record button Event mode Start end recording Keyboard mode Turn on off SpeechOne microphone when using Dragon speech recognition software Browser mode Start end recording Windows speech recognition mode Turn on off Windows microphone Dragon for Mac mode Turn on off Dragon microphone Dragon for Windows mode Turn on off Dragon mic...

Страница 24: ... end recording Windows speech recognition mode F4 Turn on off Windows microphone Dragon for Mac mode EoL Prio Turn on off Dragon microphone Dragon for Windows mode INS OVR Turn on off Dragon microphone X The SpeechOne exits the mode selection and switches to the selected mode NOTE You have 10 seconds to select a mode After 10 seconds you will automatically exit mode selection and need to restart t...

Страница 25: ...ressing or releasing a de sired button on your SpeechOne in order to control various computer applications Command 1 Instruction 2 Insert overwrite append 3 End of letter priority 4 Record 5 Fast rewind 6 Fast forward 7 Play 8 Touch navigation left mouse 9 Left mouse 10 Right mouse 11 Programmable function button 12 Programmable function button 13 Programmable function button 14 Programmable funct...

Страница 26: ...s computer by us ing the pre configured Dragon shortcuts Command Shortcut in SpeechControl 1 Record Stop Dragon micro phone on off NumKey 2 Tab forward Tab 3 Tab backward Shift Tab 4 SpeechMike microphone on off Microphone ON OFF 5 Mark previous word s Ctrl Shift Left 6 Next field Dragon Ctrl Shift N 7 Play 8 Touch navigation left mouse 9 Left mouse 10 Right mouse 11 Show dictation box Dragon Ctrl...

Страница 27: ...nd 3 4 Record 5 Fast rewind 6 Fast forward 7 Play 8 Touch navigation left mouse 9 Left mouse 10 Right mouse 11 Jump to start of dictation 12 Jump to end of dictation 13 Programmable function button 14 Programmable function button NOTE The button assignment in Browser mode depends on the application you are using in your browser Therefore there is no default configuration for this mode The table be...

Страница 28: ...indows shortcuts Command Shortcut in Speech Control 1 2 Next field Dragon Tab 3 Tab backward Shift Tab 4 Windows microphone on off Ctrl Win 5 Mark previous word s Ctrl Shift Left 6 Mark next word s Ctrl Shift Right 7 8 Touch navigation left mouse 9 Left mouse 10 Right mouse 11 Copy Ctrl C 12 Cut Ctrl X 13 Paste Ctrl V 14 Programmable function but ton Ctrl Shift H 28 ...

Страница 29: ...onfigured Dragon shortcuts Command Shortcut in Speech Control 1 2 Tab forward Tab 3 Tab backward Shift Tab 4 Dragon microphone on off F11 5 Mark previous word s Alt Shift Left 6 Mark next word s Alt Shift Right 7 Play 8 Touch navigation left mouse 9 Left mouse 10 Right mouse 11 Copy C 12 Cut X 13 Paste V 14 Programmable function button 29 ...

Страница 30: ...2 Tab forward Tab 3 Tab backward Shift Tab 4 Dragon microphone on off NumKey 5 Mark previous word s Ctrl Shift Left 6 Next field Dragon Ctrl Shift N 7 Play 8 Touch navigation left mouse 9 Left mouse 10 Right mouse 11 Show dictation box Dragon Ctrl Shift D 12 Transfer text Dragon dictation box Ctrl Shift T 13 Programmable function button 14 Switch to hidden mode Dragon Medical Practice Edition Ctrl...

Страница 31: ...ion Move closer to the docking sta tion Start the pairing process as de scribed in the chapter Pairing 12 The USB ca ble is con nected to the wrong USB port on the docking sta tion i e USB port for charging marked with 5V DC Disconnect the USB cable from the docking sta tion and connect it to the USB port for PC connec tion marked with on the docking station Your comput er is in sleep mode Wake yo...

Страница 32: ...he USB port for charging marked with 5V DC For more in formation see Charging the battery 11 LED colors and meanings The LEDs on your SpeechOne and the docking station indi cate the connection and battery status as well as problems that might occur when using your SpeechOne and the docking station Use the following table to learn more about the connection status battery status and potential prob l...

Страница 33: ... mm 1 4 1 4 3 9 Weight 58 g 2 1 oz Magnetic ear cushion 50 mm 2 Magnetic head cushions 48 12 mm 1 9 0 5 Green specifications Compliant to 2011 65 EU RoHS Lead free soldered product Certifications CE FCC C Tick Australia and New Zea land Operation conditions Temperature 5 45 C 41 113 F Humidity 10 90 System requirements Processor Intel dual core or equivalent AMD processor 1 GHz or faster RAM 2 GB ...

Страница 34: ... GB 32 bit 8 GB 64 bit Free hard disk space 8GB Accessories optional SpeechOne Remote Control ACC6100 SpeechOne Docking Station and Status Light ACC6000 SpeechOne Headset Cushions 5 ACC6005 AirBridge Wireless Adapter for SpeechOne and Speech Mike Premium Air ACC4100 34 ...

Страница 35: ...and on the user is encouraged to try to correct the interference by one or more of the following measures Reorient or relocate the receiving antenna Increase the separation between the equipment and re ceiver Connect the equipment into an outlet on a circuit different from that to which the receiver is connected Consult the dealer or an experienced radio TV technician for help Industry Canada IC r...

Страница 36: ...ations are subject to change without notice Philips and the Philips shield emblem are registered trademarks of Ko ninklijke Philips N V and are used by Speech Processing Solutions GmbH under license from Koninklijke Philips N V All trademarks are the property of their respective owners 36 ...

Отзывы: