background image

10

MML1801

I

O

CONNECTING INSTRUCTION 

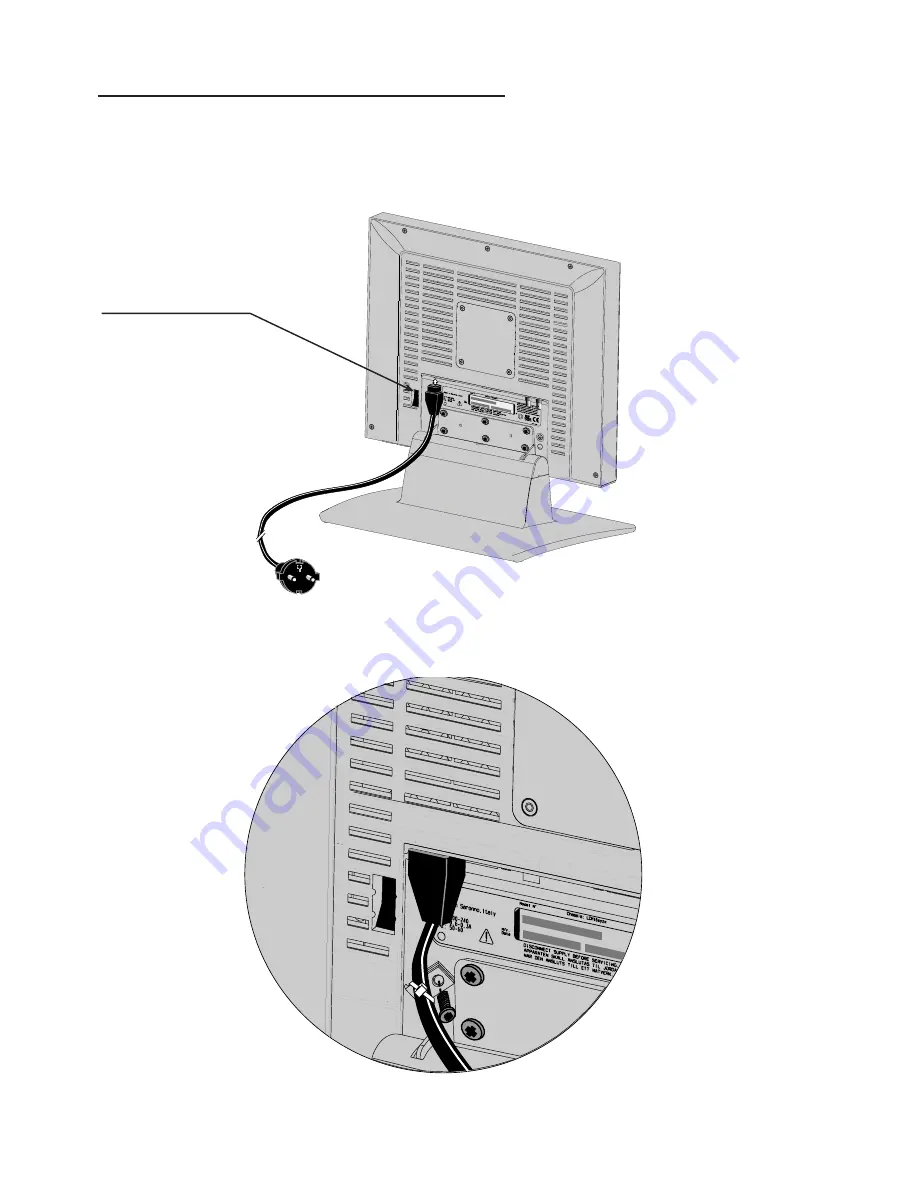
CONNECTING AC POWER

Plug the receptacle and of the cord set into the AC power adapter, then plug the power connector of the adapter 
into the power port on the monitor.
This power port is located on the back of the monitor  (see 

fi

 g. 10a).

fi

 g.10a

I

O

fi

 g 10b

The power cord set can be 

fi

 xed to cabinet with proper cable clamp and screw (see 

fi

 g. 10b)

Insert the plug end of the power cord into a grounded wall outlet. For added protection, use a surge protector 
between the AC adapter and the electrical wall outlet to prevent sudden current variations from reaching 
the monitor

MAINS SWITCH

Содержание MML1801 Series

Страница 1: ... 18 MONOCHROME MONITOR MML1801 FAMILY Copyright 2002 FIMI S r l Saronno Italy All rights are reserved Reproduction in whole or in part is prohibited without the written consent of the copyright owner Printed in Italy Rev 1 1 ...

Страница 2: ...55011 Class B Modification The FCC requires the user to be notified that any changes or modifications made to this device that are not expressly approved by the manufacturer may vold the user s autority to operate the equipment Cables Connections to this device must be made with shielded signals cables with metallic RFI EMI connector hoods to maintain compliace with FCC Rules and Regulations The l...

Страница 3: ...ments for liquid ingress and current leakage from power supply The typical application is to display high resolution X ray images This product delivers much higher brightness than the standard Flat Panel monitors equal at least to the brightness level of current high end monochrome CRT monitors used for the same applications The other key features of the MML1801 are long term luminance stability t...

Страница 4: ...5 OSD key functions 16 OSD controls 16 main menu 16 information 17 image adjust 17 horizontal position 18 vertical position 18 scale center 18 image Enhancement 18 ABC selection 18 transfer function 19 advanced 19 phase adjust 20 clock adjust 20 service 21 auto setup options 21 auto setup on modset 21 auto clock feature 22 auto Phase Position 22 auto Clock Position 22 auto level 22 restore factory...

Страница 5: ... Pitch 0 2805 one triad x 0 2805 mm width x height Video interface Analog Input BNC connection for Composite Video Signal DSUB 15 connection for Separate Sync Video Signal or SOG Video Signal Digital Input DVI D connection for TMDS signal link standard version Analog Output BNC connection for Loop Through Composite Video Signal Scanning Frequency Max pixel clock 135MHz Power Consumption 70 W Power...

Страница 6: ...6 MML1801 22 2 17 6 306 02 1 5 21 3 82 288 2 360 197 78 410 362 48 7 147 58 DIMENSIONS ...

Страница 7: ...7 MML1801 29 181 205 205 100 100 117 117 181 71 DIMENSIONS ...

Страница 8: ...packing the monitor inspect it and other package contents for shipping damage that could cause a fire or shock hazard immediately report any shipping damage to the carrier or transportation company and contact customer service for assistance keep all packing material in case you need to ship store or return the monitor After unpacking the monitor make sure the following items are included Monitor ...

Страница 9: ...100 interface must be fixed at monitor with N 4 screws M4x10 as shown in figure 9b MOUNTING INSTRUCTION I O The pedestal must be fixed at monitor with N 6 screws M3x10 included into the BOX as shown in figure 9a PEDESTAL STANDARD OPTIONAL fig 9a fig 9b ...

Страница 10: ... power port is located on the back of the monitor see fig 10a fig 10a I O fig 10b The power cord set can be fixed to cabinet with proper cable clamp and screw see fig 10b Insert the plug end of the power cord into a grounded wall outlet For added protection use a surge protector between the AC adapter and the electrical wall outlet to prevent sudden current variations from reaching the monitor MAI...

Страница 11: ... see fig 11a G R B I O fig 11a Make sure the video cable connector is securely connected to the video port on your computer Turn the monitor on first and then turn on the computer G R B I O CONNECTING COMPOSITE VIDEO BNC With the power the computer and the monitor turned off connect the supplied video cable from the monitor to the computer s video port see fig 11b fig 11b ...

Страница 12: ...instructions included on the enclosed CD for installing the Touchscreen drivers on your system Following driver software installation calibrate your Touchscreen to the system following the procedure described on the enclosed CD I O G R B G R B I O CONNECTING DIGITAL VIDEO DVI With the power the computer and the monitor turned off connect the supplied video cable from the monitor to the computer s ...

Страница 13: ... Detect Pin 5 N C Pin 17 D0_RX T M D S Pin 6 SCL For DDC Pin 18 D0_RX T M D S Pin 7 SDA For DDC Pin 19 GND Data 0 shield Pin 8 N C Pin 20 N C Pin 9 D1_RX T M D S Pin 21 N C Pin 10 D1_RX T M D S Pin 22 GND Clock shield Pin 11 GND Data 1 shield Pin 23 CK_RX T M D S Pin 12 N C Pin 24 CK_RX T M D S VIDEO INPUT XVGA Connection DSUB15 female connector Pin 1 R in Pin 9 N C Pin 2 G in Pin 10 GND Pin 3 B i...

Страница 14: ...part of the unit the following controls are placed BRIGHTNESS ADJ BRIGHTNESS ADJ MENU SELECT BRIGHTNESS Recall to 500 Cd m MENU SELECT ENTER Store Source Select fig 14a Brightness Adjust Brightness Adjust Menu select GREEN 500 cd m Power on RED 500 cd m ORANGE Stand by Power Switch Light sensor ...

Страница 15: ...O GAIN STORE VIDEO EXIT AUTO SETUP OPTIONS AUTO SETUP ON MODESET ENABLED DISABLED ONLY ONCE AUTO CLOCK FEATURE ENABLED DISABLED EXIT AUTO PHASE POSITION AUTO CLOCK POSITION AUTO LEVEL RESTORE FACTORY PRESETS EXIT EXIT LANGUAGES ENGLISH FRANCAIS DEUTSCH ESPANOL ITALIANO OSD SETTING OSD POSITION HORIZONTAL POSITION VERTICAL POSITION EXIT OSD SIZE NORMAL DOUBLE OSD TRANSPARENCY OSD TIMEOUT 10 Sec 20 ...

Страница 16: ... sub menu is active it allows to move or scroll to the previous down item or increment the magnitude of the parameter Pressing Enter key the MAIN MENU highlight selection is the first Sub menu item Information Pressing Menu or Menu key the highlight selection of menu item moves downward upward Pressing Enter key the current menu window disappears and is replaced by the new sub menu windows Informa...

Страница 17: ...djust is highlighted on Main Menu The Image Adjust window appears 6 3 1 Horizontal Position 1 Press Enter button when the Horizontal Position is highlighted on Image Adjust The Horizontal Position bar appears Horizontal Position Vertical position Scale Center Exit Image Enhancement Image Adjust Advanced 2 Press Adjust or Adjust button to move the image to the left or right 3 When the position is a...

Страница 18: ...n Exit Image Enhancement Full Screen Maintain Aspect Ratio Center Scale Center 6 3 3 Scale Center 1 Press Enter button when the Scale Center is highlighted on Image Adjust The Scale Center window appears The ON SCREEN DISPLAY shows the three modes available The default is Full Screen but you can select Maintain Aspect Ratio or Center 2 Press the Adjust or Adjust button to change the video mode the...

Страница 19: ... the Enter button to confirm your selection and return to Image Enhancement window TG3 PMS Linear DICOM Transfer Function Monitor TG3 6 3 7 Advanced 1 Press Enter button when the Adavanced is highlighted on Main Menu The Advanced window appears 6 3 6 Transfer Function 1 Press Enter button when the Transfer Functiopn is highlighted on Image Enhancement The Transfer Function window appears 2 Press t...

Страница 20: ...ress the Enter button to return to Advanced window 4 Select Exit and press again Enter button to return to Image Adjust or select Clock Adjust Phase Adjust Clock Adjust Service Exit Auto Setup Options Advanced Auto Phase Position Auto Level Restore Factory Presets Auto Clock Position 2 Press the Menu or Menu button until the desired source is highlighted 6 3 9 Clock Adjust 1 Press Enter button whe...

Страница 21: ...utton when the Store Video is highlighted 6 Select Exit and press again Enter button to return to Advanced or select Auto Setup Options 6 3 11 Auto Setup Options 1 Press Enter button when the Auto Setup Options is highlighted on Advanced The Auto Setup Options window appears 2 Press Menu or Menu button to select automatic options Auto Setup Options and Auto Clock feature define the modality of Aut...

Страница 22: ...time the video timing changes Disabled Never Enabled Every time the video timing changes Disabled Never Only Once Only the first time that the video timing is recognized Enabled Disabled Only Once Auto Setup On Modest 6 3 13 Auto Clock Feature 1 Press Enter button when the Auto Clock Feature is highlighted on Auto Setup Options The Auto Clock Feature window appears 2 Press Adjust or Adjust button ...

Страница 23: ...Press Enter button when the OSD Settings is highlighted on Main Menu The OSD Settings window appears 2 Press the Menu or Menu button until the desired item is highlighted OSD Position OSD Size OSD Transparency Exit OSD Timeout OSD Settings Horizontal Position Vertical position Exit OSD Position 6 5 1 OSD Position 1 Press Enter button when the OSD Position is highlighted on OSD Settings The OSD Pos...

Страница 24: ...cal position Exit OSD Position 2 Press Enter button and Adjust or Adjust button to move UP or DOWN the OSD image 3 When the position is adjusted press the Enter button to return to OSD Position window 4 Select Exit and press again Enter button to return to OSD Settings Horizontal Position Vertical position Exit OSD Position 2 Press Enter button and Adjust or Adjust button to move the OSD image to ...

Страница 25: ...ust button to choose the time of activation of the OSD Menu 3 Press the Enter button to confirm your selection and return to OSD Settings window 6 6 0 Video Source The ON SCREEN DISPLAY shows the four sources available The default is BNC Composite Video with Sync On Green but you can select DVI Digital Video Input DSUB D sub input Video with separated syncr DSUB SOG D sub input Video with Syncr On...

Страница 26: ... appears Keyboard Unlock Keyboard Lock Keyboard Option 2 Press the Adjust or Adjust button until the desired item is highlighted 3 Press the Enter button to confirm your selection and return to Main Menu window REMARK To select the Keyboard status LOCK or UNLOCK use the Keyboard Option Menu The new status is stored in E2prom the default status is UNLOCK If the Keyboard Status is UNLOCK any key and...

Страница 27: ...INTENTIONALLY LEFT BLANK ...

Страница 28: ...3119 206 1404 1 FIMI S r L R D CG0209 R2002B ...

Отзывы: