background image

22

Disable the password for parental control 

‡

or change the rating level.
Moisture has condensed inside the 

‡

system. Remove the disc and leave the 
system turned on for about an hour. 
Disconnect and reconnect the AC power 
plug, and then turn on the system again.

Audio or subtitle languages cannot be set

The disc is not recorded with sound or 

‡

subtitles in multiple languages.
The audio or subtitle language setting is 

‡

prohibited on the disc.

&DQQRWGLVSOD\VRPHÀOHVLQ86%GHYLFH

7KHQXPEHURIIROGHUVRUÀOHVLQWKH86%

‡

device has exceeded a certain limit. This 
phenomenon is not a malfunction.

7KHIRUPDWVRIWKHVHÀOHVDUHQRW

‡

supported.

USB device not supported

The USB device is incompatible with the 

‡

unit. Try another one.

Low hum or buzz sound

Place the DVD micro system as far away 

‡

as possible from electrical devices that 
may be causing interference.

Black and white or distorted picture

The disc does not match the TV color 

‡

system standard (PAL/NTSC).
Sometimes a slight picture distortion may 

‡

appear. This is not a malfunction.
Clean the disc.

‡

A distorted picture may appear during 

‡

progressive scan setup.

The aspect ratio of the TV screen cannot be 
changed even though you have set the TV 
display format.

7KHDVSHFWUDWLRLVÀ[HGRQWKHORDGHG

‡

DVD disc.
The aspect ratio may not be possible to 

‡

change for some TV systems.

No sound or poor sound

Adjust the volume.

‡

Check that the speakers are connected 

‡

correctly.
Check if the stripped speaker wires are 

‡

clamped.
The system is in pause, slow motion or 

‡

fast forward/reverse mode, press 

 to 

resume normal play mode.

Remote control does not work

Before you press any function button, 

‡

ÀUVWVHOHFWWKHFRUUHFWVRXUFHZLWKWKH

remote control instead of the main unit.
Reduce the distance between the remote 

‡

control and the unit.
Insert the battery with its polarities (+/– 

‡

signs) aligned as indicated.
Replace the battery.

‡

Aim the remote control directly at the 

‡

sensor on the front of the unit.
Remove any possible obstacles.

‡

Disc does not play

Insert a readable disc and ensure that the 

‡

label side faces up.
Check the disc type, color system and 

‡

regional code. Check for any scratches or 
smudges on the disc.
Press 

‡

SETUP

 to exit the system setup 

menu.

EN

Содержание MCD120

Страница 1: ...Register your product and get support at www philips com welcome EN User manual ZH TW Ԛ ʹ MCD120 ...

Страница 2: ...12 4 Get started 13 Prepare the remote control 13 Turn on 13 Find the correct viewing channel 13 SelectTV system that match the connected TV 13 Change system menu language 14 Turn on Progressive Scan 14 5 Play 15 Play a disc 15 Play from USB 16 Play mixed contents 16 Play control 16 Play options 17 6 Adjust settings 18 System Setup 18 Language Setup 19 Audio setup 19 7 Product information 20 6SHFL...

Страница 3: ...r objects have fallen into the apparatus the apparatus has been exposed to rain or moisture does not operate normally or has been dropped n Battery usage CAUTION To prevent battery leakage which may result in bodily injury property damage or damage to the unit 1 Important Safety Know these safety symbols This bolt of lightning indicates uninsulated material within your unit may cause an electrical...

Страница 4: ...an health Install all batteries correctly and as marked on the unit Do not mix batteries old and new or carbon and alkaline etc Remove batteries when the unit is not used for a long time o Apparatus shall not be exposed to dripping or splashing p Do not place any sources of danger on WKH DSSDUDWXV H J OLTXLG ÀOOHG REMHFWV OLJKWHG FDQGOHV q Where the MAINS plug or an appliance coupler is used as th...

Страница 5: ...e recycled and reused if disassembled by a specialized company Please observe the local regulations regarding the disposal of packaging materials exhausted batteries and old equipment Copyright notice This item incorporates copy protection technology that is protected by U S patents and other intellectual property rights of Rovi Corporation Reverse engineering and disassembly are prohibited Tradem...

Страница 6: ...RP WKH support that Philips offers register your product at www philips com welcome Introduction With this unit you can watch video from DVD VCD SVCD or USB devices enjoy audio from discs or USB devices view pictures from discs or USB devices The unit supports these media disc formats You can play DVD discs with one of the following region codes DVD region code Countries VLD 3DFLÀF 7DLZDQ RUHD Aus...

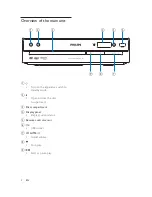
Страница 7: ... apparatus switch to standby mode b Open or close the disc compartment c Disc compartment d Display panel Display current status e Remote control sensor f USB socket g VOLUME Adjust volume h Stop play i Start or pause play a b c d e f g h i EN ...

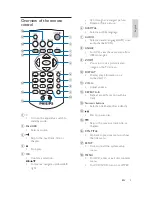
Страница 8: ...KLQ D track m Numeric buttons Select a title chapter track directly n Start or pause play o Skip to the previous track title or chapter p RTN TITLE Go back to previous menu or show the title menu q SETUP Access or exit the system setup menu r MENU For DVD enter or exit disc contents menu For VCD SVCD turn on or off PBC Overview of the remote control a Turn on the apparatus switch to standby mode b...

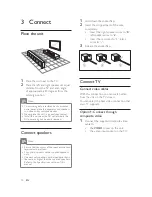
Страница 9: ...onnect Place the unit 1 Place the unit near to the TV 2 Place the left and right speakers at equal distance from the TV and at an angle of approximately 45 degrees from the listening position Note To avoid magnetic interference or unwanted noise never place this apparatus and speakers too close to any radiation devices Never place this unit in an enclosed cabinet Install this unit near the AC outl...

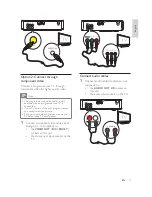
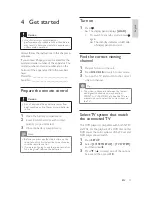
Страница 10: ... TV through component video for higher quality video Note The progressive scan video quality is only available when a progressive scan TV is connected If your TV does not support progressive scan you cannot view the picture For how to activate progressive scan on your TV refer to the TV user manual 1 Connect component video cables red blue green not supplied to the VIDEO OUT Pr Cr Pb Cb Y sockets ...

Страница 11: ...e Ensure that the power supply voltage corresponds to the voltage printed on the back or the underside of the unit Before connecting the AC power cord ensure you have completed all other connections 1 Connect the AC power cord to the wall socket EN ...

Страница 12: ... RSWLRQV below and then press OK 4 Get started Caution Use of controls or adjustments or performance of procedures other than herein may result in hazardous radiation exposure or other unsafe operation Always follow the instructions in this chapter in sequence If you contact Philips you will be asked for the model and serial number of this apparatus The model number and serial number are on the bo...

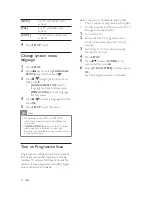
Страница 13: ...system menu language 1 Press SETUP 2 Press keys to select LANGUAGE SETUP page and then press 3 Press to highlight an option and then press LANGUAGE SETUP Select a language for screen display menu MENU LANG Select a language for disc menu 4 Press to select a language and then press OK 5 Press SETUP to exit the menu Note Depending on the DVD or VIDEO CD discs some operations may be different or rest...

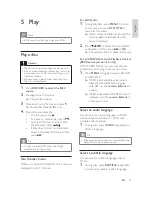
Страница 14: ...elect a language Tip If the selected audio channel is unavailable the default disc audio channel is used Select a subtitle language You can select a subtitle language only on DVDs 1 During play press SUBTITLE repeatedly to select an available subtitle language 5 Play Note LWK VRPH GLVF ÀOH W SHV SOD PD GLIIHU Play a disc Caution Never look at the laser beam inside the unit Risk of product damage N...

Страница 15: ...ly or horizontally Rotate the picture anti clockwise or clockwise Play from USB Note Ensure that the USB device contains playable music pictures or video 1 Insert the USB device 2 Press DISC USB to select the USB source Content menu of the USB source appears 3 Press to select a folder and press OK 4 Press WR VHOHFW D ÀOH 5 Press WR VWDUW SOD WKH VHOHFWHG ÀOH To stop play press To pause or resume p...

Страница 16: ...able only within the same track Search by time or chapter track number 1 During video audio play press DISPLAY The available disc information is displayed 2 Press to highlight track number chapter number or time 3 Use the numeric buttons 0 9 to input the number time and then press OK to FRQÀUP GOTO displays on the screen Play starts automatically at your selected point Play options Display play in...

Страница 17: ...ren These types of discs must be recorded with ratings 4 3 Letter Box LB 4 3 Pan Scan PS 16 9 Wide Screen 6 Adjust settings 1 Press SETUP 2 3UHVV ɾ ɼ to navigate in the menu 3 Select a setting and then press OK To exit the menu press SETUP Note Some of the features in the SETUP Menu Options are described in Get Started System Setup On the SYSTEM SETUP page you can set the following options TV SYST...

Страница 18: ... to enter the preset password 2 Go to RATING and press 3 Select a rating level and then press OK 4 Use the numeric buttons 0 9 to enter a password for this disc Rating explanations 1 KID SAFE Kids material recommended especially for children and viewers of all ages 2 G General Audience recommended as acceptable for viewers of all ages 3 PG Parental Guidance suggested 4 PG13 Material is unsuitable ...

Страница 19: ...s for MP3 disc 32 kHz 44 1 kHz 48 kHz Supported Bit rates of MP3 disc are 32 64 96 128 192 256 kbps The following formats are not supported Files like VMA AAC DLF M3U PLS WAV Non English Album Title name LVFV UHFRUGHG LQ ROLHW IRUPDW MP3 Pro and MP3 with ID3 tag 7 Product information Note Product information is subject to change without prior notice 6SHFLÀFDWLRQV System Power supply 110 240 V 50 6...

Страница 20: ...ol that selects Auxiliary or A V IN channel See yourTV owner s manual for details Or change channels at theTV until you see DVD screen on theTV Progressive scan is activated but the TV does not support progressive scan USB playability information Compatible USB devices 86 ÁDVK PHPRU 86 RU 86 86 ÁDVK SOD HUV 86 RU 86 memory cards requires an additional card reader to work with this apparatus Suppor...

Страница 21: ... may appear This is not a malfunction Clean the disc A distorted picture may appear during progressive scan setup The aspect ratio of the TV screen cannot be changed even though you have set the TV display format 7KH DVSHFW UDWLR LV À HG RQ WKH ORDGHG DVD disc The aspect ratio may not be possible to change for some TV systems No sound or poor sound Adjust the volume Check that the speakers are con...

Страница 22: ...23 E n gl i s h EN ...

Страница 23: ...he purchase receipt is required for any warranty claim b The warranty period is valid from the original date of purchase of the product c This warranty extends only to defects in material or workmanship occurring under normal use of the product when operated in accordance with the instructions d Philips may at its discretion choose to repair rather than replace this product e If a replacement prod...

Страница 24: ... 2010 Koninklijke Philips Electronics N V All rights reserved MCD120_79_96_UM_V2 0 ...

Отзывы: