background image

Easy Install

4

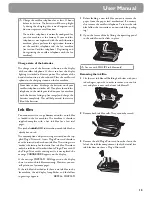
Ink film

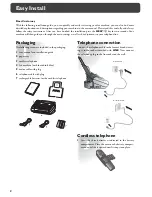
Your fax machine is supplied complete with a free ink 
fi lm for a few trial pages.

A new Plug’n’Print card has to be inserted with each new 
ink fi lm (only the fi rst free ink fi lm will work without a 
Plug’n’Print card).

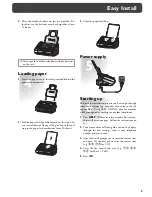
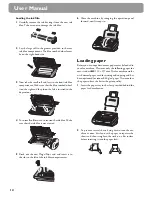
1

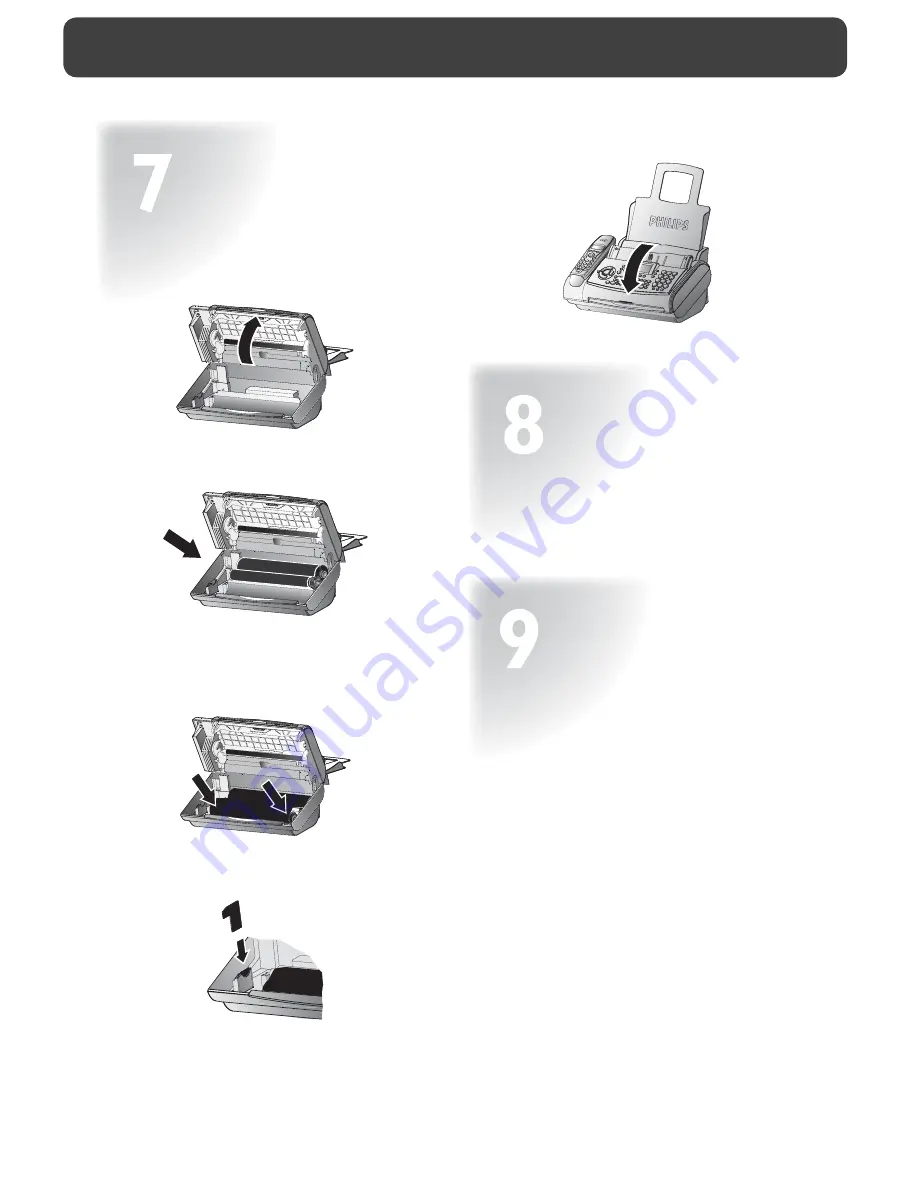
  Open the fax machine by lifting the operating panel 

in the middle until it clicks in place.


2

  Lay the large roll in the grooves in the rear ink fi lm 

compartment.

3

  Now take the small roll and lay it in the front ink fi lm 

compartment. Make sure that the blue toothed wheel 
is on the right and the pin on the left is inserted in the 
depressions.

4

  Break out the new Plug’n’Print card and insert it in 

the slot to the left of the ink fi lm compartments.

5

  Close the machine by swinging the operation panel 

forward, until it snaps in.

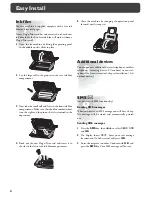
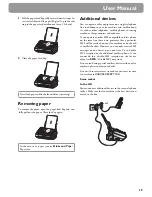
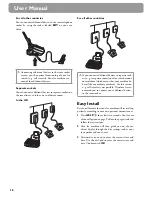
Additional devices

You can connect additional devices (telephones, cordless 
telephones, answering device, PC modem) to your tel-
ephone line (see user manual, chapter Installation / Ad-
ditional devices).

SMS 

W


(for device with SMS functionality)

Reading SMS messages

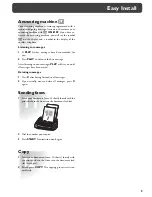
When you receive an SMS message you will hear a beep. 
Th

 e message will be stored and automatically printed 

out.

Sending SMS messages

1

 Press the 

SMS

 key, then 

u

 to select 

SEND SMS


and 

OK

.

2

  Th

 e display shows 

TEXT

. Enter your text message 

(maximum of 160 characters) and press 

OK

.

3

  Enter the recipient’s number. Confi rm with 

OK 

 and 

press the 

SMS

 key. Your SMS message will be sent.

Содержание Magic 3-2

Страница 1: ...Easy Install User Manual ...

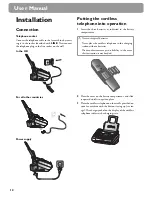
Страница 2: ...e in the user manual Please read this carefully and always follow the safety instructions After you have finished the installation press the HELP w key for two seconds Your machine will then guide you through the main settings as well as the adjustment to your telephone line Telephone connection Connect the telephone cable to the fax machine by insert ing it in the socket identified with LINE Next c...

Страница 3: ...flap Power supply Starting up To finish the installation process you have to go through some main settings e g adaption of your fax to the tel ephone line Using EASY INSTALL your fax machine will be configured according to your local conditions 1 Press HELP w for at least two seconds Your fax ma chine will print one page Follow the instructions on it 2 Your fax machine will then guide you on the disp...

Страница 4: ...e new Plug n Print card and insert it in the slot to the left of the ink film compartments 5 Close the machine by swinging the operation panel forward until it snaps in Additional devices You can connect additional devices telephones cordless telephones answering device PC modem to your tel ephone line see user manual chapter Installation Ad ditional devices SMS W for device with SMS functionality ...

Страница 5: ...en to the first message After listening to your messages PLAY will stay on until all messages have been erased Deleting messages 1 Press C after having listened to all messages 2 If you actually want to delete all messages press C again Sending faxes 1 Insert your documents max 10 sheets loosely with the printed side to the front into the document feed slot 2 Dial the number you require 3 Press STA...

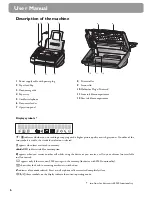
Страница 6: ... if there are new SMS messages in the memory for device with SMS functionality b shows that the built in answering machine is switched on indicates silent mode selected Faxes as well as phone calls are received completely silent S M U three symbols on the display indicate the current operating mode Description of the machine two lines for device with SMS functionality 1 Power supply cable with pow...

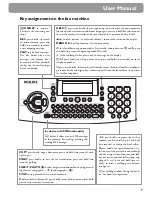
Страница 7: ...des Press briefly choose between S and M press and hold two seconds operating mode U on off v if the red lamp flashes please read the message on the display a press briefly to call up a name entry press and hold two seconds to store a telephone number press twice briefly to forward a call from the fax machine to all cordless telephones press once briefly and digit a key to forward a call from the fax ma...

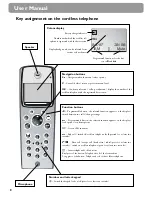
Страница 8: ...play load options confirm options W Access SMS functions End call switch off cordless telephone hold pressed for at least two seconds L Place call accept call hands free redial press for at least two seconds switch on cordless telephone press for at least two seconds m Access telephone book functions Brief press of the button Telephone book of the fax machine Long press of the button Telephone book ...

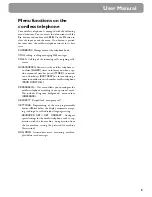
Страница 9: ...e cific amount of time has passed Timer to remind you of birthdays BIRTHDAY or for monitoring a room in combination with another cordless telephone ROOM MONITOR PERSONALIS This menu allows you to configure the cordless telephone according to your personal needs This includes Ring tone background menu colour AMBIANCE SECURITY Keypad lock emergency call SETTINGS Programming of the two programmable but...

Страница 10: ...trast 28 Transmission and error reports 28 Transmission speed 29 Size compression 29 Fax journal 29 Polled reception 29 Send later 30 Copy 30 SMS W 31 SMS settings 31 Reading SMS messages 31 Sending SMS messages 32 Printing SMS messages 32 Deleting SMS messages 32 Other SMS functions 33 Disable SMS reception 33 Answering machine b 34 Switching on and off 34 Recording a message 34 Anonymous outgoing...

Страница 11: ...ing danger of stumbling damage to the cable or the fax machine Disconnect the fax machine from the mains and tele phone line before cleaning the surface of the machine Never use liquid or gaseous cleaning agents sprays scour ing agents polishes etc Do not allow any liquid to enter the fax machine oth erwise there is a risk of electric shock or other injury to people and severe damage to the fax ma...

Страница 12: ... batteries as indicated in the battery compartment v Never use typical batteries Never place the cordless telephone in the charging station without batteries The manufacturer accepts no liability in the event this instruction is not heeded 2 Place the cover on the battery compartment and slide it upward until it snaps into place 3 Place the cordless telephone on the cradle provided on your fax mac...

Страница 13: ...free ink film for a few trial pages The symbols áéíó indicate how much ink film has already been used The consumption and print setting are stored on the sup plied Plug n Print card A new Plug n Print card therefore must be inserted with each new ink film The settings were made at the factory for the initial free ink film Therefore only this ink film will work without a Plug n Print card If the Plug n ...

Страница 14: ...Print card and insert it in the slot to the left of the ink film compartments 6 Close the machine by swinging the operation panel forward until it snaps in Loading paper Before you can copy documents paper must be loaded in your fax machine Please use only the following paper for mat standard A4 210 297 mm The fax machine works with normal paper used for writing and copying and has been optimised f...

Страница 15: ...answering machines charge counters and modems If you operate another SMS compatible cordless phone on the same line there is no guarantee that a particular SMS will be received on your fax machine or on the oth er cordless handset However you can only receive SMS messages on one device at any one time Try to disable SMS reception on the additional cordless phone If you cannot do this disable SMS r...

Страница 16: ...rate rooms your fax switch cannot control them which means that your machine be haves like any ordinary machine For this reason e g call transfer is not possible Therefore we rec ommend you to connect your additional devices to the same socket Easy Install Easy Install ensures that your fax machine will set itself up perfectly according to your own personal circumstances 1 Press HELP w for at leas...

Страница 17: ...d then entering the digits 15 Press OK 2 You can switch on the PABX operation using u PABX YES PABX NO 3 Then press OK 4 Now enter the key that has to be pressed to obtain an outside line This outside line access code must be obtained from the manufacturer This is either 0 or R in some systems also described as FLASH or a number key 5 Press OK 6 Use u to select CHECK YES and press OK Your machine ...

Страница 18: ... number keys e g 09 15 for 9 15 a m Your fax machine will now ask you for the correct date e g 15 05 05 for May 15th 2005 3 Press OK Your number 1 Select function 13 by pressing MENU 13 and OK on your fax machine 2 Enter your telephone or fax number e g 44 6151 for 44 6151 use or to enter the that is often used in international fax numbers in front of the country code and to enter a space You can ...

Страница 19: ...in If you want to correct anything at a later stage you need to call up the function again on your fax machine to enter the number or name Use u to select the character you want to change Press C to delete the character A long press on C two seconds will delete the whole line Press OK Display language for the fax machine 1 Select function 11 by pressing MENU 11 and OK on your fax machine 2 Select ...

Страница 20: ...OK Ringer volume for the fax machine You can adjust the volume of the ring tone if the fax ma chine is in stand by mode or if it is just ringing Please note that different volumes can be sett for the modus S and M see chapter Fax switch 1 By pressing u on your fax machine the display shows the current setting for about three seconds 2 Change the volume by pressing u until the de sired volume is ach...

Страница 21: ...for two seconds You can change the times when the fax machine should switch between day S and night M 1 Select function 33 by pressing MENU 33 and OK on your fax machine 2 Enter the time at which you want your fax machine to switch automatically to S e g 08 00 for 8 00 a m and confirm with OK 3 Enter the time at which you want your fax machine to switch automatically to M e g 23 30 for 11 30 p m an...

Страница 22: ...x machine unless you activate fax reception yourself Lift the handset and press START This may be sensible for example if you wish to receive your faxes by modem at your computer Economy operating mode If you select option 5 2 at TAM RINGS your answer ing machine will answer the call after two ringing signals instead of after five when you receive new messages Us ing the remote access function see ...

Страница 23: ...C you can delete the numbers you do not need any more from the redial memory Confirm with OK Call list on the fax machine The list shows the last 50 telephone numbers you have dialled After 50 entries the list is automatically printed out 1 Press MENU 41 and OK 2 Use to select CALL HISTORY Y 3 You can now select between PRINT NOW and PRINT EVERY 50 The list is printed Telephone book a on the fax ma...

Страница 24: ...or two seconds Select a character with u and press C to delete it Confirm with OK Deleting entries Press a and select the entry you want to delete with u and press C Choose with u whether you really want to delete the entry Confirm with OK List of numbers Choose function 44 to print a list of your stored tele phone book numbers Press MENU 44 and OK Group You can organise several entries in your tele...

Страница 25: ...d like to be informed of new calls during a telephone call call waiting press MENU 42 and OK Use to select ACTIV CW YES and con firm with OK Deactivate call waiting If the call waiting function is activated and you hear disturbing sounds you can deactivate the call waiting function Press MENU 42 and OK Use to select ACTIV CW NO and confirm with OK Easylink Using additional telephones Your fax machin...

Страница 26: ...s START Press 5 and hang up You want to forward a call To the fax machine Press 0 and To an additional cordless telephones that is also regis tered to the fax machine During the call press ô Menu use to select CALL TRANSFER and confirm with OK Use to select the number of the desired cordless telephone for example 2 and con firm with OK You can now make an internal call The external call is put on ho...

Страница 27: ... with the printed side to the front into the document feed slot 3 Move the document guide so that it rests on the docu ment In the event of a document jam see Hints andTips Document jam Sending faxes 1 Dial the number you require on the fax machine 2 If you want to select a higher resolution press FINE PHOTO 3 Press START Transmission now begins In case the connection is not successful your fax ma...

Страница 28: ...n 46 can no longer be changed 1 Hold the document with the print side face up and insert it into the document feeder max 10 pages 2 Press MENU 46 OK on your fax machine and select the desired group from 1 to 5 using u Press OK 3 Use u to select SEND FAX and press START The document will be sent to all persons in the group If the fax can t be sent to one of the recipients the fax machine will conti...

Страница 29: ...st and close with R Attach desired sub address or code press and hold START e g 12345 R 17 R code or 12345 RR code Polling with code If your correspondent has entered a code to protect the document to be retrieved please follow this procedure 1 Press MENU 22 and OK on your fax machine 2 Enter the code and confirm with OK 3 Enter the telephone number and press START In case it does not work try to p...

Страница 30: ...u ment feeder You can load up to 10 pages at once 2 Select the desired resolution with FINE PHOTO a To make only one copy of the original briefly press COPY The copying process starts immediately b In order to make more than one copy press COPY for at least two seconds The display will show the actual number of cop ies If you want to change this figure enter the de sired number with the number keys ...

Страница 31: ...use SMS services In some coun tries these numbers may be identical Disable SMS printing 1 Press MENU 64 and then OK four times on your fax machine 2 Use u to choose whether to have incoming mes sages automatically printed or not PRINT SMS YES NO 3 Press OK to complete your action v If your fax machine is connected to a PABX system you may not be able to use SMS services Contact the operator or man...

Страница 32: ...n u the cursor will move to the start or end of the message or number To delete the character press C To delete all the text hold down C two seconds You can also send SMS messages by pressing MENU 61 and OK on your fax machine Printing SMS messages 1 Press W on the fax machine 2 Press u to select PRINT SMS 3 Press OK 4 Use u to select which SMS messages you want to print PRINT ALL PRINT inbox PRIN...

Страница 33: ...MS compatible cordless phone on the same line there is no guarantee that a particular SMS will be received on your fax machine or on the other cordless telephone However you can only receive SMS messages on one device at any one time Try to disable SMS reception on the additional cordless phone If you cannot do this disable SMS reception on the fax ma chine 1 Press MENU 45 and OK on your fax machi...

Страница 34: ...ivated Duration of recording 1 Select MENU 51 and OK 2 Press u to choose between 30 60 120 seconds or the AUTO mode unlimited recording time Please note that AUTO mode is not available in all coun tries 3 Confirm with OK Listening to messages 1 If the PLAY button flashes on your fax machine this means that messages have been recorded for you New messages are indicated on your cordless telephone by t...

Страница 35: ...rding message select rec message yes If you want to use the existing message select rec message nO Press OK to confirm c Follow the process described above from step 7 Recording a conversation You can record a telephone conversation with your fax machine 1 Press REC during a telephone conversation 2 To stop recording press STOP 3 The recorded conversation can be played back and de leted like any re...

Страница 36: ...e played back If no new mes sages have been recorded you will hear a second con firmation tone 3 Then you can enter commands as usual or terminate the remote control by replacing the handset Overview of commands 1 The message you are just listening to will be repeated 2 All messages will be played back 3 Move to the next message 4 Record a new outgoing message Press 4 If you press 4 again after two...

Страница 37: ...g and OK in the function ANS MACH MESSAGES PLAY All new messages are played automatically You can page through all available messages with the number buttons 1 and 3 Deleting messages Use and OK to select ANS MACH MESSAGES DELETE OLD and confirm with OK Messages that have already been heard are deleted You can also delete messages while they are playing with the number button 0 Resetting the outgoi...

Страница 38: ...for example 1 Deregistering the cordless telephone If you would like to deregister an additional cordless tel ephone from your fax machine the procedure is as fol lows 1 On your fax machine press MENU 72 and OK 2 On the numeric keypad enter the cordless telephone you want to deregister Press OK Your fax machine will now release the connection to the additional cordless telephone Registering a cord...

Страница 39: ...e dial button L Call log All outgoing and incoming calls as well as events are saved in this menu You can also select whether a message should be displayed on the cordless telephone to announce a new message answering machine or SMS INCOMING CALLS List of all calls received OUTGOING CALLS List of all calls placed EVENTS View a list of all events SMS messages on the answering machine VIEW You can a...

Страница 40: ...rson on the line can no longer hear you However the speaker on the cordless telephone remains active meaning that you can still hear the person on the line The mes sage SECRET MODE blinks on the display 2 Press R Exit in order to continue the conversation Internal telephone calls If you have registered multiple cordless telephones with your fax machine you can place internal calls between two cord...

Страница 41: ...r 5 Confirm with OK 6 Select a category to assign to this number HOME WORK MOBILE FAX 7 Confirm with OK A new entry has been created Assigning an individual ring tone 1 Hold the telephone book button m on the cordless telephone pressed until the display shows 001 for example and the symbol for the telephone book ap pears Telephone book entries on the fax machine can only be modified on the fax machin...

Страница 42: ...t SEND SMS and confirm with OK 4 A text input window appears Please consult the fol lowing section SMS on how to write an SMS SMS for machine with SMS function You can send receive and manage SMS Short Message Service messages with your cordless telephone SMS messages can be sent to another fixed network telephone or to a mobile telephone In order to use the SMS function on the cordless tele phone t...

Страница 43: ...wn 4 Use to select the SMS you would like to read and confirm with OK 5 You can reach the start of the SMS message with the button R You can reach the list of all SMS messages by pressing the R button while at the start of the SMS message Managing read SMS messages After reading an SMS message you can press ô Select then use to select among the following options fol lowed by confirmation with OK REP...

Страница 44: ...ll ring for approx 15 seconds and the saved name will ap pear on the display If multiple entries exist they are displayed in a list Room monitoring You can use a second cordless telephone to monitor a room To do so both cordless telephones must be regis tered with the fax machine 1 Place a cordless telephone receiver handset 1 in the room to be monitored 2 On the other cordless telephone sender ha...

Страница 45: ...nd cordless telephones you have mislaid Press twice on the fax machine All the cord less telephones registered on the fax machine will then ring for about one minute To cancel the search function press the STOP button on the fax machine or the button on the cordless telephone Switching on and off You can switch your cordless telephone off to save power To switch off the cordless telephone press the ...

Страница 46: ...k the panel is engaged 3 Carefully remove the paper 4 Turn small roll forward to tension the ink film Make sure that the ink film is not creased 5 Close the panel so that it also clicks into place 6 Insert paper see Installation Loading paper Document jam 1 Open the paper feed flap and carefully pull out the paper Close the flap again 2 Open the operation panel by lifting in the middle When you hear a...

Страница 47: ... set tings The fax machine will therefore react in exactly the same way as on first installation Code No 7140 This code deletes all the settings and data you have en tered on your fax machine with the exception of the fol lowing received fax messages stored SMS messages stored telephone book numbers your name your telephone number Example for using a service code 1 Select function 45 by pressing ME...

Страница 48: ... a single page or when the recipient receives two pages 1 Open the machine and the scanner cover by pressing the latch A inward Clean the feed roller B and the rubber opposing element on the underside C with a soft lint free cloth moistened with cleaning alcohol 96 percent Turn the feed roller with a slight upward pressure You must clean the entire roller 2 With a Fax Cleaner Place the fax cleaner...

Страница 49: ...stallation of your fax machine When you place a call on the cordless telephone you do not hear the dial tone Connect your telephone cable to the socket on your fax machine identified with LINE BUSY or fax transmissions are constantly interrupted Try to send the fax manually Press z and dial the fax number If the recipient is using an automatic answer ing device wait until you hear a tone after the ...

Страница 50: ...tions disable SMS printing Cordless telephone 71 Register 38 registering a cordless telephone 72 Deregister 38 deregistering a cordless telephone Appendix Functions To print a list of functions press MENU three times Setup 11 Set language 19 select the language of the display text 12 Set time date 18 setting time and date 13 Your telephone number 18 enter your telephone number 14 Your name 18 ente...

Страница 51: ...ived messages Noise level on standby 30 dBA copying 53 dBA Printing method ink film printer Document feed up to 10 letters 80 g m Fax switch DAY NIGHT TIMER Dimensions 318x202x146 mm without paper tray Weight about 2 kg Power consumption stand by about 2 W telephoning about 4 W sending a standard letter 20 W receiving a standard letter 30 W Power supply 220 240 V 50 60 Hz Speech recording time up t...

Страница 52: ...atutory or otherwise and to such extent all terms and conditions implied by law are hereby exclud ed This guarantee does not affect the Customer s statutory rights B Exclusions From Guarantee SAGEM shall have no liability under the guarantee in respect of damage defects breakdown or malfunction due to failure to properly follow the installation process and instructions for use or an external cause ...

Страница 53: ...sed by the use of any other ink films Environment Respect of environment is a key objective of SAGEM SA The SAGEM Group uses environmentally friendly proc esses to run its operations and has chosen to integrate strong environmental constraints in the full lifecycle of its products including manufacturing product use and end of life PACKAGING To facilitate packaging recycling please con form to your...

Страница 54: ...nt 7 Deactivate answering ma chine 34 Deactivate call waiting 25 Delete answering machine mes sages 34 entry from a group 24 SMS messages 32 telephone book entry on the fax machine 24 deleting telephone book entries 42 Delivery service 46 Deregistering cordless telephone 38 Disable SMS printing 31 SMS reception 33 Display language for the fax machine 19 symbols for the fax machine 6 display langua...

Страница 55: ...anagement 43 writing an SMS 42 Speaker volume for the fax machine 20 Special fax switch settings 22 Start key 7 Stop key 7 Switching answering ma chine on and off 34 T Technical data 51 Telephone 23 calling line identifica tion 25 Easylink 25 group 24 hands free operation 25 making a call 23 redial 23 telephone book on the cordless telephone 24 telephone book on the fax machine 23 Telephone book key...

Страница 56: ...y of the original DoC please visit our web site As an Energy Star Program Partici pant SAGEM Communication Austria GmbH has determined that this prod uct meets the Energy Star guidelines for energy efficiency This product is intended for use on an analogue public telecommunications network PSTN and for use in the country specified on the type label Use in other countries can result in faulty function...

Отзывы: