background image

16

English

Access Control contains the following features :

Child lock
Parental level
Change country
Change code

IMPORTANT!
– Philips denies any liability associated with
unintended watching of discs.  Make sure your
discs play according to your Parental Controls
settings before you allow children access to the
player.
– Some DVDs are not encoded with a rating
though the movie rating is printed on the disc
jacket.  The rating level feature does not work for
such discs.

Child lock 

(DVD / VCD)

Not all DVDs are rated or coded by the disc maker.  You
can prevent a specific DVD from playing by locking or
unlocking the DVD, regardless of its rating.

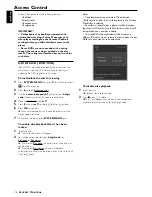
To lock/unlock the disc for viewing

1

Press 

SYSTEM MENU

, then press 

four times to select

 from the menu bar.

2

Press 

2

 to select 

Access control

.

3

Use the 

numeric keypad (0-9)

 to enter your 

4-digit

code

. If necessary, enter the code a second time.

4

Move to 

Child lock 

using 

3


4

.

5

Press 

then use 

3


4

 to select 

Ç

 (lock) or 

É

 (unlock).

6

Press 

OK

 to confirm.

 Now unauthorised discs will not be played unless the

4-digit code is entered.

7

To remove the menu, press 

SYSTEM MENU 

again.

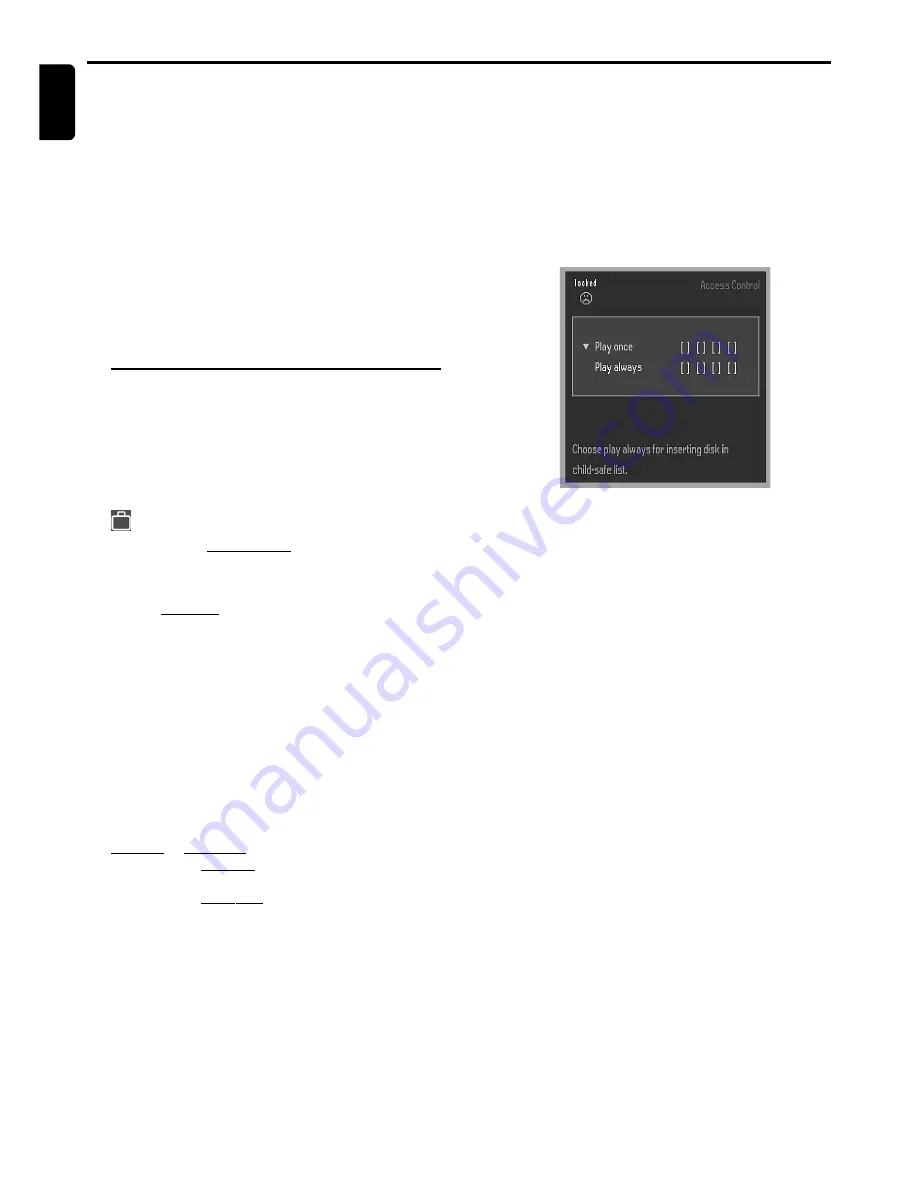
To enable disc playback after it has been
locked

1

Insert the disc.

The ‘child safe’ menu will appear.

2

You will be asked to enter your 

4-digit code 

for

Play once

 or 

Play always

.

If you select 

Play once

, the current disc in the disc tray

can be played.

If you select 

Play always

, the disc will become

authorised and can always be played, even if the Child Lock
is set to 

Ç

 (lock).

Notes:
– The player memory can maintain 120 authorised
(‘Child safe’) disc titles.  A disc will be placed in the list when
‘Play Always’ is selected.
– Each time a ‘child safe’ disc is played, it will be placed on
top of the list.  When the list is full, the last disc in the list will
be replaced when a new disc is added.
– Two-sided DVDs and multi-volume VCDs may have a
different ID for each side or volume. In order to make the disc
‘Child safe’, each side has to be authorised.

To disable disc playback

1

Insert the disc.

 Playback starts automatically.

2

Press 

9

 while 

{

 is visible.

 The 

|

 will appear and the disc is now locked, and

unable to play unless you enter the 4-digit code.

Access Control

A

CCESS

 C

ONTROL

Содержание LX 8200SA

Страница 1: ...1 DVDVideo Digital Surround System LX8200SA LX8200SA ...

Страница 2: ...yteren er sekundert innkoplet Den innebygde netdelen er derfor ikke frakoplet nettet så lenge apparatet er tilsluttet nettkontakten For å redusere faren for brann eller elektrisk støt skal apparatet ikke utsettes for regn eller fuktighet Italia DICHIARAZIONE DI CONFORMITA Si dichiara che l apparecchio LX8200SA Philips risponde alle prescrizioni dell art 2 comma 1 del D M 28 Agosto 1995 n 548 Fatto...

Страница 3: ... s p a ñ o l Nederlands Français ÏÏËÓÈÎ S u o m i Dansk Svenska Русский I t a l i a n o Index INDEX English 5 Français 30 Español 55 Deutsch 80 Nederlands 105 Italiano 130 Svenska 155 Dansk 180 Suomi 205 Português 230 255 Polski 283 Русский 308 ...

Страница 4: ...ing DTS and DTS Digital Surround are registered trademarks of DigitalTheater Systems Inc Copyright 1996 2000 DigitalTheater Systems Inc All Rights Reversed This product incorporates copyright protection technology that is protected by method claims of certain U S patents and other intellectual property rights owned by Macrovision Corporation and other rights owners Use of this copyright protection...

Страница 5: ...lume control 18 Dimming the display screen 18 Contents Operations Discs information 19 Basic playback 19 20 Continue playback from the last stop point DVD VCD Skipping to another track chapter Fast Search Repeat play Repeat A B Programme favourite tracks Audio CD Special DVD VCD features 21 23 Changing subtitle language DVD Changing audio language Changing speaker surround output Advancing by fram...

Страница 6: ... cloud over when the system is suddenly moved from cold to warm surroundings making it impossible to play a disc Leave the system in the warm environment until the moisture evaporates Introduction and General Information INTRODUCTION AND GENERAL INFORMATION 2 Features Your complete 7 piece 300 Watt LX8200SA DVD Digital Home Cinema System creates the same dynamic sound qualities that you find in fu...

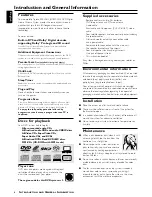
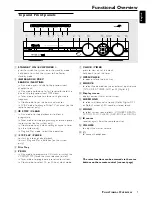
Страница 7: ...e to programme CD tracks or switch the VCD DVD FTS favourite track selection on off in Tuner mode to programme preset radio stations in Clock mode to select 12 or 24 hour clock mode Functional Overview Top and Front panels SOUND VOLUME SURROUND SOURCE OPEN CLOSE iR SENSOR STANDBY ON ECO POWER DVD VIDEO SACD DIGITAL SURROUND SYSTEM 1 2 3 4 2 6 7 8 9 5 0 PROG STOP CLEAR SEARCH PREV PLAY PAUSE CLOCK ...

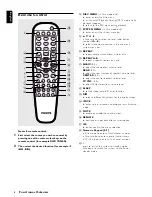
Страница 8: ...chapter track album title or disc REPEAT A B to repeat a specific section on a disc SUBW to adjust the subwoofer s volume level REAR to adjust the rear surround speakers volume level CENTER to adjust the centre speaker s volume level TV VOL to adjust Philips television s volume level SLEEP to set the sleep auto off timer function DIM to select a different brightness for the display screen VOICE to...

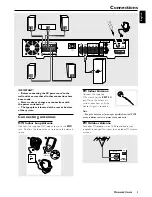
Страница 9: ...a Connect the supplied FM antenna to the FM 75 Ω jack Move the antenna in various directions until the clearest signal is received Note Keep the antenna as far away as possible from theTV VCR or any radiation source to prevent unwanted noise FM Outdoor Antenna For better FM reception use a 75 Ω coaxial cable not supplied to connect the system to an outdoor FM antenna as shown MW FM MW ANTENNA FM 7...

Страница 10: ...ting a TV You must connect aTV to the DVD system in order to use the DVD system IMPORTANT There are various ways to connect the system to aTV as shown in the illustration below You only need to make ONE of the best connections depending on the capabilities of yourTV system Never connect yourTV using the component Pr Cr Pb CbY video jacks unless yourTV can accept progressive signals If yourTV has a...

Страница 11: ...X IN R L jacks to the AUDIO OUT jacks on the other audio visual device such as a VCR Laser Disc player or cassette deck For recording Connect the system s LINE OUT R L jacks to the AUDIO IN jacks on the recording device such as a tape recorder or CD recorder Digital audio connections For listening to the playback from the CD recorder Connect the system s DIGITAL IN jack to the DIGITAL OUT jack on ...

Страница 12: ...level You can change the speakers sound distribution to suit your surround sound needs except for CDDA DTS disc Press CENTER to adjust the level of the centre speaker CEN XX is displayed Press REAR to adjust the level of the rear surround speakers SL XX or SR XX is displayed Notes XX denotes the volume level between 6 to 6 For CDDA DTS disc please refer to System Setup DVD Setting the sound Speake...

Страница 13: ...t no disc is inside the disc tray 2 Hold down DISC on the remote control until the current setting NTSC or PAL appear on the display 3 If you want to change the setting repeat step 2 System Setup DVD The system setup is carried out via theTV enabling you to customise the DVD system to suit your particular requirement If the options selected are not available on a disc then the disc s own preferenc...

Страница 14: ... PAL DVD disc 480P select this setting if you are playing an PAL DVD disc on an NTSC compatibleTV Unprocessed select this setting to remain the PAL DVD disc playback in PAL output ö TV System NTSC PAL conversion This setting is applicable only if you used the CVBS or SCART jacks to connect the DVD system to aTV Select the colour system that matches the connectedTV You do not need to change the set...

Страница 15: ... standard signal with sampling rates of 48 kHz Setting the language Audio Language Subtitle Menu English English English 1en 1en st 1 ö Audio Language Subtitle Menu This is to select the audio language subtitle language and the language used onTV screen menus or DVD menus that will always be used for every disc to be played back The default setting is English If the language selected is not availa...

Страница 16: ...rm Now unauthorised discs will not be played unless the 4 digit code is entered 7 To remove the menu press SYSTEM MENU again To enable disc playback after it has been locked 1 Insert the disc The child safe menu will appear 2 You will be asked to enter your 4 digit code for Play once or Play always If you select Play once the current disc in the disc tray can be played If you select Play always th...

Страница 17: ...uitable for most audiences and it is rated at level 1 for the most part However in the middle there are also scenes rated at 6 not suitable for children Rating explanations 8 Mature material should be viewed only by adults due to graphic sexual material violence or language 7 No children under age 17 not recommended viewing for children under age 17 6 Parental Guidance Restricted recommended that ...

Страница 18: ...for Dolby Digital and the 20 bit resolution Dolby Surround The Dolby Surround system is a specially encoded two channel analogue format that will produce sound through four speaker channels front left centre front right mono surround when a Dolby Pro Logic Decoder is used It is also compatible with stereo systems but the user will only have two channel front left right sound Matrix A new surround ...

Страница 19: ...only play the SACD layer 2 3 5 6 7 8 9 10 11 12 4 1 TRACKS AUDIO CD Audio CDs contain onlyTracks Basic playback CAUTION Do not move the disc player during playback as doing so may damage the DVD system Do not push on the disc tray or put any objects other than disc on the disc tray Doing so may cause the disc player to malfunction 1 Press STANDBY ON ECO POWER y to switch the system on 2 Press OPEN...

Страница 20: ...the current chapter REPEAT TITLE repeat the current title REPEAT DISC repeat the entire disc For SVCD VCD SACD CD Repeat track disc Press REPEAT repeatedly to select the following REPEAT TRACK repeat the current track REPEAT DISC repeat the entire disc To cancel the repeat mode Press REPEAT repeatedly to select REPEAT OFF Notes Repeat play might not work correctly with some DVDs ForVCD repeat play...

Страница 21: ...default preset at User Preference Settings Changing subtitle language DVD This operation works only on DVDs with multiple subtitle languages Move in the menu bar and use 3 4 to select the desired language Changing audio language This operation works only on DVDs with multiple audio language Move to in the menu bar and use 3 4 to select the desired languages For VCD Press 3 4 to select the desired ...

Страница 22: ...een 4 Use 1 2 3 4 to move the zoomed picture left right up and down 5 When OK is pressed the picture will remain panned 6 To exit ZOOM mode set the zoom factor to Off zoom factor 1 in the menu bar Moving to another title chapter Some discs may contain more than one title or chapter If the disc has a title or chapter menu recorded on it you can start playback from the selected item 1 Select title o...

Страница 23: ... press OK To store chapters indexes 1 At Title use 1 2 to move to a desired title number then press 4 The title number will be marked and the highlight moves to the first available chapter number of this title 2 Use 1 2 to select the required chapter number then press OK to store The title chapter selection will be added to the list of the programme To activate deactivate the FTS programme Move to...

Страница 24: ...3 CD time Comment AM radio FM radio Near CD CD like CD CD 32 kbps 64 kbps 96 kbps 128 kbps 256 kbps 320 kbps 40 1 20 1 15 1 10 1 5 1 3 1 40 hrs 20 hrs 15 hrs 10 hrs 5 hrs 3 hrs Sound quality significantly affected not recommended Balanced sound quality compression rate Compression rate low suggest to play CDs instead It is normal to experience an occasional skip while listening to your MP3 discs A...

Страница 25: ...nd Play CHECK ANTENNA will be displayed During Plug and Play if no button is pressed within 15 seconds the system will exit Plug and Play mode Tuning to radio stations 1 Press SOURCE to selectTUNER mode or TUNER on the remote control 2 Press TUNER again to select the desired band FM or MW 3 Hold down S or T until the frequency indication starts to change then release The system automatically tunes...

Страница 26: ...e clock has not been set is displayed Notes The clock setting will be cancelled when the power cord is disconnected or if a power failure occurs During clock setting if no button is pressed within 90 seconds the system will exit clock setting mode automatically Radio Reception Clock Timer RADIO RECEPTION CLOCK TIMER Listening to preset radio stations In tuner mode press 1 or 2 or use the numeric k...

Страница 27: ... system will exit timer setting mode automatically CLOCK TIMER Deactivating the timer 1 Hold down CLOCK TIMER for more than two seconds to enter timer mode 2 In timer mode press Ç on the system to cancel the timer disappears from the display and TIMER OFF is displayed Activating the timer to the last preset time and source 1 Hold down CLOCK TIMER for more than two seconds to enter timer mode 2 Pre...

Страница 28: ...4 Bits 96 kHz Frequency Response 4 Hz 20 kHz 44 1 kHz 4 Hz 22 kHz 48 kHz 4 Hz 44 kHz 96 kHz Digital Output SPDIF Coaxial SACD D A converter DSD SACD cut off frequency 30 kHz MISCELLANEOUS Power Supply Rating 220 240V 50 Hz Power Consumption 160 W Eco Power Standby 0 5 W Dimensions w x h x d 390 mm x 73 mm x 360 mm Weight 5 8 kg IR REMOTE CONTROL Effective Range 8 Meter Number of Keys 45 Battery 1 ...

Страница 29: ...tem NTSC or PAL and regional code Check for any scratches or smudges on the disc Press SYSTEM MENU to turn off the setup menu screen Cancel the parental control rating function or change the rating level Moisture has condensed inside the system Remove the disc and leave the system turned on for about an hour The DVD system does not respond Disconnect the power plug from the outlet and insert again...

Отзывы: