background image

63

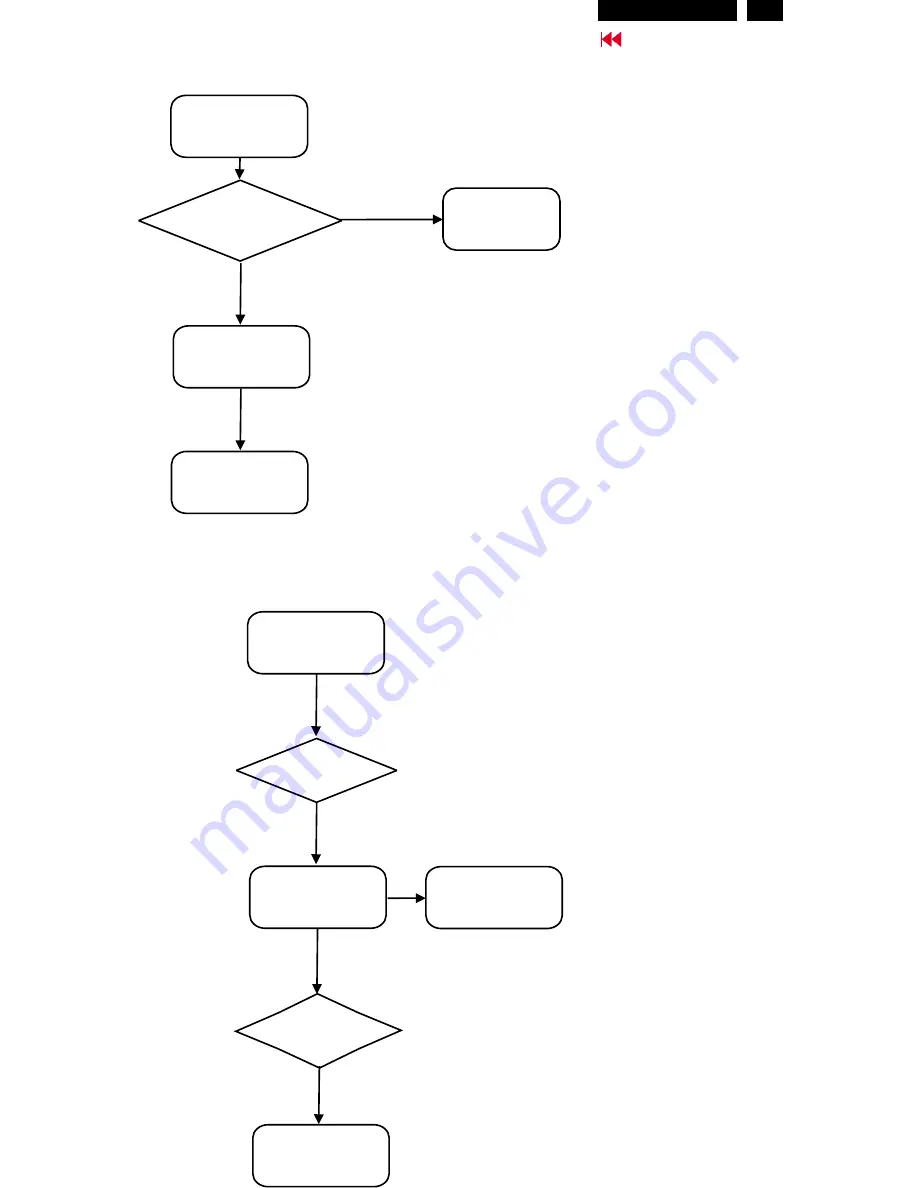
Repair Flow Chart

Go to cover page

Bad brightness

Check

Inverter panel output

740~920Vrms

No

Yes

Bad Inverter

panel

Check fluorescent

lamp

Bad image

Check

Video,fh/fv

signals

Yes

Yes

Check LCD panel

No

No

Check LCD panel

Check

all connectors &

LVDS cable

No

Check main panel

Check components

cold soldering

Hudson2 200P3

Содержание Hudson2 200P3

Страница 1: ... Diagram 31 Scaler Panel Components Copper track 32 33 Description Page Scaler Diagram 34 42 Power Panel C B A 43 Power Diagram 44 Audio Keypad Panel 45 Audio Mic Preamp Diagram 46 47 Phone Jack Board C B A Diagram 48 49 Inverter Panel C B A 50 Inverter Diagram AMBIT 51 52 Failure Mode of LCD Panel 53 Exploded View 54 Recommended Difference Parts List 60 Repair Flow Chart 61 63 Repair Tips 64 CA11...

Страница 2: ...ol which is not recommended by PHILIPS must first satisfy himself thoroughly that neither his safety nor the safe operation of the equipment will be jeopardized by the service method selected Hereafter throughout this manual PHILIPS Consumer Electronics Company will be referred to as PHILIPS Critical components having special safety characteristics are identified with a by the Ref No in the parts ...

Страница 3: ... 300 typ Brightness 250 cd m typ Peak contrast angle 6 o clock White Chromatcity x 0 281 y 0 311 at 9300 K x 0 312 y 0 338 at 6500 K Viewing Angle C R 10 Response time 30ms typ 2 Upper 85 typ Lower 85 typ Left 85 typ Right 85 typ Physical Specifications Dimension WxHxD 488 x 459 x220 mm incl Pedestal Weight 10 0 Kg Tilt Swivel 5 25 175 Power supply 100 240 VAC 50 60 Hz Power consumption 52 W typ T...

Страница 4: ...ctive Yes Yes 60W Green Stand by Blanked No Yes 3W Amber Suspend Blanked Yes No 3W Amber OFF Blanked No No 3W Amber This monitor is NERGY TAR compliant s an NERGY TAR artner has determined that this product meets the NERGY TAR guidelines for energy efficiency E S A E S P PHILIPS E S R R R 50 user definable modes Maximum 1600 x 1200 at 75Hz analog input 1600 x 1200 at 60Hz digtal input Recommended ...

Страница 5: ...n off your computer and unplug its power cord b Connect the VGA or DVI cable to video connector c Connect the microphone and audio cables d Plug the power cord of computer and monitor into a nearby outlet e Turn on your computer and monitor If the monitor displays an image installation is complete Connect to DVD VCR VCD Connect to Microphone and Earphone If you use an Apple MacintoshTM you need to...

Страница 6: ... input 2 S Video video input 3 VGA input 4 DVI I input 5 AC power in 6 Mic out 7 Audio in 8 Audio L input 9 Audio R input The monitor surface is susceptible to scratching Lay the monitor on its face on a soft surface Remove the four screws on the rear of the monitor Accessory Pack Unpack all the parts Power cord VGA signal cable PC audio cable lime Mic cable pink S video cable Mac adaptor DVI to D...

Страница 7: ... the button the On Screen Display OSD Main Controls window will pop up and you can now start making adjustments to your monitor s various features Use the or the keys to make your adjustments within Press the or button to adjust the selected function Press the or button to adjust the selected function The corresponding setting window here is displayed ADJUST POSITION Setting language for the OSD m...

Страница 8: ...signals by pressing button for more than 10 seconds without video signal input ON Factory mode Access Factory Mode Factory Mode How to Get into Factory Mode Menu Turn on LCD monitor Push AUTO Left VOLUME buttons simultaneously 3 seconds around Bring up Factory mode indication as shown in Fig 6 Fig 5 AUTO VOLUME HUDSON 150P V1 56D 01 03 09 Fig 6 Factory Mode CODE VERSION 2 02 2002 08 07 CONFIG VERS...

Страница 9: ...perating software in the computer i e Windows to 1600 x1200 60Hz for best display results The monitor will detect various display situation automatically When the monitor detects the problems the screen will show the different warning signals to remind you what is happen to your monitor WAIT FOR AUTOMATIC ADJUSTMENT This screen appears when you touch the button It will disappear when the monitor i...

Страница 10: ...g 10 The OSD Tree Below is an overall view of the structure of the On Screen Display You can use this as reference when you want to later on work your way around the different adjustments 9 Go to cover page Hudson2 200P3 ...

Страница 11: ...al 11 The OSD Tree Below is an overall view of the structure of the On Screen Display You can use this as reference when you want to later on work your way around the different adjustments 9 Go to cover page Hudson2 200P3 ...

Страница 12: ...cess Factory Mode Factory Mode How to Get into Factory Mode Menu Turn on LCD monitor Push AUTO Left VOLUME buttons simultaneously 3 seconds around Bring up Factory mode indication as shown in Fig 2 Fig 2 Fig 1 AUTO VOLUME Factory Mode CODE VERSION 2 02 2002 08 07 CONFIG VERSION 2 02 2002 08 07 OSD VERSION 2 02 2002 08 07 ORIGINAL PANEL COLOR 9300K For CAD CAM 6500K FOR IMAGE MANAGEMENT AUTO COLOR ...

Страница 13: ...f display still poor or flicker you may also improve it by manual adjust CLOCK and PHASE functions to eliminate the flicker Step 4 Press the OK button to bring up MAIN CONTROLS OSD menu Step 8 Press Left or Right to adjust PHASE The picture will be adjusted as following figure adjust PHASE and check the picture stop at the point that without any vertical jitter bar remaining on the screen button S...

Страница 14: ...mputer or compatible 2 Microsoft operation system Windows 95 98 4 A D Alignment kits 3138 106 10079 inclusion a Alignment box x1 as Fig 2 b Printer cable x1 c D Sub to D Sub cable x1 d DVI D to D Sub cable x1 as Fig 3 Note The EDID301 EXE Release Version 1 58 20000818 is a windows based program which cannot be run in MS DOS System and equipment requirements 3 EDID301 EXE program 3138 106 10103 as ...

Страница 15: ...ognized the following error message will appear on the screen as below Please confirm following steps to avoid this message 1 The data structure of EDID was incorrect 2 DDC IC that you are trying to load data is empty 3 Wrong communication channel has set at configuration setup windows 4 Cables loosed or poor contact of connection Fig 8 1 Configuration and procedure There are 2 chips contained OSD...

Страница 16: ...select fill out from Step 1 to Step 9 Step 4 Modify DDC data Monitor Serial No Next 1 Click bring up Fig 15 2 Click bring up Fig 16 Next 3 Click OK button to confirm your selection 4 Click icon Read EDID function to read DDC EDID data from monitor The EDID codes will display on screen as shown in Fig 13 Fig 15 Fig 16 Fig 12 2 Select the DDC2B as the communication channel Disable Factory memory dat...

Страница 17: ...bring up Fig 21 Next 4 Click bring up Fig 18 Next 5 Click bring up Fig 19 Next Fig 22 8 Click bring up Fig 22 Click to exit the Step window Next Finish Definition of Serial Number barcode format T Y 0 0 0 0 2 8 0 0 0 0 0 1 Serial Number U S A 8 digit Week Year TY Code TY Chungli CX Dong Guan HD Hungary BZ Suzhou Others regions 6 digit two space for example change it from TY 503960 to TY 123456 Hud...

Страница 18: ...l bar to write DDC data 2 Click Read EDID to re confirm check contents it Re programming Digital DDC IC Connecting all cables and alignment box as shown in Fig 26 Step 1 After connection for Digital DDC application if it is still in Analog DDC application of EDID301 Exit EDID301 program before Digital DDC application Fig 27 Fig 28 Step 2 Initialize alignment box Shortcut of EDID301 EXE on Double c...

Страница 19: ...nd text change select fill out from Step 1 to Step 9 Fig 32 Fig 33 Fig 31 For Digital For Digital select and fill out if necessary select and fill out if necessary Step 5 Modify DDC data Monitor Serial No Monitor S as shown in Fig 37 erial No can be filled up or be changed for example TY 123456 Fig 34 Fig 35 Fig 36 Fig 37 Definition of Serial Number barcode format T Y 0 0 0 0 2 8 0 0 0 0 0 1 Seria...

Страница 20: ...s below 1 Click Save icon or click file save as from the tool bar and give a file name as shown in Fig 40 Step 8 Load DDC data Open 1 Click from the tool bar 2 Select the file you want to open as shown in Fig 41 3 Click The display of SERIAL NO by OSD can be change update by Analog Mode only It means Analog Mode and Digital Mode are using same EEPROM for display of SERIAL NO by OSD as shown in Fig...

Страница 21: ...70 Standard Timing Identification 6 Horizontal active pixels 1152 Aspect Ratio 4 3 Refresh Rate 75 Standard Timing Identification 7 Horizontal active pixels 1280 Aspect Ratio 5 4 Refresh Rate 60 Standard Timing Identification 8 Horizontal active pixels 1600 Aspect Ratio 4 3 Refresh Rate 60 Detailed Timing 1 Pixel Clock MHz 162 H Active pixels 1600 H Blanking pixels 560 V Active lines 1200 V Blanki...

Страница 22: ...sh Rate 70 Standard Timing Identification 5 Horizontal active pixels 1152 Aspect Ratio 4 3 Refresh Rate 75 Standard Timing Identification 6 Horizontal active pixels 1280 Aspect Ratio 5 4 Refresh Rate 60 Standard Timing Identification 7 Horizontal active pixels 1600 Aspect Ratio 4 3 Refresh Rate 75 Detailed Timing 1 Pixel Clock MHz 203 H Active pixels 1600 H Blanking pixels 560 V Active lines 1200 ...

Страница 23: ... the serial number which should be proceed by application software SerialNumber exe as shown in Fig 2 PRODUCT INFORMATION SERIAL NO TY 123456 RESOLUTION 1024 X 768 75Hz VIDEO INPUT ANALOG D SUB BACK TO MAIN CONTROLS OK PRODUCT INFORMATION SERIAL NO TY 876543 RESOLUTION 1024 X 768 75Hz VIDEO INPUT ANALOG D SUB BACK TO MAIN CONTROLS OK Fill out serial number of monitor For example TY 876543 as shown...

Страница 24: ...P3 Model 200P3G 00C SCALER PCB POWER PCB INERTER PCB SPEAKER L SPEAKER R AUDIO PCB LCD PANEL CONTROL AUDIO PCB 1701 8052 1711 8051 1704 1311 DVI 1 AC IN 1902 1912 1307 MIC 19031904 1931 1933 1905 1908 CN5 CN1 CN2 CN4 CVBS D SUB S VIDEO 1705 CN2 CN3 ...

Страница 25: ... as shown in Fig 4 Lay the front bezel down Fig 4 After base assembly 4 SCREWs SCREW Fig 5 Step 3 1 on a soft area to prevent it from getting scratched defaced or broken 2 Remove 5 screws as shown in Fig 5 Lay the front bezel down Fig 9 Right side view Fig 10 Top side view Fig 8 Left side view Fig 7 Bottom side view Fig 6 Bottom side view Step 4 Turn the set over and release all the plastic clips ...

Страница 26: ...sembly the LCD panel even the Backlight unit defect Step 14 Remove 4 screws as shown in Fig 18 Fig 11 metal shield Fig 12 inverter power scaler Step 6 Remove 10 screws as shown in Fig 11 Step 7 After removing metal shield inverter power scaler board are as shown in Fig 12 Step 11 Inverter power scaler board are as shown in Fig 16 Step 12 Remove a screw as shown in Fig 16 Step 13 Turn the Panel wit...

Страница 27: ...tion and on the picture tube panel It is recommended that saferty goggles be worn when replacing the picture tube When making adjustments use plastic rather than metal tools This will prevent any short circuit or the danger of a circuit becoming unstable Never replace modules or other components while the unit is switched on Together with the defleciton unit the picture tube is used as an integrat...

Страница 28: ...ntumData 802G 2 1 2 Digital Video 600mVp p TMDS Signal 2 1 3 CVBS Video 1Vp p 75 Ohm 2 1 4 S Video Y 1Vp p 75 Ohm C 0 3Vp p 75 Ohm 2 1 5 Audio Signal For S terminal L R audio input PC line in Microphone in Input signal Item H Freq KHz Mode Resolution V Freq Hz 1 31 469 IBM VGA 10H 640x350 70 086 2 31 469 IBM VGA 3H 720x400 70 087 3 31 469 IBM VGA 12H 640x480 59 940 4 35 000 MACINTOSH 640x480 67 00...

Страница 29: ...tern set brightness control at 100 and contrast control at 50 Adjust the R G B sub_gain for the screen center the 1931 CIE chromaticity X Y co ordinates shall be Use Minolta CA 110 for color coordinates and luminance check Luminance 200 Nits in the center of the screen when brightness at 100 and contrast set to 100 4 4 Check the digital interface Check the 64 gray level color poor noise condition ...

Страница 30: ...he aim of the set up below is to test whether the microphone is operating correctly Connect the microphone pink plug to a signal measuring equipment with incorporate DC bias according circuit below Place a reference sine wave sound source close to the microphone openings and check the microphone output for correct output signal Please note that the microphone has two openings One at front and one ...

Страница 31: ...m Memory Block diagram of Hudson2 200P3 ADC AD9888 Keypad LED TMDS Rx SiI161B DVI A DVI D 24C02 D Sub 24C02 Even Odd Sync sw Even Odd TFT LCD Module Back light EEPROM 24C32 Y UV CVBS S Video Audio R Audio L Line in Microphone DC AC INVERTER DC DC Converter 18V 5V 3 3V Mute Volume MIC in AC adaptor AC90 264V 18V To PC Switching Freq 60 KHz ...

Страница 32: ...3276 B2 B 3277 B2 B 3278 B2 B 3279 B3 B 3280 B3 B 3301 C2 B 3310 C2 B 3311 C2 B 3312 B2 B 3313 B2 B 3314 C2 B 3315 C1 B 3316 B1 B 3317 B1 B 3318 C1 B 3319 C1 B 3320 B1 B 3321 B1 B 3324 C2 B 3325 C2 B 3327 C1 B 3341 A2 B 3342 A2 B 3343 A2 B 3344 A2 B 3345 A2 B 3352 B2 B 3401 A3 B 3402 A3 B 3403 A2 B 3404 A2 B 3405 A2 B 3406 A2 B 3407 B2 B 3408 A2 B 3409 B2 B 3410 B2 B 3411 B2 B 3412 B2 B 3413 B2 B ...

Страница 33: ...32 Hudson2 200P3 9 Go to cover page Schematic PWB Components side view ...

Страница 34: ...9 Go to cover page 32 Hudson2 200P3 Schematic PWB Compohnents side view ...

Страница 35: ... 2451 A2 A 2452 A2 A 2453 B2 A 2454 B2 A 2455 A1 A 2456 B1 A 2457 A2 A 2458 B2 A 2459 B2 A 2460 B2 A 2469 A2 A 2473 A1 A 2603 C1 A 2605 C1 A 2606 C2 A 2607 C2 A 2612 C2 A 2613 C2 A 2637 C1 A 2638 C1 A 2639 C1 A 2640 C1 A 2641 C1 A 2642 C1 A 2643 C1 A 2644 C1 A 2645 C1 A 2646 C1 A 2647 C1 A 2648 C1 A 2649 C1 A 2650 C1 A 2651 C1 A 2652 C1 A 2653 C1 A 2654 C1 A 2655 C1 A 2656 C1 A 2657 C1 A 2658 C1 A...

Страница 36: ...9 Go to cover page 33 Hudson2 200P3 Schematic PWB Copper track side view ...

Страница 37: ...3 1 1601 3 1 1601 2 1 1601 1 4 7602 12 2 7602 6 1 V div AC 2 mS div 1 V div AC 2 mS div 1 V div AC 2 mS div 0 5 V div AC 5 uS div 0 5 V div AC 5 mS div 0 5 V div AC 5 mS div 3 7602 9 4 8V 4 8V 2 9V 2 4 3 3 3V 2 9V 5V 1 1 1 DVI I Digital DDC IC Analog DDC IC D SUB ...

Страница 38: ...3 Schematic diagram ADC 3 2V 2 9V 1 6V 1 3V 1 3V 1 3V 1 4V 1 4V 0 8V 0 6V 0 7V 1 7V 1 6V 2 1V 2V 2 1V 2 1V 1 8V 1 6V 1 2V 1 7V 1 2V 1 3V 1 4V 1 4V 1 8V 1 8V 17 19 20 12 14 13 11 10 9 8 6 7 5 18 4 2V 3 7V 15 16 3 3V A D Convertor Analog ...

Страница 39: ...9 Go to cover page 36 Hudson2 200P3 Schematic diagram TMSD RX TMDS Transmitter ...

Страница 40: ...37 9 Go to cover page Hudson2 200P3 Schematic diagram VIDEO Video Decoder ...

Страница 41: ...9 Go to cover page 38 Hudson2 200P3 Schematic diagram SCALER 22 3v 23 24 21 Scaler Chip CPU Hardware structure only ...

Страница 42: ...39 9 Go to cover page Hudson2 200P3 Schematic diagram TMDS TX 25 7341 76 26 7341 78 0 5 V div AC 10 uS div 0 5 V div AC 10 uS div 1 1V 3 2V 3 2V 25 26 TMDS Receiver DVI I Digital ...

Страница 43: ...9 Go to cover page 40 Hudson2 200P3 Schematic diagram MEMORY CLKGEN Save CPU code Firmware for CPU EEPROM OSD data Factory data Flash ROM ...

Страница 44: ...cover page Hudson2 200P3 Schematic diagram I O CONTROL 2V 5V 3 2V 3 3V 3 3V 3 3V 3 3V 3 3V 3 3V 3 1V 3 1V 1 9V 1 9V 4V 4V Multiplexer switch key control signal data bus D A converter to Inverter to Audio from CPU ...

Страница 45: ...9 Go to cover page 42 Hudson2 200P3 Schematic diagram POWER SUPPLY ...

Страница 46: ...3 A 3118 B2 A 3119 B2 A 3122 B3 A 3123 B3 A 3124 B2 A 3125 B3 A 3126 B3 A 3128 B2 A 3129 B2 A 3131 B1 A 3132 B1 A 3133 B2 A 3135 B1 A 3136 B2 A 3137 B2 A 3140 B2 A 3142 B2 A 3191 B2 A 3192 B2 A 6105 B2 A 6107 B3 A 6108 B3 A 6112 B2 A 6113 B2 A 6115 B2 A 7082 A3 A 7083 A3 A 7103 B2 A 7105 B1 A 7107 B2 A 3110 B1 3111 B2 3116 B2 3117 B2 3118 B2 3119 B2 3120 B1 3122 B3 3123 B3 3124 B2 3125 B3 3126 B3 ...

Страница 47: ...43 9 Go to cover page Hudson2 200P3 Power Board C B A copper track smc side view ...

Страница 48: ...9 Go to cover page 44 Hudson2 200P3 Schematic diagram Power 2 3V 5V 2 5V 3 3V 6 9V 13V 13V 3 2V 1 6V 16 3V 15 3V 3 3V 2 4V 12 5V 18V 13 9V 1 4V 3 3V 5 1V 15 6V 18V 2 3V 12 7V 5V 1 6V ...

Страница 49: ...14 B 6904 A13 B 6905 A11 B 8901 A3 B GRID BOARD REF LABEL SIDE ____ _____ _________ 2901 B4 B 2902 B4 B 2903 B4 B 2904 B4 B 2905 B4 B 2909 B3 B 2910 B3 B 2911 B3 B 2912 B4 B 2913 B3 B 2914 B3 B 2915 B3 B 2916 B3 B 2917 B4 B 2918 B4 B 2919 B4 B 2920 A8 B 2921 A8 B 2922 A8 B 2923 A8 B 2924 A7 B 2925 A8 B 2926 A8 B 2927 A7 B 2928 A8 B 2929 B5 B 2930 A7 B 2936 A11 B 2938 B10 B 2939 B9 B 2940 A5 B 2944...

Страница 50: ...46 9 Go to cover page Hudson2 200P3 Schematic diagram AUDIO AMP MIC PREAMP ...

Страница 51: ...9 Go to cover page 47 Hudson2 200P3 Schematic diagram AUDIO PWR KEYPAD ...

Страница 52: ...on2 200P3 Phone Board C B A copper track smc side view GRID BOARD REF LABEL SIDE ____ _____ _________ 1931 A2 B 1932 B2 B 1933 A1 B 1934 B1 B GRID BOARD REF LABEL SIDE ____ _____ _________ 1931 A2 B 1932 B2 B 1933 A3 B 1934 B3 B ...

Страница 53: ...uS div 0 5 V div AC 10 uS div 0 5 V div AC 10 uS div 0 5 V div AC 5 mS div 0 5 V div AC 5 mS div 0 5 V div AC 5 mS div 0 5 V div AC 5 mS div 0 5 V div AC 5 mS div 0 5 V div AC 10 uS div 0 5 V div AC 10 uS div 0 5 V div AC 5 uS div 0 5 V div AC 20 mS div 0 5 V div AC 5 uS div 0 5 V div AC 5 mS div 9 3271 2 16 7253 43 21 1401 22 3425 8 23 3425 6 24 3425 5 0 2 V div AC 5 mS div 0 5 V div AC 5 mS div ...

Страница 54: ...9 Go to cover page 50 Hudson2 200P3 Inverter Diagram PWB AMBIT ...

Страница 55: ... 2 R89 R 8 2K 1 2 R92 R 0 1 2 R90 R 0 3 2 1 Q33 Q 2N7002 N2 3 2 1 Q32 Q 2N7002 N2 1 2 R79 R 0 1 2 R80 R 0 I027v5 2 I027v5 2 sch N6 N7 N8 N9 N10 N24 N25 N26 N27 N28 18V 2V 5V 1 5V 4 7V 4 7V 2 3V 2 4V 2 4V 2 4V 2 6V 1 7V 1 2V 51 9 Go to cover page Hudson2 200P3 Inverter Diagram AMBIT Q18 Q19 Q22 Q23 Q26 Q27 Q32 Q33 Q10 Q20 Q21 Q24 Q25 Q3 Q4 Q5 Q6 Q7 Q8 Q9 06 0038 01 TR NPN MMBT3904LT1 SOT23 MOTO 40V...

Страница 56: ...98 N99 N100 N101 N102 N103 N104 N105 N106 N113 N19 N45 N46 N41 I027V4 2 1 2 C18 C 22pF 1808 1 2 C19 C 333K 0805 3 2 1 D16 D BAV99 OVP 1 2 C17 C 103J 0805 N5 1 2 CP6 C CP 1 2 C50 C NC 1 2 CP7 C CP 1 2 C51 C 221K 0805 1 2 CP8 C CP 1 2 C52 C NC N115 N116 N117 1 2 3 Q7 Q 3904 1 2 R18 R 150 0805 1 2 C36 C 105Z 1 2 R36 R 4 7M 5V 1 2 D5 D 4148 SD 1 2 3 Q20 Q 3904 1 2 R21 R 150 0805 1 2 C39 C 105Z 1 2 R38...

Страница 57: ...lure description Phenomenon Vertical dim lines Vertical block defect Vertical lines defect Always bright or dark Horizontal block defect Horizontal dim lines Horizontal lines defect Always bright or dark Has bright or dark pixel Bright pixel Dark pixel Polarizer has bubbles Polarizer has bubbles Foreign material inside polarizer It shows linear or dot shape Concentric circle formed Bottom back lig...

Страница 58: ...BEZEL ASSY 8238 277 11701 MOD LM201U02 A3 3138 158 54121 SCALER ASSY 3138 158 54151 POWER ASSY 3138 157 53591 METAL SHIELDING ASSY 3138 157 52701 MAIN FRAME ASSY 3138 188 75271 DC AC INVERTER T50I027 00 3138 158 54141 EARPHONE ASSY 3138 158 54131 AUDIO ASSY 3138 157 52681 BACK COVER ASSY 3138 157 52711 BASE ASSY ...

Страница 59: ...NSC0 L 7906 932218493668 IC SM LM2937IMP 3 3 NSC0 R Recommended parts list of Inverter board T501027 00 Ambit Pos Service code Description supplier code T1 9965 000 14739 TRANSFORMER XFMR XL 19125 1531 22 0544 39 U2 9965 000 12328 IC ANA VOLT CURR REGULATOR IC COMP LM393M SO8 NO DUAL COMP 04 0004 01 U1 9965 000 14740 IC ANA OTHERS IC OZ960DS 04 3040 03 C32 9965 000 14741 CAPACITOR ELECTROLYTIC ALU...

Страница 60: ...3 CER2 0603 X7R 50V 1N PM10 R 2293 223878615645 CER2 0603 X7R 16V 47N PM10 R 2294 223878615645 CER2 0603 X7R 16V 47N PM10 R 2295 223878615645 CER2 0603 X7R 16V 47N PM10 R 2296 223858615623 CER2 0603 X7R 50V 1N PM10 R 2297 223878615645 CER2 0603 X7R 16V 47N PM10 R 2301 223886715471 CER1 0603 NP0 50V 470P PM5 R 2302 223886715471 CER1 0603 NP0 50V 470P PM5 R 2303 223886715471 CER1 0603 NP0 50V 470P P...

Страница 61: ... 2760 223878615649 CER2 0603 X7R 16V 1 N PM10 R 2761 202001293747 ELCAP SM RV2 25V 47U PM20 R 2762 222224119876 CER2 1206 Y5V 10V 10U P8020 R 2763 222258015649 CER2 0805 X7R 50V 1 N PM10 R 2764 202001293747 ELCAP SM RV2 25V 47U PM20 R 2765 223878615649 CER2 0603 X7R 16V 1 N PM10 R 2766 202001293747 ELCAP SM RV2 25V 47U PM20 R 2767 223878615649 CER2 0603 X7R 16V 1 N PM10 R 2768 202001293747 ELCAP S...

Страница 62: ...8 242254943409 IND FXD 1206 EMI 1 MHZ 50R R 6201 319801010620 DIO SIG SM BAV99 COL R 6202 319801010620 DIO SIG SM BAV99 COL R 6203 319801010620 DIO SIG SM BAV99 COL R 6216 319801010620 DIO SIG SM BAV99 COL R 6217 319801010620 DIO SIG SM BAV99 COL R 6218 933913910115 DIO SIG SM BAS32L PHSE R 6219 933137390215 DIO REG SM BZX84 C5V1 PHSE R 6222 933742280215 DIO SIG SM BAT54 PHSE R 6223 933742280215 D...

Страница 63: ...380215 TRA SIG SM BSR14 PHSE R 7083 932202899668 FET POW SM SI4835DY VISH R 7101 932213028682 IC L5991 ST L 7102 932216376687 FET POW STU9NC80ZI ST L 7102 932217477687 FET POW STU10NB80 ST L 7103 932218664668 FET POW SM STD2NC50 ST R 7104 932214014667 OPT CP TCET1103 G VISH L 7105 933508380215 TRA SIG SM BSR14 PHSE R 7106 933771100686 IC TL431CLP S MOTA R 7107 933967380685 TRA SIG SM BC858C ONSE R...

Страница 64: ... 3138 154 07621 52 BASE COVER FRONT 3138 154 06031 3138 154 07631 53 BASE COVER BACK 3138 154 06041 3138 154 07641 54 HINGE COVER TOP 3138 154 06051 3138 154 07651 55 HINGE COVER BUTTON 3138 154 06061 3138 154 07661 1073 MAINS CORD 3138 128 74931 3138 168 74231 1077 CORD SUB D 3138 188 72261 BLK 3138 188 72051 1078 DVI CABLE 3138 188 72251 BLK 3138 188 72241 1079 AV CABLE 3138 188 74531 BLK 3138 1...

Страница 65: ... Check Signal connectors Check main panel Yes No Display Check Mains cord LED of monitor Check Power board 18V 3 3V 5V DC Yes Check video signals input interface Check inverter panel No Video source Yes Check Inverter panel 740 920Vrms with load No OK Check fluorescent lamp Check main panel No Hudson2 200P3 ...

Страница 66: ...IN Power supply board Main panel 740 920Vrms Inverter panel Fluorescent Lamp LCD panel 3 3V 5V DC 18V DC 18V DC No power power indicator off Check 18V 3 3V 5V DC Check control panel No Yes Yes Check control wires Check Main panel Hudson2 200P3 ...

Страница 67: ...nverter panel output 740 920Vrms No Yes Bad Inverter panel Check fluorescent lamp Bad image Check Video fh fv signals Yes Yes Check LCD panel No No Check LCD panel Check all connectors LVDS cable No Check main panel Check components cold soldering Hudson2 200P3 ...

Страница 68: ...ng the soldering iron use suitable pressure and be careful When removing the chip do not use undue force with the pair of tweezers The soldering iron to be used approx 30 W should 1 1 General cautions on handling and storage 1 2 Removal of SMDs 1 3 Caution on removal preferably be equipped with a thermal control soldering temperature 225 to 250 C The chip once removed must never be reused o 1 4 At...

Страница 69: ...r LCD industry The CA 110 consists of a main unit and a measuring probe The measuring probe utilizes an optical system suitable for measurement of colour LCDs and is equipped with a viewfinder to verify the area to be measured 2 APPLICATIONS White balance adjustment and inspection on LCD production lines Quality control and shipping inspection by LCD manufacturers Inspection of LCDs upon receipt b...

Страница 70: ...66 Hudson2 200P3 Go to cover page CA110 Application Continued ...

Страница 71: ...sition An image can be seen in the viewfinder but no light will reach the sensor 3 Press 0 CAL If zero calibration is being performed immediately after the POWER switch has been set to ON press 0 CAL after PUSH 0 CAL KEY appears in the liquid crystal display 4 Set the measuring viewing selector to the position Measurements will be started immediately E1 will appear in the liquid crystal display th...

Страница 72: ...ops Extending the lens barrel fully sets the 25mm measurement area retracting the lens barrel fully sets the 50mm measurement area Use the screwdriver to tighten the lens barrel locking screw and lock the lens barrel in position Changing the measurement area also changes the measurement angle this may result in differences between values measured with the 25mm measurement area and those measured w...

Страница 73: ...e LCD s display surface move the measuring probe or the LCD until the distance is the correct distance for the measurement area in use o I o I measurement area 25mm 50mm measurement distance 135mm 5mm 210mm 10mm Distance from the tip of the measuring probe s lens barrel to the LCD s display surface LCD panel Lens barrel Display surface Protective glass Measurement distance Measurement distance D M...

Страница 74: ...MODEL 2250 Chroma MODEL 2250 Measurement viewing selector Measurement viewing selector cover black cover black Fig 4 Fig 5 Fig 6 TURN ON Press 0 CAL Fig 7 Access Factory Mode Factory Mode How to Get into Factory Mode Menu Turn on LCD monitor Push AUTO Left VOLUME buttons simultaneously 3 seconds around Bring up Factory mode indication as shown in Fig 2 Fig 2 Fig 1 AUTO VOLUME Factory Mode CODE VER...

Страница 75: ...1 Fig 12 Measurement viewing selector Measurement viewing selector cover black cover black Step B Brightness Contrast setting pre setting Brightness at 100 Contrast at 50 Step C Colour Temperature Original Panel 9300K 6500K Provide the Full White pattern by Chroma 2250 as shown in Fig 13 White pattern OSD position OSD position Move to optimal position as shown in Fig 14 Fig 13 Fig 14 Factory Mode ...

Страница 76: ...the value of x too low decrease the value of R 9300K As shown in Fig 15 16 Factory Mode CODE VERSION 2 02 2002 08 07 CONFIG VERSION 2 02 2002 08 07 OSD VERSION 2 02 2002 08 07 ORIGINAL PANEL COLOR 9300K For CAD CAM 6500K FOR IMAGE MANAGEMENT AUTO COLOR ADJUST EXIT MAIN CONTROLS TO PROCESS ADJUSTING OK decrease or increase the value of 6500K R G B confirm save the value change Adjust the colour tem...

Страница 77: ...ng by eye total 19 timings 64K 60Hz 1280x1024 Provides the 32 gray scale pattern by Chroma 2250 Check the image of each timing to see if all the black and white scale are visible on the screen or not For instance at timing as shown in Fig 25 32 Gray Scale pattern check by eye total 19 timings 64K 60Hz 1280x1024 Provides the cross talk pattern by Chroma 2250 Check the image of each timing to see if...

Страница 78: ...oad Do not connect Mains cord to Monitor at this moment Fig 4 Connection for Firmware upload Do not connect Mains cord to Monitor at this moment Fig 3 Fig 3 Firmware cable 200P3 12nc is 3138 106 10229 I2C RS232 Alignment Kits 3138 106 10198 9 pins to 9 pins cable Firmware cable 200P3 25 pins to 6 pins 3138 106 10229 Fig 1 Firmware PCB 200P3 12nc is 3138 106 10228 6 pins to 6 pins cable Firmware PC...

Страница 79: ... Step 1 Double click as shown in Fig 96 Bring up Flashupgrader exe for Win95 98 ME Click Next Click Next Click Next Fig 10 Fig 11 Fig 12 Connection 1 for application software Fig 8 Fig 9 Rear view of the monitor PC To video card Video cable for view of execution file Connect to Mains cord Monitor A Rear view of 200P3 PC To Com1 or Com2 PC To video card Video cable Com1 or Com2 25 pins 9 pins 9 pin...

Страница 80: ... monitor then reconnect the Mains cord to monitor again Step 4 Check the updated Firmware version Fig 19 Fig 18 1 UNPLUG 2 PLUG IN AUTO VOLUME Check Firmware version example as below CODE VERSION 2 02 2002 08 07 CONFIG VERSION 2 02 2002 08 07 OSD VERSION 2 02 2002 08 07 Factory Mode CODE VERSION 2 02 2002 08 07 CONFIG VERSION 2 02 2002 08 07 OSD VERSION 2 02 2002 08 07 ORIGINAL PANEL COLOR 9300K F...

Страница 81: ...L INPUT AUTO PICTURE ADJUSTMENT 18 FACTORY PRESET MODES AND 37 PRESET MODES WHICH CAN BE RECOVERED TO PRESET MODES USER FRIENDLY OSD DISPLAY FOR MODE IDENTIFICATION ADJUSTMENT DDC 2B COMMUNICATION CAPABILITY MAX RESOLUTION 1600 1200 NON INTERLACED AT 75 HZ 20 COLOR TFT LCD FLAT PANEL EASY TILT SWIVEL BASE FULL RANGE POWER SUPPLY 90 264 VAC CE ENVIRONMENTAL POLICY ANTI GLARE TO REDUCE LIGHT REFLECT...

Страница 82: ...egulatory compliance 3 0 Electrical characteristics 3 1 Interface signals 3 1 1 Video 3 2 Interface 3 2 1 D sub cable 3 2 2 DVI cable 3 2 3 OSD function control 3 3 Timing requirement 3 3 1 Mode storing capacity 3 3 2 Preset timings 3 3 3 Horizontal scanning 3 3 4 Vertical scanning 3 4 Power input connection 3 5 Power management 3 6 Display identification 3 6 1 Analog DDC 3 6 2 Digital DDC 4 0 Vis...

Страница 83: ...d swivel base 5 4 Transportation packages 5 4 1 Shipping dimension weight 5 4 2 Block unit palletization 6 0 Environmental characteristics 6 1 Susceptibility of display to external environment 6 2 Transportation tests 6 3 Display disturbances from external environment 6 4 Display disturbances to external environment 6 4 1 EMI 7 0 Reliability 7 1 Mean time between failures 8 0 Quality assurance req...

Страница 84: ...rtical stripes Display surface low reflection antiglare with hard coating Color depth 16777216 colors 8 bits Backlight Six CCFL s Active area WxH 408x306mm 20 1 diagonal View angle Horizontal Vertical 170 degree CR 5 Contrast ratio 300 1 White luminance 250 nits Typ 2 2 Scanning frequencies Hor 30 94 K Hz Ver 56 85 Hz 2 3 Video dot rate 140 MHz 2 4 Power input 90 264 V AC 50 60 2 Hz 2 5 Power cons...

Страница 85: ...ctrical characteristics 3 1 Interface signals The input signals can be applied in three different modes 1 D shell Analog Input signal Video Hsync Vsync Video 0 7 Vp p input impedance 75 ohm DC Sync Separate sync TTL level input impedance 5k ohm terminate Hor sync Positive Negative Ver sync Positive Negative Composite sync TTL level input impedance 5k ohm terminate Positive Negative Sync on green v...

Страница 86: ...ional data 13 H H V sync 14 V sync 15 Data clock 3 1 1 Audio 3 1 3 Interface 3 2 1 D Sub Cable Length 1 8 M 50 mm fixed Connector type D sub male with DDC2B pin assignments Blue connector thumb operated jack screws pin assignment Input signal level 500mVrms Headphone output signal level 32ohm 0 7 0 7 Vrms Input signal connector 3 5 mm mini jack Loud speaker 2 2 W stereo firing 3 1 2 Microphone Sen...

Страница 87: ... 11 TMDS data1 shield 12 NC 13 NC 14 5V 15 Ground return for 5V and H Vsync 16 Hot plug detect 17 TMDS data0 18 TMDS data0 19 TMDS data0 shield 20 NC 21 NC 22 TMDS clock shield 23 TMDS clock 24 TMDS clock C1 Analog R C2 Analog G C3 Analog B C4 Analog H sync C5 Analog GND Analog R G B return 3 2 2 DVI Cable The input signals are applied to the display through DVI I cable Length 1 8 M 50 mm fixed Co...

Страница 88: ...20 590 8 23 DAVID CHIANG PIN NO SIGNAL 1 GND 2 GND 3 LUMA 4 CHROMA 5 GND 6 GND 7 GND 3 2 3 CVBS The input signals are applied to display through CVBS cable pin assignment 3 2 4 S Video The input signals are applied to display through S Video cable pin assignment PIN NO SIGNAL 1 GND 2 CVBS 3 CVBS 4 CVBS 84 Hudson2 200P3 Go to cover page ...

Страница 89: ...ADJUST SIZE Full Screen Native Mode User Setting BRIGHTNESS CONTRAST Brightness and Contrast adjustment VIDEO NOISE Phase adjustment Clock adjustment ADJUST COLOR Original panel color 9300K for CAD CAM 6500k for image management User preset red green blue adjust OSD SETTING OSD H position OSD V position PRODUCT INFORMATION Show Serial No Resolution Video input LANGUAGE ADJUST POSITION ADJUST SIZE ...

Страница 90: ...L FRANCAIS DEUTSCH ITALIANO SIMPLFIED CHINESE ADJUST POSITION HORIZONTAL VERTICAL BRIGHTNESS CONTRAST Brightness and Contrast adjustment OSD POSITION OSD H position OSD V position PRODUCT INFORMATION Show Serial No Resolution Video input RESET TO FACTORY SETTING return to Factory preset timings and settings INPUT SELECTION select Analog D sub Digital DVI D or Analog DVI A PIP Size Small Medium Lar...

Страница 91: ... PHILIPS 8639 000 12395 02 05 20 02 05 20 590 11 23 DAVID CHIANG Go to cover page MODE NO 5 6 7 8 RESOLUTION 640 x 480 800 x 600 800 x 600 800 x 600 Dot clock MHz 31 500 36 40 49 498 f h 37 5kHz 35 156kHz 37 879kHz 46 875kHz A us 26 667 840 dots 28 444 1024 dots 26 4 1056 dots 21 333 1056 dots B us 2 032 64 dots 2 000 72 dots 3 2 128 dots 1 616 80 dots C us 3 81 120 dots 3 556 128 dots 2 2 88 dots...

Страница 92: ... 624 lines 15 880 768 lines 12 80 768 lines 12 678 870 lines S ms 0 016 1 lines 0 062 3 lines 0 017 1 line 0 043 4 line SYNC H V POLARITY SEP SYNC Y Y Y Y MODE NO 13 14 15 16 RESOLUTION 1152 x 900 1280 x 1024 1280 x 1024 1280x1024 Dot clock MHz 108 108 135 157 5 f h 71 810kHz 63 981kHz 79 976kHz 91 146kHz A us 13 926 1054dots 15 63 1688 dots 12 504 1688 dots 10 971 1728dots B us 1 185 128 dots 1 0...

Страница 93: ... 304 dots 1 501 304 dots 1 778 48 dots D us 9 877 1600 dots 7 901 1600 dots 25 481 688 dots E us 0 395 64 dots 0 316 64 dots 0 889 24 dots f v 60 000Hz 75 000Hz 50Hz O ms 16 667 1250 lines 13 333 1250 lines 20 625 lines P ms 0 040 3 lines 0 032 3 lines 0 128 4 lines Q ms 0 613 46 lines 0 491 46 lines 1 408 44 lines R ms 16 000 1200 lines 12 800 1200 lines 17 972 556lines S ms 0 013 1 lines 0 011 1...

Страница 94: ... with power management function are as follows Note Disconnect DVI signal cable and audio module On Pulse Pulse 75W Green Stand by No Pulse Pulse 3 W Amber Suspend Pulse No Pulse 3 W Amber off No Pulse No Pulse 3 W Amber According to VESA power saving signalling TCO92 power saving requirement EPA energy star requirement Power Switch Off for Digital input power consumption is less 3W In non DMPM re...

Страница 95: ...0 317 17 75 0 VESA 1600x1200 60 8 46 875 VESA 800x600 75 000 18 93 8 VESA 1600x1200 75 9 49 700 MACINTOSH 832x624 75 000 19 31 250 TV PAL 688x556 50 10 48 363 VESA 1024x768 60 004 4 0 Visual characteristics 4 1 Test conditions Unless otherwise specified this specification is defined under the following conditions 1 Input signal As defined in 3 3 1600x 1200 non interlaced mode 94K 75Hz signal sourc...

Страница 96: ...ess uniformity Set contrast at 100 and turn the brightness to get average above 200 nits at center of the screen Apply the Fig 1 it should comply with the following formula B_max or B_min B_ ave X 100 20 B_ave Where B_max Maximum brightness B_min Minimum brightness B_ave Average 9 points brightness 4 6 Check Cross talk S Apply Pattern 2 Set contrast and brightness at 100 Measure YA Then output Pat...

Страница 97: ...osition and the contrast control at 50 position The 1931 CIE Chromaticity color triangle diagram x y coordinate for the screen center should be 9300K CIE coordinates X 0 281 0 020 Y 0 311 0 020 6500K CIE coordinates X 0 312 0 020 Y 0 338 0 020 5 0 Mechanical characteristics 5 1 Controls Front side DC power switch OSD function key UP DOWN LEFT RIGHT AUTO MUTE SOURCE PIP External Microphone Jack Ear...

Страница 98: ...ht 12 5 KG 5 4 2 Block unit Palletization 7 4 28 6 0 Environmental characteristics The following sections define the interference and susceptibility condition limits that might occur between external environment and the display device 6 1 Susceptibility of display to external environment Operating Temperature 5 to 35 degree C Humidity 80 max Altitude 0 3658m Air pressure 600 1100 mBAR Storage Temp...

Страница 99: ...uding the LCD panel and CCFL 50 000 hrs CCFL MTBF 40 000 hrs Standard Philips UAN D1400 NSTA Height 70 cm 61 cm 1 corner 1 corner Drop Sequence 3 faces 3 edge Test 6 face electrical function ok Test mechanical function ok Result no serious damage on set appearance room temp 10 c humidity 70 5 200 Hz 10 50 10 Hz Sequence 0 73 G 0 35 mm 30 min for 30 min for Vibration each axis each axis Test Test e...

Страница 100: ...nce test according to MIL STD 105D Control II level AQL 0 65 major 2 50 minor please also refer to annual quality agreement Customer acceptance criteria UAW0377 00 9 0 Serviceability The serviceability of this monitor should fulfill the requirements which are prescribed in UAW 0346 and must be checked with the check list UAT 0361 Fig 1 Brightness and Uniformity Average 9 points average 96 Hudson2 ...

Страница 101: ... 200P TYPE 2002P3G 00C BRAND PHILIPS 8639 000 12395 02 05 20 02 05 20 590 21 23 DAVID CHIANG Go to cover page Fig 2 Cross talk pattern Gray level 46 64 Gray level YA 1 2 1 2 1 6 Fig 3 Cross talk Pattern Center at Gray level 0 Black YB 1 6 1 3 1 3 1 3 1 3 1 3 Hudson2 200P3 ...

Страница 102: ...HUDSON2 200P TYPE 2002P3G 00C BRAND PHILIPS 8639 000 12395 02 05 20 02 05 20 590 22 23 DAVID CHIANG D VIDEO C E SEPARATE SYNC HORIZONTAL B A R VIDEO Q S P O D VIDEO C E B A VERTICAL HORIZONTAL COMPOSITE SYNC FIG 4 TIMING CHART 1 98 Hudson2 200P3 Go to cover page ...

Страница 103: ... CMTR HUDSON2 200P TYPE 2002P3G 00C BRAND PHILIPS 8639 000 12395 02 05 20 02 05 20 590 23 23 DAVID CHIANG Go to cover page D VIDEO C E B A VERTICAL COMPOSITE SYNC FIG 5 TIMING CHART 2 O P Q R S VIDEO B S P Q O R SYNC ON GREEN HORIZONTAL VERTICAL Hudson2 200P3 ...

Страница 104: ...intained throughout the test period 2 1 3 The mains switch es must be in the ON position 2 2 Test Requirements All products should be HiPot and Ground Continuity tested as follows Test 2820VDC 1700VDC Test current voltage 2000VAC 1200VAC 25A AC Test time Test time 3 seconds 1 second 3 seconds min min Resistance required Trip set at 100 uA 5 mA 0 09 R ohm current for Max R is the Tester limitation ...

Страница 105: ... 3 4 USB 6 7 9 8 10 Unstable picture Picture flickers Out of H V Sync Picture too bright Picture too dim OSD main menu locked 12 13 No power LED is off 15 16 17 5 11 14 Buzzing sound when power on Missing color Power management function is not active Resolution colors numbers can not be changed Resolution can not be changed and LightFrame not function for Mac PC Screen color not correct ...

Страница 106: ...r type some word with your keyboard to wake up computer from saving status 2 Check that your video cable is plugged in and does not have bent pins Continued If your PC in MS Win 98 and with lots of application software Do not set screen saver Wait at 14 minutes It will cause no dispaly problem as above mentioned Action Restart PC and change timer setting of screen saver ...

Страница 107: ...PC END Is picture displayed normally YES It is need to check and repair the monitor NO YES Make sure the correct signal is input Check contrast level is not minimized Press Contrast button increase value to 100 END Is picture displayed normally YES OK NO 1 Make sure the correct signal is input 2 Press the keyboard or operate the mouse 3 Make sure of the range of the input frequency and then set th...

Страница 108: ...n 4 Choose the Settings tab then click Advanced 5 Choose Monitor button then click Change button 6 Choose Specify the location of the driver Advanced and click the Next button 7 Choose Display a list of all the drivers in a specific location so you can select the driver you want then click Next and then click Have Disk 8 Click Browse button then choose the appropriate drive F CD ROM Drive then cli...

Страница 109: ...Adjust Horizontal Vertical Shape Via the monitor On Screen Display or Front Control Knob Auto function key Reset the monitor via OSD manipulation Select Reset to Factory settings END Is picture displayed normally YES NO 3 Consult a service center the monitor may be defective Try the monitor with another computer Video card could be defective ...

Страница 110: ...ral Troubleshooting Guide Continued Please contact your dealer reseller for more information OK END NO Picture too Large or Small YES 4 Reset monitor via OSD menu manipulation Change monitor timing to work at the recommended resolution ...

Страница 111: ...SB automatically determines resources like driver software and bus bandwidth required by peripherals USB makes necessary resources available without user intervention It is designed to meet Microsoft Plug and Play PnP specification meaning users can install and hot swap devices without long installation procedures and reboots It allows 127 devices to run at the same time on the bus USB bus provide...

Страница 112: ... Continued Please contact your dealer reseller for more information OK END NO Unstable Picture Picture Flickers YES Vertical Horizontal flicker appears Push the AUTO button Eliminate the vertical horizontal bars using the Phase Adjustment in the FIRST Window 6 ...

Страница 113: ...resetting timing range or Sync problem 1 Try system with another monitor 2 Try monitor with another system Monitor related YES It is need to check and repair the monitor NO Make sure that the Video system doesn t select a driver that is outside the Monitor H V scan range out of presetting timing range while going into windows Run Windows by using basic VGA mode Example 640 x 480 H V out of presett...

Страница 114: ...t Control Knob END Is picture displayed normally YES It is need to check and repair the monitor NO Reset the monitor via OSD manipulation Select Reset to Factory settings or Change the color temperature settings to be 9300 color coordination from OSD menu Try the monitor with another computer Video card could be defective END Is picture displayed normally YES NO 8 ...

Страница 115: ...layed normally YES Reset the monitor via OSD manipulation Select Reset to Factory settings or Change the color temperature settings to be 9300 color coordination from OSD menu Try the monitor with another computer Video card could be defective END Is picture displayed normally YES NO NO 9 Note 1 Sun light passing through a window is much brighter than monitor luminance Luminance is the measurable ...

Страница 116: ...t unit is plugged into a known good power source Move a good radio to plug into the power source to test it Power off the monitor and then on POWER LED ON It is need to check and repair the monitor It is need to check and repair the monitor NO YES POWER LED ON END YES NO 1 Is the correct AC power cord connected 2 Is AC power outlet active 3 Is the power button in the ON position YES YES NO 10 YES ...

Страница 117: ...e produced 2 View an image that supposed to contain Red Green and Blue Color problems will be apparent when one or more of these colors can not be displayed 1 Turn off monitor 2 Disconnect video cable 3 Turn on monitor Is picture displayed normally It is need to check and repair the monitor Colors on warning signal OK YES Check video cable for bent pins reseat it END YES Signal cable pins OK YES 1...

Страница 118: ...eneral Troubleshooting Guide Continued Please contact your dealer reseller for more information OK END NO OSD MAIN MENU LOCKED YES Press and hold the OSD menu key for about 10 seconds until picture displays OSD MAIN MENU UNLOCKED 12 ...

Страница 119: ...th another monitor 2 Try monitor with another system Monitor related Jitter or Noise disappear END YES NO Video system problem It is need to check and repair the monitor Power off any monitor that is within 2 or 3 feet away Remove any unshielded speakers away from the monitor Make sure there are no flourescent light fixtures close to the monitor Try to keep monitor away from large metal structures...

Страница 120: ...ot active Verify the PC is compliant with VESA In case all of the video signals of PC are not off power management function is not active normally Repeat to power on and off power management There are accelerator boards not complied with VESA YES 14 Consult a service center the monitor may be defective END ...

Страница 121: ...o computer 1 3 All electronic devices are 3 feet away from the monitor 1 1 Replace damaged cable 1 2 Try to remove replug the cable 3 1 Consulted by System video chip makers for the right version of video chip driver 2 Test monitor with different PC 5 1 Install right monitor driver inf file 5 1 Driver in CDROM manual Philips web 5 2 Philips Web www philips com 5 3 Sub content pcstuff 6 1 Entry OSD...

Страница 122: ...All electronics dervoces are 3 feet away from the monitor 3 1 It s video card driver problem normally due to improper version of the driver 3 2 Color displayed limited also due to insufficinet on board memory Video RAM on video card 4 1 Resolution mode not be changeable normally due to improper version of the video card driver 4 2 It also could be due to improper version of the monitor drive inf f...

Страница 123: ...Resolution changed on Mac is done by setting of DIP switch of the adaptor change ID configuration 4 3 Power Mac G4 has been implemented the VGA feature on Mac system 3 rows 15 pins D shell connector 5 1 Only power Mac G4 can run LightFrame or other Mac which system output with VGA 15 pins 3 rows D shell connector 5 2 The LightFrame not work on Mac due to Mac dis connect DDC output for IBM VGA Moni...

Отзывы: