


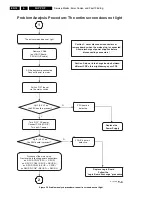


Mechanical Instructions
EN 7
FHP PDP
4.
6.
Remove the X-BUS board and the X-SUS board together.
Make sure that you do not touch the heat sink when removing
the Y-SUS board.
4.1.3
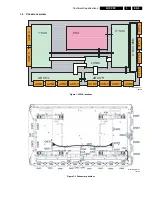
Y-SUS Circuit Board
Figure 4-4 Y-SUS board removal (1/2)
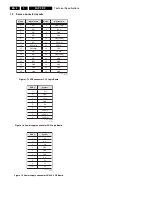
Figure 4-5 Y-SUS board removal (2/2)
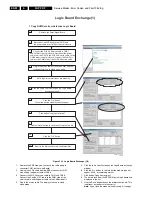
Remove the circuit board by following the steps below. To
install the circuit board, reverse the removal procedure.
1.
Release the lock of the FPC connector [1] and unplug the
signal cable.
2.
Unplug the connector [2].
3.
Remove the fixing screws [3].
4.
Release the white stand-offs [4] from the Y-SUS board.
5.
Pull out the Y-SUS board horizontally, in this way
unplugging the connectors [5].
6.
Remove the Y-SUS board.
Make sure that you do not touch the heat sink when removing
the Y-SUS board.
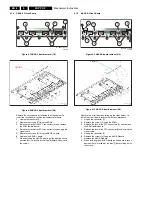
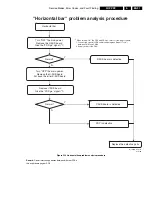
Note:
Make sure the radiation plate is positioned correctly. It is
located underneath the upper SDM, and the threaded bush
should sit in the hole of the radiation plate.
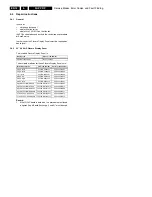
Figure 4-6 Radiation plate position
G_16400_009.eps
300706
3
5
4
4
2
1
Y-SUS
G_16400_011.eps
180706
Y-SUS board
SDM-U board
Radiation Plate
Threaded bush for
SDM-U board
G_16400_010.eps
310706
Adhesive side should be
against the IC of SDM-U


