background image

8

The pictures are for reference only, please refer to the actual packaging 
items.

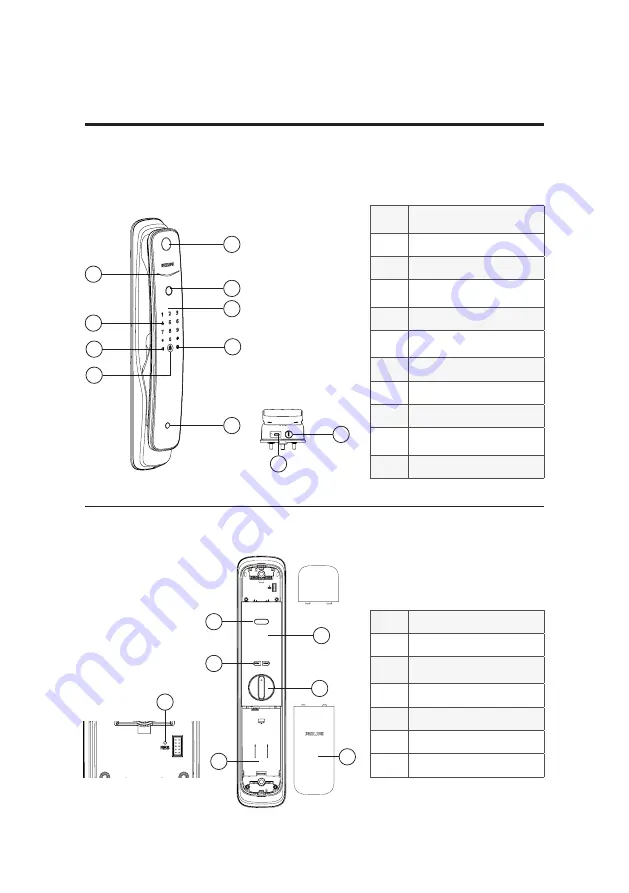
Inside escutcheon

Outside escutcheon

3. Get to know your EasyKey

Door lock status 

indicator

Keypad

Mute button

Doorbell button/Low 

battery voltage indicator

Push-pull handle

Outside forced lock 

button

Camera

PIR sensor

Fingerprint sensor

Reboot and emergency 

power supply interface

Mechanical key hole

Battery cover

Battery compartment

Restore to a default 

setting

Push-pull handle

[OPEN/CLOSE] button

Rotary knob

Infrared sensor

3

4

7

5

6

8

9

11

1

2

10

6

2

5

7

4

1

3

Содержание EasyKey 7000 Series

Страница 1: ...EasyKey 7000 series DDL702 Smart Video Door Lock User manual To register your produc t s and get support from below site www philips com support ...

Страница 2: ......

Страница 3: ...pairing guide 5 How to use EasyKey 16 Unlock from outside or inside Lock from outside or inside Inside deadlock Unlock with mechanical key 6 Other functions 18 Indoor infrared sensor unlock Outside forced lock Mute mode Restore to default settings Doorbell Two way video intercom 7 Indicators meaning and usage 21 Door lock status indicator Low battery voltage indicator Outside forced lock indicator...

Страница 4: ...lease replace all the batteries immediately if there is a low battery alarm Please make sure to correctly match the poles when installing the batteries Caution Do not place the battery near fire sources to avoid the explosion Do not use any emergency power supply that does not meet the safety requirements to power up the product Do not connect the 2 poles of the batteries with metals to avoid shor...

Страница 5: ...syKey installation Outside escutcheon with silicone pad Inside escutcheon with silicone pad Drilling template Mortise Mounting plate User manual Warranty card Certificate of conformity Installation kit Mechanical key Lithium battery Strike Cleaning pad Warranty Card EasyKey User Manual EasyKey EasyKey ...

Страница 6: ...ng screw tube 1 Outside escutcheon 1 Battery cover 1 M6 mounting screw 1 Inside escutcheon 1 8 9 10 11 12 13 14 Compressed spring 2 Square shaft 2 M5 connecting screw 4 Mounting plate 1 Mortise 1 Mortise anchor screw 4 M5 connecting screw tube 4 2 1 3 4 5 6 7 8 9 10 11 12 14 13 ...

Страница 7: ...stallation kit is applicable for a door thickness of 60 90mm If your door thickness does not within this range please feel free to contact us Left handed door Right handed door Left inward Left outward Mortise plate Mortise plate Allen wrench Latch bolt Allen wrench Right inward Right outward Attention Step 1 Determine door swing direction This product allows you to have your door installed to go ...

Страница 8: ...e shaft accordingly into the square shaft holes Pass the cable through the hole and then insert the square shaft of the outside escutcheon to the rotary hole on the mortise until the outside escutcheon is close to the surface of the door 3 Place the mounting plate against the inner surface of the door and fasten it with four M5 connecting screws 4 Make sure the latch bolt stays inside the door dur...

Страница 9: ...are shaft hole of the inside escutcheon accordingly 5 6 Insert the cable of both outside escutcheon and mortise into the corresponding sockets on the inside escutcheon Then insert the square shaft of the inside escutcheon to the rotary hole on the mortise until the inside escutcheon is close to the surface of the door Please hide the extra cables in the door hole or the inside escutcheon Attention...

Страница 10: ...Keypad Mute button Doorbell button Low battery voltage indicator Push pull handle Outside forced lock button Camera PIR sensor Fingerprint sensor Reboot and emergency power supply interface Mechanical key hole Battery cover Battery compartment Restore to a default setting Push pull handle OPEN CLOSE button Rotary knob Infrared sensor 3 4 7 5 6 8 9 11 1 2 10 6 2 5 7 4 1 3 ...

Страница 11: ... all user information for review 4 How to set up your EasyKey General mode Unlock with any registered identity information Unlock with the two seperate forms of identification PIN code Fingerprint Dual verification mode User code Name Fingerprint Password 00 01 02 03 04 05 06 Icon annotation Master PIN code User PIN code Fingerprint One time PIN code 1 Press key to return to the previous menu 2 Th...

Страница 12: ...er 2 to enter user registration and enter 1 to add a new user PIN code then the system will automatically number it and generate a voice prompt 1 2 Enter a new user PIN code of 6 to 12 digits and confirm with Then re enter the new user PIN code and comfirm with After hearing a voice prompt of Succeeded press until you finally exit master mode Enter and enter master PIN code then confirm with Enter...

Страница 13: ...PIN code deletion then enter 1 to delete a single user PIN code Delete a single user PIN code Enter a 2 digit code user code 00 19 to be deleted and confirm with After hearing a voice prompt of Succeeded press until you finally exit the master mode Enter and enter master PIN code then confirm with Delete all user PIN codes Enter 3 to enter user record deletion and enter 1 to enter user PIN code de...

Страница 14: ...fter hearing a voice prompt of Succeeded press until you finally exit the master mode Delete all fingerprints Remove the battery cover then double press the RES hole with a sharp object When you hear a voice prompt of Restoring to default settings it means all user record are deleted System initialization System settings Enter and enter master PIN code then confirm with Enter 4 to go to system set...

Страница 15: ...ode press 2 After hearing a voice prompt of Succeeded press until finally you exit master mode Switch to dual verification mode or or The default volume is high volume Attention or Extended functions Enter and enter master PIN code then confirm with Enter and enter the master PIN code then confirm with Enter 4 to go to system settings and enter 4 again to enter the locking mode or Press 1 to enabl...

Страница 16: ...ck to complete the pairing set up Scan the QR code to download the official app using a mobile phone Enter and enter master PIN code then confirm with Security code query Local query Enter and enter master PIN code then confirm with Enter 6 to go into system query and enter 2 to check the software version then the system will broadcast it automatically Directly enter 400 to go into system query At...

Страница 17: ...follow the hints on the app screen to enter a Wi Fi password and a QR code will be generated Then align it with the smart lock s camera After scanning please complete the pairing set up in the app The smart lock is only compatible with a router with dedicated 2 4 Hz 5G Hz Wi Fi is not supported Please make sure that the distance between the smart lock and the router is less than 10 meters otherwis...

Страница 18: ... push or pull the handle to unlock Double press the OPEN functional button within one second then push or pull to unlock the door Philips Easykey has an infrared sensor on the handle When the sensor is triggered you can press the sensor module on both the front and rear sides of the handle simultaneously to unlock the door Unlock from inside or outside 5 How to use EasyKey With PIN code With finge...

Страница 19: ... is required to release the door from deadlock mode Unlock with mechanical key Cut the mechanical box and take out the key Push the cover aside and reveal the key Insert the key into the keyhole and the key should be vertical to the key shell Then turn the key shell by 90 in the direction of the handle until it is close to the lock Make a 180 degrees twist clockwise and make sure the key shell is ...

Страница 20: ...ocking is enabled long press the OPEN CLOSE button at the same time to turn off the function and the red light will glow quickly Function Unlocking from inside will trigger an alert How to use After the door is successfully locked long press the button for 2 seconds to enter the outside forced lock mode Outside forced lock button Enabling the outside forced lock function will not affect the normal...

Страница 21: ... be restored to default settings Function Use only one button to mute the lock and the voice guide will be turned off This feature applies to the scenes where you don t want to disturb your family How to use 1 Mute When the system is awake long press the Mute button for 2 seconds until it glows green 2 Unmute When the system is awake long press the Mute button for 2 seconds until it glows white an...

Страница 22: ...end it straight to the paired app When you get a notification on your phone you can check the situation outside your front door remotely via app Function View the situation outside the front door and talk to the visitors via mobile app How to use When paired the smart door lock with mobile app you can view the situation outside the front door and talk to the visitors in real time with app When you...

Страница 23: ...e door is closed Red When the system wakes up it will automatically check the battery voltage If the voltage is too low then the light will flash in red and there will be a voice prompt of Low battery voltage please replace all batteries White 1 When the door is locked and the outside forced lock indicator is glowing it means that you can enable the outside forced locking 2 When outside forced loc...

Страница 24: ...nually the keypad will show the combination of 15937 X with a voice prompt of inside deadlock enabled If there are consecutive incorrect inputs of any of the fingerprint PIN code 5 times within 5 minutes the system will lock up for 3 minutes 3 minutes Flash three times Flash twice Flash once 2 minutes 1 minute Mute mode indicator Only when waking up the outside escutcheon or verifying the identity...

Страница 25: ...der the deadlock mode 1 Fast flashing in green infrared sensor unlocking is on 2 Fast flashing in red infrared sensor unlocking is off Alert types and methods 8 Troubleshooting Alert to unlock from inside under outside forced lock mode Way to trigger Under outside forced lock mode an alert will be triggered when the door is unlocked from inside Way to be alerted Repeat alerts Way to turn off The a...

Страница 26: ...igger The door is pried apart and the latch bolt is popped up Way to be alerted Repeat alerts Way to turn off Automatically turning off or successful identity verification 2 Way to trigger The outside escutcheon is pried open and there is a gap of space between the door and the outside escutcheon Way to be alerted Repeat alerts Way to turn off Automatically turning off or successful identity verif...

Страница 27: ...he setting page go to motion sensor alert and turn it on 2 When paired the smart video door lock with the mobile app you can set the sensitivity level of the motion sensor on the setting screen The default detection distance for the motion sensor is 3 meters and the default length of stay outside the front door is 10 seconds If an invited person is wandering within this certain distance and time a...

Страница 28: ...tantly If the system crash occurs and the smart door lock can not be unlocked from the outside you can reboot the system using micro USB port The smart door lock is powered by a 5000mA h lithium battery The battery compartment is in the lower part of the inside escutcheon Press the button near the bottom of the inside escutcheon then remove the battery cover to replace lithium battery Battery cove...

Страница 29: ... the lithium battery You can charge the lithium battery using USB port 1 Lithium battery is guaranteed for one year and the lithium battery life is 300 times of complete charge and discharge 2 For a lithium battery the charge cut off voltage is 5V 3 A bad network connection will increase power consumption at a faster rate Attention ...

Страница 30: ... Koninklijke Philips N V and are used under license This product has been manufactured by and is sold under the responsibility of Shenzhen Conex Intelligent Technology Co Ltd and Shenzhen Conex Intelligent Technology Co Ltd is the warrantor in relation to this product ...

Отзывы: