background image

14

EN


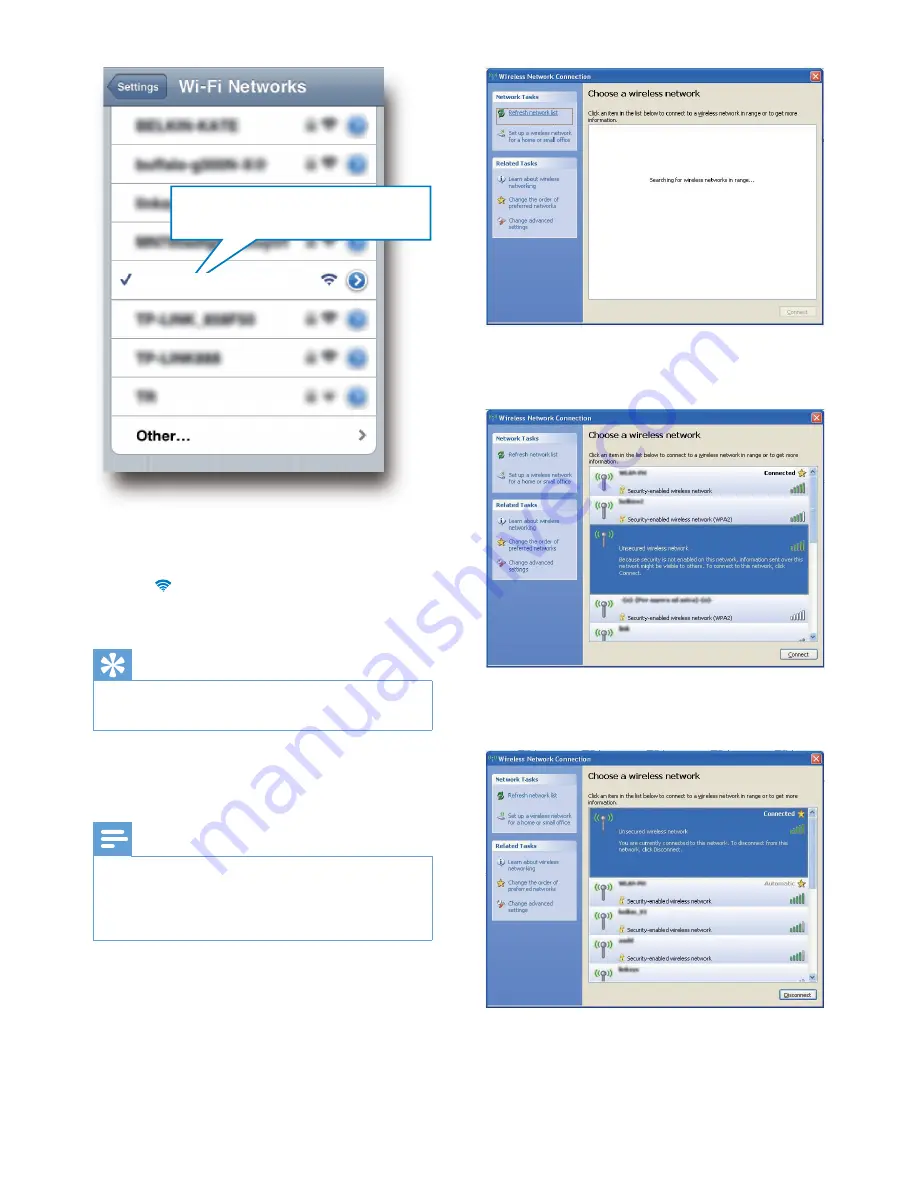
Wait until successful Wi-Fi connection on 

your iPod touch/iPhone/iPad.


»

 is displayed at the upper left corner 

of your iPod touch/iPhone/iPad.

Tip


If 

Philips_Install XXXXXX 

is not in the list, try to scan 

the available Wi-Fi networks again.


Option 2: Use your Wi-Fi enabled PC/Mac

Note


See the user manual of your PC/Mac for how to 

connect your PC/Mac to a Wi-Fi network.


During Wi-Fi network connection, do not connect any 

network cable to your PC/Mac.

Open the Wi-Fi setup tool or control 

panel on your PC/Mac.

Scan the available Wi-Fi networks.

Philips_Install XXXXXX 

Philips_Install XXXXXX 


Select 

Philips_Install XXXXXX

 from the 

list of available networks.


Wait until successful Wi-Fi connection on 

your PC/Mac.


Philips_Install XXXXXX 

Philips_Install XXXXXX 

Содержание DS9860W

Страница 1: ...www philips com support DS9860W User manual Always there to help you Register your product and get support at Question Contact Philips Question Contact Philips ...

Страница 2: ......

Страница 3: ...1 Use Wi Fi network login sharing 10 Method 2 Connect to a WPS router 11 Method 3 Connect to a non WPS Wi Fi router 12 5 Play 18 Stream audio from your iTunes music library to DS9860W 18 Control play 20 Use advanced sound settings 21 Play from an external device 21 6 Charge your iPod iPhone iPad through USB socket 22 7 Update firmware 23 Option 1 Update through Philips SoundStudio recommended 23 O...

Страница 4: ...clude batteries Please refer to safety and disposal instructions for batteries in this user manual o Where the mains plug or an appliance coupler is used as the disconnect device the disconnect device shall remain readily operable Warning Never remove the casing of this apparatus Never lubricate any part of this apparatus Never place this apparatus on other electrical equipment Keep this apparatus...

Страница 5: ...ct contains batteries covered by European Directive 2013 56 EU which cannot be disposed of with normal household waste Inform yourself about the local separate collection system for electrical and electronic products and batteries Follow local rules and never dispose of the product and batteries with normal household waste Correct disposal of old products and batteries helps prevent negative conse...

Страница 6: ...for iPad mean that an electronic accessory has been designed to connect specifically to iPod iPhone or iPad respectively and has been certified by the developer to meet Apple performance standards Apple is not responsible for the operation of this device or its compliance with safety and regulatory standards Please note that the use of this accessory with iPod iPhone or iPad may affect wireless pe...

Страница 7: ... on your PC Mac only Tip Please visit www philips com welcome for information about more Philips AirPlay enabled devices With DS9860W you can also play music from other audio devices through the MP3 LINK socket charge your iPod iPhone iPad through the USB socket What s in the box Check and identify the contents of your package Main unit 2 x wireless SoundSphere speakers with a built in Wi Fi modul...

Страница 8: ...10 a b c e d f g h Connect an iOS device through an Apple USB cable not supplied for charging Connect a USB mass storage device for firmware upgrade b Turn the unit on off Press and hold reset the unit c MP3 LINK Connect an external audio player through the supplied MP3 link cable d AC IN Connect the power cord e Speaker connectors Connect the two speakers through the supplied speaker cable f WI F...

Страница 9: ...emote control a Turn the unit on off b Select the AirPlay device audio source c Adjust volume d Mute or restore volume e Skip to the previous next track f Start or pause play g Select the MP3 link audio source g f b a e d c ...

Страница 10: ... 1 3 5 Screw the left black connector to secure the cable 6 Repeat steps 2 5 to insert the other speaker cable into the right connectors Connect power Caution Risk of product damage Make sure that the power supply voltage matches the voltage printed on the bottom of the unit Risk of electric shock When you unplug the AC cord always pull the plug from the socket Never pull the cord Before you conne...

Страница 11: ...ol Caution Risk of explosion Keep batteries away from heat sunshine or fire Never discard batteries in fire For first time use Remove the protective tab to activate the remote control battery To replace the remote control battery 1 Open the battery compartment 2 Insert one CR2032 battery with correct polarity as indicated 3 Close the battery compartment Note Before you press any function button on...

Страница 12: ...e a Wi Fi enabled device with an Internet browser such as an iPod touch iPhone iPad or a Wi Fi enabled PC Mac Choose method 3 see Method 3 Connect to a non WPS Wi Fi router on page 12 Before connection of DS9860W to you home Wi Fi network make sure that a your Wi Fi router is powered on and working properly b DS9860W has been powered on and booted up successfully see Turn DS9860W on on page 8 Once...

Страница 13: ...network successfully Method 2 Connect to a WPS router Note Before you press any button on DS9860W make sure that DS9860W has been booted up successfully see Turn DS9860W on on page 8 1 Press the WPS button on your home Wi Fi router 2 Shortly after step 1 press WI FI SETUP on the back of the main speaker The WI FI STATUS indicator blinks yellow green and red alternately Within 2 minutes the WI FI S...

Страница 14: ...or connection of DS9860W to a non WPS Wi Fi router 1 Collect settings of your home Wi Fi router and write down on paper for use during DS9860W Wi Fi setup see Collect settings of your home Wi Fi router on page 12 2 Make sure that DS9860W is in Assisted Wi Fi Setup mode If not switch DS9860W to Assisted Wi Fi Setup mode see Switch DS9860W to Assisted Wi Fi Setup mode on page 13 A new Wi Fi network ...

Страница 15: ...is created with the network name SSID of Philips_Install XXXXXX It takes about 45 seconds for successful creation of this new Wi Fi network Note After you finish manual Wi Fi setting for DS9860W this new Wi Fi network disappears If you fail to enter Assisted Wi Fi Setup mode power off DS9860W and power on it then try again after successful boot up Make sure that there are no other Philips AirPlay ...

Страница 16: ... Note See the user manual of your PC Mac for how to connect your PC Mac to a Wi Fi network During Wi Fi network connection do not connect any network cable to your PC Mac 1 Open the Wi Fi setup tool or control panel on your PC Mac 2 Scan the available Wi Fi networks Philips_Install XXXXXX Philips_Install XXXXXX 3 Select Philips_Install XXXXXX from the list of available networks 4 Wait until succes...

Страница 17: ...tion web page you can configure the internal Wi Fi settings of DS9860W for connection of DS9860W to your existing home Wi Fi network 192 168 1 1 Philips SoundSphere XXXXXX Note Make sure that the settings on the configuration web page match your home Wi Fi network settings that you wrote on paper Follow the on screen instructions to configure and confirm the internal Wi Fi settings of DS9860W Afte...

Страница 18: ...ip If you like you can change the name of your DS9860W in Philips Fidelio Device Name on the DS9860W configuration web page This is helpful when you have multiple Philips AirPlay enabled devices in your house and you need to distinguish between them Restore your Wi Fi enabled device back to your existing home Wi Fi setting Note Make sure that the settings at steps 2 to 3 below match your home Wi F...

Страница 19: ...wn list to enter the DS9860W configuration web page directly Here you can change the internal Wi Fi settings or rename your device easily 1 Click Preferences The Bookmarks menu is displayed 2 Tick Include Bonjour for Bookmarks bar 3 Select Philips SoundSphere XXXXXX from the Bonjour pull down list shown at the bookmarks bar The DS9860W configuration web page is displayed 4 Change the internal Wi F...

Страница 20: ...4 3 3 or later or a Wi Fi enabled PC Mac installed with iTunes 10 2 2 or later For iPhone 4S users To ensure optimal performance of AirPlay streaming upgrade your iPhone 4S to iOS 5 1 or later To play music wirelessly make sure that your iPod touch iPhone iPad is disconnected from the USB socket on the back of the main speaker Stream from your iPod touch iPhone iPad 1 Launch the iPod Music applica...

Страница 21: ...gain 2 Close all applications running at the background 3 Power off and then power on your iPod touch iPhone iPad again Stream from your PC Mac 1 Launch iTunes 10 2 2 or a later version on your PC Mac 2 Click the AirPlay icon on the window 3 Select Philips SoundSphere XXXXXX or user customized name from the AirPlay list 4 Select a media file and start play After a while you will hear music from DS...

Страница 22: ...y audio source press Tip If you are streaming music from a PC Mac to control music play from DS9860W launch iTunes and tick Allow iTunes audio control from remote speakers in Edit for Windows or iTunes for Mac Preferences Devices Use advanced sound settings If your iTunes host device is an iPod touch iPhone iPad For advanced sound settings and additional features you can use your iPod touch iPhone...

Страница 23: ...ct the supplied MP3 link cable to the MP3 LINK socket on the back of DS9860W the headphone socket on an external audio player 2 Press to select the MP3 link source 3 Start play on the external audio player MP3 LINK ...

Страница 24: ...iPhone iPad Made for iPhone 5 iPhone 4S iPhone 4 iPhone 3GS iPhone 3G iPhone iPad 4th generation iPad 3rd generation iPad 2 iPad iPod touch 5th generation iPod touch 4th generation iPod touch 3rd generation iPod touch 2nd generation iPod touch 1st generation iPod nano 7th generation iPod nano 6th generation iPod nano 5th generation iPod nano 4th generation iPod nano 3rd generation iPod nano 2nd ge...

Страница 25: ... file 1 On your PC Mac go to www philips com support 2 Enter the model number to find the latest firmware upgrade file available 3 Unzip and save the upgrade file to your hard drive Update through a USB mass storage device Note Make sure that the USB mass storage device is FAT16 32 formatted 1 Power on DS9860W see Turn DS9860W on on page 8 It takes about 35 seconds for the unit to boot up During b...

Страница 26: ...ter boot up you can hear a beep and the WI FI STATUS indicator turns solid green DS9860W is connected to the last configured Wi Fi network automatically 2 Make sure that DS9860W and your PC Mac are connected to the same Wi Fi router 3 Open Apple Safari on your PC Mac then select Philips SoundSphere XXXXXX from the Bonjour pull down list Or open any other Internet browser on your PC Mac then type i...

Страница 27: ... 130 mm woofer 19 mm tweeter Sensitivity 85 dB m W Wireless Wireless standard 802 11b g Wireless security WEP 64 or 128 bit WPA WPA2 8 63 characters Frequency range 2412 2462 MHz CH1 CH11 for 79 37 55 97 2412 2472 MHz CH1 CH13 for 12 10 05 PBC one button push Yes General information AC power Wireless SoundSphere speakers 100 240V 50 60Hz Operation Power Consumption 22 W Standby Power Consumption 0...

Страница 28: ...ote control instead of the main unit Reduce the distance between the remote control and the unit Insert the battery with its polarities signs aligned as indicated Replace the battery Aim the remote control directly at the IR sensor on the front of the main speaker Wi Fi network connection failed Check if your Wi Fi router is Wi Fi 802 11b g certified This device is only compatible with Wi Fi 802 1...

Страница 29: ... routers No AirPlay icon on my iTunes host device Make sure that DS9860W is already connected to your home Wi Fi network Before you open iTunes make sure that you have enabled Bonjour service in your PC Take Windows XP for example to enable the service you can click Start Control Panel and double click AdministrativeTools Services Bonjour Service then click Start followed by OK on the pop up menu ...

Страница 30: ...e of its affiliates further referred to in this document as WOOX Innovations and is the manufacturer of the product WOOX Innovations is the warrantor in relation to the product with which this booklet was packaged Philips and the Philips Shield Emblem are registered trademarks of Koninklijke Philips N V DS9860W_10_UM_V3 0 ...

Отзывы: