background image


EN      41  


Englis


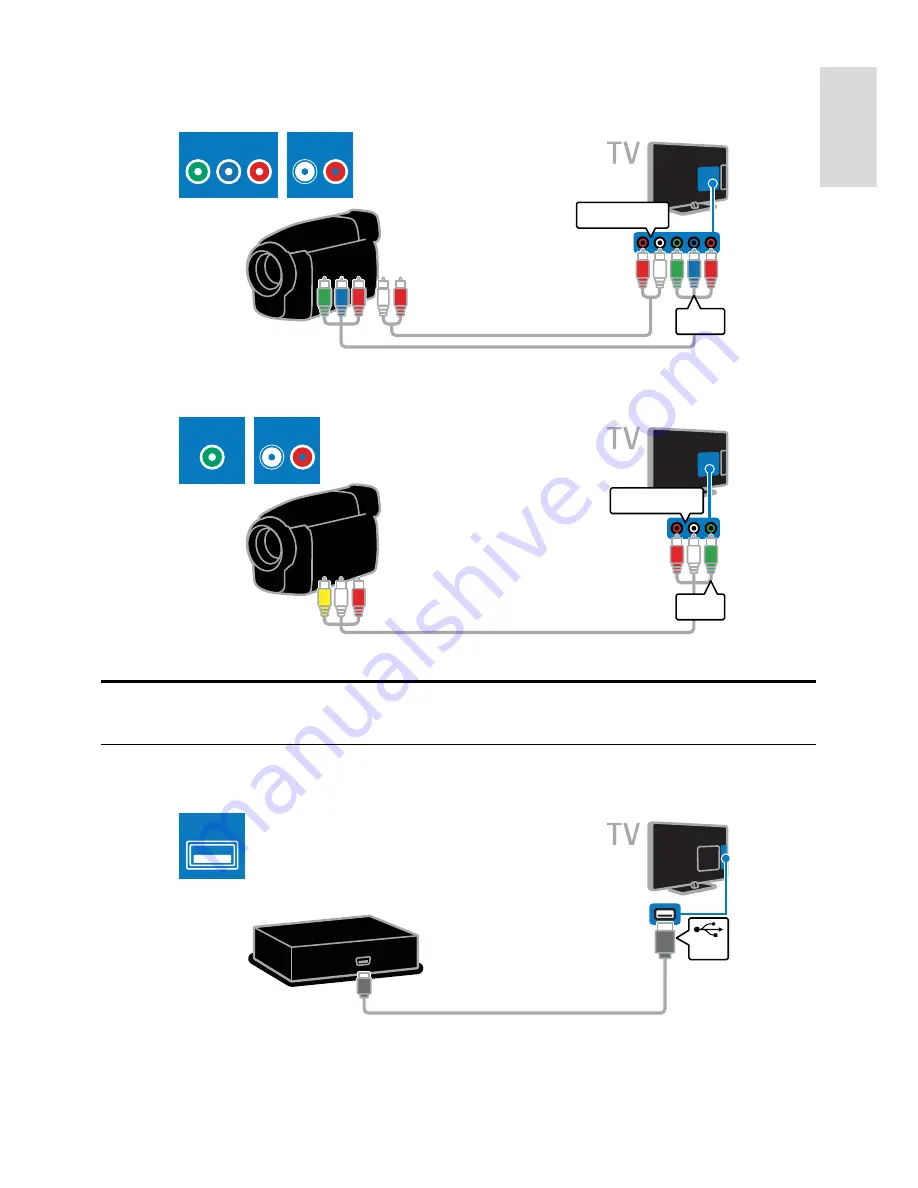
Connect the digital camcorder to the TV with a component video cable (Y Pb Pr) and an audio L/R 
cable. 

AUDIO L/R

YPbPr

AUDIO L/R

YPbPr


Connect the digital camcorder to the TV with a composite cable (CVBS) and an audio L/R cable. 

CVBS

AUDIO L/R

AUDIO L/R

CVBS


Connect more devices 

USB hard drive 

Connect the USB hard drive to the TV with a USB cable. 

USB

USB


Содержание 22HFL3007D

Страница 1: ...EN User Manual Register your product and get support at www philips com welcome ...

Страница 2: ...26 Language settings 28 Universal access settings 29 Other settings 30 Update software 30 Restore default settings 31 5 Connect your TV 32 About cables 32 Connect devices 34 Connect more devices 41 Watch a connected device 43 Common interface 44 6 Troubleshooting 45 General issues 45 Channel issues 45 Picture issues 46 Sound issues 46 Connection issues 47 Contact Philips 47 7 Product specification...

Страница 3: ...e playing an HD game Media playback If you connect your TV to a USB storage device you can enjoy your movies music and pictures on a wide screen TV with excellent sound Programme guides You can find out what s on and what s coming up with the now and next EPG Electronic Programme guide or eight day EPG Intuitive menus With the TV s intuitive menus you can easily access the channel or media file th...

Страница 4: ...by furniture or other objects 1 For HFL3017 32 to 42 inch TVs only 1 Remote control 4 5 3 2 1 1 Standby Switch the TV on or to standby 2 MyChoice Access customised menu 3 GUIDE Access TV Guide 4 ThemeTV Access ThemeTV options 5 TV Switch source to watch TV 8 9 6 7 6 CHANNEL GRID Access the TV channel list 7 SOURCE Access a connected device 8 CLOCK Access the TV clock 9 FORMAT Change picture format...

Страница 5: ...evices with one remote control Access EasyLink controls 1 While you view content from a connected HDMI CEC device press OPTIONS 2 Select Show remote control then press OK 3 Select the EasyLink control button then press OK Read more about EasyLink in Use more of your TV Use EasyLink Page 21 Important information Safety Read and understand all instructions before you use your TV If damage is caused ...

Страница 6: ...nsure that the power voltage matches the value printed on the back of the TV Never connect the TV to the power outlet if the voltage is different Parts of this product may be made of glass Handle with care to avoid injury and damage Risk of injury to children Follow these precautions to prevent the TV from toppling over and causing injury to children Never place the TV on a surface covered by a cl...

Страница 7: ...tes patents No further warranty is expressed or implied TP Vision Netherlands B V cannot be held responsible neither for any errors in the content of this document nor for any problems as a result of the content in this document Errors reported to Philips will be adapted and published on the Philips support website as soon as possible Terms of warranty Risk of injury damage to TV or void of warran...

Страница 8: ...tories The terms HDMI and HDMI High Definition Multimedia Interface and the HDMI Logo are trademarks or registered trademarks of HDMI Licensing LLC in the United States and other countries Kensington and Micro Saver are registered US trademarks of ACCO World Corporation with issued registrations and pending applications in other countries throughout the world All other registered and unregistered ...

Страница 9: ... the energy it consumes On the label you can find the energy efficiency class the average power consumption of the product in use and the average energy consumption for 1 year You can also find the power consumption values for the product on the Philips website for your country at www philips com TV Help and support Visit the Philips website If you can t find what you need in the onscreen Help vis...

Страница 10: ...with this TV s energy efficiency settings The settings are enabled by default so that if there is no user interaction such as pressing a remote control button or a control on the rear panel for four hours the TV will automatically switch to standby To disable automatic switch off 1 While you watch TV press the Green button on the remote control 2 Select Auto switch off then press OK 3 Use the Navi...

Страница 11: ...t an uppercase or lowercase letter 5 Once complete select Done then press OK to confirm when prompted 6 Press to exit Reorder channels After the channels have been installed you can reorder the channel list 1 While you watch TV press LIST The channel list is displayed 2 Press OPTIONS 3 Select Reorder then press OK 4 Select the channel to reorder then press OK 5 Press the Navigation buttons to move...

Страница 12: ...omise and store your own picture settings Select your preferred sound setting 1 While you watch TV press ADJUST 2 Select Smart sound 3 Select an option then press OK Personal Apply your personalised sound setting Standard Settings that suit most environments and types of audio NEWS Ideal settings for spoken audio such as the news Cinema Ideal settings for movies Game Ideal settings for games DRAMA...

Страница 13: ...e latest programme information View media What you can do You can play videos photos and music on your TV from a USB device connected to the TV Play files from USB If you have photos videos or music files on a USB storage device you can play the files on TV Caution TP Vision is not responsible if the USB hard drive is not supported nor is it responsible for damage to or loss of data in the device ...

Страница 14: ...elect energy saving modes View pictures Press the Navigation buttons to select a picture then press OK to start the slideshow Press Navigation buttons to search for a picture Press to exit content browser Picture slideshow options Press OPTIONS to access or exit the following picture options Slideshow transitions Select the transition from one picture to the next Slideshow frequency Select the dis...

Страница 15: ...e and display information about your hotel on TV sets including a Welcome logo Welcome message Hotel information page Display a welcome screen You can create a welcome screen with for example your hotel s logo 1 Create a welcome screen in jpeg format and save the file to a USB storage device 2 Connect the USB storage device to the TV then switch on the TV 3 In the professional setup menu select We...

Страница 16: ...de settings to the factory default Channel settings Change TV channel settings 1 In the professional setup menu select Installation 2 Select a setting to change then press OK Blank channel Select a channel to play audio only Auto channel update Automatically update channels Auto software update Automatically update your TV software Skip scrambled signals Enable or disable scrambled channels in the...

Страница 17: ...ofessional setup menu select Control settings HDMI CEC IN On then press OK Enable or disable access to a USB storage device 1 In the professional setup menu select Control settings Enable USB On or Off then press OK Direct USB access Automatically display the content of a USB storage device when the device is connected 1 In the professional setup menu select Control settings USB break in On then p...

Страница 18: ... accessible with an authorised PIN code only 1 In Professional setup menu select Installation 2 Select MyChoice On then press OK MyChoice button on the remote control is activated Setup MyChoice 1 In Professional setup menu select MyChoice setup 2 Select the list of channels then press OK R0 List of MyChoice and normal channels Channels marked with X require an authorised PIN code R1 List of all a...

Страница 19: ... Game then press OK The TV is ready for gaming Note When your gaming session ends switch back to your usual Smart Picture setting View Text Select a page While you watch channels that broadcast text you can view the text 1 Select a channel that broadcasts text then press TEXT 2 Select a page in one of the following ways Enter the page number with the Numeric buttons Press CH CH to view the next or...

Страница 20: ...t If Text 2 5 is broadcast by a channel it is switched on by default To switch Text 2 5 on or off 1 Press 2 Select Setup TV settings Preferences 3 Select Text 2 5 On or Off then press OK Set locks and timers Clock You can display a clock on the TV The clock displays the time that is broadcast by your TV service operator Display the TV clock 1 While you watch TV press CLOCK The clock is displayed a...

Страница 21: ...ls from the channel list you are prompted to enter your lock code Parental rating You can set your TV to display only programmes with age ratings lower than your child s age This restriction only applies to digital channels from broadcasters that rate their programmes according to age 1 Press 2 Select Setup Channel settings 3 Select Child lock Parental rating You are prompted to enter the child lo...

Страница 22: ... properly Switch on EasyLink Switch on EasyLink 1 Press 2 Select Setup TV settings EasyLink EasyLink 3 Select On or Off then press OK Control devices simultaneously If you connect multiple HDMI CEC devices that support this setting you can control all such devices through the TV remote control Note This is an advanced setting Devices that do not support this setting will not respond to the TV remo...

Страница 23: ... on the device audio continues to stream from the TV speakers If EasyLink autostart was selected the TV prompts the connected device to switch to system audio mode With HDMI ARC compliant device If an HDMI ARC compliant device is connected through an HDMI ARC connector to the TV you can output TV audio through the HDMI cable You will not need an additional audio cable 1 Press 2 Select Setup TV set...

Страница 24: ...er 10 minutes of inactivity 1 Press 2 Select Setup TV settings EasyLink 3 Select Auto switch off devices On then press OK to activate View Scenea What you can do With Scenea you can display a picture as the wallpaper on your TV Display the default picture or load your own picture as the wallpaper The wallpaper is displayed for 240 minutes or for the duration of the sleeptimer Switch on 1 Press 2 S...

Страница 25: ...ustom is selected Digital Crystal Clear Control advanced settings to fine tune each pixel to match surrounding pixels Produce a brilliant high definition image Advance sharpness Enable superior sharpness especially on lines and contours in the picture Dynamic contrast Set the level at which the TV automatically enhances details in the dark middle and light areas of the picture Dynamic backlight Re...

Страница 26: ... if available Mono Stereo If stereo broadcasting is available select mono or stereo audio 4 Press to exit Reset picture and sound You can restore the default picture and sound settings while the channel installation settings remain the same 1 While you watch TV press 2 Select Setup TV settings Factory settings then press OK All TV settings except for channel settings are reset to the default facto...

Страница 27: ...TV channel Note If the reception is poor reposition your antenna and repeat the procedure Install digital channels If you know the channel frequency of the channels you want to install you can search and store digital channels one by one For best results contact the service provider 1 Press 2 Select Setup Channel settings Channel installation 3 Select Digital Reception test Find channel then press...

Страница 28: ...nu language 3 Select a menu language from the list then press OK Audio language Set default audio language For digital channels that are broadcast with multiple audio languages you can set your preferred audio languages The TV automatically switches to one of these languages if they are available 1 Press 2 Select Setup Channel settings Language 3 Select Primary audio language or Secondary audio la...

Страница 29: ...xit Visually impaired access Tip To make sure that a visually impaired audio language is available press OPTIONS then select Audio language Languages with an eye icon support visually impaired audio To switch on visually impaired audio 1 While you watch TV press OPTIONS 2 Select Universal access 3 Press the Green button to select Visually impaired 4 Press a button to select an option Red button Of...

Страница 30: ...le you watch TV press 2 Select Setup TV settings Preferences 3 Select Location Home or Shop then press OK 4 Restart the TV Placement Before you position the TV read all safety precautions See Get Started Important Safety Page 5 Position the TV where light does not shine directly on the screen The ideal viewing distance of this TV is three times its diagonal screen size For example if the diagonal ...

Страница 31: ...ebsite See the installation instructions on the website to complete the update Update from digital broadcast When available the TV can receive software updates through digital broadcasts When a software update is received you are prompted to update the software We strongly recommend that you update the software when prompted Follow the onscreen instructions Note To update the software later select...

Страница 32: ...pter to connect the device to a SCART connector on the TV HDMI An HDMI connection has the best picture and sound quality An HDMI cable combines video and audio signals Connect HDMI for high definition HD TV signals and to switch on EasyLink An HDMI Audio Return Channel ARC connector allows output of TV audio to an HDMI ARC compliant device Connect HDMI cables shorter than 5 meters 16 4 feet HDMI H...

Страница 33: ...ly transmits video For sound also connect to Audio Left Right CVBS connections provide standard picture quality On certain models the video input socket on your TV is labelled as VIDEO AV IN or COMPOSITE AUDIO L R CVBS CVBS AUDIO L R VGA You can connect VGA to display PC content on the TV VGA only transmits video For sound also connect to AUDIO IN VGA AUDIO IN DVI VGA VGA AUDIO IN DVI VGA ...

Страница 34: ...ayer to the TV with an HDMI cable HDMI HDMI Connect the disc player to the TV with a component video cable Y Pb Pr and an audio L R cable AUDIO L R YPbPr AUDIO L R YPbPr Connect the disc player to the TV with a composite cable CVBS and an audio L R cable CVBS AUDIO L R ...

Страница 35: ... Connect the digital TV receiver with an antenna cable to the TV ANTENNA TVANTENNA Connect the digital TV receiver to the TV with an HDMI cable HDMI HDMI Connect the digital TV receiver to the TV with a SCART cable Scart SCART ...

Страница 36: ...ideo cable Y Pb Pr and an audio L R cable AUDIO L R YPbPr AUDIO L R YPbPr Connect the digital TV receiver to the TV with a composite cable CVBS and an audio L R cable CVBS AUDIO L R Video recorder Connect the recorder to the TV with an antenna cable ANTENNA TVANTENNA ...

Страница 37: ...th a SCART cable Scart SCART Connect the recorder to the TV with a component video cable Y Pb Pr and an audio L R cable AUDIO L R YPbPr AUDIO L R YPbPr Connect the recorder to the TV with a composite cable CVBS and an audio L R cable CVBS AUDIO L R ...

Страница 38: ...with an HDMI cable HDMI HDMI Connect the game console to the TV with a component video cable Y Pb Pr and an audio L R cable AUDIO L R YPbPr AUDIO L R YPbPr Connect the game console to the TV with a composite cable CVBS and an audio L R cable CVBS AUDIO L R ...

Страница 39: ...MI cable and an optical audio cable HDMI HDMI Digital Audio Out DIGITAL AUDIO OUT Connect the home theatre to the TV with a SCART cable Scart SCART Connect the home theatre to the TV with a component video cable Y Pb Pr and an audio L R cable AUDIO L R YPbPr AUDIO L R YPbPr ...

Страница 40: ...te cable CVBS and an audio L R cable CVBS AUDIO L R Digital camera NonPublish Connect the digital camera to the TV with a USB cable For certain camera models only USB USB Digital camcorder Connect the digital camcorder to the TV with an HDMI cable HDMI HDMI ...
Страница 41: ...e Y Pb Pr and an audio L R cable AUDIO L R YPbPr AUDIO L R YPbPr Connect the digital camcorder to the TV with a composite cable CVBS and an audio L R cable CVBS AUDIO L R AUDIO L R CVBS Connect more devices USB hard drive Connect the USB hard drive to the TV with a USB cable USB USB ...

Страница 42: ...ith an HDMI cable HDMI HDMI Connect the computer to the TV with a DVI HDMI cable and an audio cable AUDIO IN DVI VGA AUDIO IN DVI VGA HDMI HDMI Connect the computer to the TV with a VGA cable and an audio cable AUDIO IN DVI VGA VGA AUDIO IN DVI VGA ...

Страница 43: ...Add its icon to the Home menu for easy access See Connect your TV Connect device Page 34 Select from the Source menu Note If you connect an HDMI CEC compliant device to the TV through the HDMI connector and switch it on the device will be automatically added to the Home menu 1 Connect and switch on the device 2 Press 3 Select Add new device then press OK 4 Follow the onscreen instructions If you a...

Страница 44: ...he Home menu Common interface What you can do You can watch scrambled digital TV channels with a Conditional Access Module CAM After the CAM is inserted and subscription fees are paid you can watch the programme This TV supports CI as well as CI CI supports premium HD digital programmes with a high level of copy protection Note The applications functions content and onscreen messages depend on the...

Страница 45: ...king feature child lock Enter 8888 The TV menu is in the wrong language Change the menu to your preferred language For more information see Set up your TV Language settings Menu language Page 28 Subtitles are not visible when you play a movie file from a USB storage device Subtitle files that are not hard coded into a video file for example srt sub idx are not supported You want to upgrade your TV...

Страница 46: ...ormat keeps changing with different channels Instead of the picture format Auto zoom select a different picture format The picture position is incorrect Picture signals from some devices may not fit the screen correctly Check the signal output of the device The picture from broadcasts is scrambled You may need a Conditional Access Module to access content Check with your service operator An e stic...

Страница 47: ...ble If an HDMI CEC compliant audio device is connected to the TV and the TV does not display any mute or volume icon when the volume is muted increased or decreased When a HDMI CEC audio device is connected this behaviour is normal USB device content is not displayed Make sure that the USB storage device is set to Mass Storage Class compliant as described in the storage device s documentation Make...

Страница 48: ...nel Hyperband Available on certain models only Display and sound Picture Display Display type edge LCD LED backlight Diagonal size 48 cm 19 inch 56 cm 22 inch 66 cm 26 inch 81 cm 32 inch 107 cm 42 inch Aspect ratio 16 9 widescreen Panel resolution For HD models 1366 X 768 p For FHD models 1920 X 1080 p Digital Crystal Clear Perfect Motion Rate PMR 100 Hz Sound Output power RMS For 19 6 W For 22HFL...

Страница 49: ...80 30 YES 40 Mbps 40 Mbps 40 Mbps MPEG2 AAC LC MPEG4 AAC LC HE AAC AC3 Audio codec MP1 Layer1 2 MP3 AC3 DVD LPCM MPEG1 Layer1 2 AC3 MPEG1 Layer1 2 MP3 MPEG2 AAC LC MPEG4 AAC LC HE AAC wav PCM ADPCM A law PCM u law PCM MPEG1 Layer1 2 MP3 MPEG2 AAC LC MPEG4 AAC LC HE AAC AC3 WMAv8 mp4 mov and 3gpp extensions are not supported MP4 Supported audio video files Multimedia file names must not exceed 128 ...

Страница 50: ...s For HFL3007D 100mm x 100mm M4 For HFL3017D HFL3017W 100mm x 100mm M4 81 cm 32 inches For HFL3017D 200mm x 200mm M6 For HFL3016D and HFL3007D 200mm x 100mm M4 You can mount your TV on the wall with a compatible TV mount sold separately Select the type of TV mount for your TV screen size 107 cm 42 inches For HFL3016D and HFL3007D 400mm x 400mm M6 For HFL3017D 400mm x 400mm M6 Warning Follow all in...

Страница 51: ...find the length of screw add the thickness of your wall mount to the screw length as shown in the graphic 16 mm For 32HFL3017D and 26HFL3007D Before you mount the TV on the wall find the correct length of the screw To find the length of screw add the thickness of your wall mount to the screw length as shown in the graphic 18 mm For HFL3017D 42 inch TVs Before you mount the TV on the wall find the ...

Страница 52: ...nect digital camera 40 connect disc player 34 connect external hard disk 41 connect game console 38 connect home theatre system 39 connect PC 42 connect recorder 36 connect set top box 43 connect speaker 43 connect TV receiver 35 connect USB 13 connected device add 43 connected device remove 44 connected device rename 43 connectors 32 contact information on Internet 9 contact Philips 9 controls 3 ...

Страница 53: ...yChoice 18 P parental rating 21 PC connect 42 PC display resolutions 48 picture format 12 picture settings 25 picture settings reset 26 Pixel Plus link 23 placement stand or wall mount 30 position 30 power 48 product support 9 professional mode 15 R rear controls 3 recorder connect 36 recycle 8 reinstall 31 remote control 4 remove connected device 44 rename channels 11 rename connected device 43 S...

Страница 54: ... 10 T text 2 5 20 text digital text 20 text dual screen 19 text enlarge 19 text language 20 text subpages 20 text Table Of Pages 19 ThemeTV 18 trademarks and copyrights 8 TV receiver connect 35 TV speakers mute 10 U universal access enable 29 universal access hearing impaired 29 universal access visually impaired 29 V VGA 33 visually impaired 29 volume 10 W wall mount 50 wallpaper 24 Y YPbPr compo...

Страница 55: ... 2012 TP Vision Netherlands B V All rights reserved Document order number 123017102321 ...

Отзывы: