background image

• 

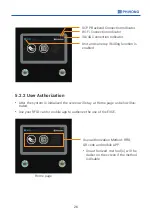
After the system is initialized the screen will stay at Home page as below illus-

trated. 

• 

Use your RFID card or mobile app to authorize the use of the EVSE.

5.2.2 User Authorization

User authorization Method: RFID,
QR code and mobile APP.        

• 

Unauthorized method(s) will be 

darker on the screen if the method 

is disable.

Home page

3G/4G Connection Indicator

Wi-Fi Connection Indicator

Unit and currency if billing function is 

enabled

OCPP Backend Connection Indicator

26

Содержание DC EVSE 60KW

Страница 1: ... Fast Charger User Manual Installation Instructions Copyright 2020 PHIHONG TECHNOLOGY PHIHONG TECHNOLOGY reserves the right to update the manual without any notice W84A99900099 HB1 ev_service phihong com tw DS Series EU Model ...

Страница 2: ......

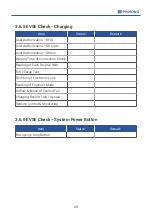
Страница 3: ...ding and Safety Requirement 9 3 3 Unpack the charger 11 3 4 Recommended Tools for Installation and Inspection 13 3 5 Installation Procedure 14 3 6 Installation Inspection Commissioning 18 4 Network Setting 21 4 1 Wi Fi Network Setting 21 4 2 3G 4G Setting 23 5 Operation Process 25 5 1 Operating Sequence 25 5 2 Operating Procedure 25 5 3 Troubleshooting 30 5 4 Status Codes 30 6 Maintenance 46 6 1 G...

Страница 4: ...ing stations charging progress and billing information The Standalone DC Fast Charger has a clear user interface with function buttons safety certifications and an excellent waterproof and dust proof design to provide the best choice for outdoor environ ments Features Pluggable power modules make installation easy and flexible Offers customers the convenience of start stop charging control from an...

Страница 5: ...ntenna Indication Light 7 Information Screen Right Button Left Button RFID Card Reader Charging Status Alarm information User Authorization Main unit Emergency Stop CHAdeMO Charging Plug and Cable CCS Charging Plug and Cable 2 ...

Страница 6: ...TPUT Output Voltage Range CCS 150Vdc 950Vdc CHAdeMO 150Vdc 500Vdc GB T 150Vdc 750Vdc Maximum Output Current CCS 120A 150Vdc 500Vdc when output voltage up to 950Vdc the output current is 63A CHAdeMO 120A 150Vdc 500Vdc GB T 120A 150Vdc 500Vdc when output voltage up to 750Vdc the output current is 80A Maximum Output Power DC 60kW Voltage Accuracy 2 Current Accuracy 2 Electrical Isolation Isolation be...

Страница 7: ...de APP Mobile Payment Backend Support OCPP 1 6 JSON Environmental Conditions Operation Temperature 30 C 50 C power derating from 50 C and above Storage Temperature 40 C to 70 C Relative Humidity 5 95 RH non condensing Altitude 2000m Regulations Safety IEC 61851 1 IEC 61851 23 EMI EMC IEC 61851 21 2 Charging Interface CHAdeMO Ver 1 2 CCS DIN 70121 GB T 27930 Mechanical Specifications Dimensions WxD...

Страница 8: ...onnector Right DC Connector DSYx601 J0E CHAdeMO CCS2 DSYx601 J00 CHAdeMO DSYx601 E00 CCS2 DSYx601 G0E GBT CCS2 DSYx601 E0E CCS2 CCS2 DSYx601 J0U CHAdeMO CCS1 DSYx601 U00 CCS1 DSYx601 U0U CCS1 CCS1 0 none 1 IEC 62196 2 Type 1 SAE J1772 Plug 2 IEC 62196 2 Type 1 SAE J1772 Socket 3 IEC 62196 2 Type 2 Plug 4 IEC 62196 2 Type 2 Socket 5 GB T AC Plug 6 GB T AC Socket 7 CCS2 AC Plug J CHAdeMO U Natural c...

Страница 9: ...2 3 LED Indication and Operation Status Status LED Left Indicator Right Indicator Standby Green Green Fault Red Red Charging Blue Blue 2 4 Dimensions Main Size of Charger Unit mm 700 331 1800 6 ...

Страница 10: ...2 5 Direction of cooling Airflow Air Out Air In 7 ...

Страница 11: ...o the earth In the installation of TT system the neutral N and the PE of the power distribu tion are directly connected to the earth The PE of the charger equipment is iso lated to the PE of power distribution to the earth The capacity of power supply should be higher than 67kVA in order to function correctly The product should be installed in free air area and keep at least 30cm clearance distanc...

Страница 12: ...ger Use appropriate protection when connecting to main power distribution network Use appropriate tools for each task 3 2 Grounding and Safety Requirement CAUTION The disconnect switch for each ungrounded conductor of AC input shall be provided by installation contractor or technician CAUTION A cord extension set or second cable assembly shall not be used in addition to the cable assembly for conn...

Страница 13: ...he main breaker panel and Neutral connected to Ground at that point 400Vac Three Phase Line to Line CAUTION This is feed from Wye connection power grid the Standalone DC Fast Charger can connect to L1 L2 or L3 and Neutral Earth ground must be connected to neutral at only one point usually at the breaker panel 400V Three Phase Wiring Connection WARNING Earth Connection is Essential PE 230V 230V 230...

Страница 14: ...3 3 Unpack the charger Remove the surrounding boards STEP 1 STEP 2 Remove the carton and packing cushion and film WARNING Charger weight might be 235 kg Be careful during unpack process 11 ...

Страница 15: ...Remove these 4 pcs of fixing M12 screws STEP 3 12 ...

Страница 16: ... 1 Ring Terminal for L1 L2 L3 N Inner Diam eter 10 5mm Outer Diameter 22mm 2 Ring Terminal for PE Inner Diameter 6 4mm Outer Diameter 22mm Crimping Pliers for Ring Terminal Wire Stripper Wire Cutters Crane Folklift 235Kg 3 4 2 Recommended Tools for Inspection Commissioning Type Description EV or EV Simulator Meet CHAdeMO CCS Standard Multiple Meter 1000V Current Probe 200Amp RFID Authorized Card R...

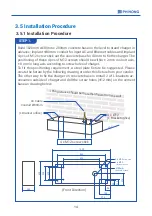
Страница 17: ... requirement a steel plate fixture be suggested Please create the fixture by the following drawing or order this fixture from your vendor The other way to fix the charger on concrete base is install 2 of L brackets ac cessories outside of charger and drill the screw holes Φ12 mm on the cement base as drawing below 60cm The distance should be more than 60cm from the wall AC Cable Conduit Ø80mm 4 x ...

Страница 18: ...s via Ethernet a 1500 mm Ethernet cable is necessary to install via the conduit to the charger Lift the charger on concrete base pull the input cable through bottom hole of charger fasten 8 pcs of M12 screw nuts and 4 pcs of M12 washers on 4 pcs of M12 screw of concrete base 2 nuts for each screw to secure the chargers Then fix the base cover in the accessory pack in charger base STEP 2 METHOD 1 3...

Страница 19: ...ack STEP 1 3 5 3 Installing the AC Input Connection Open Right Cover for Wiring Connect L1 L2 L3 and N of AC power to 4P termi nal Fasten each wire with proper screw and torque number 120Kgf cm 5 15 secs Connect the PE wire green with yellow to grounding position of charger and torque number 60Kgf cm L1 L2 L3 N PE 16 ...

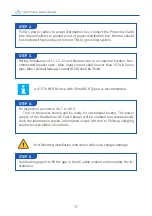
Страница 20: ...residual leakage current RCD shall be 30mA STEP 3 Not following installation instruction will cause charger damage An 157A NFB B curve with 30mA RCD Type A is recommended Do Inspection as section 3 6 1 to 3 6 3 Turn on the power source and be ready for operational testing The power supply of the Standalone DC Fast Charger will be enabled and automatically drive the information screen Information s...

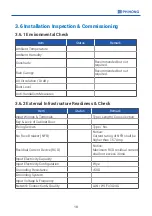
Страница 21: ...astructure Readiness Check Item Status Remark Input Wirings Terminals Type Length Cross Section Key Lock of Cabinet Door Fixing Screws Type No No Fuse Breaker NFB Notice Current rating of NFB shall be higher than 157 Amp Residual Current Device RCD Notice Maximum RCD residual current shall not excess 30mA Input Electricity Capacity Input Electricity Configuration Wye Grounding Resistance 50Ω Groun...

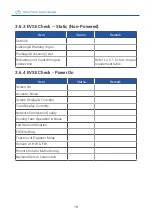
Страница 22: ...efer to 6 1 Screw torque requirement table 3 6 4 EVSE Check Power On Item Status Remark Screen On Acoustic Noise Screen Display Function Time Display Correctly Network Connection Quality Cooling Fans Operation Noise Led Status Indication EVSE Setting Function of Engineer Mode Version of H W F W Remote Control Monitoring Backend Server Connection 19 ...

Страница 23: ...m Status Remark User Authorization RFID User Authorization QR Code User Authorization Others Waiting Time of Connection Check Reading of Each Display Item Full Charge Test Function of Electronic Lock Reading of Engineer Mode Airflow Noise of Cooling Fan Charging Record log Upload Remote Control Monitoring 20 ...

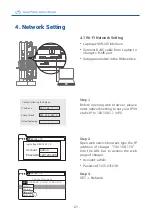
Страница 24: ... Password login https 192 168 1 10 admin 1231231238 192 168 1 10 SET UPGRADE OTHER LANGUAGE Phihong Technology System System Charging Network Backend SET Network Open web service browser type the IP address of charger 192 168 1 10 into the URL bar to access the web page of charger Account admin Password 1231231238 Use the following IP address IP address 192 168 1 1 Subnet mask 255 255 255 0 Defaul...

Страница 25: ... WifiSubmask Address Wi Fi submask address WifiGateway Address Wi Fi gateway address 192 168 1 10 Network Network Status Ethernet Interface Ethernet Interface WiFi Module 3G 4G Module 192 168 1 10 SET UPGRADE OTHER LANGUAGE WiFiMode WiFI Module WiFiSsid WiFiPassword Set Step 4 Select Wi Fi Module Select Wi Fi modes and fill in SSID and Password according to your application if not required just ke...

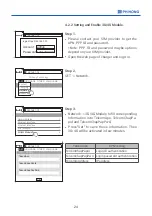
Страница 26: ...ide the cabinet Step 1 4 2 1 SIM Card Installation Insert 3G 4G Micro SIM Card in the tray ensure the gold contacts are facing down and the notch is located in the upper right corner Note the tray might be damaged if insert SIM card in wrong direction Step 2 SIM Card SIM Card 23 ...

Страница 27: ...G 4G Module TelcomChapPapId TelcomChapPapPwd Set 4 2 2 Setting and Enable 3G 4G Module Network 3G 4G Module to fill corresponding information into TelcomApn TelcomChapPa pid and TelcomChapPapPwd Press Set to save those information Then 3G 4G will be activated in few minutes 192 168 1 10 Network Network Status Ethernet Interface Ethernet Interface WiFi Module 3G 4G Module Step 3 192 168 1 10 Accoun...

Страница 28: ... Messages 5 1 Operating Sequence When the charger is powered on it start with the Charging Station Initializing page You will see the below image on the screen after powering on and the system is initializing The initializing process will take around 2 minutes then shows home page 5 2 Operating Procedure 5 2 1 System Initialization Initializing page 25 ...

Страница 29: ...orize the use of the EVSE 5 2 2 User Authorization User authorization Method RFID QR code and mobile APP Unauthorized method s will be darker on the screen if the method is disable Home page 3G 4G Connection Indicator Wi Fi Connection Indicator Unit and currency if billing function is enabled OCPP Backend Connection Indicator 26 ...

Страница 30: ...nds to start the process after completing the physical connection of charging connector to charging inlet To terminate this session please press the left button to return to the Home page The screen will return to home page and terminate this session if the left button is pressed 5 2 4 Prepare for Charging After authorization and plug in process the charger will start communicating with the vehicl...

Страница 31: ... RFID to stop charging 5 2 5 In Charging Charging information area includes charging duration charged power and energy EV battery SOC Show the selected connector in use Press right button to select the charger connector that the user would like to stop Tap RFID card or push stop button to stop Charging page Information of Selected Charging Connector Connector Select Button This area indicates whic...

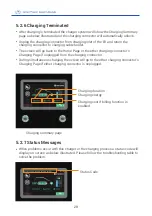
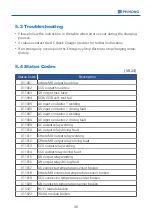
Страница 32: ...nector s Charging Page if unplugged from the charging connector During simultaneous charging the screen will go to the other charging connector s Charging Page if either charging connector is unplugged 5 2 6 Charging Terminated Charging cost if billing function is enabled Charging duration Charging energy When problems occur with this charger or the charging process a status code will display on s...

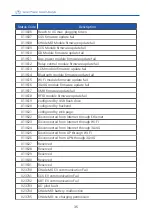
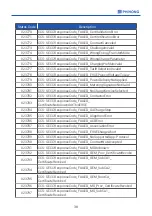
Страница 33: ...ng 011006 AC input contactor 1 driving fault 011007 AC input contactor 2 welding 011008 AC input contactor 2 driving fault 011009 AC output relay welding 011010 AC output relay driving fault 011011 CHAdeMO output relay welding 011012 CHAdeMO output relay driving fault 011013 CCS output relay welding 011014 CCS output relay driving fault 011015 GB output relay welding 011016 GB output relay driving...

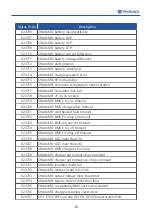
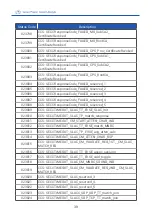
Страница 34: ...setup error 011034 Shutter fault 011035 BLE module broken 011036 Rotary switch fault 011037 Reserved 011038 Reserved 011039 Reserved 011040 Reserved 012200 System L1 input OVP 012201 System L2 input OVP 012202 System L3 input OVP 012203 System L1 input UVP 012204 System L2 input UVP 012205 System L3 input UVP 012206 PSU L1 input OVP 012207 PSU L2 input OVP 012208 PSU L3 input OVP 012209 PSU L1 inp...

Страница 35: ...int OTP 012227 Aux power module OTP 012228 Relay board smart box OTP 012229 CHAdeMO connector OTP 012230 CCS connector OTP 012231 GB connector OTP 012232 AC connector OTP 012233 RCD CCID trip 012234 CHAdeMO GFD trip 012235 CCS GFD trip 012236 GB GFD trip 012237 SPD trip 012238 Main power breaker trip 012239 Aux power breaker trip 012240 PSU communication fail 012241 Wi Fi module communication fail...

Страница 36: ...9 CHAdeMO ground fault detection timeout GFD 012260 CCS ground fault detection timeout GFD 012261 GB T ground fault detection timeout GFD 012262 System AC L1 output Circuit Short 012263 PSU Duplicate ID 012264 PSU Output Short Circuit 012265 PSU Discharge Abnormal 012266 PSU Dc Side Shutdown 012267 PSU Failure Alarm 012268 PSU Protection Alarm 012269 PSU Fan Failure Alarm 012270 PSU Input UVP 0122...

Страница 37: ...HAdeMO output UVP 012290 GBT output UVP 012291 Self test Failed due to communication of GBT board failure 012292 Self test Failed due to communication of AC failure 012293 Self test Failed due to communication of LED board failure 012294 AC input OVP 012295 AC input UVP 012296 CHAdeMO ground fault detection warning 012297 CCS ground fault detection warning 012298 GBT ground fault detection warning...

Страница 38: ... fail 013618 RFID module firmware update fail 013619 configured by USB flash drive 013620 configured by backend 013621 configured by web page 013622 Disconnected from Internet through Ethernet 013623 Disconnected from Internet through Wi Fi 013624 Disconnected from Internet through 3G 4G 013625 Disconnected from AP through Wi Fi 013626 Disconnected from APN through 3G 4G 013627 Reserved 013628 Res...

Страница 39: ... CHAdeMO wait ground fault timeout 023722 CHAdeMO BMS EV relay on timeout 023723 CHAdeMO BMS req current timeout 023724 CHAdeMO BMS k to j off timeout 023725 CHAdeMO BMS EV relay off timeout 023726 CHAdeMO ADC more than 10v 023727 CHAdeMO ADC more than 20v 023728 CHAdeMO BMS charge before stop 023729 CHAdeMO charger get normal stop command 023730 CHAdeMO charger get emergency stop command 023731 C...

Страница 40: ...ILED_reserved_by_ISO_3 023753 CCS EVCC EVErrorCode_FAILED_reserved_by_OEM_1 023754 CCS EVCC EVErrorCode_FAILED_reserved_by_OEM_2 023755 CCS EVCC EVErrorCode_FAILED_reserved_by_OEM_3 023756 CCS EVCC EVErrorCode_FAILED_reserved_by_OEM_4 023757 CCS EVCC EVErrorCode_FAILED_reserved_by_OEM_5 023758 CCS SECC ResponseCode_FAILED_SequenceError 023759 CCS SECC ResponseCode_FAILED_SignatureError 023760 CCS ...

Страница 41: ...de_FAILED_ContactorError 023783 CCS SECC ResponseCode_FAILED_ CertificateNotAllowedAtThisEVSE 023784 CCS SECC ResponseCode_FAILED_GAChargeStop 023785 CCS SECC ResponseCode_FAILED_AlignmentError 023786 CCS SECC ResponseCode_FAILED_ACDError 023787 CCS SECC ResponseCode_FAILED_AssociationError 023788 CCS SECC ResponseCode_FAILED_EVSEChargeAbort 023789 CCS SECC ResponseCode_FAILED_NoSupportedApp Proto...

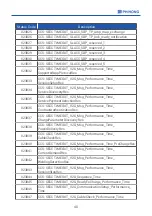
Страница 42: ...ed_5 023809 CCS SECC TIMEOUT_SLAC_TT_EVSE_SLAC_init 023810 CCS SECC TIMEOUT_SLAC_TP_match_response 023811 CCS SECC TIMEOUT_CM_START_ATTEN_CHAR_IND 023812 CCS SECC TIMEOUT_SLAC_TT_EVSE_match_MNBC 023813 CCS SECC TIMEOUT_SLAC_TP_EVSE_avg_atten_calc 023814 CCS SECC TIMEOUT_SLAC_CM_ATTEN_CHAR_RSP 023815 CCS SECC TIMEOUT_SLAC_CM_VALIDATE_REQ_1ST__CM_SLAC_ MATCH_REQ 023816 CCS SECC TIMEOUT_SLAC_TT_EVSE_...

Страница 43: ...entSelectionRes 023836 CCS SECC TIMEOUT_V2G_Msg_Performance_Time_ ContractAuthenticationRes 023837 CCS SECC TIMEOUT_V2G_Msg_Performance_Time_ ChargeParameterDiscoveryRes 023838 CCS SECC TIMEOUT_V2G_Msg_Performance_Time_ PowerDeliveryRes 023839 CCS SECC TIMEOUT_V2G_Msg_Performance_Time_ CableCheckRes 023840 CCS SECC TIMEOUT_V2G_Msg_Performance_Time_PreChargeRes 023841 CCS SECC TIMEOUT_V2G_Msg_Perfo...

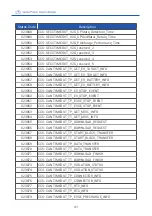
Страница 44: ...UT_TP_EVSE_STOP_EVENT 023862 CCS CAN TIMEOUT_TT_EVSE_STOP_EVENT 023863 CCS CAN TIMEOUT_TP_GET_MISC_INFO 023864 CCS CAN TIMEOUT_TT_GET_MISC_INFO 023865 CCS CAN TIMEOUT_TP_DOWNLOAD_REQUEST 023866 CCS CAN TIMEOUT_TT_DOWNLOAD_REQUEST 023867 CCS CAN TIMEOUT_TP_START_BLOCK_TRANSFER 023868 CCS CAN TIMEOUT_TT_START_BLOCK_TRANSFER 023869 CCS CAN TIMEOUT_TP_DATA_TRANSFER 023870 CCS CAN TIMEOUT_TT_DATA_TRANS...

Страница 45: ...CCS SECC Not_Ready_For_Charging 023892 CCS SECC TIMEOUT_QCA7000_COMM The firmware code of QCA7000 may not be installed yet 023893 CCS SECC FAIL_QCA7000_SETKEY 023894 Reserved 023895 Reserved 023896 Reserved 023897 Reserved 023898 Reserved 023899 Reserved 023900 GBT_LOS_CC1 023901 GBT_CONNECTOR_LOCK_FAIL 023902 GBT_BATTERY_INCOMPATIBLE 023903 GBT_BMS_BROAA_TIMEOUT 023904 GBT_CSU_PRECHARGE_TIMEOUT 0...

Страница 46: ...10V 023920 Reserved 023921 Reserved 023922 Reserved 023923 Reserved 023924 Reserved 023925 Reserved 023926 Reserved 023927 Reserved 023928 Reserved 023929 Reserved 023930 GBT_CEM_BHM_TIMEOUT 023931 GBT_CEM_BRM_TIMEOUT 023932 GBT_CEM_BCP_TIMEOUT 023933 GBT_CEM_BRO_TIMEOUT 023934 GBT_CEM_BCL_TIMEOUT 023935 GBT_CEM_BCS_TIMEOUT 023936 GBT_CEM_BSM_TIMEOUT 023937 GBT_CEM_BST_TIMEOUT 023938 GBT_CEM_BSD_T...

Страница 47: ...ISOLATION 023955 GBT_BST_OUTPUT_CONNECTOR_OTP 023956 GBT_BST_COMPONEN 023957 GBT_BST_CHARGE_CONNECTOR 023958 GBT_BST_OTP 023959 GBT_BST_OTHER 023960 GBT_BST_HIGH_V 023961 GBT_BST_CC2 023962 GBT_BST_CURRENT 023963 GBT_BST_VOLTAGE 023964 GBT_GET_BST_NO_REASON 023965 Reserved 023966 Reserved 023967 Reserved 023968 Reserved 023969 Reserved 023970 GBT_BSM_CELL_OVER_VOLTAGE 023971 GBT_BSM_CELL_UNDER_VOL...

Страница 48: ...d 033900 disconnected from backend through Ethernet 033901 disconnected from backend through Wi Fi 033902 disconnected from backend through 3G 4G 033903 Remote start charging by backend 033904 Remote stop charging by backend 033905 Remote reset by backend 033906 Reserved 033907 Reserved Status Code Description 45 ...

Страница 49: ...e charging connector charging cable or holder of the charging connector then please contact the DC Fast Charger provider When using the DC Fast Charger please handle properly Do not strike or scrape the cabinet or touch screen If the enclosure or touch screen is broken cracked open or shows any other indi cation of damage then please contact the DC Fast Charger provider 6 1 General Maintenance WAR...

Страница 50: ...ll be conducted only by a qualified technician After opening the front door of the DC Fast Charger turn off the main breaker and auxiliary breaker before any maintenance work Replace the ventilation filter every six to twelve months Please confirm the main power junctions are tightened every month and rotate cables testing when the power off If any main power screw is loose will be resulted in dam...

Страница 51: ...7 316 23 24 30 98 190 253 18 63 24 8 M10 1 5 Hex cap 212 382 245 440 24 02 43 15 196 351 19 22 34 42 M12 1 75 Hex cap 372 668 430 770 42 17 75 49 343 615 33 63 60 3 Screw in Imperial 2 56 Machine 1 5 2 1 7 2 3 0 17 0 22 1 4 1 8 0 14 0 18 4 40 Machine 3 4 3 5 4 5 0 34 0 44 2 8 3 6 0 27 0 35 6 32 Machine 6 10 7 11 5 0 68 1 13 5 6 9 2 0 55 0 9 8 32 Machine 10 15 11 5 17 1 13 1 66 9 2 14 0 9 1 37 10 3...

Страница 52: ... Kit List 7 inch LCD CCS CHAdeMO 125Amp or above DC charging connector 4M charging cable Charging Cable Holder Emergency Stop Button 30kW DC PSU G 1K0100 MW Aux Power HEP 100 12V MW Aux Power HEP 600 24V Control Supervisory Unit CSU3 0 Surge Protection Device SPD DC Fan Air Filters Door Key Gland M50 User Manual 49 ...

Страница 53: ...fications alterations or disassembling which were not pre authorized in writing by PHIHONG Damage due to the failure to observe the applicable safety regulations govern ing the proper use of the product Installed or operated not in strict conformance with the documentation in cluding without limitation not ensuring sufficient ventilation for the product as described in PHIHONG installation instruc...

Страница 54: ...iption No Remark 1 EVSE 1 2 User Manual 1 3 EVSE Approved Certificate 1 4 OQC Report 1 5 RFID Card 2 6 Door Key 1 7 Waterproof Plastic Bolts 4 8 Base Cover 2 A Cable Management 1 Optional B Bracket set for payment system 1 Optional 51 ...

Страница 55: ...52 NOTE ...

Страница 56: ...NOTE ...

Страница 57: ...NOTE ...

Страница 58: ...Manufacturer Contact Info Sticker www phihong com tw ...

Отзывы: