


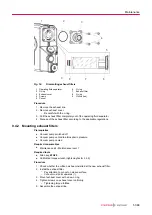


1
2
3
4
7
6
5
8
9
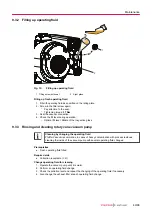
Fig. 16:
Dismantling exhaust filters
1 Operating fluid separator
6
O-ring
2 O-ring
7
Exhaust filter
3 Exhaust cover
8
O-ring
4 Screws
9
Orifice (red)
5 Cut-out
Procedure
1. Remove the exhaust line.
2. Remove exhaust cover.
– Be careful with the o-ring.
3. Pull the exhaust filter completely out of the operating fluid separator.
4. Dispose of the exhaust filter according to the applicable regulations.
9.4.2 Mounting exhaust filters
Prerequisites
● Vacuum pump switched off
● Vacuum pump vented to atmospheric pressure
● Vacuum pump cooled
Required consumables
● Maintenance kit – Maintenance level 1
Required tools
● Allen key,
WAF 5
● Calibrated torque wrench (tightening factor ≤ 2.5)
Procedure
1. Check whether the orifice has been installed at the new exhaust filter.
2. Install the exhaust filter.
– Pay attention to cut-out on sleeve surface.
– Cut-out must point upwards (
↑
).
3. Mount exhaust cover with a new o-ring.
4. Tighten screws on exhaust cover uniformly.
– Tightening torque:
4 Nm
.
5. Assemble the exhaust line.
Maintenance
51/68
Содержание SMARTVANE 55
Страница 1: ...OPERATING INSTRUCTIONS EN Translation of the Original SMARTVANE 55 70 Rotary vane pump ...
Страница 67: ...67 68 ...
Страница 68: ... PD0114 ed A Date 2211 P N PD0114BEN ...


