background image

                                                                                                       23

IDS-710 Hardware Installation Guide

Appendix D - DIN Rail and Wall Mounting

This appendix provides instructions on the following:

• Mounting the IDS Switch on a DIN Rail

• Removing the IDS from the DIN Rail

• Wall Mounting the IDS

Mounting the IDS Switch on a DIN Rail

1. The DIN rail clip will be fixed to the back of the IDS unit when you receive the switch.

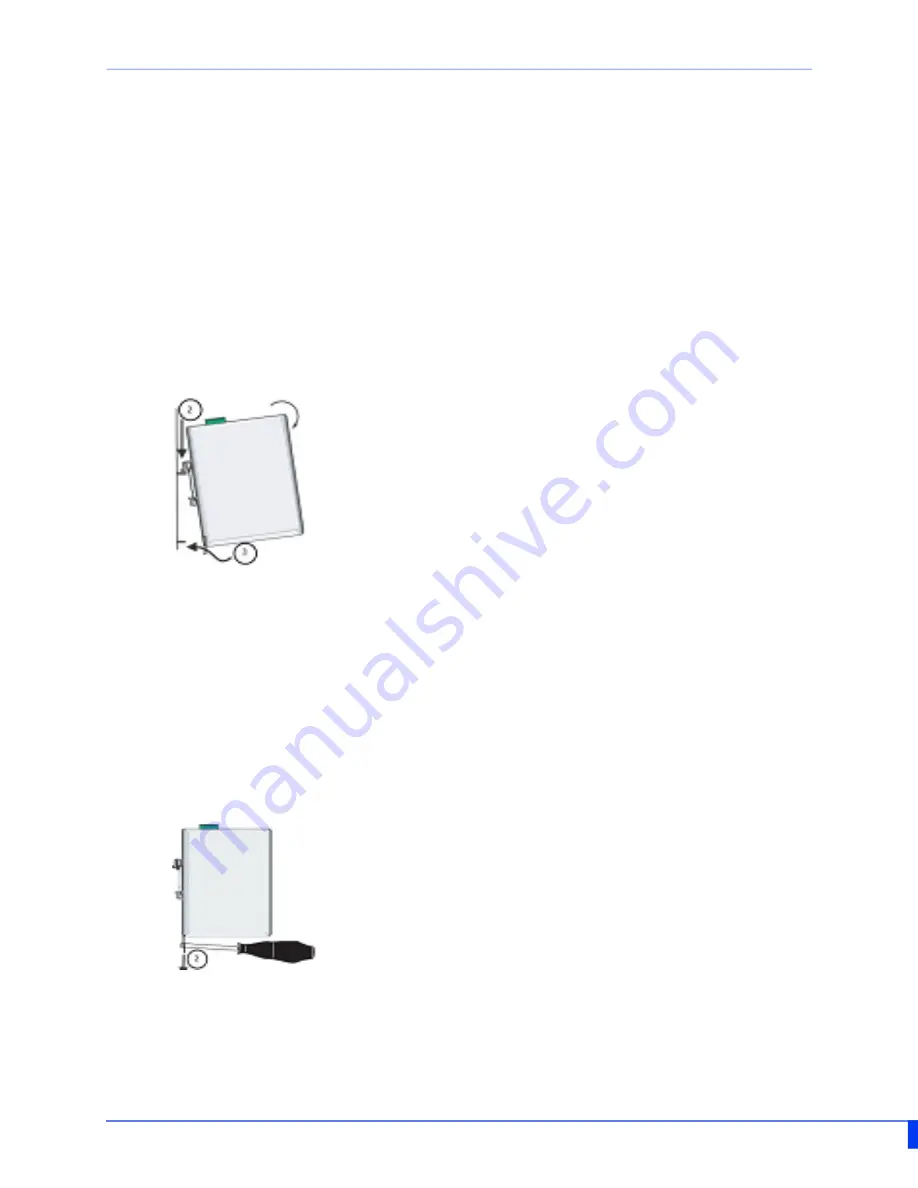
2. Position the IDS switch such that the top hooks of the DIN rail clip attach onto the top 

of the DIN rail.

3. Rotate the bottom of the IDS switch towards the rail. This will snap the bottom hooks 

of the DIN rail clip onto the bottom of the DIN rail.

Removing the IDS from the DIN Rail

1. The DIN rail attachment clip has a slot at the bottom of the latch that is visible beneath 

the switch when it is mounted.

2. Insert a flat blade screwdriver into the slot and twist the base to release the clip. Alter

-

natively a downward force on the clip will release the clip.

3. When the clip is released, pull the bottom of the switch out slightly and remove the 

switch from the DIN rail. 

Содержание IDS-710

Страница 1: ...IDS 710 Hardware Installation Guide Managed Industrial Ethernet Switches Updated December 2020 Version A 15 12 2020 Document Part 5500471 10 www perle com ...

Страница 2: ...al environment This equipment generates uses and can radiate radio frequency energy and if not installed and used in accordance with this hardware guide may cause harmful interference to radio communications Operation of this equipment in a residential area is likely to cause harmful interference in which case users will be required to correct the interference at their own expense Modifications to...

Страница 3: ...r to the IDS Switch 10 Wiring the Relay Alarm 10 Wiring Digital Input 10 Connecting the Console Port 11 Connecting Data Ports 12 Resetting the Switch 14 Configuring the IDS Switch 16 Appendix A Technical Specifications 17 Appendix B Sample Labels 21 Appendix C Mechanical Drawings 22 Appendix D DIN Rail and Wall Mounting 23 Appendix E IDS Maintenance 26 Appendix F Cables and Connectors 27 ...

Страница 4: ...with attached DIN rail mounting bracket IDS 710 Switches Quick Start Guide Document Conventions This document contains the following conventions Most text is presented in the typeface used in this paragraph Other typefaces are used to help you identify certain types of information The other typefaces are Note Means reader take note notes contain helpful suggestions Caution Means reader be careful ...

Страница 5: ... Block Connectors Installation The table below gives a brief overview of the models covered in this guide For more details and for the most up to date list of models please refer to the product pages at www perle com Standard Models 10 100 1000 Base T EthernetPorts PoE Enabled Fixed SFP Port Software Set Temp IDS 710 8 2 Pro Standard IDS 710 XT 8 2 Pro Industrial ...

Страница 6: ...puts 1 Reset FS Fast Setup 6 SFP slots 2 Status LEDs 7 10 100 1000Base T Ethernet Ports with PoE PoE PoE capability 3 Terminal Block for Digital Input and Relay 8 Ethernet LED 1 4 SFP status LEDs 9 Ethernet LED 2 5 Console Port MicroUSB 10 DIN Rail Clip State Description Green P1 and P2 power within specifications ...

Страница 7: ...terface that can be used from a PC Terminal emulation program such as PuTTY This provides access to the switch management function using the industry standard CLI command set Yellow solid P1 or P2 providing power within specifications Red Neither P1 and P2 providing power within specifications State Description State Description Green blinking after power on System booting Green solid System ready...

Страница 8: ...trigger an external alarm circuit such as a light or sounding device This connector provides a Normally opened NO dry contact on the connector block Digital Input Connector A Digital Input is provided It can be used for the generation of alarms SNMP trap ener gizing of on board Alarm Relay etc Port Status Indicators Ethernet Port Status Indicators Port Link Speed State Description LED 1 Green LED ...

Страница 9: ...Hardware Installation Guide SFP Status LEDs Each SFP has a corresponding LED to indicate the current state of the fiber link State Description Green Fiber link established Green flashing Link activity Off No Link ...

Страница 10: ...Installation Guide Terminal Block Connectors P1 Power Input 1 P2 Power Input 2 Either P1 or P2 can power the unit When both are connected one will act as a backup IN Digital Input Dry Contact Relay Normally Open NO relay ...

Страница 11: ... of a tool or lock and key or any means of security and is controlled by the authority responsible for the location Warning The safety of any system incorporating the equipment is the responsibility of the assembler of the system Warning If the unit is installed vertically in a living or office environment the device must be operated exclusively in switch cabinets with fire protection characterist...

Страница 12: ...ad The relay connections are located next to the power connections Using this the IDS switch can be connected to an external powered device such as a siren or light for visual or audible notification of an alarm status 1 Ensure the power source is off prior to connection 2 Strip 2x12 20AWG 3 31 mm 0 52 mm twisted pair copper wires 7 8 mm 3 Loosen the terminal block screws and connect wires into th...

Страница 13: ...USB connector 2 Connect power to the switch as described in Connecting Power to the IDS Switch 3 On the PC Choose Start Control Panel Systems or equivalent on the Windows Operating System then open the Hardware tab Choose the Device Manager and expand the Ports section The assigned COM port appears can be identified 4 Start an terminal emulation program such as Putty or SecureCRT on the com port w...

Страница 14: ...sion To connect to 10Base T 100Base TX or 1000Base T follow these steps 1 When connecting to devices workstations servers or routers connect a straight through Ethernet cable toa 10 100 1000 RJ45 connector on the front of the IDS switch Gigabit Ethernet requires CAT 5e orbetter 2 Once the device is connected and link is established the link LEDs will turn on These LEDs willindicate whether you hav...

Страница 15: ...nsert them one way 3 If the SFP module is equipped with a clasp ensure the clasp is in the locked posi tion The appropriate fiber cable can now be connected to the SFP module Removing SFPs SFP modules are inserted in the SFP slots on the front of the IDS switch 1 Disconnect the fiber cable from the SFP module 2 If the SFP module is equipped with a clasp move it to the unlocked position and use the...

Страница 16: ...perform a complete power down and stay in the powered off state Press the reset button again to power the switch on Reset to Factory Default Configuration The switch can be reset to the Factory default configuration When this is done all config uration user IDs passwords and security certificates are deleted The start up and backup software are unaffected Follow this procedure Power off the switch...

Страница 17: ...st Setup configurator Switches are shipped in Factory default mode Refer to the Quick Start Guide that came with the switch for instructions on how to connect to the switch for the first time Password Recovery When the switch is not in factory default the Fast Setup Mode sequence will activate Password recovery Note The password recovery feature can be disabled in the software LED Behavior PWR Yel...

Страница 18: ... Web Device Manager The Perle Web Device Manager is an embedded Web based application that provides an easy to use browser interface for managing the switch This interface provides the ability to configure and manage the switch This is accessible through any standard desktop web browser Requires the switch to have a valid IP address Fast Setup This utility provides the ability to do either an init...

Страница 19: ...is Dual Power Input Dual Power Input 12 24 48 VDC nominal 9 6 60 VDC range 0 8A Max Alarm Relay NO Normally Open 1 0A 24VDC or 0 3A 48VDC Resistive Requires Class 2 LPS or SELV circuit with Fuse protection Digital Input IEC 61131 2 Type 3 Digital Input 24V 2 25 mA Rated Cable Temperatures IDS 710 IDS 710 XT 98 C 106 C Overload Current Protection Fuse Reverse polarity protection Yes Interfaces RJ45...

Страница 20: ...e Temperature Range IDS 710 IDS 710 XT 25 C to 75 C 13 F to 167 F 40 C to 85 C 40 F to 185 F Operating Humidity Range 5 to 90 non condensing Storage Humidity Range 5 to 90 non condensing Operating Altitude Up to 3 048 meters 10 000 feet Standards and Certifications Standard Safety CE Mark UL ULC EN 62368 1 including CB CAN CSA C22 2 No 62368 1 14 Industrial Safety UL 61010 1 and UL 61010 2 201 Sta...

Страница 21: ...EC EN 61000 4 5 Surge DC power line Line Line 1kV Line Earth 2kV Data Line line earth 1kV IEC EN 61000 4 6 CS 150MHz to 80MHz 10Vrms IEC EN 61000 4 8 Magnetic Field 30 A M IEC EN 61000 4 11 IEC EN 61000 6 2 General Immunity in Industrial Environments Laser Safety Class 1 Laser safety requirements for those models with fixed fiber transceiver modules EN 60825 1 2007 FDA CDRH 21 CFR1040 10 and 21 CF...

Страница 22: ...or the Perle Technical Assistance Center PTAC can be found at the link below www perle com support_services support_request shtml Warranty Registration This product is covered by the Perle Ethernet Switches Warranty Details can be found at https www perle com support_services warranty shtml ...

Страница 23: ...21 IDS 710 Hardware Installation Guide Appendix B Sample Labels ...

Страница 24: ...22 IDS 710 Hardware Installation Guide Appendix C Mechanical Drawings ...

Страница 25: ... DIN rail clip attach onto the top of the DIN rail 3 Rotate the bottom of the IDS switch towards the rail This will snap the bottom hooks of the DIN rail cliponto the bottom of the DIN rail Removing the IDS from the DIN Rail 1 The DIN rail attachment clip has a slot at the bottom of the latch that is visible beneath the switch when it is mounted 2 Insert a flat blade screwdriver into the slot and ...

Страница 26: ...to mark the spot where the screws will beplaced 4 Drive the screws into the wall leaving about 2 mm of the screw protruding from the wall to allow room for sliding the wall mount panel between the wall and the screws 5 Once the screws are fixed to the wall insert the four screw heads through the large parts of the keyhole shaped screw openings 6 Pull the IDS switch down to lock the IDS switch to t...

Страница 27: ...25 IDS 710 Hardware Installation Guide ...

Страница 28: ... inches on all sides of the IDS switch to pro vide proper airflowthrough the unit Do not use solvents or cleaning agents on this unit Keep vent holes clear of debris If case gets dirty wipe with a dry cloth Ensure all cables are in good working condition Replace any frayed cables or cables without clips ...

Страница 29: ... panel are used to con nect to Ethernet enabled devices These Ethernet ports will automatically adjust depend ing on the type of Ethernet cable used straight through or cross over and the type of device NIC type or HUB Switch type connected to the port Requirements Cat 5 UTP or STP Cat 5e cables are preferable when running 1000Mbps speeds 24 22 AWG 0 20mm2 0 33mm2 Straight through or Ethernet Cros...

Отзывы: