background image

VisuNet Display Unit

Product Description

 2

018-

11

9

2.3

Marking

ATEX/IECEx Marking

2.4

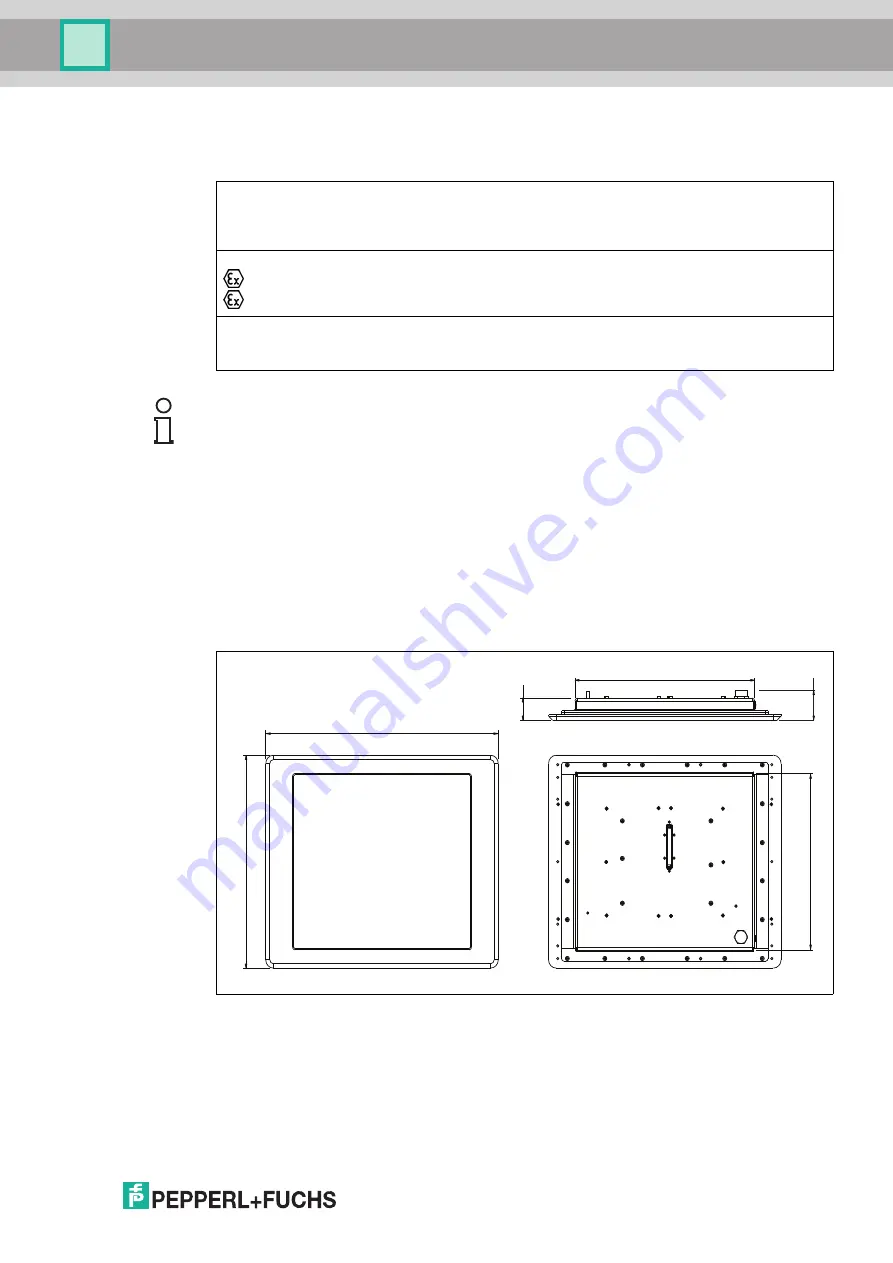
Dimensions and Type Labels

Dimensions

Figure 2.1

VisuNet DPU2100-* dimensions

Display Unit

DPU2100-*

Fuchs GmbH

Lilienthalstraße 200, 68307 Mannheim, Germany
ATEX: CML 17 ATEX 5191X 

 II 2G Ex eb ib q IIC T4 Gb 
 II 2D Ex tb IIIC T85 

°

C Db

IECEx: IECEx CML 17.0106X 

Ex eb ib q IIC T4 Gb 

Ex tb IIIC T85

°

C Db

Note!
FCC Digital Devices Statement

This equipment has been tested and found to comply with the limits for a Class A digital device, 

pursuant to part 15 of the FCC Rules. These limits are designed to provide reasonable 

protection against harmful interference when the equipment is operated in a commercial 

environment. This equipment generates, uses, and can radiate radio frequency energy and, if 

not installed and used in accordance with the instruction manual, may cause harmful 

interference, in which case the user will be required to correct the interference at his own 

expense.

48

419

65

382

542

460

Содержание VisuNet DPU2100 Series

Страница 1: ...VisuNet Display Unit DPU2100 PROCESS AUTOMATION MANUAL ...

Страница 2: ...s of Delivery for Products and Services of the Electrical Indus try published by the Central Association of the Electrical Industry Zentralverband Elektrotechnik und Elektroindustrie ZVEI e V in its most recent version as well as the supplementary clause Expanded reservation of proprietorship VisuNet Display Unit ...

Страница 3: ...roduct Description 6 2 1 Overview 6 2 2 Technical Data 7 2 3 Marking 9 2 4 Dimensions and Type Labels 9 3 Installation 11 3 1 Special Conditions of Use 11 3 2 General Installation Requirements 11 3 3 Mechanical Installation 12 3 4 Repairand Disposal 13 4 Operation and Configuration 14 5 Appendix 21 5 1 Health Monitoring 21 ...

Страница 4: ...amination certificate EU declaration of conformity Attestation of conformity Certificates Control drawings Additional documents 1 2 Target Group Personnel Responsibility for planning assembly commissioning operation maintenance and dismounting lies with the plant operator Only appropriately trained and qualified personnel may carry out mounting installation commissioning operation maintenance and ...

Страница 5: ...played in descending order as follows Informative Symbols Action This symbol indicates a paragraph with instructions You are prompted to perform an action or a sequence of actions Danger This symbol indicates an imminent danger Non observance will result in personal injury or death Warning This symbol indicates a possible fault or danger Non observance may cause personal injury or serious property...

Страница 6: ...puts of the computing unit and input user data Five system keys on the front of the unit allow users to control system functions e g brightness and the computing unit e g home key Integrated signal lights on the front keys show selected failure modes in case of a defective component The display unit is optimized for use with the modular HMI components of the VisuNet product line TCU1100 thin clien...

Страница 7: ...chscreen optional projective capacitive 10 finger multi touch glove friendly Control elements 5 capacitive front keys behind glass 1 home button 2 brightness control buttons 1 touchscreen button 1 power button Interface Interface type interface v1 0 from Pepperl Fuchs for computing units from Pepperl Fuchs Directive conformity Electromagnetic compatibility Directive 2014 30 EU EN 61326 1 2013 indu...

Страница 8: ... hazardous areas EU Type Examination Certificate CML 17 ATEX 5191X Marking II 2G Ex eb ib q IIC T4 Gb II 2D Ex tb IIIC T85 C Db Directive conformity Directive 2014 34 EU EN 60079 0 2012 A11 2013 EN 60079 5 2015 EN 60079 7 2015 EN 60079 11 2012 EN 60079 31 2014 International approvals IECEx approval IECEx CML 17 0106X Approved for Ex eb ib q IIC T4 Gb Ex tb IIIC T85 C Db Standards IEC 60079 0 2011 ...

Страница 9: ...e FCC Digital Devices Statement This equipment has been tested and found to comply with the limits for a Class A digital device pursuant to part 15 of the FCC Rules These limits are designed to provide reasonable protection against harmful interference when the equipment is operated in a commercial environment This equipment generates uses and can radiate radio frequency energy and if not installe...

Страница 10: ...is factory sealed Avertissement Cette enveloppe est scellée en usine Ne pas l ouvrir Warning marking Warning Do not open when energized Warning Refer to instruction manual Avertissement Ne pas ouvrir sous tension Avertissement Reportez vouz au manuel d instruction Warning Do not open This enclosure is factory sealed Warning Refer to instruction manual Warning Do not open when energized ...

Страница 11: ... EU Type examination certificate BVS 16 ATEX E 083X for ATEX applications or IECEx BVS 16 0060X for IECEx applications It must be properly joined prior to being installed into a hazardous environment See the system manual for full mounting details Power supplied from the TCU 00 or PCU 00 needs to be from a SELV or PELV source 3 2 General Installation Requirements Observe the following requirements...

Страница 12: ... 3 Carefully push the Pepperl Fuchs connector into the Pepperl Fuchs socket 4 Use the mounting screws to attach the PCU TCU onto the display unit Tighten the screws in a criss cross pattern to a torque of 2 Nm Figure 3 1 Mounting the TCU PCU onto the display unit Note For system installation instructions and complete mounting options see the VisuNet IXD System Manual Installation to IEC 60079 14 a...

Страница 13: ...ze as the power feed but a minimum of 4 mm2 Torque ground hardware to 4 Nm 3 4 Repair and Disposal Caution Damage to pins Carefully align the PCU TCU with the DPU when connecting the units Mounting or dismounting the PCU TCU at an angle can damage the pins Note The DPU can be dismounted from the PCU TCU and sent to Pepperl Fuchs for repair and or replacement For mounting and dismounting instructio...

Страница 14: ...tools like screw drivers to trigger the front buttons Warning Warning Do not use the display when there are scratches in the front glass Button Description 1 Home Configurable front button to call a specified function 2 Brightness Reduce display brightness dimmable to 0 3 Brightness Increase display brightness 4 Touchscreen Enable disable touchscreen e g for cleaning purposes If the display unit h...

Страница 15: ... off off off off on solid white Power ON Touchscreen ON on solid white on solid white on solid white on solid white on solid green Power ON Touchscreen OFF on solid white on solid white on solid white on flashing white on solid green Power ON Display OFF Brightness 0 on solid white on solid white on flashing white on solid white on solid green Sleeping Mode off off off off on flashing green ...

Страница 16: ... Touchscreen ON Power LED solid green Other LEDs solid white Power ON Touchscreen OFF Power LED solid green Touchscreen LED flashing white Other LEDs solid white Power ON Display OFF Brightness 0 Power LED solid green Brightness LED flashing white Other LEDs solid white ...

Страница 17: ...to reduce the display brightness faster Each single button press reduces the display brightness about 10 Pressing and holding the button reduces the brightness about 20 every 0 5 second Rebooting the System To reboot the system press and hold and for 5 seconds Touchscreen In contrast to resistive touchscreens the 10 point multi touch capacitive touchscreen behind security glass does not operate wi...

Страница 18: ...available This allows adjusting the sensitivity of the touch sensor according to the application requirements e g for working with gloves Increasing Decreasing Touch Sensitivity by Choosing a Sensitivity Profile To choose a sensitivity profile use the VisuNet RM Shell user interface Re Calibrating the Touchscreen To re calibrate the touchscreen use the VisuNet RM Shell user interface ...

Страница 19: ...ck pattern The lock mechanism can only be enabled via VisuNet RM Shell 5 firmware This feature is available in RM Shell 5 versions with an update of 5 0 1 441 or higher Locking the Front Buttons via VisuNet RM Shell 5 The default setting of the button lock mechanism is off 1 From the main screen of RM Shell 5 change Operator to Administrator 2 Enter the system settings app by clicking the appropri...

Страница 20: ...red 1 Press the home button when it is illuminated 2 Press the decrease brightness button when it is illuminated 3 Press the increased brightness button when it is illuminated 4 Press the touch enable disable button when it is illuminated 5 Press the power button when it is illuminated If the unlock sequence is performed incorrectly the process must be started again from the beginning An unsuccess...

Страница 21: ...ey controller damaged Replace the display unit Indication Problem Solution Brightness button solid white Power button solid red Temperature too low monitored only during booting up Check if ambient temperature surrounding the panel is lower than the panel s allowed operating temperature Indication Problem Solution Brightness button solid white Power button solid red Temperature too high monitored ...

Страница 22: ...Display Unit Appendix Communication Error Indication Problem Solution Touchscreen button solid white Power button solid red No communication with DPU devices e g storage device temperature monitoring Replace display unit ...

Страница 23: ...erl fuchs com Worldwide Headquarters Pepperl Fuchs GmbH 68307 Mannheim Germany Tel 49 621 776 0 E mail info de pepperl fuchs com For the Pepperl Fuchs representative closest to you check www pepperl fuchs com contact PROCESS AUTOMATION PROTECTING YOUR PROCESS DOCT 6224A 11 2018 ...

Отзывы: