background image

63

Taking Pictures

4

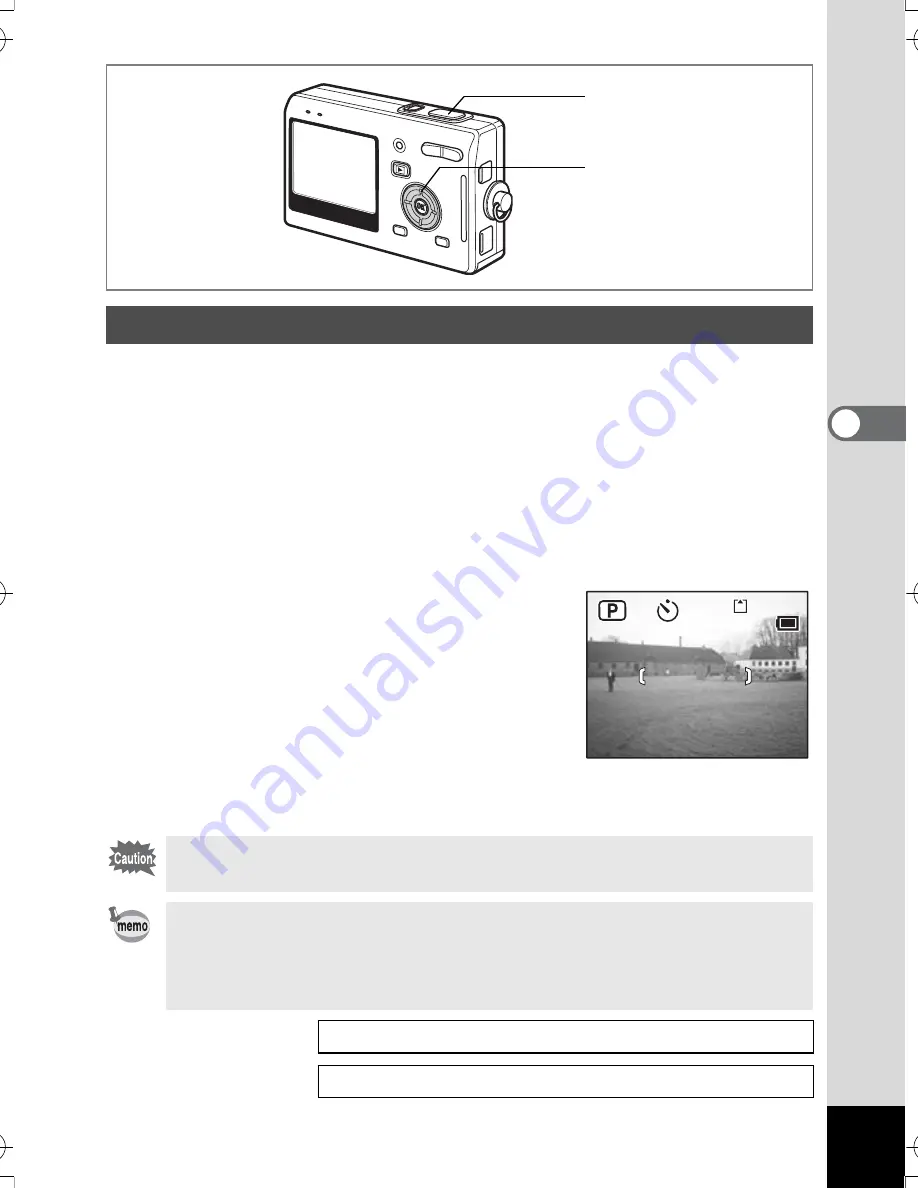
In self-timer mode, the picture is taken ten seconds or two seconds after 
the shutter release button is pressed.

1

Press the four-way controller (

2

) in Capture mode to display 

g

 or 

r

 on the LCD monitor.

2

Press the shutter release button halfway.

The focus frame on the LCD monitor will light green when the camera 
is in focus.

3

Press the shutter release button fully.

g

 The self-timer is engaged and the self-

timer lamp lights for about seven 
seconds. The picture is taken 
approximately three seconds after the 
self-timer lamp starts to blink.

r

 The self-timer is engaged and the picture 

is taken approximately two seconds after the self-timer lamp starts 
to blink.

Using the Self-Timer

Focusing may be compromised if you move the camera while the 
self-timer is running.

• The countdown is displayed when you press the shutter release 

button.

• To cancel the self-timer, press the MENU button while the second 

count is displayed.

Taking Pictures of Yourself 

1

p.52

Troubleshooting “Subject is not in focus” 

1

p.157

2, 3

1

112

112

12:00

12:00

112

12:00

3/24/2005

3/24/2005

3/24/2005

e_kb386.book  Page 63  Monday, February 28, 2005  2:39 PM

Содержание Optio S5n

Страница 1: ...Digital Camera Operating Manual To ensure the best performance from your camera please read the Operatin Manual before using the camera...

Страница 2: ...actured using extremely high precision technology Although the level of functioning pixels is 99 99 or better you should be aware that 0 01 or fewer of the pixels may not illuminate or may illuminate...

Страница 3: ...p the SD Memory Card out of the reach of small children Seek medical attention immediately if a memory card is accidentally swallowed Use an AC adapter that is of the power and voltage specified for e...

Страница 4: ...Some portions of the camera heat up during use so please take care as there is a risk of low temperature burns if such portions are held for long periods of time Should the LCD be damaged be careful o...

Страница 5: ...le it is still plugged in Remove the battery and unplug the AC plug cord when not using the battery charging stand Do not plug in the AC plug cord with wet hands This can cause an electrical shock Do...

Страница 6: ...les which can become very hot inside Storing the camera where pesticides and chemicals are handled should be avoided Remove from case and store in a well ventilated place to prevent the camera from be...

Страница 7: ...Memory Card p 23 regarding the SD Memory Card The AC plug cord supplied with the camera is for exclusive use with the Battery charging stand D BC25 Do not use it with any other equipment Please do not...

Страница 8: ...the Display Language 26 Setting the Date and Time 27 Quick Start 29 Taking Still Pictures 29 Playing Back Still Pictures 31 Playing Back an Image 31 Playing Back the Previous or Next Image 31 Rotatin...

Страница 9: ...5 Selecting the Quality Level 77 Adjusting the White Balance 79 Changing the Focusing Area 81 Setting the Light Metering Range to Determine the Exposure 82 Setting the Sensitivity 84 Setting the Expos...

Страница 10: ...ing the Camera from the Printer 123 Editing Images 124 Changing the Image Size and Quality 124 Trimming Images 126 Editing Pictures with Color Filters 128 Editing Pictures with Brightness Filter 129 E...

Страница 11: ...ctions including how to use the Capture Mode screen to select the capture mode best suited to the situation 5 Recording and Playback This chapter explains how to record sound only or add a voice memo...

Страница 12: ...D CO2J Japan D CO2K Korea D CO2U North America Canada Checking the Contents of the Package Camera Optio S5n Strap O ST20 Software CD ROM S SW29 AV cable I AVC7 USB cable I USB17 Rechargeable lithium...

Страница 13: ...amp Auxiliary AF light Remote control receiver USB AV terminal Lens Strap lug DC input terminal Terminal covers Shutter release button Microphone Battery card cover Focus status lamp green LCD monitor...

Страница 14: ...ntroller 2 2 Zoom button Four way controller 3 3 for digital zoom y Four way controller 4 4 for trimming Four way controller 5 5 QUICK i button MENU button for operating as the QUICK button Shutter re...

Страница 15: ...13 1 Getting Started Getting Started Attaching the Strap Pass the narrow end of the strap through the strap lug and pass the other end through the loop...

Страница 16: ...our finger to press the battery lock lever in the same direction as when you inserted the battery Pull the battery out Installing the Battery Removing the Battery If you intend to use the camera conti...

Страница 17: ...C plug cord into the power outlet 3 Turn the camera off 4 Place the camera in the battery charging stand Position the camera so that the lens rests in the depression in the case The CAMERA charging in...

Страница 18: ...ether on the battery charging stand to charge the battery inside the camera and a spare battery The time required for full charge is about 100 minutes The appropriate ambient temperature range for cha...

Страница 19: ...ries other than D LI8 rechargeable lithium ion batteries as the charging stand may overheat or be damaged as a result If the battery is inserted correctly but the charging indicator blinks the battery...

Страница 20: ...Regions of the World p 20 and take an appropriately shaped off the shelf adapter plug with you Electrical socket shapes may vary depending on the region of the country Check the socket shape used in...

Страница 21: ...n Japan 9 Sri Lanka Maldives 9 Nepal Bangladesh Mongolia 9 Vietnam 9 9 India Indonesia Pakistan Macau 9 9 Thailand 9 9 9 Korea 9 9 9 Philippines 9 9 9 Singapore Hong Kong 9 9 China 9 9 9 9 9 Malaysia...

Страница 22: ...Plug the AC plug cord into the power outlet Using the AC Adapter optional Make sure that the camera is turned off when connecting or disconnecting the AC adapter Make sure that the AC plug cord and co...

Страница 23: ...n using the battery charging stand or AC adapter be sure to read the section on FOR SAFE USE OF YOUR CAMERA on page 1 Refer to page 160 for the specifications of the battery charging stand and AC adap...

Страница 24: ...h the card in until it clicks 3 Close the battery card cover To remove the card eject the card by pressing it in the direction indicated by the arrow and pull it out Make sure that the camera is turne...

Страница 25: ...g Do not remove the SD Memory Card during formatting as this may damage the card and render it unusable The data on the SD Memory Card may be deleted in the following circumstances PENTAX does not acc...

Страница 26: ...is 5M 2560 1920 Appropriate Quality According to Use The default setting is D Image Size and Quality How to Set the Menus 1p 39 Selecting the Recorded Pixels 1p 75 Selecting the Quality Level 1p 77 5M...

Страница 27: ...table is based on standard shooting conditions specified by PENTAX and may vary depending on the subject shooting conditions capture mode SD Memory Card etc Quality Level Best C Better D Good E Movie...

Страница 28: ...se the language in which the menus error messages etc are displayed from the following English French German Spanish Italian Swedish Dutch Russian Korean Chinese traditional and simplified and Japanes...

Страница 29: ...roller 23 to choose the date and time display style 2 Press the four way controller 5 The frame moves to 24h 3 Use the four way controller 23 to select 24h 24 hour display or 12h 12 hour display 4 Pre...

Страница 30: ...h the settings and press the OK button the camera clock is reset to 00 seconds To set the exact time press the OK button when the time signal on the TV radio etc reaches 00 seconds When the Initial Se...

Страница 31: ...halfway The focus frame on the LCD monitor will light green when the camera is in focus 4 Press the shutter release button fully The image appears on the LCD monitor for one second Instant Review and...

Страница 32: ...ressing theibutton selecting Delete when the Delete menu appears and pressing the OK button 1p 110 You can also record a voice memo by pressing the OK button during Instant Review 1p 101 Using the Shu...

Страница 33: ...t a time proceeding either forward or backward 1 Press the Q Playback button after taking a picture The image appears on the LCD monitor 2 Press the four way controller 45 displays the previous image...

Страница 34: ...image displayed on the LCD monitor by pressing the QUICK button using the four way controller 2 to select Delete and pressing the OK button Press the Q Playback button again or press the shutter rele...

Страница 35: ...y to take pictures by pressing the shutter release button Press the Q Playback button to switch to the Playback mode and view pictures while the lens is extended Hold down the Q Playback button for mo...

Страница 36: ...o the Playback mode with the lens retracted You can use the camera as a voice recorder There are two ways to activate the Voice Recording mode 1 Press the power switch for more than two seconds The po...

Страница 37: ...s to Capture mode 1p 31 Four way controller 425 Changes the focus mode as follows 1p 71 qs5 Macro mode 1p 71 Super Macro mode 1p 71 Pan Focus mode 1p 71 Infinity Landscape mode 1p 71 Manual Focus mode...

Страница 38: ...pressing the Q Playback button again switches to the Voice Recording mode Four way controller For playing back still images 45 Displays the previous or next image in single image display 1p 31 3 Rotat...

Страница 39: ...ve seconds If there are recorded indexes When 4 is pressed during playback plays back starting from the previous index When 5 is pressed during playback plays back starting from the next index OK Disp...

Страница 40: ...and stops when the button is released Q Playback button Switches to Playback mode 1p 34 When pressed again returns to Voice Recording mode OK Display button Turns the LCD monitor on and off MENU butt...

Страница 41: ...2 Press the four way controller 45 Changes the menu screen 3 Use the four way controller 23 to choose an item Moves the highlight up or down 4 Press the four way controller 5 A pull down menu or sett...

Страница 42: ...original screen Capture or Playback mode Saves the current setting and return to Step 1 Cancel Cancels the current selection exit the operation and return to Step 3 To Save the Setting and Begin Playb...

Страница 43: ...ity AWB AUTO 5M Rec Mode MENU Exit Recorded Pixels Quality Level White Balance Focusing Area AE Metering Sensitivity AWB AUTO 5M Rec Mode MENU Cancel Recorded Pixels Quality Level White Balance Focusi...

Страница 44: ...ity For setting the sensitivity AUTO No No Yes p 84 EV Compensation For adjusting the exposure between 2 0 and 2 0 0 0 No Yes Yes p 85 Movie Time lapse Movie For setting the frame rate when recording...

Страница 45: ...and messages appear p 145 USB Connection For changing the USB connection mode p 146 Video Out For setting the video output format p 146 Brightness Level For changing the brightness of the LCD monitor...

Страница 46: ...rate the Mode Palette Mode Palette List Icon Item Description Page R Program mode The basic picture taking mode p 51 B Night Scene mode Lets you take dark scenes such as night views p 54 C Movie mode...

Страница 47: ...r pictures of text or writing Sports mode Lets you take clear pictures of moving subjects with a high shutter speed and prevents blurring of images L Surf Snow mode Lets you take photos against dazzli...

Страница 48: ...in memory to the SD Memory Card and vice versa p 134 Color Filter For processing images using the color filter B W p 128 Brightness Filter For adjusting the brightness of images using a filter p 129...

Страница 49: ...splay shooting information on the LCD monitor when taking pictures The display mode can be changed by pressing the OK DISPLAY button Normal Display Shooting information is displayed when the power is...

Страница 50: ...Balance 4 AE Metering 5 Sensitivity 6 Histogram Guide Display The grids divided into three parts are displayed These grids will help you to improve composition No icons No shooting information is dis...

Страница 51: ...eak tends to appear on the left side for a darker image and the graph peak tends to appear on the right side for a brighter image In general when the exposure meter of your image is well balanced the...

Страница 52: ...ted 2 Press the shutter release button halfway The focus frame on the LCD monitor will light green when the camera is in focus 3 Press the shutter release button fully The picture is taken Taking Pict...

Страница 53: ...2 Use the four way controller 2345 to select R Program mode 3 Press the OK button 4 Set the functions you want to use Refer to Setting the Shooting Functions p 71 94 for details of how to set the fun...

Страница 54: ...brightly colored flower pictures J Portrait Lets you take portraits with spatial effect by emphasizing the person S Self portrait Lets you take pictures of yourself or include yourself in pictures K S...

Страница 55: ...the pet mode appears 4 Use the four way controller 23 to select E F F H G or G There are two icons of a cat and a dog Choosing either the cat or dog icon does not affect the resulting picture Choose...

Страница 56: ...me on the LCD monitor will light green when the camera is in focus 5 Press the shutter release button fully The picture is taken Taking Pictures of Dark Scenes Night Scene Mode Total recording time wi...

Страница 57: ...nitor and the camera is ready to take movies 1 Movie mode icon 2 Flash Off icon 3 Card Built in memory 4 Recordable time 4 Press the shutter release button Shooting starts You can change the size of t...

Страница 58: ...h will not discharge in Movie mode Continuous shooting is not possible in Movie mode Sound cannot be recorded when Time lapse Movie is set to On Only Pan Focus mode normal setting no icons Infinity La...

Страница 59: ...ress the MODE button in Capture mode The Mode Palette appears 2 Use the four way controller 2345 to select F Panorama Assist mode 3 Press the OK button 4 Use the four way controller to choose the dire...

Страница 60: ...e button Repeat Steps 5 and 6 to take the third and subsequent images 7 Press the OK button The screen returns to Step 4 To cancel Panorama Assist mode change to another mode The camera cannot join th...

Страница 61: ...a limited range of color tones and enables you to take posterization type pictures 1 Press the MODE button in Capture mode The Mode Palette appears 2 Use the four way controller 2345 to select Special...

Страница 62: ...with a soft lens effect 4 Use the four way controller 23 to select Soft Filter 5 Press the OK button 6 Press the shutter release button halfway The focus frame on the LCD monitor will light green whe...

Страница 63: ...the image up to twice its size horizontally Stretches the image up to twice its size vertically 5 Press the OK button 6 Press the shutter release button halfway The focus frame on the LCD monitor wil...

Страница 64: ...y controller 2345 to select E USER mode 3 Press the OK button 4 Press the shutter release button halfway The focus frame on the LCD monitor will light green when the camera is in focus 5 Press the shu...

Страница 65: ...s for about seven seconds The picture is taken approximately three seconds after the self timer lamp starts to blink r The self timer is engaged and the picture is taken approximately two seconds afte...

Страница 66: ...the camera is ready to take the picture 2 Press the shutter release button on the remote control unit i The self timer lamp blinks quickly and the picture is taken after approximately three seconds h...

Страница 67: ...y for the Remote Control Unit A signal can be sent from the remote control unit to the camera approximately 30 000 times Contact your nearest PENTAX customer service center if the battery needs changi...

Страница 68: ...are taken continuously while the shutter release button is pressed Shooting stops when you take your finger off the shutter release button Continuous Shooting Continuous Shooting Mode You can continu...

Страница 69: ...oom function is disabled you can take pictures at up to three times magnification using the optical zoom When the digital zoom function is enabled you can further enlarge the subject to a maximum magn...

Страница 70: ...2 Use the four way controller 23 to select Digital Zoom 3 Use the four way controller 45 to select O On P Off 4 Press the shutter release button halfway The camera is ready to take pictures Setting t...

Страница 71: ...ovie 5 Press the four way controller 5 A pull down menu appears 6 Use the four way controller 23 to change the time lapse setting You can choose from Off 2 5 10 and 20 7 Press the shutter release butt...

Страница 72: ...dy to take movies Off 1 is the normal setting for movies approximately 30 frames per second Each time 2 or 5 is selected the number of frames taken per second is reduced to 1 2 or 1 5 As movies are no...

Страница 73: ...ocuses on the object in the autofocus area when the shutter release button is pressed halfway r Super Macro mode This mode is used when the distance to the subject is approx 6 cm 20 cm 2 4 in 8 in The...

Страница 74: ...e The auxiliary AF light of this camera conforms to the safety standard IEC60825 1 for Class 1 LED product Looking at the light directly will not create safety hazard However do not look into the emit...

Страница 75: ...g Area mode press the four way controller 2345 Moves the focus frame Focusing area 2 Press the shutter release button halfway The focus frame is fixed in its new position Press the OK button again to...

Страница 76: ...red eyes caused by the light from the flash being reflected in the subject s eyes The flash discharges automatically d Flash On red eye reduction This mode reduces the phenomenon of red eyes caused by...

Страница 77: ...r way controller 5 The pull down menu appears Selecting the Recorded Pixels 5M 2560 1920 Printing images with high resolution settings in your printer 4M 2304 1728 Printing at A4 size or larger Editin...

Страница 78: ...ed at 5M in the Green mode The number of recorded pixels is fixed at 640 480 in the Movie mode Selecting a large size produces a clear picture when it is printed out The Recorded Pixels setting is sav...

Страница 79: ...se button halfway The camera is ready to take the picture Selecting the Quality Level C Best Lowest compression ratio Suitable for photo prints D Better Standard compression ratio Suitable for viewing...

Страница 80: ...78 Taking Pictures 4 The Quality Level setting is saved when the camera is turned off The quality level is fixed at D Better in the Green mode Image Size and Quality 1p 24...

Страница 81: ...n taking pictures outside in sunlight Cloudy Use this mode when taking pictures under a cloudy sky H Shade Use this mode when taking pictures outside in the shade I Tungsten Light Use this mode when t...

Страница 82: ...hite material so that it fills the screen 3 Press the shutter release button fully The white balance is automatically adjusted Complete appears on the LCD monitor 4 Press the OK button The setting now...

Страница 83: ...roller 23 to change the setting 5 Press the shutter release button halfway The camera is ready to take the picture Changing the Focusing Area Multiple Normal range Spot The autofocus range becomes sma...

Страница 84: ...picture Setting the Light Metering Range to Determine the Exposure L Multi segment The exposure is determined by the entire screen M Center weighted The exposure is determined mainly by the center of...

Страница 85: ...83 Taking Pictures 4 When N is selected the AE metering point moves in correspondence with movement of the focusing area 1p 73 Saving the AE Metering Mode 1p 95...

Страница 86: ...cally 80 The lower the sensitivity the sharper the image and the less noise The shutter speed will be slower in low light conditions The higher the sensitivity the faster the shutter speed in low ligh...

Страница 87: ...arken set a negative value You can choose the EV setting in the range of 2 0 EV to 2 0 EV in 1 3 EV steps 4 Press the shutter release button halfway The camera is ready to take the picture Setting the...

Страница 88: ...iliary AF light of this camera conforms to the safety standard IEC60825 1 for Class 1 LED product Looking at the light directly will not create safety hazard However do not look into the emitter from...

Страница 89: ...5 Press the shutter release button halfway The camera is ready to take the picture Setting the Instant Review Time The Instant Review setting is saved when the camera is turned off Rec Mode MENU Exit...

Страница 90: ...to take the picture Setting the Color Mode Color Mode You can set the Color mode both for still images and movies When selecting the picture mode the effect of the picture mode is based on the Color m...

Страница 91: ...the four way controller 5 The Fn Setting screen appears 4 Use the four way controller 23 to select a key you want to assign a function to 5 Press the four way controller 5 The pull down menu appears R...

Страница 92: ...ctions registered are as follows 2 Recorded Pixels 3 EV Compensation 4 White Balance and 5 Sensitivity You can assign only one function to each key The functions you can assign are as follows Recorded...

Страница 93: ...Press the shutter release button halfway The camera is ready to take the picture Setting the QUICK Button Registering a Function For the initial setting the Green Mode for easy operation is registere...

Страница 94: ...To soften the contours choose and to sharpen the contours choose 4 Press the shutter release button halfway The camera is ready to take the picture Setting the Image Sharpness The Sharpness setting is...

Страница 95: ...n choose and to increase the saturation choose 4 Press the shutter release button halfway The camera is ready to take the picture Setting the Color Saturation The Saturation setting is saved when the...

Страница 96: ...choose and to increase the contrast choose 4 Press the shutter release button halfway The camera is ready to take the picture Setting the Image Contrast The Contrast setting is saved when the camera...

Страница 97: ...e setting on the button is saved P Zoom Position The optical zoom position setting on the zoom button is saved P MF Position The manual focus position is saved P White Balance The White Balance settin...

Страница 98: ...selected on the menus for each function when the camera is turned off The zoom position setting in the digital zoom range will not be saved even if Zoom Position is set to O On in Memory Registering F...

Страница 99: ...rmal p 93 Contrast Normal p 94 EV compensation 0 0 p 85 Aux AF Light O On p 86 Color Mode Full color p 88 The settings of these items are memorized separately in User mode and Capture mode These setti...

Страница 100: ...refer to Menu List p 42 1 Press the QUICK button in Capture mode The Initialize Rec Mode message appears 2 Use the four way controller 23 to select Initialize 3 Press the OK button All the shooting f...

Страница 101: ...the shutter release button is pressed for more than one second recording continues for as long as the button is held down and stops when the button is released 3 Press the shutter release button Recor...

Страница 102: ...out five seconds If there are recorded indexes Four way controller 4 Plays back starting from the previous index Four way controller 5 Plays back starting from the next index Zoom button x Increases t...

Страница 103: ...appears 3 Use the four way controller 2345 to select Voice Memo 4 Press the OK button Recording starts You can record for up to 30 seconds 5 Press the OK button Recording stops Recording a voice memo...

Страница 104: ...ge a voice memo has been recorded 2 Press the four way controller 2 Playback starts The following operations can be performed during playback Zoom button x Increases the volume Zoom button w Reduces t...

Страница 105: ...eight times A guide to operation appears on the LCD monitor during magnification 1 Enter the Playback mode and use the four way controller 45 to choose the image to magnify 2 Press x y on the zoom bu...

Страница 106: ...Zoom 3 Press the four way controller 5 The pull down menu appears 4 Use the four way controller 23 to select the desired zoom scale 5 Press the shutter release button halfway The camera is ready to t...

Страница 107: ...troller 5 Fast forward playback Four way controller 2 Pause OK button Changes the display mode 1p 107 Zoom button w x Adjusts the volume The following operations can be performed while pause is engage...

Страница 108: ...the zoom button Each time you press the button the image is enlarged up to four times The following operations can be performed during playback Four way controller 2345 Moves the position to be magnif...

Страница 109: ...orizontal axis shows the brightness darkest at the left end and brightest at the right end and the vertical axis shows the number of pixels 1 Recorded pixels 2 Quality level 3 White balance 4 AE meter...

Страница 110: ...four way controller 4 the previous page appears Similarly if you choose a lower right image and press the four way controller 5 the next page appears The icons that appear on the images indicate the f...

Страница 111: ...change the playback interval Choose from the following 1 sec 3 sec 5 sec 10 sec 20 sec 30 sec 6 Press the OK button Start appears on the LCD monitor and playback starts at the set interval Press any...

Страница 112: ...ars 3 Use the four way controller 2 to select Delete 4 Press the OK button The image or sound is deleted Deleting a Single Image Movie or Sound Once deleted images movies or sounds cannot be restored...

Страница 113: ...leted When the Quick Delete function is set to On the Delete screen appears with Delete already selected 1 Press the MENU button in Playback mode The B Set up menu appears 2 Use the four way controlle...

Страница 114: ...r 2 to select Delete all 3 Press the OK button All the images and sounds will be deleted Deleting All Images Once deleted images movies or sounds cannot be restored You cannot delete protected Z image...

Страница 115: ...ress the MODE button The Mode Palette appears 3 Use the four way controller 2345 to select Z Protect 4 Press the OK button The Protect screen appears 5 Use the four way controller 23 to select Select...

Страница 116: ...cted the Z icon appears when the image movie or sound is played back Protecting All Images movies and Sounds Select Unprotect in Step 7 to cancel the Protect setting on all the images movies and sound...

Страница 117: ...nd input terminal on the TV When using stereo sound equipment insert the sound terminal into the L white terminal 3 Turn the TV and camera on Changing the Video Output Format 1p 146 If you intend to u...

Страница 118: ...e remote control unit Shutter button displays the next image Zoom button displays the previous image Playing Back an Image Using the Remote Control Unit optional As there is no zoom button on the remo...

Страница 119: ...Copies Choose the number of copies up to a maximum of 99 Date Specify whether you want the date imprinted on the print or not 1 Enter the Playback mode and use the four way controller 45 to choose th...

Страница 120: ...F settings have already been made for an image the previous number of copies and date setting will be displayed To cancel DPOF settings set the number of copies to 0 and press the OK button You cannot...

Страница 121: ...oller 45 to choose whether to insert the date or not O On The date will be imprinted P Off The date will not be imprinted 9 Press the OK button Prints can be made according to the settings Printing Al...

Страница 122: ...d with the camera The PictBridge menu appears You are recommended to use the AC adapter D AC8 optional while the camera is connected to the printer The printer may not work properly or the image data...

Страница 123: ...settings go to Step 7 7 Press the QUICK button The Change setting screen appears 8 Use the four way controller 23 to select Paper size Printing Single Images Select printing mode Select printing mode...

Страница 124: ...ity 11 Press the OK button twice The image is printed according to the settings Press the MENU button to cancel printing 1 Use the four way controller 23 to select Print All 2 Press the OK button The...

Страница 125: ...11 on Printing Single Images pages 121 to 122 Disconnect the camera from the printer when you have finished printing 1 Turn the camera off 2 Disconnect the USB cable from the camera 3 Disconnect the...

Страница 126: ...writing the original images to make more space available in the memory After changing the size and quality the image can be saved as a new image or written over the original image 1 Press the MODE but...

Страница 127: ...roller 45 to change the quality 7 Press the OK button 8 Use the four way controller 23 to select Overwrite or Save as 9 Press the OK button The resized image is saved Movies cannot be resized You cann...

Страница 128: ...e four way controller 2345 to select Trimming 3 Press the OK button The Trimming screen appears 4 Trim the image Operations that can be performed on the Trimming screen Zoom button Changes the size of...

Страница 129: ...127 6 Playback Deleting Editing 5 Press the OK button The trimmed image is saved as a separate image Movies cannot be trimmed The image size is changed and saved...

Страница 130: ...ontroller 2345 to select D Color Filter 3 Press the OK button The color filter screen appears 4 Use the four way controller 23 to choose a color 5 Press the OK button The overwrite confirmation screen...

Страница 131: ...brightness filter screen appears 5 Use the four way controller 45 to adjust the brightness Each time you press the four way controller 5 the image becomes brighter step by step and each time you press...

Страница 132: ...130 6 Playback Deleting Editing 8 Press the OK button The edited image is saved with the same number of recorded pixels and quality level as the original...

Страница 133: ...layback mode The Mode Palette appears 2 Use the four way controller 2345 to select Movie Edit 3 Press the OK button The Movie Edit screen appears Choose the editing function that you want to use 4 Use...

Страница 134: ...5 Advances the movie frame by frame 7 Press the OK button The confirmation screen appears 8 Use the four way controller 23 to select Divide 9 Press the OK button The movie is divided at the specified...

Страница 135: ...ontroller 45 to choose the end point 9 Press the OK button 10 Use the four way controller 23 to select Overwrite or Save as 11 Press the OK button The movie cut and stitched is saved Cutting and Stitc...

Страница 136: ...all the files are copied at once When files are copied from the SD Memory Card to the built in memory the files are copied one at a time 1 Press the MODE button in Playback mode The Mode Palette appea...

Страница 137: ...ed to the built in memory To Copy Files from the Built in Memory to the SD Memory Card To Copy Files from the SD Memory Card to the Built in Memory If the image has a voice memo the sound file will be...

Страница 138: ...se Start up Screen 3 Press the OK button The screen for setting start up screen appears 4 Use the four way controller 45 to choose an image for the start up screen User is indicated on the upper right...

Страница 139: ...the start up screen display the Image select screen While the image you have selected as a start up screen is on the screen User is indicated on the upper right corner of the screen press the QUICK b...

Страница 140: ...ures Formatting an SD Memory Card or the Built in Memory Do not remove the SD Memory Card while the card is being formatted as this may damage the card and render it unusable SD Memory Cards formatted...

Страница 141: ...ontroller 45 to change the operation volume 4 Use the four way controller 3 to select Playback Volume 5 Use the four way controller 45 to change the volume of playback sounds 6 Press the shutter relea...

Страница 142: ...ay The camera is ready to take pictures Changing the Start up Sound and Shutter Sound The Sound settings are saved when the camera is turned off How to recall the B Set up menu Four way controller MEN...

Страница 143: ...Use the four way controller 23 to choose the date and time display style 4 Press the four way controller 5 The frame moves to 24h 5 Use the four way controller 23 to select 24h 24 hour display or 12h...

Страница 144: ...tep 6 the setting switches between am and pm corresponding to the time 8 Press the shutter release button The camera is ready to take pictures How to recall the B Set up menu Four way controller MENU...

Страница 145: ...5 The World Time screen appears 3 Use the four way controller 45 to select O On P Off O Displays the time in the city selected in X Destination P Displays the time in the city selected in W Hometown...

Страница 146: ...y controller 45 to set whether daylight saving time is used or not Select if the present location uses daylight saving time 12 Press the shutter release button halfway The World Time setting is saved...

Страница 147: ...sh Dutch Russian Korean Chinese traditional and simplified and Japanese 1 Select Language on the B Set up menu 2 Press the four way controller 5 3 Use the four way controller 2345 to choose the langua...

Страница 148: ...at NTSC or PAL for taking or playing back images on a TV 1 Select Video Out on the B Set up menu 2 Press the four way controller 5 The pull down menu appears 3 Use the four way controller 23 to select...

Страница 149: ...our way controller 45 to adjust the brightness Moving the slider leftwards makes the LCD monitor darker and moving rightwards makes it brighter 3 Press the Q Playback button The camera is ready to pla...

Страница 150: ...way controller 23 to select 2 min 1 min 30 sec or Off 4 Press the Q Playback button The camera is ready to play back images Sleep Timeout This function will not work when playing a slideshow movie or...

Страница 151: ...s the four way controller 5 The pull down menu appears 3 Use the four way controller 23 to select 5 min 3 min or Off 4 Press the Q Playback button The camera is ready to play back images Setting Auto...

Страница 152: ...apture mode from other modes 1 Select Guide Display on the B Set up menu 2 Use the four way controller 45 to select O On P Off 3 Press the Q Playback button The camera is ready to play back images Set...

Страница 153: ...y controller 5 The Reset screen appears 3 Use the four way controller 2 to select Reset 4 Press the OK button The settings return to the defaults and the camera is ready to take or play back images Re...

Страница 154: ...nto Kathmandu New York Dacca Halifax East Asia Yangon Central and South America Mexico City Bangkok Lima Kuala Lumpur Santiago Vientiane Caracas Singapore Buenos Aires Phnom Penh Sao Paulo Ho chi Minh...

Страница 155: ...ST8 Strap O ST20 Strap O ST24 Remote control unit E zoom function Remote control unit F Rechargeable lithium ion battery D LI8 Battery charging stand D BC25 Battery charger D BC8 AC plug cord D CO2 D...

Страница 156: ...38 Card locked The SD Memory Card is write protected Only menu operation and mode change are possible Data being processed The image is being recorded on the SD Memory Card or in the built in memory T...

Страница 157: ...filter or edit a movie while the image or movie cannot be processed with these functions There is no file to be processed There is no file that can be processed with the Playback Mode Palette No paper...

Страница 158: ...res outside in sunlight Shutter will not release Flash is charging When flash status lamp blinks red flash is charging and no pictures can be taken Lamp lights red when charging is completed No availa...

Страница 159: ...e button fully or use Manual Focus mode Subject is not in focusing area Position subject in focus frame focusing area in middle of LCD monitor If the subject is outside the focusing area aim the camer...

Страница 160: ...tem monaural max recording time Approx 3 hours 10 min when using a 64 MB SD Memory Card Quality Level Best Better Good Storage Medium Built in memory approx 9 3 MB SD Memory Card Quality Level Recorde...

Страница 161: ...rama Assist Landscape Flower Portrait Self portrait Sunset Food Pet Text Sports Surf Snow Special Effect posterization filter soft filter slim filter USER EV Compensation 2 EV can be set in 1 3 EV ste...

Страница 162: ...ttery and SD Memory Card Accessories Rechargeable lithium ion battery battery charging stand AC plug cord USB cable software CD ROM AV cable strap operating manual Battery Charging Stand D BC25 AC Ada...

Страница 163: ...facturer If there is no representative of the manufacturer in your country send the equipment to the manufacturer with postage prepaid In this case it will take a considerable length of time before th...

Страница 164: ...in some countries can supersede this warranty policy Therefore we recommend that you review the warranty card supplied with your product at the time of purchase or contact the PENTAX distributor in y...

Страница 165: ...led and used in accordance with the instructions may cause harmful interference to radio communications However there is no guarantee that interference will not occur in a particular installation If t...

Страница 166: ...ith the standards Records maintained continue to reflect the equipment being produced can be expected to be within the variation accepted due to quantity production and testing on the statistical basi...

Страница 167: ...Display Language 145 DPOF 117 E Exposure 85 F Flash 11 Flash Mode 74 Flash status lamp 11 30 Fn Setting 89 Focus frame 30 Focus Mode 71 Focus status lamp 11 30 Focusing Area 81 Folder Display 108 For...

Страница 168: ...ck Zoom 104 R Rec Mode Menu 42 Recording Sound 99 Remote Control 64 116 Reset 151 Resize images 124 Rotate the displayed image 32 S SD Memory Card 22 23 Self Timer 63 Self timer lamp 11 Sensitivity 84...

Страница 169: ...167 8 Appendix Write protect switch 23 Z Zoom 67 Zoom button 12 35 36 Zoom Display 103...

Страница 170: ...Memo...

Страница 171: ...Memo...

Страница 172: ...Jean Poulmarch 95106 Argenteuil Cedex FRANCE PENTAX Benelux B V for Netherlands Spinveld 25 4815 HR Breda NETHERLANDS http www pentax nl for Belgium Luxembourg Weiveldlaan 3 5 1930 Zaventem BELGIUM h...

Отзывы: