92
4
Tak
ing Pi
cture
s
1
Press the
3
button in Capture mode.
The [
A
Rec. Mode] menu appears.
2
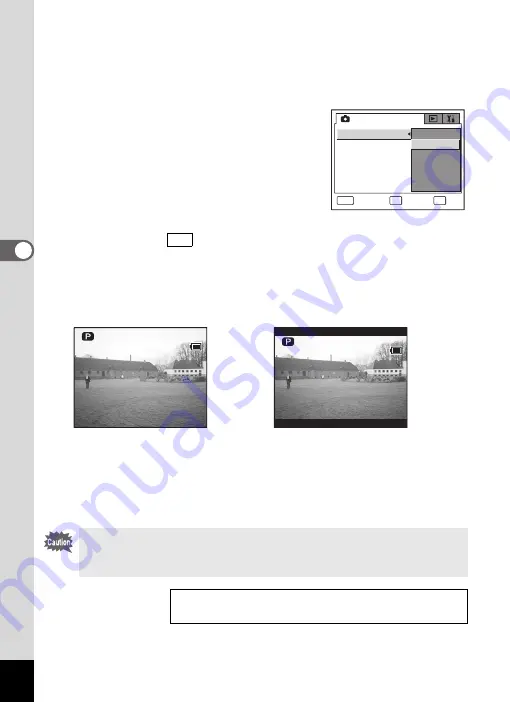
Use the four-way controller (
23
) to select [Recorded
Pixels].
3
Press the four-way controller (
5
).
A pull-down menu appears.
4
Use the four-way controller (
23
)
to change the number of recorded
pixels.
Press the
g
button to switch between
4:3 and 3:2 for the aspect ratio of the image
to be recorded.
appears after the recorded pixels when 3:2 is
selected. When 3:2 is selected, the LCD monitor switches to a screen
similar to that shown below on the right, enabling you to compose your
picture accordingly.
5
Press the shutter release button halfway.
The Recorded Pixels setting is saved and the screen returns to
capture status. Refer to Step 6 of
) for
other operations after the setting has been made.
The image in the viewfinder always appears with a 4:3 aspect ratio
regardless of the aspect ratio setting of the image. Use the LCD
monitor when taking pictures with the aspect ratio set to 3:2.
Recorded Pixels and Quality Level for Still Pictures
OK
DP
MENU
3056x2296
2592x1944
2048x1536
1600x1200
1024x 760
640x 480
3 : 2
O K
C a n c e l
R e c o r d e d P i x e l s
Q u a l i t y L e v e l
W h i t e B a l a n c e
A F S e t t i n g
A E M e t e r i n g
S e n s i t i v i t y
R e c . M o d e
3:2
3 8
3 8
1 4
1 4 : 2 5
: 2 5
1 4 : 2 5
0 9 / 2 5 / 2 0 0 4
0 9 / 2 5 / 2 0 0 4
0 9 / 2 5 / 2 0 0 4
1 4
1 4 : 2 5
: 2 5
1 4 : 2 5
3 8
3 8
0 9 / 2 5 / 2 0 0 4
0 9 / 2 5 / 2 0 0 4
0 9 / 2 5 / 2 0 0 4
4:3
3:2
Содержание 750Z - Optio Digital Camera
Страница 33: ...Memo 31 ...
Страница 82: ...80 4 Taking Pictures Example of a 3D Picture Parallel Method ...


