TWO OR MORE PEOPLE ARE REQUIRED FOR
THE FOLLOWING STEPS
H.
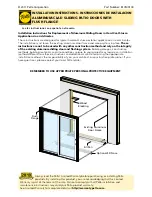
Insert shims between the door
and the sides of
the opening at the top two anchor hole locations in
the door. Keep shims back 1/2" from interior face
of the door frame.
Note: Keep the exterior of
the door pressed against the
existing door frame to ensure
a good sealant line.
F.
From the exterior, set the door into the opening.
Set
the sill of the door onto the sill pan and tilt the door into
position, centering it in the opening. DO NOT slide the
door on the sill pan.
4
SETTING AND FASTENING THE DOOR (CONTINUED)
Shim
Shim
I.
Plumb and square door.
Insert
shims, as necessary, between
the door and the sides of the
rough opening starting up 6"
from the bottom of the door.
Keep shims back 1/2" from
interior face of the door frame.
Note: DO NOT OVER SHIM.
J.
Check the interior reveal.
Make sure the measurement from the interior face of the door
to the interior face of the wall is equal at several points around the door.
Note: If the dimensions are not equal, check to make sure the fins are folded out to 90°
at all points.
K.
Secure the frame
. Insert a 1" wide
shim behind the pilot hole at the lock
strike(s). Insert a #8 x 2-1/2" screw
(included in the panel retainer and
screw package) into the pilot hole
making sure it passes through the
shim and into the rough opening.
Note: The weather-strip must be
pushed aside to reveal the pilot
hole. Be careful not to damage the
weather-strip.
Exterior View
4F
Interior
Interior
1
2 0 3 0 40
5 0 6 0 70
2
3
INCHES
mm
3D
4H
4J
4K
4K
G.
Insert the door from the exterior of the building. DO
NOT slide the bottom
of the door into the opening.
Sliding will damage the sealant lines. Place the bottom
of the door at the bottom of the opening, then tilt the
top into position. Center the door between the sides
of the opening to allow equal clearance for shimming.
Frame Screw Method:
Insert one #8 x 3" screw into
the top anchor hole on each side of the frame.
Installation Clip Method:
Insert one screw into one
hole in each of the top clips.
&YUFSJPS7JFX
E.
Place a 3/8" diameter continuous bead of sealant
on
the face of the existing door frame jambs and head.
4E

