background image

AI Trouble shooting

Symptom

Cause

Remedy

11

11

10

6

7

11


Always turn off the power, unplug the machine and then well-qualified technicians should troubleshoot a problem.


If trouble occurs frequently, stop using the device and contact your local dealer or Pegasus' sales office.


 In the case of the adjustment that is made with the power on, well-qualified technicians should carry out this adjustment 

with great care because the machine could start unexpectedly.

CAUTION

CAUTION

Reference 

    page

The Al device is not 
turned on.

While the power of the 
machine is on, the motor 
for the Al device keeps 
on running.

The power relay cord is not 
connected correctly to the 
controller.

Faulty wiring inside the power 
switch (push button)

The fuse for the controller has 
a break.

Connect the power relay cord correctly. 
At this time check to make sure the 
power relay cord to be used matches 
the supply voltage.

Connect the wires of the same colors.

Replace the fuse.

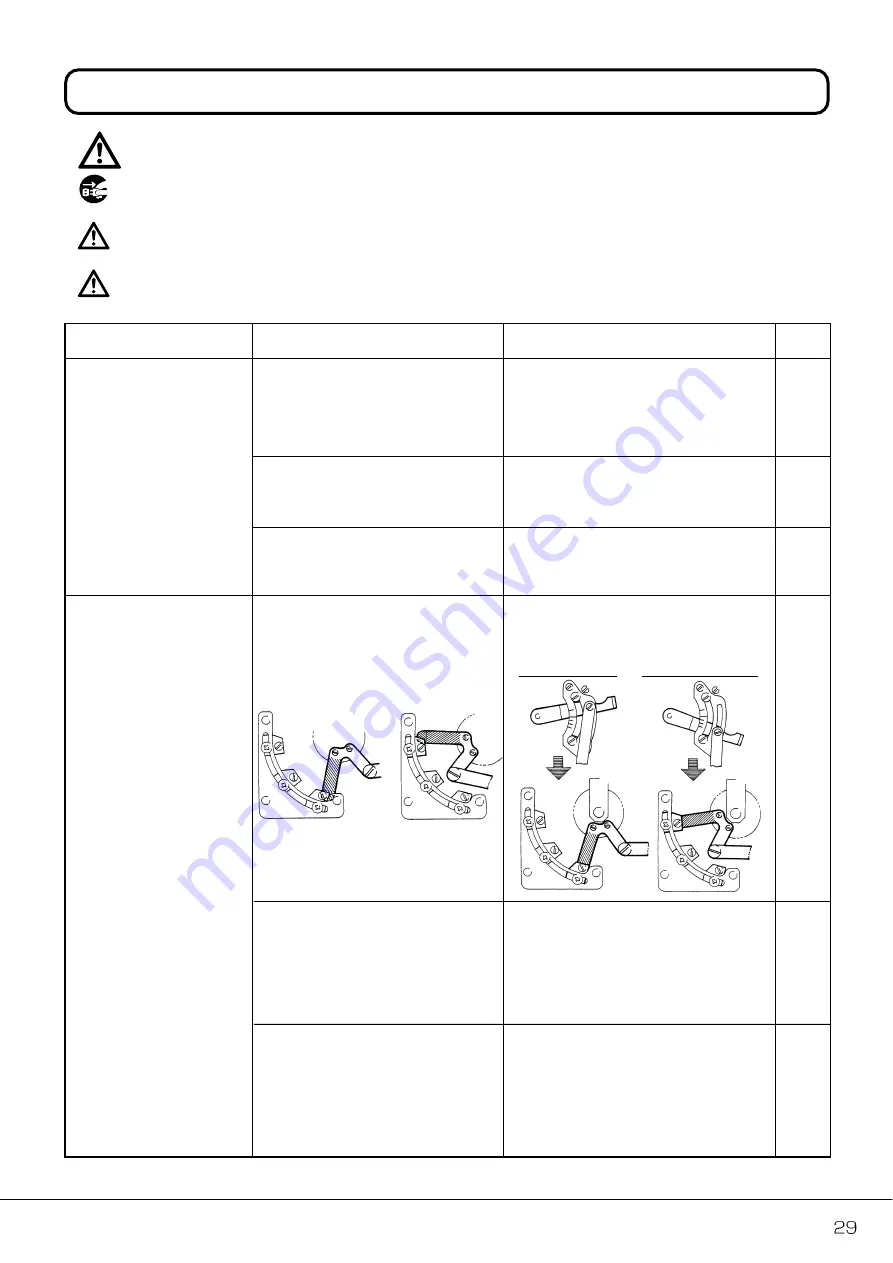
Three sensors on the Al motor 
are out of where these sensors 
can detect the lever.

Position the lever as shown below.

 In the case of the 
 maximum reverse 
 differential feed

 In the case of the 
 maximum differential 
 feed

When the power or the machine 
is off, the differential lever is out 
of any one of three sensors.

Even if the power or the machine 
is off, the differential lever should 
be aligned with any one of three 
sensors. 

The relay cords for three sensors 
on the Al motor are disconnected.

Connect the relay cords of the 
same colors correctly.

Содержание AI 100

Страница 1: ...manual very carefully before beginning any of the procedures and then use the device correctly and safely Keep this manual in a convenient place for quick refer ence when needed Automatic differential feed amount switching device INSTRUCTIONS W500 Series Models AI 100 AI 110 ...

Страница 2: ...box 8 Description of power box 9 Replacing the fuse for the power box 10 Connecting cords 11 Description of AI console box 12 Adjusting the sensitivity of sensor 13 Before entry 14 Programming the sewing mode 15 Function selecting mode 16 20 To change and or enter sewing data 21 24 Change of Item number 21 Programming sewing data 22 24 To enter data during sewing Teaching 25 27 Testing mode 28 AI ...

Страница 3: ...ou have to keep in mind you could easily touch them To prevent accidents it is essential that you use the safe products supplied by Pegasus correctly All the people who will use sewing machines must study this manual and the instruction manual for sewing machines very carefully and then take necessary safety measures before beginning any of the procedures 2 Indications of dangers warnings and caut...

Страница 4: ... and productivity according to you needs Therefore never use the device for the applications which may defeat the above purpose Circumstances Some circumstances when you are using the labor saving device may affect its life function performance and safety For safety do not use the labor saving device under the circumstances below 1 Do not use the device near objects which make noise such as a high...

Страница 5: ...d service maintenance personnel should have proper knowledge and skills for safe operation To ensure so managers must design and conduct training for these people 4 Notes for each procedure CAUTION CAUTION Unpacking The machine and device are packed in boxes and plastic bags in the factory before shipment Unpack the boxes and bags properly and sequentially by following the instructions shown on th...

Страница 6: ...the safety cover are properly secured 6 Drain and clean the filter regulator periodically if the device is pneumatic Otherwise drainage will flow into the solenoid valve and or air cylinder causing trouble 7 Always turn off the power before leaving the machine table 8 If any trouble occurs stop using the machine and turn off the power Check repair and or perform other necessary procedures immediat...

Страница 7: ...ing can be entered and set for each item 20 steps where to switch the amount of differential feed can be entered and set 3 kinds of modes are available START The number of stitches counted from when the light from the sensor is interrupted by the edge of the fabric at the start of sewing process CONTINUE The number of stitches counted while the light from the sensor is being interrupted by the fab...

Страница 8: ...ble with wood screws 6 Check to see if lever 4 moves smoothly Fig 2 3 Connect lever 4 to motor 11 with links 7 and 8 Center screws 9 in each slot 10 Tighten screws 9 temporarily Fig 3 4 Install motor 11 to the table with wood screws 12 Adjust differential feed lever 3 so that lever 13 does not touch support 14 two points when differential feed lever 3 is at the top or bottom of its travel Adjustme...

Страница 9: ... each slot Adjustment is made by loosening screws 9 that connect link 7 and 8 After this adjustment tighten screws 9 To make a fine adjustment loosen screw 18 for sensor 16 and screw 19 for sensor 17 Adjust the position of sensors 16 and 17 in the slot After this adjustment is made tighten screws 18 and 19 Check to make sure that links 7 and 8 move easily by moving differential feed lever 3 6 Grea...

Страница 10: ...ine from the outlet and then only well qualified technicians should install the console box and power box Install the console box 1 and the power box 2 by referring to the illustration below Without GF elastic feeder 1 2 With GF elastic feeder Install the console box on the back side of the machine 1 2 ...

Страница 11: ... Connector output for the stepping motor To connect the relay cord from the stepping motor 9 Output connector output To connect the relay cord from the tape cutter solenoid 10 Fabric detection sensor sensitivity adjusting dial To adjust the sensitivity of the fabric detection sensor 11 Fabric detection sensor sensitivity indicator lights To show the sensitivity of the fabric detection sensor 12 Fa...

Страница 12: ... the fuse CAUTION CAUTION The fuse for the AI power box is 3A Do not use any other than 3A If the replaced fuse is blown out the AI power box may be malfunctioning Stop using the AI power box and contact your local Pegasus sales office or representative Remove fuse holder cap 1 with the screwdriver by turning in the direction of the arrow and replace the fuse 2 with a new one 1 ...

Страница 13: ...the outlet and then only well qualified technicians should connect the cords Check the voltage designation 7 to make sure the power relay cord 1 matches the local supply voltage The use of wrong cord may cause damage to parts and or fire 1 Each of cords and connectors is color and shape coded Connect the cords to the connectors correctly as shown below Connect the earth wire correctly Otherwise yo...

Страница 14: ...th M Level Item Change With M O Level Japanese English Mesh Count Mode ON or Mesh Count OFF 4 TEACHING key To enter the sewing data while performing a sewing operation 5 INPUT key To store the sewing data entered during teaching 6 INC key To increase a number in data To select Japanese English Manual Auto ON OFF etc 7 DEC key To decrease a number in data To select Japanese English Manual Auto ON O...

Страница 15: ...rm that the lamps indicated by 6 are all terned off when material is inserted ON ON Adjusting the sensitivity of sensor Note 1 To sew special materials and or extra light fabrics which the light from the sensor goes through see below 1 Turn dial 4 until the third from the left of indicator lights 6 is turned on completely 2 Turn dial 4 clockwise slowly and stop turning dial 4 until the fourth ligh...

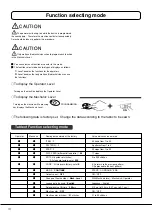
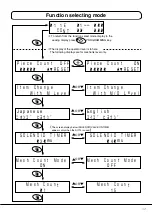
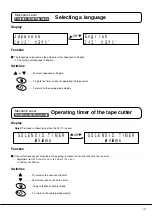
Страница 16: ...the language mode is not changed 2 To initialize the differential feed amount After the initialization of the Al device has been completed initialize the differential feed amount Note There is no need to initialize this amount at start up every day Be sure to initialize it when you use this device for the first time Otherwise the device will not function correctly with the entered data 1 Turn off ...

Страница 17: ...Select this code to make each pattern proceed to the next pattern E End Select this code to make each pattern return to the previous pattern without proceeding to the next pattern Ex 1 To select each code with 3 patterns 1 pattern 2 pattern 3 pattern C C E Ex 2 To select the code with only one pattern 1 pattern E Note Be sure to select CODE E for an unused operation MODE To display how to sew each...

Страница 18: ...MMING key displays the Mechanic Level The following data is factory set Change the data according to the fabric to be sewn Table of Function selecting mode Operator Mechanic Sewing data entered at the factory Value which can be entered ITEM 1 30 items from 1 to 30 PATTERN 1 4 patterns from 1 to 4 STEP 1 20 steps from 1 to 20 DIFF FEED differential feed ratio 00 17 steps STITCH number of stitches 0...

Страница 19: ...d e N t F F O M e s h C o u n M o d e t OR S O L E N O I T I M E 0 0 3 s m D R 4 S O L E N O I T I M E 0 0 s m D R OR ゙ J e s e n a p a ニ ホ ン コ ヒ ヨ ウ シ ゙ ゙ E h s i l g n エ イ コ ヒ ヨ ウ シ ゙ OR OR m I t e C h a n W i t h M L v e l e e g m I t e C h a n W i t h M L v e l e e O g To return from the function select mode display to the sewing display press PROGRAMMING key The display of the operator level ...

Страница 20: ...turn to the sewing mode display c e i e P C o u n O F F R E S T 0 0 0 0 0 t E N c e i e P C o u n O R E S T 0 0 0 0 0 t E Item change Display Function To call up each item number Select either Operator Level or Mechanic Level display If you call up the item number using Mechanic Level display select With M level If you call up the item number using Operator Level display select Mechanic Operator S...

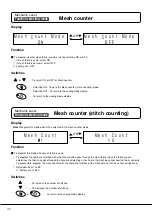
Страница 21: ...timer of the tape cutter Display Function If the cutter does not get activated during sewing increase the count on the timer by ten units Adjustable from 010 ms 0 01 sec to 100 ms 0 1 sec Factory set 030 ms Switches To increase the count on the timer To decrease the count on the timer To go to the Mesh counter mode To return to the sewing mode display S O L E N O I T I M E 0 0 3 s m D R 4 S O L E ...

Страница 22: ...ected in the mesh counter mode Function To program this mode when mesh fabric is sewn To program the number of stitches with which the machine goes through the mesh fabric since the fabric sensor determines the fabric has gone through the sensor by detecting a mesh hole the machine cannot sew the fabric correctly To prevent this program the mesh counter with the number of stitches of the mesh hole...

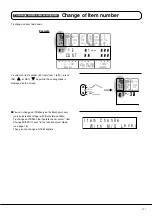
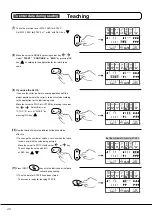
Страница 23: ... to 30 press INC or DEC key while the sewing mode is displayed on the screen You can change an ITEM only on the Mechanic Level service personnel stage with the factory set data To change an ITEM on the Operator Level select Item Change With M O Level in the function select mode see page 18 Then you can change an ITEM anytime Change of Item number To change and or enter sewing data 増 増 INC INC 減 減 ...

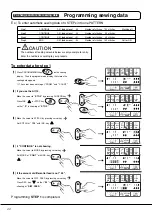
Страница 24: ... 増 INC INC 減 減 DEC DEC 増 増 INC INC 減 減 DEC DEC CURSOR CURSOR カーソル カーソル CURSOR CURSOR カーソル カーソル CURSOR CURSOR カーソル カーソル PRGM 品番 PRGM 品番 PATTERN 工程 PATTERN 工程 STEP ステップ STEP ステップ STITCH 針数 STITCH 針数 MODE モード MODE モード CODE コード CODE コード CUTTER カッター CUTTER カッター COUNTカウント COUNTカウント DIFF FEED 差動送り量 DIFF FEED 差動送り量 STOP ストップ STOP ストップ E 1 1 1 ー ー 0 0 0 0 0 0 0 0 0 0 C N T O PRGM 品番 PRGM 品番 PATTERN 工程 PATT...

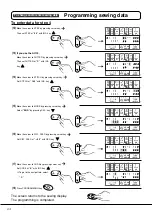
Страница 25: ... カッター CUTTER カッター COUNTカウント COUNTカウント DIFF FEED 差動送り量 DIFF FEED 差動送り量 STOP ストップ STOP ストップ E 1 1 2 ー 0 0 0 0 0 5 0 0 0 0 ー C N T O PRGM 品番 PRGM 品番 PATTERN 工程 PATTERN 工程 STEP ステップ STEP ステップ STITCH 針数 STITCH 針数 MODE モード MODE モード CODE コード CODE コード CUTTER カッター CUTTER カッター COUNTカウント COUNTカウント DIFF FEED 差動送り量 DIFF FEED 差動送り量 STOP ストップ STOP ストップ E 1 1 2 ー 0 0 0 0 0 5 3 0 0 0 ー ー C N T O 増 増 INC INC 減 減 DE...

Страница 26: ...TTER カッター COUNTカウント COUNTカウント DIFF FEED 差動送り量 DIFF FEED 差動送り量 STOP ストップ STOP ストップ E 1 1 4 0 0 0 0 0 0 0 0 C ー 0 0 C N T O PRGM 品番 PRGM 品番 PATTERN 工程 PATTERN 工程 STEP ステップ STEP ステップ STITCH 針数 STITCH 針数 MODE モード MODE モード CODE コード CODE コード CUTTER カッター CUTTER カッター COUNTカウント COUNTカウント DIFF FEED 差動送り量 DIFF FEED 差動送り量 STOP ストップ STOP ストップ E 1 1 4 0 0 0 0 0 4 0 0 C 1 ー 0 C N T O 増 増 INC INC 減 減 DEC DEC CURS...

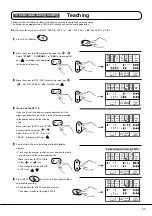
Страница 27: ...EED 差動送り量 DIFF FEED 差動送り量 STOP ストップ STOP ストップ E 1 1 1 ー ー 0 0 0 0 0 0 0 0 0 0 C N T O PRGM 品番 PRGM 品番 PATTERN 工程 PATTERN 工程 STEP ステップ STEP ステップ STITCH 針数 STITCH 針数 MODE モード MODE モード CODE コード CODE コード CUTTER カッター CUTTER カッター COUNTカウント COUNTカウント DIFF FEED 差動送り量 DIFF FEED 差動送り量 STOP ストップ STOP ストップ E 1 1 1 ー 0 0 0 0 0 4 0 0 ー 0 0 C N T O PRGM 品番 PRGM 品番 PATTERN 工程 PATTERN 工程 STEP ステップ STEP ステップ STITCH...

Страница 28: ...ODE コード CUTTER カッター CUTTER カッター COUNTカウント COUNTカウント DIFF FEED 差動送り量 DIFF FEED 差動送り量 STOP ストップ STOP ストップ E 1 1 2 ー 0 0 0 0 0 3 0 0 ー 0 0 ー C N T O PRGM 品番 PRGM 品番 PATTERN 工程 PATTERN 工程 STEP ステップ STEP ステップ STITCH 針数 STITCH 針数 MODE モード MODE モード CODE コード CODE コード CUTTER カッター CUTTER カッター COUNTカウント COUNTカウント DIFF FEED 差動送り量 DIFF FEED 差動送り量 STOP ストップ STOP ストップ E 1 1 2 ー 0 0 0 0 0 3 0 0 ー 0 0 ー C N T O PR...

Страница 29: ...カッター COUNTカウント COUNTカウント DIFF FEED 差動送り量 DIFF FEED 差動送り量 STOP ストップ STOP ストップ E 1 1 3 ー 0 0 0 0 0 1 0 0 ー 0 0 C N T O PRGM 品番 PRGM 品番 PATTERN 工程 PATTERN 工程 STEP ステップ STEP ステップ STITCH 針数 STITCH 針数 MODE モード MODE モード CODE コード CODE コード CUTTER カッター CUTTER カッター COUNTカウント COUNTカウント DIFF FEED 差動送り量 DIFF FEED 差動送り量 STOP ストップ STOP ストップ E 1 1 3 ー 0 0 0 0 0 1 0 0 ー 0 0 C N T O PRGM 品番 PRGM 品番 PATTERN 工程 PATTER...

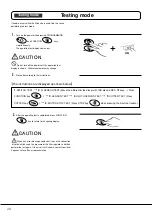
Страница 30: ...WITCH TEST 2 AI SENSOR TEST Move the differential feed lever with INC and DEC keys Press FUNCTION key 3 SENSOR TEST 4 CLOTH SENSOR TEST 5 CUTTER TEST Press CUTTER key 6 MOTOR STOP TEST Press STOP key while pressing the machine treadle Testing mode FUNCTION FUNCTION 機能選択 機能選択 ON Testing mode If truoble occurs while the AI device is used find the cause performing the test mode 1 Turn on the power wh...

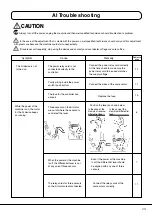
Страница 31: ...orrectly to the controller Faulty wiring inside the power switch push button The fuse for the controller has a break Connect the power relay cord correctly At this time check to make sure the power relay cord to be used matches the supply voltage Connect the wires of the same colors Replace the fuse Three sensors on the Al motor are out of where these sensors can detect the lever Position the leve...

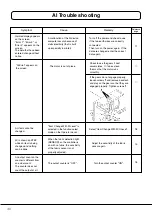
Страница 32: ...es clean them so that the motor runs smoothly If the gears do not engage properly loosen screws 1 and remove backlash and play on the gears so that they are engaged properly Tighten screws 1 An item cannot be changed Item Change With M Level is selected in the function select mode on the Operator Level Select Item Change With M O Level 30 is shown on STEP while an item is being changed and nothing...

Страница 33: ......

Страница 34: ......

Страница 35: ......

Страница 36: ... LTD 5 7 2 Sagisu Fukushima ku Osaka 553 0002 Japan Phone 06 6458 4739 Telefax 06 6454 8785 Cat No 9B3040E0000 June 2002 2002PEGASUS SEWING MACHINE MFG CO LTD The description in this INSTRUCTIONS is subject to change without notice ...

Отзывы: