background image

16

PATHFINDER

GPS Connector 

(PT10U)

PATHFINDER
GPS Receiver 

(PC10U, PR10U)

6. PAIRING

Pairing a Smartphone to the GPS Connector

1) Launch the PATHFINDER app
2) Turn on the GPS connector
3) In the PATHFINDER app, navigate to Menu 

ĺ

 Settings 

ĺ

 Bluetooth Pairing

4) Set the GPS connector to pairing mode and click 'Start Pairing' in the app

• Once paired, launching the app when the GPS connector is on will 

automatically connect the phone and connector together.

• The GPS connector should be within Bluetooth range (33 feet) of your phone 

to operate. 

• The GPS connector will reconnect with the phone when it is within range. 
• Reinstalling the app will require pairing with the GPS connector. 
• The PATHFINDER app may need to be restarted for compatibility issues.

Pairing Additional GPS Receivers

Pair the GPS connector and GPS receiver in close proximity to each other. 
You can use the PATHFINDER app to check if the GPS receiver is properly 
paired. 
1) Turn the GPS connector on. 
2) Check that the GPS receiver is turned off. 
3) Use the Select button on the GPS connector to set the LED to Collar.
4) Hold down the Connect button for 5 seconds until the LED blinks rapidly. 

Release the button.

5) Hold down the Power button on the GPS receiver until the LED blinks rapidly 

and emits three beeps to show it has coded. 

6) The GPS connector and receiver will return to blinking in normal intervals  

when pairing is complete.

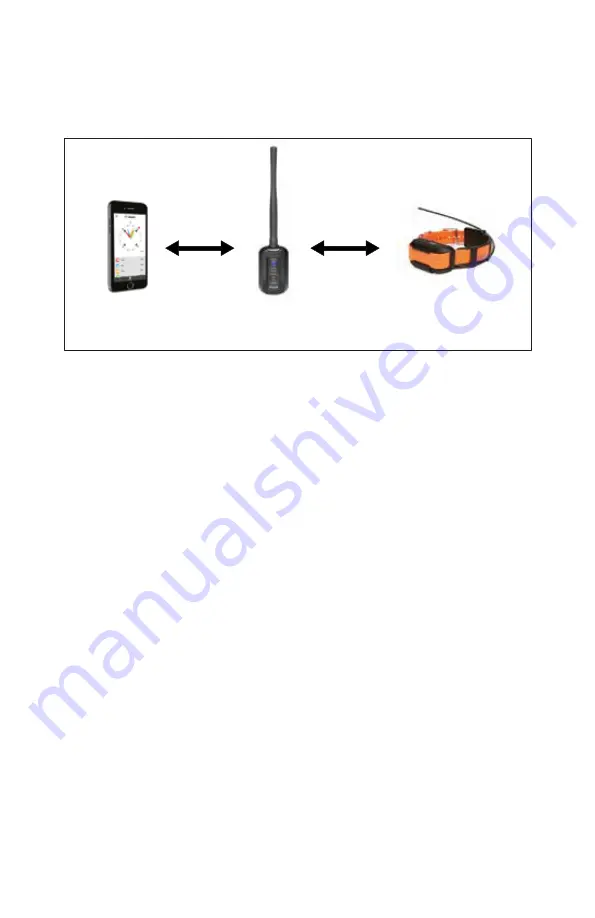
PATHFINDER GPS connector connects between your smartphone and 
PATHFINDER GPS receiver. These devices need to be paired for the 
PATHFINDER system to work properly.

Smartphone

Bluetooth

Max 33 Ft.

MURS Band

Max 9 Miles

Содержание PT10U

Страница 1: ...1 PATHFINDER PT10U PC10U PR10U AVAILABLE IN GPS ONLY SYSTEM PATHFINDER TRX Owner s Manual Please read this manual thoroughly before operating the Dogtra PATHFINDER...

Страница 2: ...og s neck Do not leave a receiver on your dog for an extended time Although each dog is different Dogtra recommends that its receivers be used a maximum of 4 to 6 hours at any one time on your dog A r...

Страница 3: ...age to your product its charger or battery obtain service from Dogtra before charging the product Do not use more than one splitter cable with a single battery charger Medical Device Interference Dogt...

Страница 4: ...APP FEATURES Q A CHANGING THE CONTACT POINT LENGTH RECEIVER FITTING FINDING THE RIGHT STIMULATION REPLACING THE ANTENNA MAXIMIZING THE DISTANCE ATTACHING THE BELT CLIP USING THE TEST LIGHT APPLICATION...

Страница 5: ...HISTORY DETAIL MAP MANAGEMENT MAP SELECT OFFLINE MAP CREATING CUSTOM MAP UPLOADING MAPS TO YOUR SMARTPHONE UPLOADING FILES GEO FENCE APP SETTINGS BASIC MAINTENANCE TROUBLESHOOTING GUIDE FCC WARNING WA...

Страница 6: ...er Splitter Cable Owner s Manual Belt Clip Not included with TRX Test Light Contact Point Extension Washer Adjustment Tool Non Stimulation Contacts GPS Connector PT10U PATHFINDER GPS Receiver PATHFIND...

Страница 7: ...ile Range Expandable to 21 Dogs IPX9K Waterproof Certified Belt Clip 3 5 Hour Rapid Charge Batteries 2s 9 Mile 21 3 5hr For PATHFINDER TRX Only UKC AKC and PKC Events Approved Not included with PATHFI...

Страница 8: ...8 OVERVIEW Battery Charging Receptacle Rubber Plug Power Select Button Connect Button MURS Band Antenna PATHFINDER GPS Connector PT10U...

Страница 9: ...9 Battery Charging Receptacle Receiver Strap Mic Sensor GPS Antenna Black Antenna Casing LED Indicator Light Contact Points Power Button PATHFINDER GPS Receiver PC10U MURS Band Antenna...

Страница 10: ...10 Battery Charging Receptacle Receiver Strap Mic Sensor GPS Antenna Orange Antenna Casing LED Indicator Light PATHFINDER TRX does not have contact points PATHFINDER TRX GPS Only Receiver PR10U...

Страница 11: ...button until the red LED shows GPS Receiver PC10U PR10U To turn on the GPS receiver press the Power button until the LED turns on To turn off the GPS receiver press the Power button until the LED tur...

Страница 12: ...S connector The PATHFINDER set comes with both parts paired to each other GPS Connector PT10U The Select button is used to turn the connector on off and select a device to pair While turned on press t...

Страница 13: ...smitter or receiver will not come on When the indicator light turns on momentarily but will not stay on when the Constant button is pushed How to Charge 1 Connect the charger to the GPS connector and...

Страница 14: ...d when 0 10 battery Phone When turned on press the Select button to set the GPS connector to Phone When set to Phone a green LED will stay on Hold down the Connect button until the LED blinks rapidly...

Страница 15: ...iPad Generation 3 and above 2 Android Android 4 3 and above Samsung Galaxy S4 and above Note 2 and above and LG G3 Downloading the App Search for Dogtra PATHFINDER in the App Store or in Google Play 5...

Страница 16: ...e restarted for compatibility issues Pairing Additional GPS Receivers Pair the GPS connector and GPS receiver in close proximity to each other You can use the PATHFINDER app to check if the GPS receiv...

Страница 17: ...he signal is acquired the GPS receiver icon will appear on the Map tab of the PATHFINDER app Operating the PATHFINDER near tall buildings and other steel structures will reduce the range of the GPS si...

Страница 18: ...ttom of the Menu to see all the app features such as Map Features Marker History Record File Detail Device List Options Device Sharing Receiving Map Management Offline Custom Map Geo fence App Setting...

Страница 19: ...ntact point extension over the exposed threads flat side down 3 Place the contact points over the extensions and tighten the contact points and extensions clockwise using the adjustment tool with the...

Страница 20: ...will not be consistent and cause the corrections to be inconsistent Dogtra uses medical grade stainless steel contact points and anti microbial plastic to protect the dog s skin Attention Leaving the...

Страница 21: ...ropriate level can be found when your dog responds to the stimulation with a mild reaction such as a tensing of the neck muscles Note Every dog has a different tolerance and reaction to the stimulatio...

Страница 22: ...emove 2 Place the new antenna on the bolt and turn clockwise to tighten the antenna REPLACING THE ANTENNA Open the antenna enclosure by removing the 4 screws and the contact points Remove the screw ho...

Страница 23: ...phone for proper operation preferably less than 33 feet Follow the instructions below to attach the included belt clip to the GPS connector 1 Align the belt clip to the grooves on the back of the GPS...

Страница 24: ...ht up as long as the button is pressed for up to 12 seconds 4 The test light will glow brighter at higher levels of stimulation and dimmer with lower levels USING THE TEST LIGHT Note The test light ma...

Страница 25: ...eled Distance Current Speed Altitude Battery Updated Time and Shared Device My Position When the GPS connector is paired with your phone your current position and tracks will be displayed When viewing...

Страница 26: ...shared will display the shared symbol on the device icon The PATHFINDER TRX receiver is a tracking only receiver that does not have tone or stimulation The PATHFINDER TRX receiver is displayed as a sq...

Страница 27: ...Map tab has multiple map features to help make finding your way around easier Zoom Double tap the map with one finger to zoom in once Single tap the map with two fingers to zoom out once Use two finge...

Страница 28: ...ant locations The marker will be stored in the history file When starting a new Tracking History the previous marker will still be on the map If you tap on the marker you will see the marker delete bu...

Страница 29: ...Directions The Directions function is used to find your way back to your desired destination which can only be marked with one marker You must have the Google Maps application installed in order to s...

Страница 30: ...er will be created When you press the Stop recording button a STOP marker will be created The markers cannot be deleted while the recording is in session You must stop and save the session in order to...

Страница 31: ...e information on the Compass tab Use the View All button to view all dogs and hunters at once Dogs and hunters are not displayed when hidden or offline Metal phone cases or metal objects attached to t...

Страница 32: ...tion levels from 1 to 100 The stimulation level is controlled by the stimulation slider and stimulation increase decrease buttons on the left and right of the slider The stimulation level can be set f...

Страница 33: ...heir distance from you The List view is recommended when training multiple dogs Map view displays selectable dog icons on a mini map The Map view is recommended for long distance recall commands Dogs...

Страница 34: ...Mode button 4 When Nick is selected the receiver emits a single rapid pulse of electrical stimulation When Constant is selected the stimulation will give continuous stimulation as long as the button i...

Страница 35: ...es are displayed on the Device List The dog icons display the dog s current action Device battery life and distance from your location are displayed Selecting a device will display detailed informatio...

Страница 36: ...ce Reorder Reorder how the devices show in the app Press reorder to place the device in sorting mode Hold down the sort button and place the device in the desired position The new order will be used i...

Страница 37: ...p will appear when a device has been successfully shared Device Sharing Press the share button to share and receive GPS connector or receiver devices Both sharing and receiving PATHFINDER users must u...

Страница 38: ...eceived Shared devices can be identified by the shared symbol or and are displayed on the Map and Compass tabs along with the tracks and dog statuses as they update E Collar and updating GPS settings...

Страница 39: ...ce List to go to the device details page The device details displays the total distance traveled current speed ID GPS strength radio frequency strength battery level and shared and hidden statuses Sli...

Страница 40: ...s the channel and the second number is the order Do not use the same ID for additional GPS receivers GPS Rate The GPS update rate can be changed for each device with options for 2 seconds 6 seconds 10...

Страница 41: ...nds to reduce power consumption The rescue mode setting cannot be changed for devices that are shared with you Delete Delete removes the pairing between the GPS receiver and GPS connector or removes f...

Страница 42: ...the edit button History files currently recording cannot be accessed until completed Select completed history files to playback and view details A history file begins recording when the GPS connector...

Страница 43: ...ic time Show Statistics If you press the Statistics button it will show the dog s Status Distance Speed and Altitude at the time it was recorded If you select an item on the list it will not play on t...

Страница 44: ...ected Choose between the following options Google Map Normal Google Map Satellite Google Map Terrain Offline Maps Outdoors Offline Maps Google Normal Offline Maps Google Satellite Offline Maps Google...

Страница 45: ...he offline map area 1 Select the type of map you want to download 2 Navigate to the area you want to download and use the pinch and zoom functions to specify the area 3 Select the area to show a green...

Страница 46: ...er the zip code of the area you want to download 3 The map can be downloaded if the map size is less the storage space of your smartphone Please note that it may take a longer time to download if the...

Страница 47: ...you can see how to create and upload Mbtiles files for use in the PATHFINDER app Creating Mbtiles Files The introduction to Mobile Atlas Creator and Maperitive will go over the differences for each pr...

Страница 48: ...Mobile Atlas Creator can be downloaded from https sourceforge net projects mobac files 2 Unzip the file and run the installation program Window Execution Mobile_Atlas_Creator exe Mac or linux Executi...

Страница 49: ...2 Select the desired area on the map using Drag and Drop 3 Select the Zoom level to save Note Please check the number of image tiles downloaded Downloading more than 10 000 image tiles is not recommen...

Страница 50: ...50 5 Add the selected area to the map in Atlas Content First enter a name in the Name field 4 You can change the name of the file in Atlas Content by right clicking the title and selecting Rename...

Страница 51: ...51 Click the Add Selection button to add the selected region to Atlas Content 6 Click on Atlas in the upper left corner to open the menu and select Convert Atlas format...

Страница 52: ...52 8 Click the Create Atlas button to start creating Mbtiles 7 Select the Mbtiles SQLite file format...

Страница 53: ...53 9 When the creation process is completed you can check the completed file by pressing the Open Atlas Folder button...

Страница 54: ...54 Maperitive can create Mbtiles files from Open Street Maps Maperitive...

Страница 55: ...peritive on OS X download the latet version of Mono from https www xquartz org X11 is already installed on MAC Download from http maperitive net and go to the Applications directory to unzip it From t...

Страница 56: ...56 2 Select the desired map style through Tools Add Web Map 3 Select Map Set Geometry Bounds to select the area to save After selecting an area zoom out to review the selected area...

Страница 57: ...zoom level range minimum and maximum for the desired area into the Command prompt For example if you want to create Mbtiles with a zoom level between 5 and 18 type into the Command prompt generate mbt...

Страница 58: ...er the download is complete follow the path displayed in the Command prompt to see the Mbtiles created For detailed explanations please refer to http maperitive net docs TenMinutesIntro html Using 20T...

Страница 59: ...ectly to your smartphone or upload it to a cloud service and download it via the PATHFINDER app Uploading directly to your smartphone Android 1 Connect your smartphone to a computer using a USB cable...

Страница 60: ...ng to internal storage save Mbtiles in the PATHFINDER CustomMaps folder to skip importing from the PATHFINDER app If the CustomMaps folder is missing create a new folder directly in the PATHFINDER fol...

Страница 61: ...hone iPhone 1 Connect your iPhone to your computer and launch iTunes This guide is based on iTunes version 12 7 0 166 2 Go to the iPhone summary page Click the icon to go to the iPhone summary page Th...

Страница 62: ...62 3 Select File Sharing from the left menu 4 Select PATHFINDER from the File Sharing list...

Страница 63: ...he PATHFINDER opens add the Mbtiles by Drag Drop or the Add button 6 You can see that the Mbtiles files have been added Mbtiles files placed in the PATHFINDER folder via iTunes can be used without imp...

Страница 64: ...Uploading to iCloud iPhone 1 Log in using https www icloud com For detailed login instructions please visit https support apple com en us HT204174 2 On the main page click iCloud Drive 5 UPLOADING FIL...

Страница 65: ...65 3 Upload Mbtiles files using one of the following methods 3 1 Drag drop the Mbtiles file to iCloud Drive 3 2 Click the upload icon at the top of the iCloud page and select the Mbtiles file...

Страница 66: ...66 If you click the icon the following window appears Select the desired Mbtiles file and click Choose to add the file to iCloud 4 When the upload is complete you can see that the file has been added...

Страница 67: ...pbox Add files from the desktop app 1 Install the Dropbox desktop app The latest version can be downloaded from https www dropbox com install 2 When the installation is finished open the Dropbox folde...

Страница 68: ...68 3 Move the desired Mbtiles file to the Dropbox folder Adding files from a web page 1 Log in to Dropbox com...

Страница 69: ...69 2 Click the Upload File button on the top right corner 3 Select the desired Mbtiles file to upload and click Open to add them to Dropbox...

Страница 70: ...70 4 You can also add the files by dragging and dropping them directly into the web browser...

Страница 71: ...n the top left corner then select the Upload File or Folder button Uploading to Google Drive 1 Navigate to drive google com and sign in with your Google account Google accounts can be created at https...

Страница 72: ...pload and click Open or OK to add it to your Google Drive 4 You can also add the files by dragging and dropping them directly into the web browser To learn more about using Google Drive please visit h...

Страница 73: ...o fence points must be created in a clockwise order and cannot intersect A valid Geo fence will be displayed in green while an invalid Geo fence will be displayed in red and cannot be saved Once a val...

Страница 74: ...eed Unit Select between seconds and hours GPS Data The GPS Data Limit sets how far back the tracks are displayed If 2 minutes is selected only the tracks up to 2 minutes will be displayed Select betwe...

Страница 75: ...elect a receiver the alarm will sound for all receivers The options for alerts are pop up vibration and sound which can be turned on and off Sound alerts include 5 melody options and voice Allow Alert...

Страница 76: ...as the Geo fence Geo fence In Out Turn on off alerts used with a saved Geo fence Low Battery Warning Level Setting The battery warning changes the device icon and displays a notification when the devi...

Страница 77: ...the waterproof guarantee on the unit The antenna must be securely in place for maximum range Charge the unit for 3 5 hours before storing for extended periods Charge the unit fully once a month while...

Страница 78: ...ase substantially Keep objects away from touching the GPS connector s antenna as the range may decrease substantially The range indicated is for line of sight flat terrain Heavy brush trees hills buil...

Страница 79: ...frequency RF energy for data communications The device emits RF energy below the published limits when operating in its maximum output power mode and when used with Dogtra Co authorized accessories To...

Страница 80: ...nd Extended Warranties are not transferrable and apply to your Dogtra product only if 1 You are the original retail purchaser of the product 2 You bought the product from a Dogtra Authorized Dealer an...

Страница 81: ...LAIMS ANY IMPLIED WARRANTIES INCLUDING BUT NOT LIMITED TO THE IMPLIED WARRANTIES OF MERCHANTABILITY AND FITNESS FOR A PARTICULAR PURPOSE Limitation of Remedies Dogtra s liability is limited to the cos...

Страница 82: ...seful information and updates about your existing and future Dogtra products To register your product visit www dogtra com product registration If your product is not registered with Dogtra You will b...

Отзывы: