background image

12 


8. USING THE OVEN 

8.1 Warnings and general advice 

When using the oven for the first time, heat it at the maximum temperature for long enough to burn off 
any oily residues left by the manufacturing process, which might contaminate foods with unpleasant 
smells. 

WARNING: the gas oven must be lit with the oven door open. The oven is equipped with a safety system 
that blocks ignition of the burner if the door is closed. If you make a mistake in the lighting procedure, open 

the oven door and wait a few minutes before trying to light it again. 

While cooking desserts and vegetables, condensation from the bottom of the door could occur. This is a 
natural physical phenonmenon which mainly occurs when preheating has not taken place. To avoid this, 
open the door a couple of times while cooking, taking great care. 

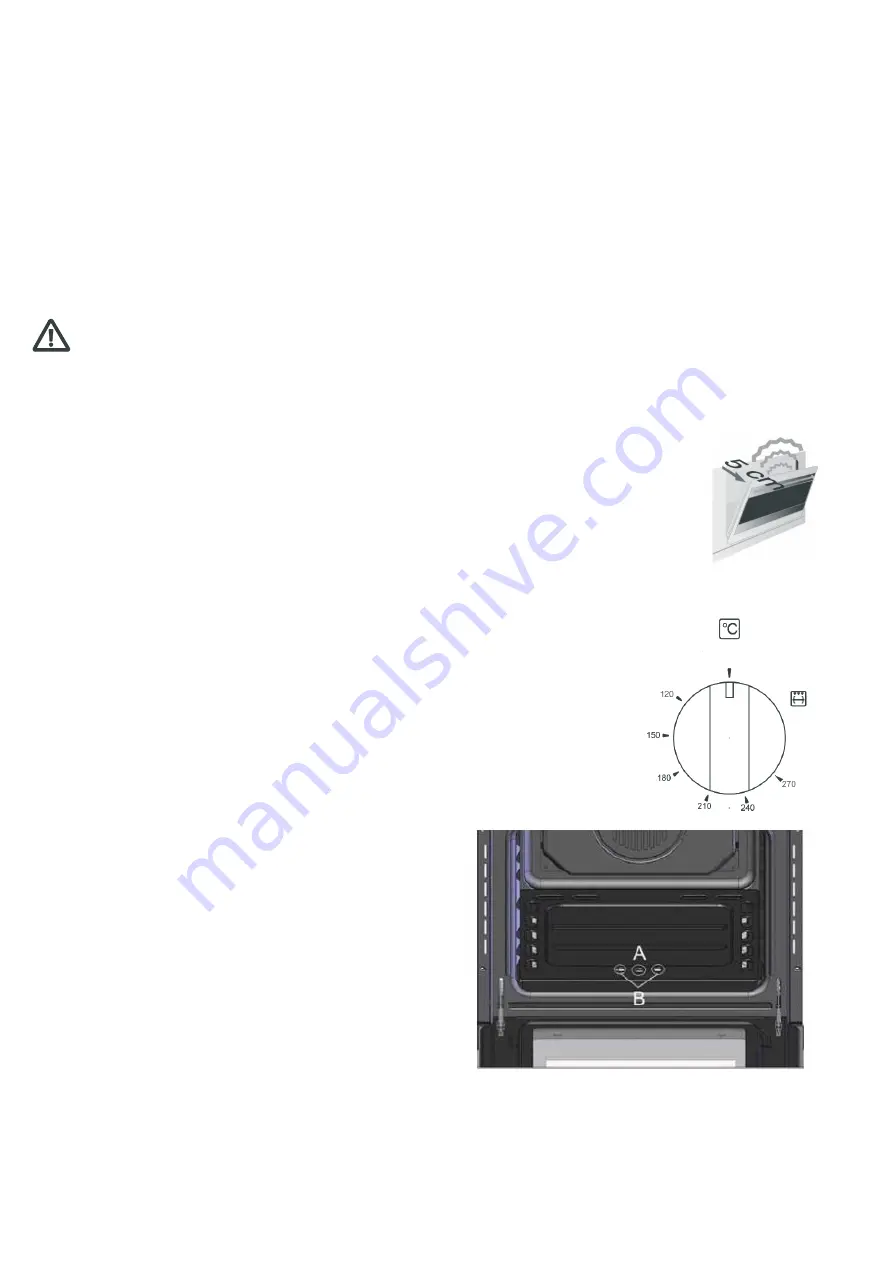
To prevent the steam from the oven creating problems, open the door in two stages – 
approximately 5cm open for 5 seconds, then fully open. Try to minimize the length of 
time the door is open to prevent the temperature in the oven falling and ruining the 
food. 

8.2 Using the gas oven 

Electronic spark ignition 

Open the oven door fully, press the thermostat knob and turn it counter-
clockwise to the maximum temperature. The electrical spark ignition is activated 
automatically. When the oven is lit, keep the knob pressed down for a few 
seconds to allow the thermocouple to heat up. If the burner does not ignite after 
15 seconds, stop the attempt to light it, open the door completely, and wait at 
least 60 seconds before trying to light it again.  

Manual ignition for FS 600-GAS GAS model only 

Open the oven fully and turn the thermostat knob, 
keeping it pressed. Bring a lit match close to the 
mouth of the flame pipe A at the centre of the oven 
surface. Once it is lit, continue keeping the knob 
pressed down for a few seconds to allow the 
thermocouple to heat up. Make sure that it remains lit 
by looking through the inspection hole B. Select the 
cooking temperature by turning the knob clockwise to 
have the desire setting.  


Содержание FS 600-GAS GAS

Страница 1: ...Installation and Operating Instructions Model FS 600 GAS GAS For your convenience we recommend to attach the serial number label HERE 727626092017...

Страница 2: ...by spills when cooking Any breakage or damage of glass items Any damage caused by non recommended product used for cleaning maintaining lubricating or similar Any aspect relating to the installation...

Страница 3: ...e take special note of all detailed technical information and installation instructions It is essential that you follow these instructions to ensure the safety and reliability of this appliance Furthe...

Страница 4: ...erations 9 6 Control panel 10 7 Using the cooking hob 10 8 Using the oven 12 9 Accessories 14 10 Cleaning and maintenance 14 11 Additional maintenance 16 INSTALLATION MUST BE CARRIED OUT BY A QUALIFIE...

Страница 5: ...b Never use pans or griddle plates that extend beyond the outside edge of the hob During use the appliance becomes very hot Take care not to touch the heating elements inside the oven The appliance is...

Страница 6: ...WASTE MATERIALS AND TAKE THEM TO THE NEAREST SELECTIVE WASTE COLLECTION CENTRE INFORMATION FOR USERS Pursuant to Directives 2002 95 EC 2002 96 EC and 2003 108 EC relating to the reduction of the use o...

Страница 7: ...s to the gas pipe Take the expansion with the hook and make an adequate hole in the wall behind at the same height as the chain fixation area Insert the plug into the hole and then screw in the hook u...

Страница 8: ...pe 3 x 1 0mm2 for 60cm models WARNING The values indicated above refer to the cross section of the internal conductor 3 2 Room Ventilation The room containing the appliance should have an air supply i...

Страница 9: ...ection to the gas supply mains must be made so that no stresses or strains of any kind are applied to the appliance The connection can be made using the adapter unit D with two conical elements noting...

Страница 10: ...of burners Injector size in mm Nominal Gas consumption per burner Natural Gas Primary aeration Natural Gas FS 600 GAS GAS Auxiliary 1 0 9 3 96 MJ h Semi Rapid 2 1 16 6 48 MJ h Wok 1 1 75 13 7 MJ h Gr...

Страница 11: ...screw A Push the burner B towards the right until the nozzle is accessible Using a 13 socket spanner replace the nozzle with a new nozzle suitable for the type of gas to be used see section 4 2 Burne...

Страница 12: ...te the safety device 5 2 Adjusting the minimum setting for hob burners LPG In order to adjust the minimum with liquid gas the screw on the side of the tap rod must be fully tightened clockwise all the...

Страница 13: ...djustment is progressive and intermediate positions between the figures can be used The end of the timer does not interrupt the operation of the oven Gas oven thermostat knob This knob lights the gas...

Страница 14: ...open In this case turn the knob to the off position and wait at least 60 seconds before trying to light the burner again 7 2 Practical hints for using the hob burners For better burner efficiency and...

Страница 15: ...n for 5 seconds then fully open Try to minimize the length of time the door is open to prevent the temperature in the oven falling and ruining the food 8 2 Using the gas oven Electronic spark ignition...

Страница 16: ...rate the gas oven and the grill rotisserie at the same time Once the oven is turned on leave it to heat up for 5 minutes before placing foods inside Use the oven tray to collect any cooking juices The...

Страница 17: ...pizza and baked desserts Chromium plated gripper useful for removing hot racks and plates Note not all accessories are provided on some models 10 CLEANING AND MAINTENANCE Before performing any operati...

Страница 18: ...er caps and flame spread crowns For easier cleaning the burner caps and the flame spread crowns can be removed Wash them with warm water and a non abrasive detergent making sure to remove any encrusta...

Страница 19: ...ermostat Over time the gas taps and the gas oven thermostat may become blocked and difficult to turn Clean them internally and replace the lubrication grease This operation must be carried out by a sp...

Страница 20: ...he door seal To allow thorough cleaning of the oven the seal may be removed Before removing the seal remove the door as described above Once the door has been removed lift the tabs at the corners as s...

Отзывы: