


41
GB
MT
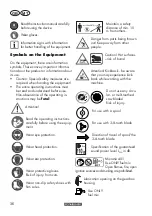
Protective measures against
kickbacks
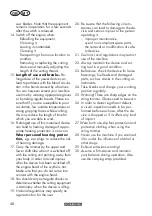
In the event of a kickback, the
operator will feel a powerful
blow from the petrol-powered
trimmer. This may lead to lo-
sing control of the device and
serious injury. You can avoid
kickbacks through caution
and proper technique.
While working with the 3- or 4-tooth bla-
de there is a risk of kickback if the blade
edge hits an obstacle (stone, wood).
• Hold the device with both hands.
• Make sure there are no obstacles on the
ground and do not use the 3- or 4-tooth
blade near fences, metal posts or similar.
Use only properly
sharpened tools. To
cut thick stems, switch
the device to position
A.
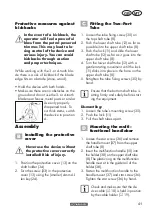
Assembly
Installing the protective
cover
Never use the device without
the protective cover correctly
installed! Risk of injury.
1. Position the protective cover (13) on the
shaft holder (34).
2. Turn the screw (33) in the protective
cover (13) using the (smaller) 4-mm Al-
len key (24).
Fitting the Two-Part
Tube
1. Loosen the tube fixing screw (35) on
the top shaft tube (8).
2. Push the lower shaft tube (12) as far as
possible into the upper shaft tube (8).
3. Push the lock (11) and slide the lower
shaft tube (12) as far as it goes into the
upper shaft tube (8).
4. Turn the lower shaft tube (12) with a
gentle rotating movement until the lock
(11) clicks into place in the bore on the
upper shaft tube (8).
5. Retighten the tube fixing screws (35) by
hand.
Ensure that the bottom shaft tube is
sitting firmly and safely before start
-
ing the equipment.
Dismantling:
1. Loosen the tube’s mounting screw (35).
2. Push the lock (11).
3. Pull the shaft tubes apart.
Mounting the multi-
functional handlebar
1. Loosen the star screw (36) and remove
the handle mount (37) from the upper
shaft tube (8).
2. Insert the multifunction handle (10) into
the holder (38) on the upper shaft tube
(8). The plastic ring on the multifunction
handle must sit in the guide rail of the
holder (38).
3. Fasten the multifunction handle to the
handle mount (37) and star screw (36).
Tighten the star screw (36) by hand.
Check and make sure that the de-
vice cable (
A
18) is held in position
by the cable holder (
A
19).
Содержание PBS 2 D4
Страница 4: ...D C E G H 8 40 42 15 41 41 16 43 43 28 9 9 40 F 12 11 10 20 21 22 39 8 35 36 38 8 7 27 26 37 4 3...
Страница 310: ...310 SI...
Страница 361: ...361 BG 16 3 2 x 4 mm 5 mm 500 ml 3 4...
Страница 364: ...364 BG 2 1182 86 g kWh 15 m...
Страница 365: ...365 BG 3 4 3 4 LWA dB 40 1 4 3 4x 2 3 1 1...
Страница 366: ...366 BG 2 3 4 5 6 7 8 9 10 11 12 13...
Страница 367: ...367 BG 14 15 16 17...
Страница 368: ...368 BG 1 2 3 4 5 6 7 8 9 15 m...
Страница 369: ...369 BG 15 16 17 18 19 20 10 11 12 13 14...
Страница 370: ...370 BG 21 22 23 24 25 26 27 28 29 30 3 4 3 4 1 13 34...
Страница 372: ...372 BG 4 15 cm 52 53 54 3 4 2 3 29 4 30 51 3 52 53 54 54 23 4 25 14 3 m...
Страница 374: ...374 BG 28 3 1 A 14 3 4 56 2 3 20 4 4 5 6 A 5 6 8 3 3 4 7 21 22 8 21 22 9 20 1 20 2 4 3 8 3 4 20...
Страница 375: ...375 BG 15 cm 20 cm 1 58 9 4 24 58 2 9 8...
Страница 376: ...376 BG 3 58 30 15 cm 1 2 A 13 A 14 3 4...
Страница 377: ...377 BG A 2 1 2 3 51 25 5 mm 15 51 4 15 41...
Страница 378: ...378 BG 15 5 16 15 42 6 16 15 15 42 43 7 15 51 25 8 9 15 cm 1 2 3 51 25 5 mm 4 3 29 4 30 51 5 52 53 54 6 25...
Страница 379: ...379 BG 1 55 2 56 1 55 1 2 44 6 6 45 3 46 45 4 46 46 45 46 5 6 45 6 6 45 7 6 44 1 2 2 47 3 47 23 4 0 6 0 7 mm 5 47 6 47...
Страница 380: ...380 BG 7 47 47 TORCH L8RTC 8 2 1 2 14 13 3 14 4 14 13 1 39 2 7 3 48 4 5 7 39 4 mm 16 mm M 2 4 mm 6 m...
Страница 381: ...381 BG 1 49 16 2 50 16 3 m 10 1 57 25 2 5 g 3 57 A 2...
Страница 382: ...382 BG 10 20 A 31 32 A 19 A 18 3 1 7 2...
Страница 383: ...383 BG 3 5 3 4 J 47 A 23 5 2 6 J 47 A 2 A 8 12 A 31 32 2012 19...
Страница 385: ...385 BG 3...
Страница 387: ...387 BG w...
Страница 389: ...GR 389 16 3 2 x Allen 4 mm 5 mm 500 ml 3 4...
Страница 392: ...GR 392 15 m...
Страница 393: ...GR 393 3 4 3 4 LWA dB 40 1 4 3 4x 2 3 1 1 2...
Страница 394: ...GR 394 3 4 5 6 7 8 9 10 11 12 13...
Страница 395: ...GR 395 14 15 16 17 online...
Страница 396: ...GR 396 1 2 3 4 5 6 7 8 9 15 m 10 11 12...
Страница 397: ...GR 397 13 14 OFF 15 16 17 18 19 20 21 22 23 24 25 26...
Страница 398: ...GR 398 1 13 34 2 33 13 4 mm 24 1 35 8 2 12 8 3 11 12 8 4 12 11 8 5 35 27 28 29 30 3 4 3 4 A...
Страница 400: ...GR 400 14 3 m 1200 ml 3 40 1...
Страница 402: ...GR 402 3 4 56 2 3 20 4 4 5 6 x A 5 6 8 3 3 4 x 7 21 22 8 21 22 9 20 1 20 2 4 3 8 3 4 20...
Страница 403: ...GR 403 15 cm 20 cm 1 58 9 Allen 4 mm 24 58 2 9 8 3 58 30 15 cm...
Страница 404: ...GR 404 1 2 A 13 A 14 3 4...
Страница 405: ...GR 405 A 2 1 2 3 51 Allen 25 Allen 5 mm 15 51 4 15 41 15 5 16 15 42 6 16 15 15 42...
Страница 406: ...GR 406 43 7 15 51 Allen 25 8 9 15 cm 1 2 3 51 Allen 25 Allen 5 mm 4 3 29 4 30 51 5 52 53 54 6 Allen 25 1 55 2 56 1 55...
Страница 408: ...GR 408 1 2 14 13 3 14 4 14 13 1 39 2 7 3 48 4 5 7 39 4 mm 16 mm M 2 4 mm 6 m 1 49 16 2 50 16 3 m 10 1 57 Allen 5 mm 25 2...
Страница 409: ...GR 409 5 g 3 57 A 2 10 20...
Страница 410: ...GR 410 10 20 A 31 32 A 19 A 18 3 1 7 2 3 5 3 4 J 47 A 23 5 2 6 J 47...
Страница 411: ...GR 411 A 2 A 8 12 A 31 32 2012 19...
Страница 413: ...GR 413 3 IAN 420340_2207...
Страница 415: ...GR 415...
Страница 434: ...J 44 7 39 48 6 45 46 44 2 14 13 49 16 50 M 47 2...
Страница 435: ...51 52 23 52 53 53 15 54 30 29 54 25 57 25 55 56 55 55 24 9 58 8 20 cm 13...


