background image

www.paramondo.de

77

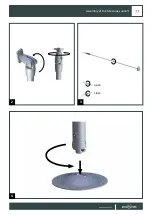
Assembly of the telescope support  

2

3

4

open

close

Содержание Summer Lite

Страница 1: ...Summer Lite offene Gelenkarmmarkise nach Ma V3 01 01 2023 Eine aktuelle Version dieser Anleitung finden Sie auf https www paramondo de bedienungsanleitung A current version of these instructions can b...

Страница 2: ...36 37 Montage der Teleskopst tzen 38 39 Leistungserkl rung 40 41 Kontaktinformationen letzte Seite DE Safety instructions 42 47 Disposal considerations 47 48 Consumer information 49 50 Wind resistanc...

Страница 3: ...ellen bertragung der Markise an Dritte an den neuen Besitzer weitergegeben werden Warnsymbole Sicherheitshinweise und wichtige Informati onen sind an entsprechender Stelle zu fin den und mit einem Sym...

Страница 4: ...d ausgew hlt und nach den Erfordernissen der Anlage und des Monta geuntergrundes abgestimmt werden Hierbei sind die Angaben zu den erforderli chen D belauszugskr ften zwingend einzu halten Nach der Ri...

Страница 5: ...rschutz etc Wenn mehrere Personen an der Anlage arbeiten m ssen deren Arbeiten koordiniert werden Der Arbeitsbereich unter der Markise muss abgesperrt und gesch tzt werden damit Personen nicht ungesc...

Страница 6: ...n Konsolen zu ver wenden ebenso m ssen die Konsolen an allen erforderlichen bzw angegebenen Be festigungspunkten montiert werden Vorschriften f r den Monteur und Anwender Arbeiten Montage Wartung an d...

Страница 7: ...iten im spannungsfreien Zu stand aus Verwenden Sie niemals defekte oder besch digte Ger te Pr fen Sie Motor und Netzkabel auf Unver sehrtheit WARNUNG Der Motor muss w hrend der Reinigung Wartung und d...

Страница 8: ...handen sein Als Trennvorrichtung gelten Schalter mit einer Kontakt ffnungsweite von mindestens 3 mm z B LS Schalter Sicherungen oder FI Schalter ACHTUNG Folgende Installationshinweise unbe dingt beach...

Страница 9: ...b stanzen haben m glicherweise negative Auswirkungen auf Gesundheit und Umwelt daher tragen auch die Anwender von Elek troprodukten und Batterien Verantwortung bei der Wiederverwertung dieser Abfallst...

Страница 10: ...ck nahmesystem angebunden sind k nnen wir auf den Erf llungsgrad der Recycling Betriebe verweisen Diese Informationen finden Sie auf unserer Webseite Unsere Registrierungsnummern Reg Nr WEEE DE 41060...

Страница 11: ...nd die Gebrauchstauglichkeit der Markise nicht Um Irritationen zu vermeiden wollen wir Sie im Rahmen der Verbrauchraufkl rung auf die nachstehenden Eigenschaften ausdr ck lich hinweisen Knickfalten En...

Страница 12: ...rden muss die Markise sp ter zum Trocknen wie der ausgefahren werden um Stockflecken zu vermeiden Weitere Informationen zu Eigenschaften von Markisent chern sowie die wichtigsten Anwendungenf lle zum...

Страница 13: ...werden In nachfolgender Tabelle sind die Windwi derstandsklassen gem DIN EN 13561 den bekannten Windst rken nach Beaufort zuge ordnet Gebrauch von Markisen in windreichen Gegenden Bei der Verwendung...

Страница 14: ...ht unterschieden ob die Schraube samt D bel aus der Wand kommt die Schraube bricht oder das Mauerwerk versagt Die Auszugskr fte sagen aus wie stark die Schraube und oder der D bel auf Zug bean sprucht...

Страница 15: ...t und evtl Besch digungen Unvollst ndige besch digte oder nicht den Angaben Bestellungen entsprechende Produkte d rfen nicht in Betrieb genommen werden Ggf fehlende Teile Besch digungen oder nicht der...

Страница 16: ...lz oder Stahlger sten Z unen u montiert worden sind schlie en wir die gesetzliche Gew hrleistung ausdr cklich aus F r Markisen die nicht sach und fachgerecht montiert worden sind schlie en wir ebenfal...

Страница 17: ...Platzierung der Halter 210 300 x 160 cm 30 30 L L 2 265 300 x 210 cm 20 20 L L 2 301 400 x 160 cm 30 30 L L 2 301 400 x 210 cm 17 5 17 5 L L 2 315 400 x 260 cm 20 20 L L 2 365 400 x 310 cm 20 20 L L 2...

Страница 18: ...zierung der Halter 401 500 x 210 cm 30 30 L L 2 401 500 x 260 cm 30 30 L L 2 401 500 x 310 cm 12 5 12 5 L L 2 501 600 x 160 cm 30 155 155 30 155 155 155 155 155 155 501 600 x 210 cm 30 30 501 600 x 26...

Страница 19: ...der Konsolen miteinander ben tigt und d rfen nicht als Befestigungspunkte an Wand oder Decke verwendet werden da sich dadurch die Achsabst nde der Anker ver ndert was zu einer unzureichen den Festigk...

Страница 20: ...20 www paramondo de Wandmontage 4 Die Konsolen m ssen exakt ausgerichtet werden da ansonsten das folgende Einh ngen des Markisen Tragrohres nicht m glich ist 6 5 7...

Страница 21: ...en Sitz aller Konsolen Achten Sie auf einen festen Stand der Aufstiegshilfen und darauf dass sich keine Personen unterhalb der Markise befinden Markise in die Konsolen einh ngen Mindestens 2 Personen...

Страница 22: ...22 www paramondo de Wandmontage 11 12 13...

Страница 23: ...3 Wandmontage Setzen Sie die Unterlegscheibe und die Schraubenmutter auf die Schraube und ziehen Sie diese an Sollten Sie eine Markise mit Motor haben fahren Sie bitte hier mit der Anleitung des Motor...

Страница 24: ...www paramondo de Optional Deckenmontage 1 Es ist f r die Deckenhalterung unerheblich welche Bohrl cher genau Sie nutzen Wichtig ist dass sie jeweils die schr g gegen berliegenden L cher verwenden 2 3...

Страница 25: ...www paramondo de 25 Optional Deckenmontage 5 6 7 8...

Страница 26: ...26 www paramondo de Optional Deckenmontage 9 12 13 Sollten Sie eine Markise mit Motor haben fahren Sie bitte hier mit der Anleitung des Motors fort 10 11...

Страница 27: ...enden Seiten erkl rt Sollte Ihr Ausfallprofil nicht in Waage sein obwohl der Neigungswinkel auf beiden Seiten gleich eingestellt ist schauen Sie in das folgende Kapitel Die 5 Neigungswinkel sind wie f...

Страница 28: ...ngswinkel einstellen Grundeinstellung Entfernen Sie die Abdeckkappen der Armhalter auf beiden Seiten der Markise L sen Sie die beiden Schraubenmuttern mit einem Schraubenschl ssel Gr e 17 mm mit max 2...

Страница 29: ...sen Sie die Schraube mit dem Inbusschl ssel Gr e 4 mm vollst ndig L sen Sie die untere Schraubenmutter mit einem Schraubenschl ssel Gr e 17 mm vollst ndig und entfernen Sie die Mutter und die Unterle...

Страница 30: ...e Loch des festen Bereiches des Armhalters auf beiden Seiten der Markise aus indem Sie die vordere Stange nach oben unten bewegen Fester Bereich des Armhalters Beweglicher Bereich des Armhalters 15 Se...

Страница 31: ...auf die untere Schraube Schrauben Sie anschlie end die Schraubenmutter mit max 4 Umdrehungen wieder an 19 20 Ziehen Sie die Schraube mit dem Inbusschl ssel Gr e 4 mm an bis Sie einen Widerstand sp re...

Страница 32: ...darauf dass die Armhalter fest sitzen 24 25 26 Die zweite Person kann nun das Ausfallprofil loslassen absenken berpr fen Sie ob das Ausfallprofil in Waage ist Sollte dies nicht der Fall sein fahren S...

Страница 33: ...lett ausgefahrener Markise einstellen Eine zweite Person muss das Ausfallprofil entlasten anheben Entfernen Sie die Abdeckkappen der Armhalter auf der Seite der Markise an der Sie den Neigungswinkel k...

Страница 34: ...ie die Schraubenmuttern mit einem Schraubenschl ssel Gr e 17 mm mit max 2 Umdrehungen 5 Stellen Sie den Neigungswinkel des Arms ein indem Sie die Schraube in die entsprechende Richtung drehen Verwende...

Страница 35: ...chl ssel an und achten Sie darauf dass die Armhalter fest sitzen Die zweite Person kann nun das Ausfallprofil loslassen absenken berpr fen Sie ob das Ausfallprofil in Waage ist Sollte dies nicht der F...

Страница 36: ...tor eingebaute Getriebe nur f r Notf lle ausgelegt und eine dauerhafte Bedienung der Markise mit der Nothandkurbel nicht zul ssig ist Nach einer Bedienung mit der Nothandkurbel muss die Markise mit de...

Страница 37: ...www paramondo de 37 Montage des Regenschutzdaches 3 4 5...

Страница 38: ...pst tzen vom Ausfallprofil gel st werden Beachten Sie au erdem dass die Sonnen Windsteue rung unbedingt deaktiviert ist bei der Benutzung der Teleskopst tzen Es kann sonst zu k rperlichen oder baulich...

Страница 39: ...www paramondo de 39 Montage der Teleskopst tzen 2 3 ffnen schlie en 4...

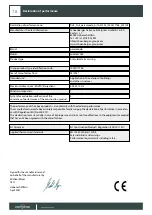
Страница 40: ...SGE_paramondo_ArtA_M2M_1000017786_202104 Hersteller Kontaktinformationen Schoenberger Germany Enterprises GmbH Co KG Zechstr 1 7 82069 Hohensch ftlarn Tel 49 0 8178 932 932 info schoenberger group com...

Страница 41: ...fo schoenberger group com www schoenberger group com Marke paramondo Produkttyp Vollkassettenmarkise nach Ma mit Motorantrieb Modellbezeichnung Summer Lite Produkt Identifikations Code 1000017786 Bauj...

Страница 42: ...new owner in the case of the awning being sold to a third party Warning symbols Safety notices and important information are placed in the corresponding locations and must be marked with a symbol This...

Страница 43: ...chor pull out forces According to the Directive for technical advice sale and installation of folding arm awnings BKTex Directive Section 3 8 dowels that are used to anchor folding arm awnings must ha...

Страница 44: ...ting check that all movable com ponents are seated securely in their bearings and brackets supporting tube fabric roller joints brackets and ensure that the articula ted brackets cannot move uncontrol...

Страница 45: ...lead to damage to the awning and accidents Once the fitting company has obtained knowledge of the location and fitted the awning they explain to the user if the wind resistance class stated by the ma...

Страница 46: ...must be constantly available at the place of installati on for electrical connection The mains cable must always be replaced by the manufacturer its customer service or similarly qualified person to p...

Страница 47: ...WN command simulta neously Movable components of motors that are operated below a height of 2 5 m above ground must be protected The winding shaft must be fitted in a hori zontal position If the fabri...

Страница 48: ...oducts are professionally recycled via these local facilities This reduces the amount of waste to the benefit of the e vironment For registration data of other European countries see Contact Informati...

Страница 49: ...arks in the cloth that sometimes get complained about that are impossible to prevent despite sophistica ted production and processing technology Such markings do not lessen the value and usability of...

Страница 50: ...angle of 15 The awning must not be opened or retrac ted during prolonged and or heavy rainfall to prevent damage If the cloth has become wet the awning must be extracted to dry to prevent mould stains...

Страница 51: ...The following table shows the wind resistan ce classes in accordance with DIN EN 13561 and their allocated wind forces according to Beaufort Use of awnings in windy regions When using motorised awnin...

Страница 52: ...election of the most suitable fixing material depends on the type of fitting base and its physical condition The fitter is responsible for checking the fitting base prior to fitting the awning The scr...

Страница 53: ...e and free from damage Incomplete or damaged products or products that do not correspond with the specifications orders may not be taken into operation Any missing components damage or products that d...

Страница 54: ...r awnings which contrary to the above have not been mounted on one of the above mentioned bases e g wooden or steel scaffolding fences etc We also expressly exclude the statutory warranty for awnings...

Страница 55: ...itioning of the brackets 210 300 x 160 cm 30 30 L L 2 265 300 x 210 cm 20 20 L L 2 301 400 x 160 cm 30 30 L L 2 301 400 x 210 cm 17 5 17 5 L L 2 315 400 x 260 cm 20 20 L L 2 365 400 x 310 cm 20 20 L L...

Страница 56: ...Teleskopst tzen 401 500 x 210 cm 30 30 L L 2 401 500 x 260 cm 30 30 L L 2 401 500 x 310 cm 12 5 12 5 L L 2 501 600 x 160 cm 30 155 155 30 155 155 155 155 155 155 501 600 x 210 cm 30 30 501 600 x 260...

Страница 57: ...d as fastening points on the wall or cei ling as this changes the center distance of the anchors which can lead to insufficient strength of the mounting surface Assembly of the awning 2 1 Wall assembl...

Страница 58: ...58 www paramondo de Wall assembly 4 6 5 7 Align the console accurately otherwise it is impossible to mount the supporting tube of the awning...

Страница 59: ...ailable Prior to mounting the awning check all of the screw connections again especially that all of the consoles are fixed securely Ensure that the climbing aid is placed securely and that no persons...

Страница 60: ...60 www paramondo de Wall assembly 11 12 13...

Страница 61: ...www paramondo de 61 Wall assembly Place the washer and nut on the screw and tighten If you have a motorised awning please continue here with the motor instructions 14 15 16 17...

Страница 62: ...62 www paramondo de Optional ceiling assembly 1 2 3 4 It is irrelevant for the ceiling mount which drill holes you use The main thing is that you utilize the diagonally opposite holes...

Страница 63: ...www paramondo de 63 Optional ceiling assembly 5 6 7 8...

Страница 64: ...64 www paramondo de Optional ceiling assembly 9 12 13 10 11 If you have an awning with motor please continue with the motor instructions here...

Страница 65: ...plained on the following pages If your front profile is not level although the angle of inclination is set the same on both sides please refer to the follo wing chapter The 5 angles of inclination are...

Страница 66: ...66 www paramondo de Set the angle of inclination basic setting 7 8 Remove the covers of the arm handles on both sides of the awning Loosen both nuts with a spanner size 17mm with max 2 turns 3 4 5 6...

Страница 67: ...Set the angle of inclination basic setting 13 14 Fully loosen the screw with hex key size 4 mm Fully loosen the bottom nut with spanner size 17 mm and remove the bottom nut and washer Pull out the bot...

Страница 68: ...able part of arm handle with the desired hole of the fixed part of arm handle on both sides of the awning moving up down the front bar Fixed part of arm handle movable part of arm handle Insert the sc...

Страница 69: ...nclination basic setting Put the washer on the bottom bolt Then screw the nut back on with a maximum of 4 turns Tighten the screw with the hex key size 4 mm until you will feel resistance The screw No...

Страница 70: ...spanner again Make sure the arm holders are firmly seated The second person can now release lower the front profile Check whether the front profile is level If this is not the case conti nue with sett...

Страница 71: ...ilt angle with a fully extended awning A second person must take the load of lift the front profile Remove the cover caps from the arm holders on the side of the awning on which you want to correct th...

Страница 72: ...usting the inclination angle 5 6 7 8 9 Loosen the nuts with a spanner size 17mm with max 2 turns Adjust the angle of inclination of the arm by turning the screw in the appropriate direction Use a hex...

Страница 73: ...oth nuts with spanner again Make sure the arm holders are firmly seated The second person can let go of the front profile lower it Check the level of the front profile If it is not in balance repeat t...

Страница 74: ...eli very in an emergency e g power cut Please note that the gears inside the motor is only designed for emergencies and it is not permitted to operate the awning with the manual emergency crank on a p...

Страница 75: ...www paramondo de 75 Assembly of the rain cover 3 4 5...

Страница 76: ...eased from the front rail before retracting the motorized awnings Please also note that the sun and wind sensor needs to be deactivated when using the telescope supports Otherwise it can lead to physi...

Страница 77: ...www paramondo de 77 Assembly of the telescope support 2 3 4 open close...

Страница 78: ...00017786_202104 Manufacturer Contact Information Schoenberger Germany Enterprises GmbH Co KG Zechstr 1 7 82069 Hohensch ftlarn Tel 49 0 8178 932 932 info schoenberger group com www schoenberger group...

Страница 79: ...p com www schoenberger group com Brand paramondo Product type Articulated arm awning with motor drive Model Summer Lite Product type identification code 1000017786 Year of manufacture from 04 2021 Int...

Страница 80: ...m the delivered goods Errors excepted No liability is assumed for printing errors Our general terms and conditions apply EU Waste and recycling Registrations Germany for electrical devices Stiftung EA...

Отзывы: