background image

1752 and 1754 SHDSL Router User’s Guide 

Quick Setup page 

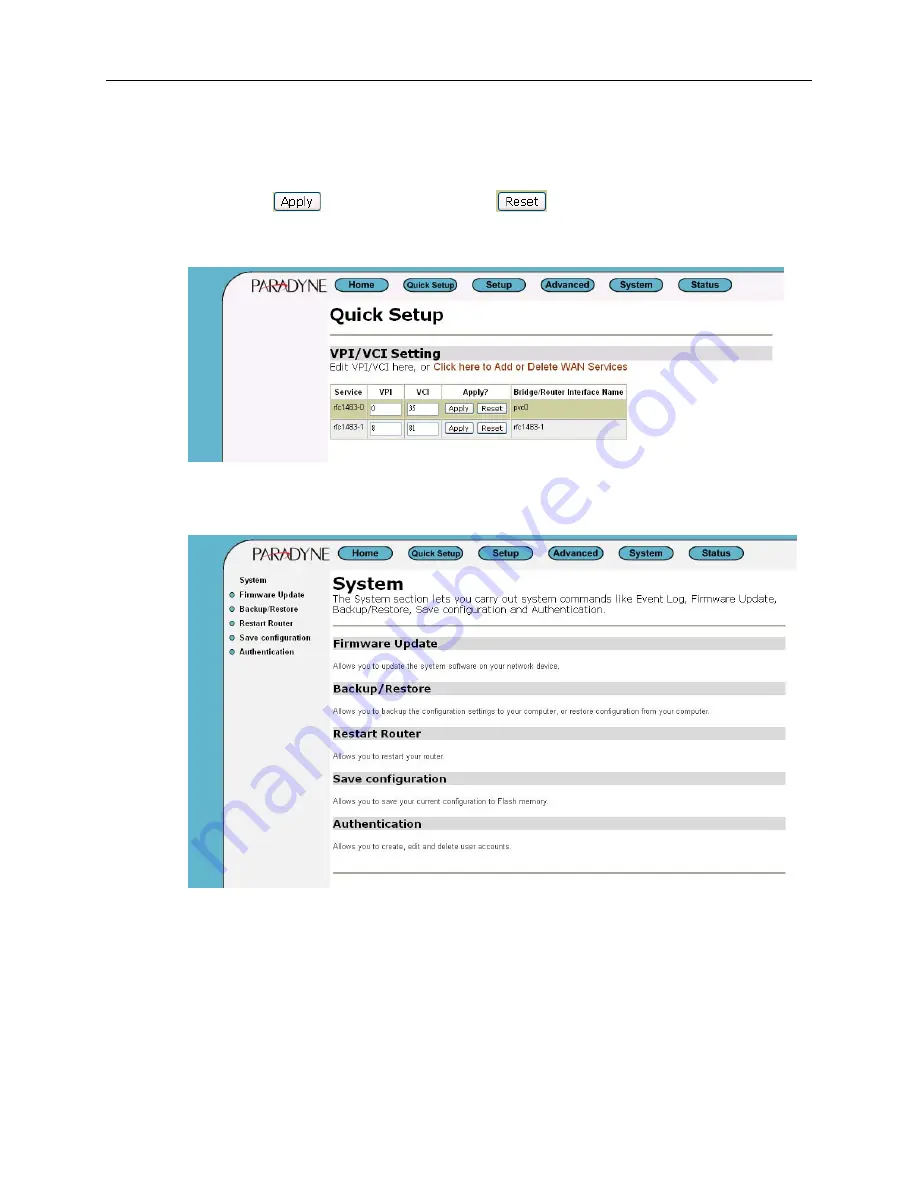
The Quick Setup will guide you to configure virtual circuits in this device. To set VPI/VCI: 

1.  Enter the VPI and VCI for each service listed.  

2. Click 

on 

 to submit your settings or 

 to clear your settings.  

3.  If to create or delete WAN services, click on the 

Click here to Add or Delete WAN 

Services

 link

.


System Pages 

Click on 

System

, and the following screen appears: 


The System menu includes Firmare Update, Backup/Restore, Restart Router, Save 
configuration, and Authentication.  

48                                                                              June 2005                                                              1752-A2-GB20-00 

Содержание 1752 SHDSL

Страница 1: ...1752 and 1754 SHDSL Routers User s Guide Document Number 1752 A2 GB20 00 June 2005...

Страница 2: ...training distributor locations or Paradyne worldwide office locations use one of the following methods Internet Visit the Paradyne World Wide Web site at www paradyne com Be sure to register your warr...

Страница 3: ...nomenon exists and if necessary implement corrective action prior to interconnecting the products 7 Input power to this product must be provided by one of the following 1 a UL Listed CSA certified pow...

Страница 4: ...provide reasonable protection against harmful interference when the equipment is operated in a commercial environment This equipment generates uses and can radiate radio frequency energy and if not in...

Страница 5: ...one of the following methods Internet Visit the Paradyne World Wide Web site at www paradyne com Be sure to register your warranty at www paradyne com warranty Telephone Call our automated system to r...

Страница 6: ...Features 9 Applications 10 Specifications 10 Chapter 2 Hardware Setup and Startup 12 Front Panel LED and Rear Panel description 12 DSL Connectors Description 13 Restore Factory Defaults Reboot Button...

Страница 7: ...t Log 32 Setup pages 33 WAN Connection 33 LAN Setup 35 LAN connections 36 DHCP Server 38 DHCP Relay 42 DNS Client 43 DNS Relay 43 SNTP Client 45 Quick Setup page 48 System Pages 48 Firmware Update 49...

Страница 8: ...1752 and 1754 SHDSL Router User s Guide Chapter 4 Diagnostic and Troubleshooting 86 8 June 2005 1752 A2 GB20 00...

Страница 9: ...ymmetric data rates up to 5 69 Mbps 11 38 Mbps or 22 76 Mbps over 2 wire 4 wire or 8 wire connections respectively Features Rate and Reach Improvements Symmetric transmission rate is up to 5704 kbps 1...

Страница 10: ...ssion rate up to 5704 kbps on 2 wire Transmission rate up to 11408 kbps on 4 wire Transmission rate up to 17112 kbps on 6 wire Transmission rate up to 22816 kbps on 8 wire Maintenance Firmware upgrade...

Страница 11: ...outing mode optional Supports ATM over G SHDSL bis and G SHDSL Supports 8 PVCs Supports IGMP Snooping Supports Port based VLAN VPN pass through IPSec and L2TP LED LED indicator power DSL links Alarm E...

Страница 12: ...tions show the front panels of the 2 wire and 4 wire routers Figure 2 1 2 Wire 1752 Front Panel LEDs Figure 2 2 4 wire 1754 Front Panel LED LED Usage PWR Power Indicator DSL DSL loop activity On unit...

Страница 13: ...Connected to loops 1 through 4 FG Connected to ground wire DSL Connectors Description DSL Connectors on back of the unit are RJ11 sockets RJ11 uses a 6 position connector and cable Two wire pairs are...

Страница 14: ...Ds blink very quickly release the Reset button The reset fails if you hold the button in too long 5 Save the current configuration again to overwrite your previous user configuration This is a so call...

Страница 15: ...the SHDSL router Connect the other end of the cable into the Ethernet Network Interface Card NIC in your PC Connect up to four Ethernet devices to the router Use a crossover cable for a hub 3 Connect...

Страница 16: ...Ethernet cable into one of the LAN ports marked LAN on the back of the SHDSL router Connect the other end of the cable into the Ethernet Network Interface Card NIC in your PC Connect up to four Ethern...

Страница 17: ...click on the Start button and then click on Control Panel 2 Double click on the Network Connections icon 3 In the LAN or High Speed Internet window right click on the icon corresponding to your networ...

Страница 18: ...ox click in the radio button labeled Use the following IP address and type 192 168 1 x where x is any number between 3 and 254 in the IP Address field Type 255 255 255 0 in the Subnet Mask field 6 Cli...

Страница 19: ...the new settings 10 After restarting your PC double click on the Network and Dial up Connections icon in the Control Panel 11 In Network and Dial up Connections window right click on the Local Area Co...

Страница 20: ...llowing IP address and type 192 168 1 x where x is any number between 3 and 254 in the IP Address field Type 255 255 255 0 in the Subnet Mask field 15 Click on twice to confirm and save your changes a...

Страница 21: ...s a list of currently installed network protocols If the list includes TCP IP the protocol has already been enabled in which case you can skip to Step 12 5 If TCP IP does not appear as an installed co...

Страница 22: ...menu select System Preferences 2 Click on the Network icon 3 In the Network window choose the item that corresponds to your Ethernet interface from the Show drop down list 4 Select Manually from the C...

Страница 23: ...he item that corresponds to your Ethernet interface from the Connect via drop down list 3 Select Manually from the Configure drop down list 4 Type an address between 192 168 1 3 and 192 168 1 254 in t...

Страница 24: ...RL http 192 168 1 1 2 A login box is displayed Enter the default User Name and Password User Name admin Password admin 3 Click on You are now ready to configure the router using EmWeb About EmWeb page...

Страница 25: ...ion and Authentication Status Provides information about the current setup and status of the system The exact information displayed on each web page depends on the specific configuration that you are...

Страница 26: ...e status of the bridge router interfaces or routing table is displayed Physical port connection status If to view or change a physical port configuration select a port to see configuration information...

Страница 27: ...change advanced configuration settings for the SHDSL port click on View advanced attributes The SHDSL Port Configuration page is displayed Shdsl is the default port name You can configure SHDSL param...

Страница 28: ...1752 and 1754 SHDSL Router User s Guide 28 June 2005 1752 A2 GB20 00...

Страница 29: ...ion WirePair1 1 WirePair2 1 2 WirePair3 1 2 3 WirePair4 1 2 3 4 DSL 1 2 3 4 3 To set the maximum and minimum line rate input the Max Line Rate and Min Line Rate respectively where values range from 19...

Страница 30: ...dvanced attributes The Advanced Eth1 Port Configuration page is displayed 3 Update the port attributes that are available for editing then click on to update the advanced configuration or to revert ba...

Страница 31: ...r Interfaces select a specified interface to invoke the status page The following figure shows the statistics on the interface rfc1483 0 under SHDSL port configuration page Click to configure WAN conn...

Страница 32: ...k on Event Log to display the Event Log screen This page displays a table containing all configuration errors experienced by the router during the current session The table also tells you All Events S...

Страница 33: ...o configure 1 LAN connections 2 DHCP Server 3 DHCP Relay 4 DNS Client 5 DNS Relay 6 SNTP Client WAN Connection This screen allows you to create and configure WAN connections for your router You can al...

Страница 34: ...connections page is displayed The table now contains details of the service that you have just created Editing a WAN service 1 Click on the Edit link for a specific service The WAN connection edit pag...

Страница 35: ...rface routed services only 1 Click on the Virtual I f link for a specific service The Virtual interface page is displayed 2 Click on the Create a new virtual interface hyperlink On the Create virtual...

Страница 36: ...ddress Create virtual interfaces Multiple virtual interfaces can be associated with the existing primary LAN interface From the Configuration menu click on LAN connections The following page is displa...

Страница 37: ...in your web browser Address box Creating virtual interfaces 1 Click on the Create a new virtual interface hyperlink at the bottom of the LAN connections page On the Create virtual interface page type...

Страница 38: ...Server This option allows you to enable or disable the DHCP server and create configure and delete DHCP server subnets and DHCP fixed IP MAC mappings From the Configuration menu click on DHCP server T...

Страница 39: ...d set the maximum and default lease times Set the DHCP address range or use a default range of 20 addresses Set the Primary and Secondary DNS Server addresses or set your System to give out its own IP...

Страница 40: ...option information At the bottom of the page click on the Create new DHCP option link 3 Click on the Option name drop down list and select a name Type a value that matches the selected option name in...

Страница 41: ...Type in the MAC address and the maximum lease time default is 86400 seconds 3 Click on OK The DHCP Server page is displayed and details of your new fixed host are displayed under the sub heading Exist...

Страница 42: ...screen shows that the DHCP relay is currently disabled If you click on the Enable button DHCP server is disabled and the button changes to Enable Note If DHCP server is enabled DHCP relay will be dis...

Страница 43: ...in name in the DNS servers text box 2 Click on The IP address appears in the DNS servers table You can add a maximum of three server IP addresses Each IP address entry has a Delete button associated w...

Страница 44: ...type an address in the New DNS server IP address text box 2 Click on The address is displayed in the Edit DHCP server list section To edit an entry click on an IP address and type a new entry then cl...

Страница 45: ...NTP client The following page is displayed Synchronize Client with NTP Server Click on to force the SNTP client to immediately synchronize the local time with the server located in the association lis...

Страница 46: ...ver is removed from the association list Broadcast mode Enable Allows the SNTP client to accept time synchronization broadcast packets from an SNTP server located on the network and update the local s...

Страница 47: ...packet retries value and SNTP automatic resynchronization polling value in their respective text boxes Click on to validate your setting Setting the System Clock Enter the date and time with yyyy mm...

Страница 48: ...each service listed 2 Click on to submit your settings or to clear your settings 3 If to create or delete WAN services click on the Click here to Add or Delete WAN Services link System Pages Click on...

Страница 49: ...ten to Flash ROM the Firmware Update page is refreshed The page confirms completion of the update and asks you to restart your router in order to use the new firmware Click on Restart Router from the...

Страница 50: ...isplayed 2 Click on to reset your router The Restart page also provides you with the option of restarting and restoring the factory default settings Click in the Reset to factory default settings box...

Страница 51: ...e details for the new user into the username password and comment text boxes and select a May login Option true means that the user can login false means that the user can not login 3 Click on the but...

Страница 52: ...the edit user page Advanced Pages The Advanced pages allow you to configure Security IP Routes Bridge VPN SNMP Port These options are introduced in the following pages Security Security allows you to...

Страница 53: ...Firewall and or Intrusion Detection You must create a security interface before you can enable Firewall and or Intrusion Detection Once you have created a security interface 1 Click on the Firewall En...

Страница 54: ...e your security interface on 3 Click on the Interface Type drop down list and specify what kind of interface it is depending on how it connects to the network external internal or DMZ 4 Click on The S...

Страница 55: ...s column would also include an Enable NAT to DMZ interfaces button 4 To enable NAT between the external interface and the internal interface type click on The Security page is refreshed and NAT is ena...

Страница 56: ...ess or Use IP Address Range specify the first and last IP address in the range Click on the drop down list and select a method Type in the IP Address that is visible outside the network Subnet Mask IP...

Страница 57: ...ng to The Advanced NAT Configuration page is displayed See the Advanced NAT configuration section 2 Click on the Add Reserved Mapping hyperlink The following page is displayed 3 This page allows you t...

Страница 58: ...rt filter is an individual rule that determines what kind of traffic can pass between two interfaces specified in an existing policy This section assumes that you have followed the instructions in Con...

Страница 59: ...k inbound traffic and allow or block outbound traffic Click on The Firewall Port Filters page is displayed containing details of the IP port filter that you have just added 2 Each port filter displaye...

Страница 60: ...ed 6 Each port filter displayed in the Configure Validators page has a Delete Host Validator hyperlink assigned to it To delete a validator click on this link then at the confirmation page click on th...

Страница 61: ...y what type of address replacement is set on a trigger Set Binary Address Replacement to Allow to enable it 3 Once you have configured the trigger click on The Firewall Trigger Configuration page is d...

Страница 62: ...tected d Scan Attack Block Duration Type the length of time in seconds that the Firewall blocks suspicious hosts for after it has detected scan activity e Victim Protection Block Duration Type the len...

Страница 63: ...utes Whether the route is valid or invalid Destination IP address Gateway address Netmask address Whether the route is advertised via RIP true or false Editing a route 1 To edit the destination gatewa...

Страница 64: ...2 Complete the Create IP v4 Route form in order to configure the route 3 When you have typed the details click on The Edit Routes page is displayed The table now contains details of the route that yo...

Страница 65: ...the same MAC address in the other VLAN too 6 Config Pvid Status which is non configurable and is always true i e the bridge supports the ability to override the default PVID setting and its egress sta...

Страница 66: ...ping of regenerated priority to its traffic class disable Disable the mapping of regenerated disable priority to its traffic class prioritybased Traffic class mapping would happen only if traffic clas...

Страница 67: ...configuration and then bridge interfaces page is displayed as shown in the following figure The following table gives the range of values for each option which can be specified with this command and a...

Страница 68: ...erated priority map and Regenerated Priority to Traffic Class Map are provided to configure The procedure is shown as follows 1 Number of traffic classes as shown in the following figure specifies the...

Страница 69: ...he regenerated user priority to which the user priority with value 6 in the incoming frame should be mapped 6 Priority 7 The regenerated user priority to which the user priority with value 7 in the in...

Страница 70: ...ority of value 4 is mapped 4 Priority 5 The traffic class to which the regenerated priority of value 5 is mapped 5 Priority 6 The traffic class to which the regenerated priority of value 6 is mapped 6...

Страница 71: ...e valid values for the VLAN Id ranges between 1 and 4094 1 FDB Name The name of an existing Filtering Database with which the user wants the VLAN to be associated If the FDB already exists the VLAN be...

Страница 72: ...ar your setting and to return to previous page Create a new VLAN Click on Create a new VLAN the Create a new VLAN page is displayed as shown in the following figure In this page user can create a new...

Страница 73: ...1752 and 1754 SHDSL Router User s Guide 1752 A2 GB20 00 June 2005 73...

Страница 74: ...hows the VPN is currently enabled VPN Status Click on Status to view current VPN status including selector information WAN service information policy information and security association information 1...

Страница 75: ...ly interface name Name of the interface ikeport The IKE port value the UDP port number on which IKE daemon listens on all valid unicast IPv4 and IPv6 addresses of this interface The default value is 5...

Страница 76: ...lector Action The action specified by the policy deny bypass or applyipsec Click on View and then IPSec Policy Port Configuration page is invoked as follows 4 Security Associations Information a secur...

Страница 77: ...l mode you must also specify the source and destination addresses either IPv4 or IPv6 of the security gateways that form the IPsec peers You can also optionally configure how IPsec deals with fragment...

Страница 78: ...an be specified with this command and a default value Option Description Ipversion IPv4 only currently Source IP Type Name of the selector Start Source Address Start source address End Source Address...

Страница 79: ...valid unicast IPv4 and IPv6 addresses of this interface The default value is 500 Status The status of IPsec on this interface The default value is disabled Note if to create a IPSec Interface successf...

Страница 80: ...Bundle This option is only relevant if applyipsec has been selected It is used to control the interpretation of two tunnel mode SAs in an SA bundle as follows When two tunnel mode SAs SA1 and SA2 in a...

Страница 81: ...racters e g conexant 3DES 192 bit 24 characters e g conexantconexantconexant Auth Key Auth Key is a cryptographic key for an authentication algorithm algorithm The key requirements for specific algori...

Страница 82: ...eger values The SA with the lowest bundleorder value is applied first followed by the higher bundleorder value irrespective of the direction of the SA e g 0 SPI SPI specifies a unique value If the SA...

Страница 83: ...entifies the location of the SNMP agent system The location is represented by a string of up to 255 characters no spaces N A Sys Contact Contact details e g telephone number email address for the pers...

Страница 84: ...n your router is displayed From the Ports Configuration menu click on SHDSL The SHDSL Port Configuration page is displayed Shdsl is the default port name You can configure basic SHDSL parameters in th...

Страница 85: ...e A B A B F G or F G 5 Click on the PSD drop down list to set PSD as symmetric or asymmetric 6 To set the maximum and minimum line rate click on the Max Line Rate and Min Line Rate drop down list resp...

Страница 86: ...hould turn solid green when the connection is established If your Ethernet LED does not light make sure the RJ45 cable you are using is connected properly Use a straight through or crossover cable as...

Отзывы: