background image

ACX2000 and ACX2100 Universal Metro
Router Hardware Guide

Published

2020-09-07

Содержание ACX2000

Страница 1: ...ACX2000 and ACX2100 Universal Metro Router Hardware Guide Published 2020 09 07 ...

Страница 2: ...ter Hardware Guide Copyright 2020 Juniper Networks Inc All rights reserved The information in this document is current as of the date on the title page YEAR 2000 NOTICE Juniper Networks hardware and software products are Year 2000 compliant Junos OS has no known time related limitations through the year 2038 However the NTP application is known to have some difficulty in the year 2036 END USER LIC...

Страница 3: ... Overview 17 Benefits of the ACX2000 and ACX2100 Routers 18 ACX2000 Router Description 18 ACX2100 Router Description 19 ACX2000 and ACX2100 Routers Hardware and CLI Terminology Mapping 20 ACX2000 Hardware and CLI Terminology Mapping 20 ACX2100 Hardware and CLI Terminology Mapping 22 Packet Flow on ACX Series Routers 24 Protocols and Applications Supported by ACX Series Routers 26 ACX2000 Chassis C...

Страница 4: ...ns 63 ACX2000 and ACX2100 DC Power Specifications 65 Site Planning Preparation and Specifications 2 Site Preparation Checklist for ACX2000 and ACX2100 Routers 68 ACX2000 and ACX2100 Site Guidelines and Requirements 69 General Site Guidelines 70 Site Electrical Wiring Guidelines 70 Clearance Requirements for Airflow and Hardware Maintenance on ACX2000 and ACX2100 Routers 71 Chassis Physical Specifi...

Страница 5: ...Series Routers 87 Console or Auxiliary Port Connector Pinout on ACX Series Routers 88 USB Port Specifications for an ACX Series Router 89 Clocking Ports Specifications on the ACX2000 and the ACX2100 Router 89 External Clocking Port Connector Specifications 90 External Clocking Input Port Specifications 90 Initial Installation and Configuration 3 Installing and Connecting an ACX2000 or ACX2100 Rout...

Страница 6: ...g Cables That Connect to ACX2000 or ACX2100 Network Ports 117 Maintaining the ACX2000 and ACX2100 Uplink Ports 118 Removing a Transceiver from the ACX2000 or ACX2100 119 Installing a Transceiver in the ACX2000 or ACX2100 121 Replacing an ACX2000 or ACX2100 Management Ethernet Cable 122 Removing an ACX2000 or ACX2100 Management Ethernet Cable 122 Installing an ACX2000 and ACX2100 Management Etherne...

Страница 7: ...nings 137 Definitions of Safety Warning Levels 138 Qualified Personnel Warning 141 Warning Statement for Norway and Sweden 142 Installation Instructions Warning 142 Chassis and Component Lifting Guidelines 143 Restricted Access Warning 144 Ramp Warning 146 Rack Mounting and Cabinet Mounting Warnings 147 Grounded Equipment Warning 153 Radiation from Open Port Apertures Warning 154 Laser and LED Saf...

Страница 8: ...Power Grounding Requirements and Warning 176 DC Power Wiring Sequence Warning 178 DC Power Wiring Terminations Warning 181 Midplane Energy Hazard Warning 183 Multiple Power Supplies Disconnection Warning 184 TN Power Warning 185 Agency Approvals for ACX2000 and ACX2100 Routers 185 Compliance Statements for NEBS for ACX2000 and ACX2100 Routers 187 Compliance Statements for EMC Requirements for ACX2...

Страница 9: ...tion see the product documentation page on the Juniper Networks website at https www juniper net documentation If the information in the latest release notes differs from the information in the documentation follow the product Release Notes Juniper Networks Books publishes books by Juniper Networks engineers and subject matter experts These books go beyond the technical documentation to explore th...

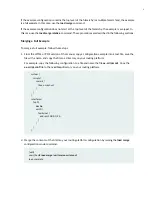
Страница 10: ... 1 From the HTML or PDF version of the manual copy a configuration example into a text file save the file with a name and copy the file to a directory on your routing platform For example copy the following configuration to a file and name the file ex script conf Copy the ex script conf file to the var tmp directory on your routing platform system scripts commit file ex script xsl interfaces fxp0 ...

Страница 11: ...ng platform commit file ex script snippet xsl 2 Move to the hierarchy level that is relevant for this snippet by issuing the following configuration mode command edit user host edit system scripts edit system scripts 3 Merge the contents of the file into your routing platform configuration by issuing the load merge relative configuration mode command edit system scripts user host load merge relati...

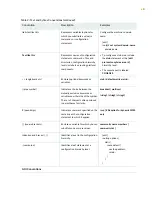
Страница 12: ...e text and syntax conventions used in this guide Table 2 Text and Syntax Conventions Examples Description Convention To enter configuration mode type the configure command user host configure Represents text that you type Bold text like this user host show chassis alarms No alarms currently active Represents output that appears on the terminal screen Fixed width text like this A policy term is a n...

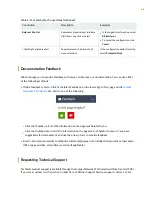
Страница 13: ...b default metric metric Encloses optional keywords or variables angle brackets broadcast multicast string1 string2 string3 Indicates a choice between the mutually exclusive keywords or variables on either side of the symbol The set of choices is often enclosed in parentheses for clarity pipe symbol rsvp Required for dynamic MPLS only Indicates a comment specified on the same line as the configurat...

Страница 14: ...stem Click TechLibrary Feedback on the lower right of any page on the Juniper Networks TechLibrary site and do one of the following Click the thumbs up icon if the information on the page was helpful to you Click the thumbs down icon if the information on the page was not helpful to you or if you have suggestions for improvement and use the pop up form to provide feedback E mail Send your comments...

Страница 15: ...uniper net Find product documentation https www juniper net documentation Find solutions and answer questions using our Knowledge Base https kb juniper net Download the latest versions of software and review release notes https www juniper net customers csc software Search technical bulletins for relevant hardware and software notifications https kb juniper net InfoCenter Join and participate in t...

Страница 16: ...1 CHAPTER Overview ACX2000 and ACX2100 System Overview 17 ACX2000 Chassis Components 47 Cooling System and Airflow in an ACX2000 and ACX2100 Router 60 ACX2000 Power System 61 ...

Страница 17: ...it Ethernet capabilities for uplink along with support for legacy interfaces and Gigabit Ethernet interfaces for radio and NodeB connectivity in a compact form factor that is environmentally hardened and passively cooled Seamless end to end MPLS can be used to address legacy and emerging requirements to provide the foundation for a converged network that utilizes the same mobile backhaul infrastru...

Страница 18: ...cm deep and 17 5 in 44 5 cm wide The outer edges of the mounting brackets extend the width to 19 in 48 cm from the front mounting brackets to the rear of the chassis The chassis installs in standard 300 mm deep or larger enclosed cabinets 19 in equipment racks or telco open frame racks Benefits of the ACX2000 and ACX2100 Routers Improved operational efficiency with zero touch deployment ZTD The AC...

Страница 19: ...ts for installing Gigabit Ethernet SFP transceivers and two ports for installing 10 Gigabit Ethernet SFP transceivers The ports labeled COMBO PORTS provide an additional four copper Gigabit Ethernet ports or four Gigabit Ethernet SFP ports You can use only one set of combination ports at a time The ACX2100 router has two pseudo Flexible PIC Concentrators FPC 0 and FPC 1 and four pseudo PICs PIC 0 ...

Страница 20: ...ne interface CLI Figure 5 on page 22 shows the port locations of the interfaces Table 3 CLI Equivalents of Terms Used in Documentation for ACX2000 Routers Additional Information Item in Documentation Value as displayed in the CLI Description as displayed in the CLI Hardware Item as displayed in the CLI Chassis Physical Specifications for ACX2000 and ACX2100 Routers on page 72 Router chassis ACX200...

Страница 21: ...el of the router PIC 0 16x T1 E1 RJ 48 ACX2000 and ACX2100 Universal Metro Router Overview on page 17 Built in network ports on the front panel of the router PIC 1 One of the following 6x 1GE RJ 45 2x 1GE POE RJ 45 ACX2000 and ACX2100 Universal Metro Router Overview on page 17 Built in uplink ports on the front panel of the router PIC 2 2x 1GE SFP ACX2000 and ACX2100 Universal Metro Router Overvie...

Страница 22: ... T1 E1 0 0 0 0 0 15 FPC 0 PIC 1 GE 0 1 0 0 1 7 FPC 0 PIC 3 XE 0 3 0 0 3 1 ACX2100 Hardware and CLI Terminology Mapping Table 4 on page 22 describes the hardware terms used in ACX2100 router documentation and the corresponding terms used in the Junos OS command line interface CLI Figure 6 on page 24 shows the port locations of the interfaces Table 4 CLI Equivalents of Terms Used in Documentation fo...

Страница 23: ...Overview on page 17 Built in network ports on the front panel of the router PIC 0 on FPC 1 4x 1GE RJ 45 ACX2000 and ACX2100 Universal Metro Router Overview on page 17 Built in uplink ports on the front panel of the router PIC 1 on FPC 1 One of the following 4x 1GE RJ 45 4x 1GE SFP ACX2000 and ACX2100 Universal Metro Router Overview on page 17 Built in uplink ports on the front panel of the router ...

Страница 24: ... 0 GE 1 0 0 1 0 3 FPC 1 PIC 1 GE 1 1 0 1 1 3 FPC 1 PIC 2 GE 1 2 0 1 2 1 FPC 1 PIC 3 XE 1 3 0 1 3 1 Packet Flow on ACX Series Routers The class of service CoS architecture for ACX Series routers is in concept similar to that for MX Series routers The general architecture for ACX Series routers is shown in Figure 7 on page 24 Figure 7 ACX Series Router Packet Forwarding and Data Flow Incoming packet...

Страница 25: ...t scheduling using the weighted deficit round robin WDRR mechanism a form of round robin queue servicing The supported priority levels are strict high and default low The ACX Series router architecture supports both weighted random early detect WRED and weighted tail drop WTD All CoS features are supported at line rate The packet pipeline through an ACX Series router is shown in Figure 8 on page 2...

Страница 26: ...the MTU apply at interface or family inet levels and let it calculate for each family automatically MTU values are not limited to 1500 but can range between 256 to 9216 For more information see the Knowledge Base KB article KB28179 at https kb juniper net InfoCenter index page content id KB28179 Table 5 Protocols and Applications Supported by ACX Series Routers A C X 5 4 4 8 A C X 5 0 0 A C X 5 0 ...

Страница 27: ...uit emulation interfaces SAToP CESoP 12 3x51 D10 requires a MIC SONET SDH interfaces Layer 3 18 2R1 12 3X54 D20 Indoor 12 3X54 D25 Outdoor 15 1X54 D20 15 1X54 D20 12 3x51 D10 12 3X54 D15 12 2R2 12 2 12 2R2 12 2 Static routes 18 2R1 12 3X54 D20 Indoor 12 3X54 D25 Outdoor 15 1X54 D20 15 1X54 D20 12 3x51 D10 12 3X54 D15 12 2R2 12 2 12 2R2 12 2 OSPF 18 2R1 12 3X54 D20 Indoor 12 3X54 D25 Outdoor 15 1X5...

Страница 28: ...5 Outdoor 15 1X54 D20 15 1X54 D20 12 3x51 D10 12 3X54 D15 12 2R2 12 2 12 2R2 12 2 Internet Control Message Protocol ICMP 18 2R1 12 3X54 D20 Indoor 12 3X54 D25 Outdoor 15 1X54 D20 15 1X54 D20 12 3x51 D10 12 3X54 D15 12 2R2 12 2 12 2R2 12 2 Address Resolution Protocol ARP 18 2R1 12 3X54 D20 Indoor 12 3X54 D25 Outdoor 15 1X54 D20 15 1X54 D20 12 3x51 D10 12 3X54 D15 12 2R2 12 2 12 2R2 12 2 Bidirection...

Страница 29: ...IS 18 2R1 12 3X54 D20 Indoor 12 3X54 D25 Outdoor 15 1X54 D20 15 1X54 D20 12 3x51 D10 12 3X54 D15 12 2R2 12 2 12 2R2 12 2 Maximum transmission unit MTU range 256 to 9192 18 2R1 12 3X54 D20 Indoor 12 3X54 D25 Outdoor 15 1X54 D20 15 1X54 D20 12 3x51 D10 12 3X54 D15 12 3R1 12 3R1 12 3R1 12 3R1 Layer 3 VPNs 18 2R1 12 3X54 D20 Indoor 12 3X54 D25 Outdoor 15 1X54 D20 15 1X54 D20 12 3x51 D10 12 3X54 D15 12...

Страница 30: ... 2R2 12 2 Static label switched path LSP 18 2R1 12 3X54 D20 Indoor 12 3X54 D25 Outdoor 15 1X54 D20 15 1X54 D20 12 3x51 D10 12 3X54 D15 12 2R2 12 2 12 2R2 12 2 FRR 18 2R1 12 3X54 D20 Indoor 12 3X54 D25 Outdoor 15 1X54 D20 15 1X54 D20 12 3x51 D10 12 3X54 D15 12 2R2 12 2 12 2R2 12 2 Traffic engineering 18 2R1 12 3X54 D20 Indoor 12 3X54 D25 Outdoor 15 1X54 D20 15 1X54 D20 12 3x51 D10 12 3X54 D15 12 2R...

Страница 31: ...2 12 2 Static Ethernet PWs 18 2R1 12 3X54 D20 Indoor 12 3X54 D25 Outdoor 15 1X54 D20 15 1X54 D20 12 3x51 D10 12 3X54 D15 12 2R2 12 2 12 2R2 12 2 Layer 2 circuits 18 2R1 12 3X54 D20 Indoor 12 3X54 D25 Outdoor 15 1X54 D20 15 1X54 D20 12 3x51 D10 12 3X54 D15 12 2R2 12 2 12 2R2 12 2 IEE802 1ag CC monitoring on active and standby pseudowires 18 2R1 15 1X54 D20 15 1X54 D20 VPLS Ethernet Layer 2 18 2R1 1...

Страница 32: ...Outdoor 15 1X54 D20 15 1X54 D20 12 3x51 D10 12 3X54 D15 12 2R2 12 2 12 2R2 12 2 IEE802 1ag interface status type length and value TLV QoS 18 2R1 12 3X54 D20 Indoor 12 3X54 D25 Outdoor 15 1X54 D20 15 1X54 D20 12 3x51 D10 12 3X54 D15 12 2R2 12 2 12 2R2 12 2 Firewall filters access controllists ACLs family inet 18 2R1 12 3X54 D20 Indoor 12 3X54 D25 Outdoor 15 1X54 D20 15 1X54 D20 12 3x51 D10 12 3X54 ...

Страница 33: ... 12 2R2 12 2 Policing per logical interface 18 2R1 12 3X54 D20 Indoor 12 3X54 D25 Outdoor 15 1X54 D20 15 1X54 D20 12 3x51 D10 12 3X54 D15 12 2R2 12 2 12 2R2 12 2 Policing per physical interface 18 2R1 12 3X54 D20 Indoor 12 3X54 D25 Outdoor 15 1X54 D20 15 1X54 D20 12 3x51 D10 12 3X54 D15 12 2R2 12 2 12 2R2 12 2 Policing per family 18 2R1 12 3X54 D20 Indoor 12 3X54 D25 Outdoor 15 1X54 D20 15 1X54 D2...

Страница 34: ...ion 18 2R1 12 3X54 D20 Indoor 12 3X54 D25 Outdoor 15 1X54 D20 15 1X54 D20 12 3x51 D10 12 3X54 D15 12 2R2 12 2 12 2R2 12 2 Eight queues per port 18 2R1 12 3X54 D20 Indoor 12 3X54 D25 Outdoor 15 1X54 D20 15 1X54 D20 12 3x51 D10 12 3X54 D15 12 2R2 12 2 12 2R2 12 2 Priority queuing 18 2R1 12 3X54 D20 Indoor 12 3X54 D25 Outdoor 15 1X54 D20 15 1X54 D20 12 3x51 D10 12 3X54 D15 12 2R2 12 2 12 2R2 12 2 Rat...

Страница 35: ...2 3X54 D20 Indoor 12 3X54 D25 Outdoor 15 1X54 D20 15 1X54 D20 12 3x51 D10 12 3X54 D15 12 2R2 12 2 12 2R2 12 2 Weighted random early detection WRED drop profile DP 18 2R1 12 3X54 D20 Indoor 12 3X54 D25 Outdoor 15 1X54 D20 15 1X54 D20 12 3x51 D10 12 3X54 D15 12 2R2 12 2 12 2R2 12 2 Classification DSCP 18 2R1 12 3X54 D20 Indoor 12 3X54 D25 Outdoor 15 1X54 D20 15 1X54 D20 12 3x51 D10 12 3X54 D15 12 2R...

Страница 36: ... 18 2R1 12 3X54 D20 Indoor 12 3X54 D25 Outdoor 15 1X54 D20 15 1X54 D20 12 3x51 D10 12 3X54 D15 12 2R2 12 2 12 2R2 12 2 Rewrite MPLS EXP 18 2R1 12 3X54 D20 Indoor 12 3X54 D25 Outdoor 15 1X54 D20 15 1X54 D20 12 3x51 D10 12 3X54 D15 12 2R2 12 2 12 2R2 12 2 Rewrite 802 1p 18 2R1 12 3X54 D20 Indoor 12 3X54 D25 Outdoor 15 1X54 D20 15 1X54 D20 12 3x51 D10 12 3X54 D15 12 2R2 12 2 12 2R2 12 2 Rewrite MPLS ...

Страница 37: ...2 3X54 D15 12 2R2 12 2 12 2R2 12 2 Synchronous Ethernet 12 3X54 D20 Indoor 12 3X54 D25 Outdoor 12 3x51 D10 12 3X54 D15 12 2R2 12 2 12 2R2 12 2 Building integrated timing supply BITS 12 3X54 D20 Indoor 12 3X54 D25 Outdoor 12 3x51 D10 12 3X54 D15 12 2R2 12 2 12 2R2 12 2 Clock synchronization Redundant clock multiple 1588 masters 18 2R1 15 1X54 D20 15 1X54 D20 Transparent clock 12 3X54 D20 and 17 3R1...

Страница 38: ...rk Time Protocol NTP 18 2R1 12 3X54 D20 Indoor 12 3X54 D25 Outdoor 15 1X54 D20 15 1X54 D20 12 3x51 D10 12 3X54 D15 12 2R2 12 2 12 2R2 12 2 SNMP 18 2R1 12 3X54 D20 Indoor 12 3X54 D25 Outdoor 15 1X54 D20 15 1X54 D20 12 3x51 D10 12 3X54 D15 12 2R2 12 2 12 2R2 12 2 802 1ag CFM 18 2R1 12 3X54 D20 Indoor 12 3X54 D25 Outdoor 15 1X54 D20 15 1X54 D20 12 3x51 D10 12 3X54 D15 12 2R2 12 2 12 2R2 12 2 802 3ah ...

Страница 39: ... 2R2 12 2 MPLS OAM 18 2R1 12 3X54 D20 Indoor 12 3X54 D25 Outdoor 15 1X54 D20 15 1X54 D20 12 3x51 D10 12 3X54 D15 12 2R2 12 2 12 2R2 12 2 RMON 18 2R1 12 3X54 D20 Indoor 12 3X54 D25 Outdoor 15 1X54 D20 15 1X54 D20 12 3x51 D10 12 3X54 D15 12 2R2 12 2 12 2R2 12 2 Layer 2 traceroute 18 2R1 12 3X54 D20 Indoor 12 3X54 D25 Outdoor 15 1X54 D20 15 1X54 D20 12 3x51 D10 12 3X54 D15 12 2R2 12 2 12 2R2 12 2 DNS...

Страница 40: ...al port mirroring 18 2R1 12 3X54 D20 Indoor 12 3X54 D25 Outdoor 15 1X54 D20 15 1X54 D20 12 3x51 D10 12 3X54 D15 12 2R2 12 2 12 2R2 12 2 Interface loopback 12 3X54 D20 Indoor 12 3X54 D25 Outdoor 12 3x51 D10 12 3X54 D15 12 2R2 12 2 12 2R2 12 2 Ethernet loopback 18 2R1 12 3X54 D20 Indoor 12 3X54 D25 Outdoor 15 1X54 D20 15 1X54 D20 12 3x51 D10 12 3X54 D15 12 2R2 12 2 12 2R2 12 2 Interface byte and pac...

Страница 41: ...2 12 2R2 12 2 Drop packet stats 18 2R1 12 3X54 D20 Indoor 12 3X54 D25 Outdoor 15 1X54 D20 15 1X54 D20 12 3x51 D10 12 3X54 D15 12 2R2 12 2 12 2R2 12 2 Distinguish each 802 1ag connection by VLAN ID 18 2R1 12 3X54 D20 Indoor 12 3X54 D25 Outdoor 15 1X54 D20 15 1X54 D20 12 3x51 D10 12 3X54 D15 12 2R2 12 2 12 2R2 12 2 Interface passive monitor mode 12 3X54 D20 Indoor 12 3X54 D25 Outdoor Multipacket mir...

Страница 42: ...5 12 2R2 12 2 12 2R2 12 2 RADIUS authentication 18 2R1 12 3X54 D20 Indoor 12 3X54 D25 Outdoor 15 1X54 D20 15 1X54 D20 12 3x51 D10 12 3X54 D15 12 2R2 12 2 12 2R2 12 2 Control plane DOS prevention High Availability 18 2R1 12 3X54 D20 Indoor 12 3X54 D25 Outdoor 15 1X54 D20 15 1X54 D20 12 3x51 D10 12 3X54 D15 12 2R2 12 2 12 2R2 12 2 MPLS FRR 18 2R1 12 3X54 D20 Indoor 12 3X54 D25 Outdoor 15 1X54 D20 15...

Страница 43: ...apsulation S6 1 ATM N to one cell mode required as per standard 12 3X54 D20 Indoor 12 3X54 D25 Outdoor 12 3x51 D10 12 3X54 D15 12 2R2 12 2 12 2R2 12 2 RFC4717 S6 3 ATM AAL5 SDU encapsulation optional 12 3X54 D20 Indoor 12 3X54 D25 Outdoor 12 3x51 D10 12 3X54 D15 12 2R2 12 2 12 2R2 12 2 ATM PWE3 control word 12 3X54 D20 Indoor 12 3X54 D25 Outdoor 12 3x51 D10 12 3X54 D15 12 2R2 12 2 12 2R2 12 2 ATM ...

Страница 44: ...sion 12 3X54 D20 Indoor 12 3X54 D25 Outdoor 12 3x51 D10 12 3X54 D15 12 2R2 12 2 12 2R2 12 2 ATM support for N to 1 PW promiscuous mode 1 PW per port and 1 PW per VPI 12 3X54 D20 Indoor 12 3X54 D25 Outdoor 12 3x51 D10 12 3X54 D15 12 2R2 12 2 12 2R2 12 2 Cell concatenation 1 to 30 cells per packet 12 3X54 D20 Indoor 12 3X54 D25 Outdoor 12 3x51 D10 12 3X54 D15 12 2R2 12 2 12 2R2 12 2 Packet byte coun...

Страница 45: ... 2 AAL5 SDU n to 1 cell relay ATM Queuing 12 3X54 D20 Indoor 12 3X54 D25 Outdoor 12 3x51 D10 12 3X54 D15 12 2R2 12 2 12 2R2 12 2 ATM service categories CBR nrt VBR UBR to the UNI 12 3X54 D20 Indoor 12 3X54 D25 Outdoor 12 3x51 D10 12 3X54 D15 12 2R2 12 2 12 2R2 12 2 MAP ATM service categories to PW EXP bits 12 3X54 D20 Indoor 12 3X54 D25 Outdoor 12 3x51 D10 12 3X54 D15 12 2R2 12 2 12 2R2 12 2 Input...

Страница 46: ...D20 Indoor 12 3X54 D25 Outdoor 12 3x51 D10 12 3X54 D15 12 2R2 12 2 12 2R2 12 2 Early packet discard MIBs 18 2R1 12 3X54 D20 Indoor 12 3X54 D25 Outdoor 15 1X54 D20 15 1X54 D20 12 3x51 D10 12 3X54 D15 12 2R2 12 2 12 2R2 12 2 Standard SNMP MIBs 18 2R1 12 3X54 D20 Indoor 12 3X54 D25 Outdoor 15 1X54 D20 15 1X54 D20 12 3x51 D10 12 3X54 D15 12 2R2 12 2 12 2R2 12 2 Juniper Networks enterprise specific MIB...

Страница 47: ...OLE AUX Alarm contact port labeled ALARM accepts a DE 15 alarm cable External clocking input port labeled EXT REF CLK IN External clocking ports supporting 1PPS and 10MHz input and output Network ports and corresponding status LEDs Sixteen T1 E1 ports labeled 0 0 0 through 0 0 15 Six Gigabit Ethernet RJ 45 ports labeled 0 1 0 through 0 1 2 and 0 1 4 through 0 1 6 Two 65 W PoE Gigabit Ethernet port...

Страница 48: ...ocking input port Alarm contact port 12 5 USB ports T1 E1 and RJ 45 Gigabit Ethernet network ports 13 6 System LED PoE Gigabit Ethernet ports 14 7 Grounding terminals ESD point SEE ALSO ACX2000 and ACX2100 Universal Metro Router Overview 17 LEDs on ACX2000 and ACX2100 Routers 57 Front Panel of an ACX2100 Router The front panel of an ACX2100 router consists of the following components see Figure 10...

Страница 49: ...ed ACX2100 Router g017846 ACX2100 MGMT CONSOLE AUX SYS 0 1 EXT REF CLK IN ALARM OUT IN IN OUT 0 0 8 0 0 0 0 0 9 0 0 1 0 0 10 0 0 2 0 0 11 0 0 3 0 0 12 0 0 4 0 0 13 0 0 5 0 0 6 0 0 14 0 0 7 0 0 15 1 0 0 1 0 2 1 0 1 1 1 1 1 1 0 1 0 3 1 1 2 GE 1 1 3 COMBO PORTS XE 1 3 0 1 3 1 T1 E1 1PPS 10MHz GE 1 1 0 1 1 1 1 2 0 1 1 2 1 1 3 1 2 1 5 4 12 15 1 2 14 13 3 10 8 9 7 11 6 9 1 Ten Gigabit Ethernet SFP ports...

Страница 50: ...0 2 Gigabit Ethernet SFP ports Management Ethernet port 11 3 Combination Gigabit Ethernet SFP ports Console or auxiliary port 12 4 External clocking ports Alarm contact port 13 5 External clocking input port T1 E1 network ports 14 6 USB ports Gigabit Ethernet network ports 15 7 System LED Combination Gigabit Ethernet RJ 45 ports 16 8 Grounding terminals ESD point Uplink Ports on ACX2000 and ACX210...

Страница 51: ...Compatibility Tool is located at https apps juniper net hct The list of supported transceivers for the ACX2000 is located at https apps juniper net hct product prd ACX2000 The list of supported transceivers for the ACX2100 is located at https apps juniper net hct product prd ACX2100 T1 E1 Ports The router has sixteen T1 E1 ports located on the front panel Table 6 on page 51 describes the ports in ...

Страница 52: ...tail Table 7 RJ 45 Port Features Description Feature 10BASE T Copper 100BASE T 1000BASE T Supported standards Category 5 Cable RJ 45 Connector ACX2000 0 1 0 through 0 1 2 and 0 1 4 through 0 1 6 ACX2100 1 0 0 through 1 0 3 and 1 1 0 through 1 1 3 Port numbering hardware ACX2000 ge 0 1 0 through ge 0 1 2 and ge 0 1 4 through ge 0 1 6 ACX2100 ge 1 0 0 through ge 1 0 3 and ge 1 1 0 through ge 1 1 3 P...

Страница 53: ... ports Use one set of ports at a time On the ACX2100 router you can use both sets at the same time Table 9 SFP Port Features Description Feature See the Hardware Compatibility Tool for the specifications of transceivers supported on the ACX2000 or ACX2100 The list of supported transceivers for the ACX2000 is located at https pathfinder juniper net hct product prd ACX2000 The list of supported tran...

Страница 54: ... 3 1 Port numbering software ACX2000 and ACX2100 Alarm Contact Port The ACX2000 and ACX2100 router has four external alarm contacts also known as potential free contacts for connecting the router to external alarm devices The port labeled ALARM uses a 15 pin D type connector The external alarm contact has 15 pins that accept a single core wire from external alarm devices A DE15 alarm cable is requ...

Страница 55: ...ally Closed NC Provides the current path for the external alarm reporting device and functions as a reference or negative potential terminal for Contact 1 Reference REF Contact 2 Figure 12 on page 55 shows an example of a wiring diagram for a simple output alarm reporting device In this case the device is a light bulb that illuminates when the device encounters a condition that activates the red a...

Страница 56: ...8v2 recovered clocks or xDSL NTU R timing Externally available reference clocks are BITS T1 E1 rate clocks 1 PPS and 10 MHz The four SubMiniature B SMB connectors and one RJ 48 port on the front panel of the router connect to external clock signal sources The clocking ports provide the synchronized output clocks from any one of the above reference inputs based on the clock s priority Internal cloc...

Страница 57: ... SECTION System LED on the Front Panel 57 T1 E1 Port LEDs 58 Ethernet Port LEDs 58 PoE Port LEDs 59 SFP and SFP Port LEDs 59 Management and Console Port LEDs on the Front Panel 60 Unless otherwise specified the information about LEDs applies to both ACX2000 and ACX2100 routers System LED on the Front Panel One bicolor LED labeled SYS indicates the status of the router Table 12 on page 58 describes...

Страница 58: ...page 58 describes the LEDs in more detail Table 13 T1 E1 Port LEDs Description Color Location Name Online with no alarms or failures Green Left Link Active with a local alarm router has detected a failure Red Not enabled Online with alarms for remote failures Yellow Right Link remote alarms Ethernet Port LEDs The front panel of the ACX2000 router has six Gigabit Ethernet RJ 45 ports and the ACX210...

Страница 59: ...9 describes the LEDs in more detail Table 15 PoE Port LEDs Description State Color Location Name Link is online On Amber Right Link No link Off The port is receiving data Blinking Green Left RX The port is not receiving data Off SFP and SFP Port LEDs The front panel has Gigabit Ethernet SFP ports and 10 Gigabit Ethernet SFP ports each with one pair of port LEDs Table 16 on page 59 describes the LE...

Страница 60: ... Color Location Name Link is online On Amber Right Link Activity Indicates link activity Blinking Yellow No link Off The port is receiving data Blinking Green Left RX The port is not receiving data Off SEE ALSO Troubleshooting Resources for ACX2000 and ACX2100 Routers 126 Cooling System and Airflow in an ACX2000 and ACX2100 Router The ACX2000 and ACX2100 routers do not contain fans and are passive...

Страница 61: ...outers 78 Cabinet Requirements for ACX2000 and ACX2100 Routers 76 Clearance Requirements for Airflow and Hardware Maintenance on ACX2000 and ACX2100 Routers 71 ACX2000 and ACX2100 Router Environmental Specifications 73 ACX2000 Power System IN THIS SECTION ACX2000 and ACX2100 Power Overview 62 ACX2100 AC Power Specifications 62 ACX2100 AC Power Cord Specifications 63 ACX2000 and ACX2100 DC Power Sp...

Страница 62: ...s Value Description 52 8 W 60V and 0 88A ACX2100 DC 62 3 W 264V and 0 236A ACX2100 AC Maximum power consumed by the router SEE ALSO ACX2000 and ACX2100 Universal Metro Router Overview 17 Connecting DC Power Cables to the ACX2000 or ACX2100 Router 102 ACX2000 and ACX2100 DC Power Electrical Safety Guidelines 172 ACX2100 AC Power Specifications Table 19 on page 62 lists the AC power system electrica...

Страница 63: ...ds each approximately 8 ft 2 5 m long that supply AC power to the router The C15 appliance coupler at the female end of the cord as described by International Electrotechnical Commission IEC standard 60320 inserts into the AC appliance inlet coupler The plug at the male end of the power cord fits into the power source receptacle that is standard for your geographic location Table 20 on page 63 pro...

Страница 64: ...ter is intended for use with the router only and not for any other use WARNING The attached power cable is only for this product Do not use the cable for another product Translation in Japanese follows NOTE In North America AC power cords must not exceed approximately 14 75 ft 4 5 m in length to comply with National Electrical Code NEC Sections 400 8 NFPA 75 5 2 2 and 210 52 and Canadian Electrica...

Страница 65: ...d for the system A single power supply can provide full power for as long as the router is operational NOTE When only one power supply is available on an ACX2100 router we recommend that you connect both the power inputs to the same source That is connect both the DC power inputs of the ACX2100 router to the only available power supply Doing so ensures that you get the maximum amount of hold up ti...

Страница 66: ...upgrading the power infrastructure and allows the router to function at full capacity using multiple power supplies SEE ALSO ACX2000 and ACX2100 DC Power Electrical Safety Guidelines 172 DC Power Copper Conductors Warning 173 DC Power Disconnection Warning 174 DC Power Grounding Requirements and Warning 176 DC Power Wiring Sequence Warning 178 DC Power Wiring Terminations Warning 181 66 ...

Страница 67: ... Preparation Checklist for ACX2000 and ACX2100 Routers 68 ACX2000 and ACX2100 Site Guidelines and Requirements 69 ACX2000 and ACX2100 Network Cable and Transceiver Planning 80 ACX2000 and ACX2100 Alarm Management and Clocking Cable Specifications and Pinouts 85 ...

Страница 68: ...sure the distance between external power sources and router installation site Locate sites for connection of system grounding ACX2000 and ACX2100 DC Power Specifications on page 65 ACX2100 AC Power Specifications on page 62 Calculate the power consumption and requirements Hardware Configuration ACX2000 and ACX2100 Universal Metro Router Overview on page 17 Choose the number and types of routers yo...

Страница 69: ...ased on your planned configuration Review the maximum distance allowed for each cable Choose the length of cable based on the distance between the hardware components being connected Plan the cable routing and management RELATED DOCUMENTATION Installing and Connecting an ACX2000 or ACX2100 Router Overview 93 ACX2000 and ACX2100 Site Guidelines and Requirements IN THIS SECTION General Site Guidelin...

Страница 70: ...from dust and conductive material such as metal flakes Follow prescribed airflow guidelines to ensure that the cooling system functions properly and that exhaust from other equipment does not blow into the intake vents of the device Follow the prescribed electrostatic discharge ESD prevention procedures to prevent damaging the equipment Static discharge can cause components to fail completely or i...

Страница 71: ...C particularly from lightning or radio transmitters seek expert advice Some of the problems caused by strong sources of electromagnetic interference EMI are Destruction of the signal drivers and receivers in the device Electrical hazards as a result of power surges conducted over the lines into the equipment Electromagnetic compatibility Clearance Requirements for Airflow and Hardware Maintenance ...

Страница 72: ...n ACX2000 or ACX2100 Router Overview 93 Chassis Physical Specifications for ACX2000 and ACX2100 Routers The ACX2000 router is a rigid sheet metal structure that houses the hardware components Table 24 on page 72 summarizes the physical specifications of the ACX2000 router Table 24 Physical Specifications of the ACX2000 and ACX2100 Router Chassis Value Description 1 75 in 4 45 cm Height 17 5 in 44 ...

Страница 73: ...the router to protect the hardware components NOTE Depending on the ambient temperature it may take up to 5 minutes for the router to heat up to the operating temperature Table 25 on page 73 provides the required environmental conditions for normal router operation Table 25 Router Environmental Specifications Value Description No performance degradation to 10 000 ft 3048 m Altitude Normal operatio...

Страница 74: ...al grade Configuration NOTE Install the router only in restricted areas such as dedicated equipment rooms and equipment closets in accordance with Articles 110 16 110 17 and 110 18 of the National Electrical Code ANSI NFPA 70 ACX2000 and ACX2100 Chassis Grounding Cable and Lug Specifications IN THIS SECTION Grounding Points Specifications 74 Grounding Cable Lug Specifications 75 Grounding Cable Sp...

Страница 75: ...1 g006433 EXT REF CLK IN GE XE 1 1 Grounding points NOTE All bare grounding connection points to the router must be cleaned and coated with an antioxidant solution before grounding the router NOTE All surfaces on the router that are unplated must be brought to a bright finish and treated with an antioxidant solution before connecting the router NOTE All nonconductive surfaces on the router must be...

Страница 76: ...priately sized driver with a maximum torque capacity of 5 lb in or less Ensure that the driver is undamaged and properly calibrated and that you have been trained in its use You may wish to use a driver that is designed to prevent overtorque when the preset torque level is achieved Grounding Cable Specifications You must provide one grounding cable that meets the following specifications 6 AWG 4 1...

Страница 77: ...s and Associated Equipment document number EIA 310 D published by the Electronics Industry Association http www eia org NOTE The cabinet must meet the strength requirements to support the weight of the router The minimum cabinet size must be able to accommodate the maximum external dimensions of the router Cabinet size The outer edges of the mounting brackets extend the width of the chassis to 19 ...

Страница 78: ... in these elements assist with removing the hot air exhaust Install the router in the cabinet in a way that maximizes the open space on the side of the chassis that has the hot air exhaust This space maximizes the clearance for critical airflow Route and dress all cables to minimize the blockage of airflow to and from the chassis Ensure that the spacing of rails and adjacent cabinets allows for th...

Страница 79: ...acket hole spacing Ensure that the rack complies with this standard A 19 in 48 3 cm rack as defined in Cabinets Racks Panels and Associated Equipment document number EIA 310 D published by the Electronics Industry Association http www eia org Ensure that the rack rails are spaced widely enough to accommodate the router chassis external dimensions The outer edges of the front mounting brackets exte...

Страница 80: ...uct displaying all the transceivers supported on that device or category displaying all the transceivers by interface speed or type The Hardware Compatibility Tool is located at https apps juniper net hct Some transceivers support additional monitoring using the operational mode CLI command show interfaces diagnostics optics Use the Hardware Compatibility Tool to determine if your transceiver supp...

Страница 81: ...er margin perform the following tasks 1 How to Calculate Power Budget for Fiber Optic Cable 81 2 How to Calculate Power Margin for Fiber Optic Cable 82 How to Calculate Power Budget for Fiber Optic Cable To ensure that fiber optic connections have sufficient power for correct operation you need to calculate the link s power budget which is the maximum amount of power it can transmit When you calcu...

Страница 82: ...d other factors refer to vendor documentation Table 28 Estimated Values for Factors Causing Link Loss Estimated Link Loss Value Link Loss Factor Single mode None Multimode 0 5 dB Higher order mode losses Single mode None Multimode None if product of bandwidth and distance is less than 500 MHz km Modal and chromatic dispersion 0 5 dB Connector 0 5 dB Splice Single mode 0 5 dB km Multimode 1 dB km F...

Страница 83: ...r Optic Cable Multimode fiber is large enough in diameter to allow rays of light to reflect internally bounce off the walls of the fiber Interfaces with multimode optics typically use LEDs as light sources However LEDs are not coherent sources They spray varying wavelengths of light into the multimode fiber which reflects the light at different angles Light rays travel in jagged lines through a mu...

Страница 84: ...ent speeds of light rays Modal dispersion Spreading of the signal over time resulting from the different propagation modes in the fiber For multimode transmission modal dispersion rather than chromatic dispersion or attenuation usually limits the maximum bit rate and link length For single mode transmission modal dispersion is not a factor However at higher bit rates and over longer distances chro...

Страница 85: ...low alarm condition or to ignore alarm conditions You can independently configure alarm output ports 0 and 1 can be configured to relay alarm information when the system condition goes to a red or yellow alarm condition and when the alarm output port is configured to trigger based on alarm input condition Alarm output ports 2 and 3 are used to indicate major and minor system alarms and are normall...

Страница 86: ...ltage on this pin is between 24V to 72V with reference to Pin 2 alarm input 1 is closed Input Alarm Port 1 Input ALARM_IN1_NO NC 7 Common contact for external alarm input 3 and 4 Reference for Pin 3 and Pin 4 Input Alarm Port 2 and Input Alarm Port 3 Input ALARM_IN2_IN3_REF 8 External alarm output 2 this pin is connected to Pin 15 in closed condition Reserved for Major alarm Output ALARM_OUT2_REF ...

Страница 87: ... on ACX2000 and ACX2100 Routers 57 Management Port Connector Pinout Information for ACX Series Routers The management port labeled MGMT on an ACX Series router uses an RJ 45 connector to connect to a management device for out of band management The port uses an autosensing RJ 45 connector to support a 10 100BASE T connection Two LEDs indicate link activity on the port and the administrative status...

Страница 88: ...d in Table 31 on page 88 to connect the Routing Engine to an auxiliary or console management device NOTE You must use a shielded twisted pair STP cable for both outdoor and indoor deployments Table 31 Connector Pinout for the Console Auxiliary Port Direction CPU Description Signal Pin Out Routing Engine Request to Send RTS 1 Out 1588 CPU Transmit Data TXD 2 Out Routing Engine Transmit Data TXD 3 S...

Страница 89: ...ctable behavior Juniper Networks Technical Assistance Center JTAC can provide only limited support for issues related to unsupported hardware We strongly recommend that you use only supported USB flash drives All USB flash drives used on ACX Series routers must have the following features USB 2 0 or later Formatted with a FAT or MS DOS file system Clocking Ports Specifications on the ACX2000 and t...

Страница 90: ...o connect external clock signal sources The port uses an autosensing RJ 48 connector to support framed T1 or E1 signals Two LEDs indicate link activity on the port and function in the same way as the T1 E1 ports The clocking information is extracted from the input but the data is discarded Table 32 on page 90 provides the pinout information for the RJ 48 connector for the external clocking input p...

Страница 91: ...Front Panel of an ACX2000 Router 47 LEDs on ACX2000 and ACX2100 Routers 57 91 ...

Страница 92: ...ing an ACX2000 or ACX2100 Router Overview 93 Unpacking and Mounting the ACX2000 and ACX2100 Routers 94 Connecting the ACX2000 and ACX2100 Routers to Power 99 Connecting the ACX2000 and ACX2100 to External Devices 105 Initially Configuring the ACX2000 or ACX2100 Router 111 ...

Страница 93: ...rth Ground on page 100 5 Connect the power and power on the router AC powered models See Connecting AC Power Cords to the ACX2100 Router on page 104 DC powered models See Connecting DC Power Cables to the ACX2000 or ACX2100 Router on page 102 6 Connect the router to external devices See Connecting ACX2000 or ACX2100 Routers to Management Devices on page 106 Connecting ACX2000 or ACX2100 Routers to...

Страница 94: ...y protected inside the shipping carton Do not unpack the routers until you are ready to begin installation To unpack the router and prepare for installation you need the following tools Blank panels to cover any slots not occupied by a component To unpack the router 1 Move the shipping carton to a staging area as close to the installation site as possible but where you have enough room to remove t...

Страница 95: ...k the parts you receive in the router shipping carton against the items on the packing list The packing list specifies the part number and description of each part in your order The parts shipped depend on the configuration you order If any part on the packing list is missing contact your customer service representative or contact Juniper Customer Care from within the U S or Canada by telephone at...

Страница 96: ...uter Overview 17 Installing the ACX2000 or ACX2100 Mounting Brackets To attach the mounting brackets you need the following tools Phillips screwdriver number 2 Two mounting brackets for front or rear mounting ship with the router see Figure 18 on page 97 and Figure 19 on page 97 To attach both mounting brackets to either the front or rear of the chassis 1 Align the bracket with the two sets of mou...

Страница 97: ... Router g006405 Figure 19 Installing the Mounting Brackets to the Rear of the ACX2000 or ACX2100 Router g006406 Installing the ACX2000 or ACX2100 Router in the Rack NOTE The router can be installed horizontally in a rack or cabinet For additional installation options contact JTAC 97 ...

Страница 98: ...ng Ensure that the installation site allows adequate clearance for both airflow and maintenance 2 Position the router in front of the rack or cabinet 3 Hold onto the bottom of the chassis and carefully lift it so that the mounting brackets contact the rack rails WARNING To prevent injury keep your back straight and lift with your legs not your back Avoid twisting your body as you lift Balance the ...

Страница 99: ...ite Preparation Checklist for ACX2000 and ACX2100 Routers 68 Connecting the ACX2000 and ACX2100 Routers to Power IN THIS SECTION Connecting the ACX2000 or ACX2100 Router to Earth Ground 100 Connecting DC Power Cables to the ACX2000 or ACX2100 Router 102 Connecting AC Power Cords to the ACX2100 Router 104 99 ...

Страница 100: ...SD grounding strap to your bare wrist and connect the strap to an approved site ESD grounding point See the instructions for your site 3 Ensure that all grounding surfaces are clean and brought to a bright finish before grounding connections are made 4 Connect the grounding cable to a proper earth ground 5 Detach the ESD grounding strap from the site ESD grounding point 6 Wrap and fasten one end o...

Страница 101: ...ximum torque capacity of 5 lb in or less Ensure that the driver is undamaged and properly calibrated and that you have been trained in its use You may wish to use a driver that is designed to prevent overtorque when the preset torque level is achieved 9 Dress the grounding cable and verify that it does not touch or block access to router components and that it does not drape where people could tri...

Страница 102: ...at the cable leads might become active during installation 2 Remove the clear plastic cover protecting the terminal on the faceplate 3 Verify that the DC power cables are correctly labeled before making connections to the power supply In a typical power distribution scheme where the return is connected to chassis ground at the battery plant you can use a multimeter to verify the resistance of the ...

Страница 103: ...tighten screws on the DC power supply terminals Use an appropriately sized driver with a maximum torque capacity of 9 lb in or less Ensure that the driver is undamaged and properly calibrated and that you have been trained in its use You may wish to use a driver that is designed to prevent overtorque when the preset torque level is achieved 6 Replace the clear plastic cover over the terminals on t...

Страница 104: ...propriate for your geographical location See the ACX2100 AC Power Cord Specifications on page 63 2 Wrap and fasten one end of the ESD grounding strap around your bare wrist and connect the other end of the strap to an ESD point 3 Insert the appliance coupler end of the power cord into the appliance inlet on the power supply 4 Insert the power cord plug into an external AC power source receptacle N...

Страница 105: ...een steadily If the system LED is not lit the power supply is not functioning normally Repeat the cabling procedures Figure 23 Connecting AC Power to the Router g006689 SEE ALSO ACX2000 and ACX2100 Power Overview 62 ACX2100 AC Power Specifications 62 Connecting the ACX2000 and ACX2100 to External Devices IN THIS SECTION Connecting ACX2000 or ACX2100 Routers to Management Devices 106 Connecting ACX...

Страница 106: ...t adapter provided Management host such as a PC with an Ethernet port not provided Connecting the Router to a Network for Out of Band Management To connect to the MGMT port on the router 1 Turn off the power to the management device 2 Plug one end of the Ethernet cable into the MGMT port on the router Figure 24 on page 106 shows the connector Figure 25 on page 106 shows the port 3 Plug the other e...

Страница 107: ... Plug the RJ 45 end of the serial cable into the AUX port or CONSOLE port on the front panel Figure 26 on page 107 shows the connector Figure 27 on page 108 shows the ports CAUTION Do not connect Power over Ethernet PoE cable to the AUX port or the CONSOLE port Connecting PoE cable to the AUX or CONSOLE ports might damage these ports permanently 3 Plug the female DB 9 end into the device s serial ...

Страница 108: ...er 108 Connecting a T1 or E1 External Clocking Device to the Router 109 The ACX2000 and ACX2100 routers support external clock synchronization for Synchronous Ethernet T1 or E1 line timing sources and external inputs Connecting 1 PPS and 10 MHz Timing Devices to the Router The router has four SMB connectors that support 1 PPS and 10 MHz timing devices NOTE Ensure a cable of 3m or less in length is...

Страница 109: ...nternal clock port on the craft interface 3 Plug the other end of the RJ 45 cable into the T1 or E1 external clocking device 4 Verify that the LEDs for the external clock input is lit steadily green 5 Configure the port See Initially Configuring the ACX2000 or ACX2100 Router on page 111 Configuring External Clock Synchronization for ACX Series Routers 6 Issue the show chassis synchronization comma...

Страница 110: ...o connect an external device to an alarm relay contact 1 Prepare the required length of wire with gauge between 8 AWG and 14 AWG 0 08 and 2 08 mm 2 2 Attach an electrostatic discharge ESD grounding strap to your bare wrist and connect the strap to one of the ESD points on the chassis 3 While the terminal block is not plugged into the relay contact use a 2 5 mm flat blade screwdriver to loosen the ...

Страница 111: ...ion as alternate boot devices When the router boots it first attempts to start the image on the USB Flash memory device If a USB Flash memory device is not inserted into the router or the attempt otherwise fails the router next tries the active partition on the NAND Flash device and then tries the alternate partition on the NAND Flash device You configure the router by issuing Junos OS command lin...

Страница 112: ... Start the CLI root cli root 4 Enter configuration mode cli configure edit root 5 Configure the name of the router If the name includes spaces enclose the name in quotation marks edit root set system host name host name 6 Create a management console user account edit root set system login user user name authentication plain text password New password password Retype new password password 7 Set the...

Страница 113: ...et system backup router address 11 Configure the IP address of a DNS server edit root set system name server address 12 Set the root authentication password by entering either a clear text password an encrypted password or an SSH public key string DSA or RSA edit root set system root authentication plain text password New password password Retype new password password or edit root set system root ...

Страница 114: ...outes see the Junos OS Administration Library edit root set routing options static route remote subnet next hop destination IP retain no readvertise 14 Configure the telnet service at the edit system services hierarchy level edit root set system services telnet 15 Optional Display the configuration to verify that it is correct edit root show system host name host name domain name domain name backu...

Страница 115: ...ation statements Then commit the changes to activate them on the router edit root host commit 18 When you have finished configuring the router exit configuration mode edit root host exit root host RELATED DOCUMENTATION ACX2000 and ACX2100 Routers Hardware and CLI Terminology Mapping 20 Protocols and Applications Supported by ACX Series Routers 26 115 ...

Страница 116: ...4 CHAPTER Maintaining Components Maintaining ACX2000 and ACX2100 Components 117 ...

Страница 117: ...outer Purpose For optimum router performance perform preventive maintenance procedures Action Inspect the installation site for moisture loose wires or cables and excessive dust Make sure that airflow is unobstructed around the router and into the air intake vents Check the status reporting devices on the font panel system LED Maintaining Cables That Connect to ACX2000 or ACX2100 Network Ports Pur...

Страница 118: ...en absorbed by the short fiber extension which is easy and inexpensive to replace Keep fiber optic cable connections clean Small microdeposits of oil and dust in the canal of the transceiver or cable connector could cause loss of light reducing signal power and possibly causing intermittent problems with the optical connection To clean the transceivers use an appropriate fiber cleaning device such...

Страница 119: ...2100 Routers Hardware and CLI Terminology Mapping 20 Removing a Transceiver from the ACX2000 or ACX2100 Removing a transceiver does not interrupt router functioning but the removed transceiver no longer receives or transmits data To remove a transceiver see Figure 28 on page 120 1 Have ready a replacement transceiver or a transceiver slot plug an antistatic mat and a rubber safety cap for the tran...

Страница 120: ...at you open the ejector handle completely until you hear it click This action prevents damage to the transceiver Use needlenose pliers to pull the ejector handle out from the transceiver 6 Grasp the transceiver ejector handle and pull the transceiver approximately 0 5 in 1 3 cm out of the router 7 Using your fingers grasp the body of the transceiver and pull it the rest of the way out of the route...

Страница 121: ... each transceiver to be installed out of its electrostatic bag and identify the slot on the component where it will be installed 3 Verify that each transceiver is covered by a rubber safety cap If it is not cover the transceiver with a safety cap 4 Carefully align the transceiver with the slots in the component The connectors should face the component 5 Slide the transceiver until the connector is...

Страница 122: ...on ACX2000 and ACX2100 Routers 50 Replacing an ACX2000 or ACX2100 Management Ethernet Cable 1 Removing an ACX2000 or ACX2100 Management Ethernet Cable 122 2 Installing an ACX2000 and ACX2100 Management Ethernet Cable 123 Removing an ACX2000 or ACX2100 Management Ethernet Cable To remove a serial cable connected to a management device 1 Wrap and fasten one end of the ESD grounding strap around your...

Страница 123: ...or Pinout Information for ACX Series Routers 87 Replacing an ACX2000 or ACX2100 Console or Auxiliary Cable 1 Removing an ACX2000 or ACX2100 Console or Auxiliary Cable 123 2 Installing an ACX2000 or ACX2100 Console or Auxiliary Cable 124 Removing an ACX2000 or ACX2100 Console or Auxiliary Cable To remove a serial cable connected to a console or auxiliary device 1 Wrap and fasten one end of the ESD ...

Страница 124: ... serial cable with RJ 45 connectors To connect a cable between the router and the console or auxiliary device 1 Wrap and fasten one end of the ESD grounding strap around your bare wrist and connect the other end of the strap to an ESD point 2 Connect one end of the replacement cable into the CONSOLE AUX port 3 Plug the other end of the cable into the device s serial port SEE ALSO Console or Auxili...

Страница 125: ...5 CHAPTER Troubleshooting Hardware Troubleshooting ACX2000 and ACX2100 126 ...

Страница 126: ...primary tool for controlling and troubleshooting router hardware the Junos OS routing protocols and network connectivity CLI commands display information from routing tables information specific to routing protocols and information about network connectivity derived from the ping and traceroute utilities You enter CLI commands on one or more external management devices connected to ports on the fr...

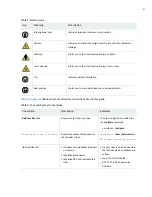
Страница 127: ...n see Displaying a Log File from a Single Chassis System Alarm Types and Severity Classes on ACX Series Routers Before monitoring the alarms on the router become familiar with the terms defined in Table 34 on page 127 Table 34 Alarm Terms Definition Term Signal alerting you to conditions that might prevent normal operation On a router the alarm signal is the red system LED that is lit on the front...

Страница 128: ...hresholds An alarm condition configured on an interface has triggered a critical warning Minor blinking red Indicates a noncritical condition on the router that if left unchecked might cause an interruption in service or degradation in performance A minor alarm condition requires monitoring or maintenance A missing rescue configuration generates a minor system alarm Verifying Active Alarms Purpose...

Страница 129: ... with no active alarms the CLI displays the output as shown user host show chassis alarms No alarms currently active Meaning Table 35 on page 129 lists the alarm output fields Table 35 Alarm Output Fields Values Field Date and time when the failure was detected Alarm time Alarm severity either major or minor Class Brief synopsis of the alarm Description 129 ...

Страница 130: ...6 CHAPTER Contacting Customer Support and Returning the Chassis or Components Contacting Customer Support and Returning the Chassis or Components 131 ...

Страница 131: ...ot return any component to Juniper Networks Inc unless you have first obtained an RMA number Juniper Networks Inc reserves the right to refuse shipments that do not have an RMA Refused shipments are returned to the customer by collect freight For more information about return and repair policies see the customer support webpage at https support juniper net support For product problems or technical...

Страница 132: ...uter components and their serial numbers enter the following command line interface CLI command user host show chassis hardware Hardware inventory Item Version Part number Serial number Description Chassis ACX2000 Midplane REV 00 650 037055 HS0211334046 ACX2000 Routing Engine BUILTIN BUILTIN Routing Engine FEB 0 BUILTIN BUILTIN Forwarding Engine Processor FPC 0 BUILTIN BUILTIN FPC BUILTIN PIC 0 BU...

Страница 133: ... Packing Hardware Components for Shipment To pack and ship individual components When you return components make sure that they are adequately protected with packing materials and packed so that the pieces are prevented from moving around inside the carton Use the original shipping materials if they are available Place individual components in antistatic bags Write the RMA number on the exterior o...

Страница 134: ...strap around your bare wrist and connect the other end of the strap to an ESD point 4 Shut down power to the router by pressing the AC input switch or DC circuit breaker for all power supplies to the off O position 5 Disconnect power from the router 6 Remove the cables that connect to all external devices 7 Remove all field replaceable units FRUs from the router 8 Remove the router from the rack O...

Страница 135: ...g 142 Chassis and Component Lifting Guidelines 143 Restricted Access Warning 144 Ramp Warning 146 Rack Mounting and Cabinet Mounting Warnings 147 Grounded Equipment Warning 153 Radiation from Open Port Apertures Warning 154 Laser and LED Safety Guidelines and Warnings 155 Maintenance and Operational Safety Guidelines and Warnings 158 General Electrical Safety Guidelines and Warnings 167 Action to ...

Страница 136: ...6 DC Power Wiring Sequence Warning 178 DC Power Wiring Terminations Warning 181 Midplane Energy Hazard Warning 183 Multiple Power Supplies Disconnection Warning 184 TN Power Warning 185 Agency Approvals for ACX2000 and ACX2100 Routers 185 Compliance Statements for NEBS for ACX2000 and ACX2100 Routers 187 Compliance Statements for EMC Requirements for ACX2000 and ACX2100 Routers 188 Compliance Stat...

Страница 137: ...ndle Never install or manipulate wiring during electrical storms Never install electrical jacks in wet locations unless the jacks are specifically designed for wet environments Operate the device only when it is properly grounded Follow the instructions in this guide to properly ground the device to earth Replace fuses only with fuses of the same type and rating Do not open or remove chassis cover...

Страница 138: ...ls of safety warnings there are two Warning formats NOTE You might find this information helpful in a particular situation or you might overlook this important information if it was not highlighted in a Note CAUTION You need to observe the specified guidelines to prevent minor injury or discomfort to you or severe damage to the device WARNING This symbol alerts you to the risk of personal injury f...

Страница 139: ...139 ...

Страница 140: ...e befinden sich in einer Situation die zu einer Körperverletzung führen könnte Bevor Sie mit der Arbeit an irgendeinem Gerät beginnen seien Sie sich der mit elektrischen Stromkreisen verbundenen Gefahren und der Standardpraktiken zur Vermeidung von Unfällen bewußt Avvertenza Questo simbolo di avvertenza indica un pericolo La situazione potrebbe causare infortuni alle persone Prima di lavorare su q...

Страница 141: ...ention Tout installation ou remplacement de l appareil doit être réalisé par du personnel qualifié et compétent Warnung Gerät nur von geschultem qualifiziertem Personal installieren oder auswechseln lassen Avvertenza Solo personale addestrato e qualificato deve essere autorizzato ad installare o sostituire questo apparecchio Advarsel Kun kvalifisert personell med riktig opplæring bør montere eller...

Страница 142: ...istämistä virtalähteeseen Attention Avant de brancher le système sur la source d alimentation consulter les directives d installation Warnung Lesen Sie die Installationsanweisungen bevor Sie das System an die Stromquelle anschließen Avvertenza Consultare le istruzioni di installazione prima di collegare il sistema all alimentatore Advarsel Les installasjonsinstruksjonene før systemet kobles til st...

Страница 143: ...your knees bent and your back relatively straight Do not twist your body as you lift Balance the load evenly and be sure that your footing is firm Use the following lifting guidelines to lift devices and components Up to 39 7 lb 18 kg One person 39 7 lb 18 kg to 70 5 lb 32 kg Two or more people 70 5 lb 32 kg to 121 2 lb 55 kg Three or more people Above 121 2 lbs 55 kg Material handling systems suc...

Страница 144: ...Restricted Access Warning 144 ...

Страница 145: ...canisme de verrouillage et une clé ou tout autre moyen de sécurité L accès aux zones de sécurité est sous le contrôle de l autorité responsable de l emplacement Warnung Diese Einheit ist zur Installation in Bereichen mit beschränktem Zutritt vorgesehen Ein Bereich mit beschränktem Zutritt ist ein Bereich zu dem nur Wartungspersonal mit einem Spezialwerkzeugs Schloß und Schlüssel oder anderer Siche...

Страница 146: ...ning och kontrolleras av den auktoritet som ansvarar för området Ramp Warning WARNING When installing the device do not use a ramp inclined at more than 10 degrees Waarschuwing Gebruik een oprijplaat niet onder een hoek van meer dan 10 graden Varoitus Älä käytä sellaista kaltevaa pintaa jonka kaltevuus ylittää 10 astetta Attention Ne pas utiliser une rampe dont l inclinaison est supérieure à 10 de...

Страница 147: ...k Mounting and Cabinet Mounting Warnings Ensure that the rack or cabinet in which the device is installed is evenly and securely supported Uneven mechanical loading could lead to a hazardous condition 147 ...

Страница 148: ...148 ...

Страница 149: ...Networks switch moet in een stellage worden geïnstalleerd die aan een bouwsel is verankerd Dit toestel dient onderaan in het rek gemonteerd te worden als het toestel het enige in het rek is Wanneer u dit toestel in een gedeeltelijk gevuld rek monteert dient u het rek van onderen naar boven te laden met het zwaarste onderdeel onderaan in het rek Als het rek voorzien is van stabiliseringshulpmiddele...

Страница 150: ...oder Warten dieser Einheit in einem Gestell müssen Sie besondere Vorkehrungen treffen um sicherzustellen daß das System stabil bleibt Die folgenden Richtlinien sollen zur Gewährleistung Ihrer Sicherheit dienen Der Juniper Networks switch muß in einem Gestell installiert werden das in der Gebäudestruktur verankert ist Wenn diese Einheit die einzige im Gestell ist sollte sie unten im Gestell angebra...

Страница 151: ...lt skal kabinettet lastes fra bunnen og opp med den tyngste komponenten nederst i kabinettet Hvis kabinettet er utstyrt med stabiliseringsutstyr skal stabilisatorene installeres før montering eller utføring av reparasjonsarbeid på enheten i kabinettet Aviso Para se prevenir contra danos corporais ao montar ou reparar esta unidade numa estante deverá tomar precauções especiais para se certificar de...

Страница 152: ...g För att undvika kroppsskada när du installerar eller utför underhållsarbete på denna enhet på en ställning måste du vidta särskilda försiktighetsåtgärder för att försäkra dig om att systemet står stadigt Följande riktlinjer ges för att trygga din säkerhet Juniper Networks switch måste installeras i en ställning som är förankrad i byggnadens struktur Om denna enhet är den enda enheten på ställnin...

Страница 153: ...gen Sie die Anweisungen in dieser Anleitung um das Gerät ordnungsgemäß zu erden Avvertenza Questo dispositivo deve sempre disporre di una connessione a massa Seguire le istruzioni indicate in questa guida per connettere correttamente il dispositivo a massa Advarsel Denne enheten på jordes skikkelig hele tiden Følg instruksjonene i denne veiledningen for å jorde enheten Aviso Este equipamento dever...

Страница 154: ... Vermeiden Sie es sich den Strahlungen auszusetzen und starren Sie nicht in die Öffnungen Avvertenza Quando i cavi in fibra non sono inseriti radiazioni invisibili possono essere emesse attraverso l apertura della porta Evitate di esporvi alle radiazioni e non guardate direttamente nelle aperture Advarsel Unngå utsettelse for stråling og stirr ikke inn i åpninger som er åpne fordi usynlig stråling...

Страница 155: ...following guidelines and warnings General Laser Safety Guidelines When working around ports that support optical transceivers observe the following safety guidelines to prevent eye injury Do not look into unterminated ports or at fibers that connect to unknown sources Do not examine unterminated optical ports with optical instruments Avoid direct exposure to the beam WARNING Unterminated optical c...

Страница 156: ...laser produkt Varoitus Luokan 1 lasertuote Attention Produit laser de classe I Warnung Laserprodukt der Klasse 1 Avvertenza Prodotto laser di Classe 1 Advarsel Laserprodukt av klasse 1 Aviso Produto laser de classe 1 Atención Producto láser Clase I Varning Laserprodukt av klass 1 156 ...

Страница 157: ...us Luokan 1 valodiodituote Attention Alarme de produit LED Class I Warnung Class 1 LED Produktwarnung Avvertenza Avvertenza prodotto LED di Classe 1 Advarsel LED produkt i klasse 1 Aviso Produto de classe 1 com LED Atención Aviso sobre producto LED de Clase 1 Varning Lysdiodprodukt av klass 1 157 ...

Страница 158: ...kt mit optischen Geräten prüfen Avvertenza Non fissare il raggio con gli occhi né usare strumenti ottici per osservarlo direttamente Advarsel Stirr eller se ikke direkte p strlen med optiske instrumenter Aviso Não olhe fixamente para o raio nem olhe para ele directamente com instrumentos ópticos Atención No mirar fijamente el haz ni observarlo directamente con instrumentos ópticos Varning Rikta in...

Страница 159: ...Operating Temperature Warning 164 Product Disposal Warning 166 While performing the maintenance activities for devices observe the following guidelines and warnings 159 ...

Страница 160: ...leichen oder vom Hersteller empfohlenen Batterietyp Entsorgen Sie die benutzten Batterien nach den Anweisungen des Herstellers Advarsel Det kan være fare for eksplosjon hvis batteriet skiftes på feil måte Skift kun med samme eller tilsvarende type som er anbefalt av produsenten Kasser brukte batterier i henhold til produsentens instruksjoner Avvertenza Pericolo di esplosione se la batteria non è i...

Страница 161: ...Jewelry Removal Warning 161 ...

Страница 162: ... Vor der Arbeit an Geräten die an das Netz angeschlossen sind jeglichen Schmuck einschließlich Ringe Ketten und Uhren abnehmen Metallgegenstände erhitzen sich wenn sie an das Netz und die Erde angeschlossen werden und können schwere Verbrennungen verursachen oder an die Anschlußklemmen angeschweißt werden Avvertenza Prima di intervenire su apparecchiature collegate alle linee di alimentazione togl...

Страница 163: ... te sluiten of te ontkoppelen Varoitus Älä työskentele järjestelmän parissa äläkä yhdistä tai irrota kaapeleita ukkosilmalla Attention Ne pas travailler sur le système ni brancher ou débrancher les câbles pendant un orage Warnung Arbeiten Sie nicht am System und schließen Sie keine Kabel an bzw trennen Sie keine ab wenn es gewittert Avvertenza Non lavorare sul sistema o collegare oppure scollegare...

Страница 164: ...Operating Temperature Warning 164 ...

Страница 165: ...iner Gegend betrieben werden in der die Umgebungstemperatur das empfohlene Maximum von 40 C überschreitet Um Lüftungsverschluß zu verhindern achten Sie darauf daß mindestens 15 2 cm lichter Raum um die Lüftungsöffnungen herum frei bleibt Avvertenza Per evitare il surriscaldamento dei switch non adoperateli in un locale che ecceda la temperatura ambientale massima di 40 C Per evitare che la circola...

Страница 166: ...sia lakeja ja säännöksiä noudattaen Attention La mise au rebut définitive de ce produit doit être effectuée conformément à toutes les lois et réglementations en vigueur Warnung Dieses Produkt muß den geltenden Gesetzen und Vorschriften entsprechend entsorgt werden Avvertenza L eliminazione finale di questo prodotto deve essere eseguita osservando le normative italiane vigenti in materia Advarsel E...

Страница 167: ...ing strap could result in damage to the device Install the device in compliance with the following local national and international electrical codes United States National Fire Protection Association NFPA 70 United States National Electrical Code Other countries International Electromechanical Commission IEC 60364 Part 1 through Part 7 Evaluated to the TN power system Canada Canadian Electrical Co...

Страница 168: ...rical Accident If an electrical accident results in an injury take the following actions in this order 1 Use caution Be aware of potentially hazardous conditions that could cause further injury 2 Disconnect power from the device 3 If possible send another person to get medical aid Otherwise assess the condition of the victim then call for help Prevention of Electrostatic Discharge Damage Device co...

Страница 169: ...ng strap is available touch the exposed bare metal of the device to ground yourself before handling the component Avoid contact between the component that is subject to ESD damage and your clothing ESD voltages emitted from clothing can damage components When removing or installing a component that is subject to ESD damage always place it component side up on an antistatic surface in an antistatic...

Страница 170: ...ated at 2 A 100 VAC or 1 A 240 VAC or as required by local code WARNING The router is pluggable type A equipment installed in a restricted access location The power cord serves as the main disconnecting device for the AC powered device The socket outlet must be near the AC powered device and be easily accessible The cores in the main lead are colored in accordance with the following code Green and...

Страница 171: ...tés en courant alternatif Warnung Bevor Sie an einem Chassis oder in der Nähe von Netzgeräten arbeiten ziehen Sie bei Wechselstromeinheiten das Netzkabel ab bzw Avvertenza Prima di lavorare su un telaio o intorno ad alimentatori scollegare il cavo di alimentazione sulle unità CA Advarsel Før det utføres arbeid på kabinettet eller det arbeides i nærheten av strømforsyningsenheter skal strømledninge...

Страница 172: ...osed loop ring is recommended for terminating the ground conductor at the ground stud A DC powered router that is equipped with a DC terminal block is intended only for installation in a restricted access location In the United States a restricted access area is one in accordance with Articles 110 16 110 17 and 110 18 of the National Electrical Code ANSI NFPA 70 NOTE Primary overcurrent protection...

Страница 173: ...s Warning WARNING Use copper conductors only Waarschuwing Gebruik alleen koperen geleiders Varoitus Käytä vain kuparijohtimia Attention Utilisez uniquement des conducteurs en cuivre Warnung Verwenden Sie ausschließlich Kupferleiter Avvertenza Usate unicamente dei conduttori di rame Advarsel Bruk bare kobberledninger Aviso Utilize apenas fios condutores de cobre Atención Emplee sólo conductores de ...

Страница 174: ...DC Power Disconnection Warning 174 ...

Страница 175: ... être sûr localiser le disjoncteur situé sur le panneau de service du circuit en courant continu placer le disjoncteur en position fermée OFF et à l aide d un ruban adhésif bloquer la poignée du disjoncteur en position OFF Warnung Vor Ausführung der folgenden Vorgänge ist sicherzustellen daß die Gleichstromschaltung keinen Strom erhält Um sicherzustellen daß sämtlicher Strom abgestellt ist machen ...

Страница 176: ...F y sujetar con cinta la palanca del interruptor automático en posición de Apagado OFF Varning Innan du utför någon av följande procedurer måste du kontrollera att strömförsörjningen till likströmskretsen är bruten Kontrollera att all strömförsörjning är BRUTEN genom att slå AV det överspänningsskydd som skyddar likströmskretsen och tejpa fast överspänningsskyddets omkopplare i FRÅN läget DC Power...

Страница 177: ...ier et déconnectée en dernier Warnung Der Erdanschluß muß bei der Installation der Einheit immer zuerst hergestellt und zuletzt abgetrennt werden Avvertenza In fase di installazione dell unità eseguire sempre per primo il collegamento a massa e disconnetterlo per ultimo Advarsel Når enheten installeres må jordledningen alltid tilkobles først og frakobles sist Aviso Ao instalar a unidade a ligação ...

Страница 178: ...DC Power Wiring Sequence Warning 178 ...

Страница 179: ...tez que le fil de masse devrait toujours être relié d abord et débranché pour la dernière fois Warnung Die Stromzufuhr ist nur mit geeigneten Ringösen an das DC Netzteil anzuschliessen Die richtige Anschlusssequenz ist Erdanschluss zu Erdanschluss RTN zu RTN und dann 48V zu 48V Die richtige Sequenz zum Abtrennen der Stromversorgung ist 48V zu 48V RTN zu RTN und dann Erdanschluss zu Erdanschluss Es...

Страница 180: ...üência apropriada da fiação é moída para moer RTN a RTN então 48 V a 48 V Ao desconectar a potência a seqüência apropriada da fiação é 48 V a 48 V RTN a RTN moeu então para moer Anote que o fio à terra deve sempre ser conectado primeiramente e desconectado por último Anote que o fio à terra deve sempre ser conectado primeiramente e desconectado por último Varning Korrekt kopplingssekvens ar jord t...

Страница 181: ...DC Power Wiring Terminations Warning 181 ...

Страница 182: ... sur le conducteur Warnung Wenn Litzenverdrahtung erforderlich ist sind zugelassene Verdrahtungsabschlüsse z B für einen geschlossenen Regelkreis oder gabelförmig mit nach oben gerichteten Kabelschuhen zu verwenden Diese Abschlüsse sollten die angemessene Größe für die Drähte haben und sowohl die Isolierung als auch den Leiter festklemmen Avvertenza Quando occorre usare trecce usare connettori omo...

Страница 183: ...ndas t ex kabelsko av sluten eller öppen typ med uppåtvänd tapp Storleken på dessa kontakter måste vara avpassad till ledningarna och måste kunna hålla både isoleringen och ledaren fastklämda Midplane Energy Hazard Warning WARNING High levels of electrical energy are distributed across the midplane Be careful not to contact the midplane connectors or any component connected to the midplane with an...

Страница 184: ...inen Stromanschluß um Strom gänzlich von der Einheit fernzuhalten müssen alle Stromzufuhren abgetrennt sein Avvertenza Questa unità ha più di una connessione per alimentatore elettrico tutte le connessioni devono essere completamente rimosse per togliere l elettricità dall unità Advarsel Denne enheten har mer enn én strømtilkobling Alle tilkoblinger må kobles helt fra for å eliminere strøm fra enh...

Страница 185: ...i di alimentazione TN Advarsel Utstyret er utfomet til bruk med TN strømsystemer Aviso O dispositivo foi criado para operar com sistemas de corrente TN Atención El equipo está diseñado para trabajar con sistemas de alimentación tipo TN Varning Enheten är konstruerad för användning tillsammans med elkraftssystem av TN typ Agency Approvals for ACX2000 and ACX2100 Routers ACX2000 and ACX2100 routers ...

Страница 186: ...61000 3 2 Power Line Harmonics EN 61000 3 3 Power Line Voltage Fluctuations EN 61000 4 2 ESD EN 61000 4 3 Radiated Immunity EN 61000 4 4 EFT EN 61000 4 5 Surge EN 61000 4 6 Conducted Disturbances Immunity EN 61000 4 11 Voltage Dips and Sags ETSI ETSI EN 300 019 Environmental Conditions Environmental Tests for Telecommunications Equipment ETSI EN 300 019 2 1 2000 Storage ETSI EN 300 019 2 2 1999 Tr...

Страница 187: ...d ACX2100 Routers 190 Compliance Statements for Environmental Requirements 190 Compliance Statements for NEBS for ACX2000 and ACX2100 Routers The equipment is suitable for installation as part of the Common Bonding Network CBN The equipment is suitable for installation in locations where the National Electrical Code NEC applies The battery return connection is to be treated as an isolated DC retur...

Страница 188: ...uropean Community This is a Class A product In a domestic environment this product might cause radio interference in which case the user might be required to take adequate measures Israel Translation from Hebrew Warning This product is Class A In residential environments the product might cause radio interference and in such a situation the user might be required to take adequate measures 188 ...

Страница 189: ...e reasonable protection against harmful interference when the equipment is operated in a commercial environment This equipment generates uses and can radiate radio frequency energy and if not installed and used in accordance with the instruction manual might cause harmful interference to radio communications Operation of this equipment in a residential area is likely to cause harmful interference ...

Страница 190: ...proper method of reclamation and recycling Compliance Statements for Acoustic Noise for ACX2000 and ACX2100 Routers The router complies with NEBS Level 3 requirements GR 63 CORE NEBS Physical Protection GR 1089 CORE EMC and Electrical Safety for Network Telecommunications Equipment RELATED DOCUMENTATION Compliance Statements for NEBS for ACX2000 and ACX2100 Routers 187 Compliance Statements for EM...

Отзывы: