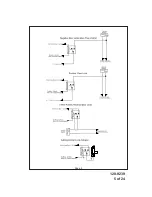
Panther PA-420C Скачать руководство пользователя страница 9

128-9239

9 of 24

Page 9

    long chirp and 2 Light flashes when the key is turned on indicates that you are in
    feature selection of bank 2.
4. Press the pushbutton switch 1 time to access the first selection as shown below.
    Use the button of the transmitter to change the feature selection or press the
    pushbutton to advance to the next selectable feature.

Bank 2

Feature

               1 Chirp/Flash     2 Chirp/Flash    3 Chirp/Flash    4 Chirp/Flash    5 Chirp/Flash    6 Chirps/Flash

     Default

1stDoor Unlock             1S/1S                    3.5 S/3.5S         1 S/Dbl 1 S.        Dbl 1/1 S           Dbl 1/Dbl 1        1S L/350mS ul

      1S

2nd Accy Lock                NA

3rd Accy. UL                On

                  Off

      Off

4th Horn Chirp              10mS                  16mS                   30mS

    40mS

       50mS

      16mS

5

th

 Chp Del TX              NA

6th Park Lights              Normal               NA                       On 15 Sec W/UL

      Normal

5. When finished setting the keyless/alarm selectable features, turn the ignition off then
    on to advance to Bank 3, Remote Start Selectable Features.
    1 Flash when the key transitions off, then 2 long chirps and 3 light flashes when the key
    transitions on.
6. Press the pushbutton switch one time to access the first selection as shown below.
    Use the button of the transmitter to change the feature selection or press the
    pushbutton to advance to the next selectable feature.

Bank 3

Feature

                1 Chirp/Flash      2 Chirp/Flash     3 Chirp/Flash   4 Chirp/Flash    5 Chirp/Flash    6 Chirps/Flash

Default

1 RF Start Chirp            Off                     On

On

2 Run Time

                5 Min.                 10 Min.                   15Min.              20 Min.

10 Min

3 Park Lights                 On Steady           Flash

Steady

4 Input Check                 Voltage               Tach

DBI  Tach 


Hybrid

Tach

5 Voltage Level               > 0.5V B4 Start   < 0.5V B4 Start

> 0.5

6 Ign. 2 Select               Off With Crank    On With Crank    Same As Accy                                                                                                 On With Crank

7 Diagnostics               Off                         On

Off

8 Crank Time                 0.8Sec                 1.0 Sec

1.5 Sec             2.0 Sec               3.0 Sec                      4.0 Sec                     1.0 Sec

9 Gas/Diesel                 Gas                       Diesel 10

Diesel 15          Diesel 20

Gas

10 Grn/Blk (Aux O/P)  Single Pulse          As D U/L Pulse

Single

11 DBI Select                ADS                      DBI

ADS

12 Time Start                2 Hours                 4 Hours

4 Hours

Diagnostics:

Enter Bank 3 and turn on selectable feature # 7 as described in the feature selection and
setting section.
Exit the feature selection mode then press and hold the pushbutton valet/program switch
and then turn the ignition switch to the on position.

NOTE:

Diagnostic mode is a temporary mode. Once you have accessed the diagnostic
mode, the unit will pause for two seconds then begin to flash the last stored shut
down code. This code will be displayed three times in succession, then the unit
will automatically exit the diagnostic mode.

The parking lights will flash a number of times indicating the reason for the last remote
start shutdown. The light flash indications are as follows:
1 Flash

Run timer expired

2 Flashes

Low or no tach signal (RPM)

3 Flashes

Positive inhibit wire activation

5 Flashes

RF shutdown signal received, or manual start trigger wire reactivated.

6 Flashes

High tach signal (RPM)

Содержание PA-420C

Страница 1: ...ble Duration Selectable RF Start Chirp Car Finder Mode Can elect to have horn beep along with parking lights if connected Selectable Run Times 5 10 15 or 20 Minutes Selectable Gas or Diesel Automatic...

Страница 2: ...nch the cable as this will cause poor or no RF reception to the control module Connect the 5 pin cable to the mating connector of control module HOOD PIN SWITCH P N 1363699 The pin switch included in...

Страница 3: ...l realize why the connection of the safety wire is required for all mechanical switch con figurations Failure to make this connection properly can result in personal injury and property damage In all...

Страница 4: ...es today have factory door lock relays which can be connected directly to this output however always confirm that the factory relays in your particular vehicle do not exceed the rated 250mA output of...

Страница 5: ...128 9239 5 of 24 Page 5...

Страница 6: ...lsed ground output after the remote start unit shuts down and the G W R O P turns off This output will occur regardless of whether the circuit times out or is manually terminated Typically this output...

Страница 7: ...e to do so may result in personal injury or property damage This wire may also be used if the vehicle brake light circuit switches ground to the brake lights An isolation diode must be used for ground...

Страница 8: ...to the On position 2 Press and release the valet program push button switch 3 times 3 Immediately turn the ignition key Off 4 Press and hold the valet program push button switch then start the vehicl...

Страница 9: ...ash Default 1 RF Start Chirp Off On On 2 Run Time 5 Min 10 Min 15Min 20 Min 10 Min 3 Park Lights On Steady Flash Steady 4 Input Check Voltage Tach DBI Tach Hybrid Tach 5 Voltage Level 0 5V B4 Start 0...

Страница 10: ...with the individual component along with the proper 4 pin wiring harness requires to access the data transmit and receive as well as the proper voltage levels for the interface COMPLETING THE INSTALLA...

Страница 11: ...128 9239 11 of 24 Page 11 2013 Audiovox Electronics Corporation Hauppauge NY 11788 128 9239 For technical support go to www prestigecarsecurity com or call 1 800 225 6074...

Страница 12: ...ble Seleccionable RF Inicio Chirp Modo de buscador de coche puede elegir tener cuerno junto con las luces de estacionamiento si conecta una se al sonora Seleccionable Run Times 5 10 15 o 20 minutos Se...

Страница 13: ...control con cautela para no pellizcar el cable ya que esto causar pobres o sin recepci n de RF al m dulo de control Conecte el cable de 5 pines en el conector del m dulo de control Interruptor de clav...

Страница 14: ...y seleccionar el m todo de instalaci n correcta Adem s te dar s cuenta por qu es necesaria para todas las configuraciones del interruptor mec nico la conexi n del alambre de seguridad Si no se realiza...

Страница 15: ...puerta de f brica desbloquear rel s que pueden conectarse directamente a esta salida sin embargo siempre confirmar que los rel s de f brica en su veh culo particular no excedan la capacidad de salida...

Страница 16: ...rcuitos conmutados de bloqueo de puerta En esta aplicaci n se utilizar un rel para invertir la se al de salida de bloqueo de puerta del m dulo Conecte los alambre azul como se muestra a continuaci n C...

Страница 17: ...de Banco 3 como puerta de desbloquear el pulso Alambre Azul Claro Pulsada salida negativa despu s de inicio El alambre de luz azul traza proporcionar un 1 segundo negativo de 250 mA pulsed salida desp...

Страница 18: ...contacto de salida del rel de luz de estacionamiento Conecte este alambre al veh culo alambre de activaci n de luz de estacionamiento 5 Pin Entrada Salida de accesorio arn s conector P N 1124266 Alam...

Страница 19: ...ativa 250mA que se convierte en activas 3 segundos antes de que el control remoto iniciar m dulo inicializa y sigue siendo negativo mientras que el m dulo est activo un es adicional de 2 segundos desp...

Страница 20: ...isor que desea programar Consulte propietario guia para transmisor adicional de programaci n 3 Apague el interruptor de encendido a continuacion en Esto tiene acceso a Banco de funci n 2 alarma sin ll...

Страница 21: ...po ADS DBI ADS 12 De tiempo Inicio cada 2 Horas cada 4 Horas Cada 4 horas automatico Diagn sticos Introduzca 3 Banco y Activar funci n seleccionable 7 como se describe en la secci n de selecci n y aju...

Страница 22: ...de datos de 4 PIN Puerto de 4 pines ubicado al costado de este m dulo es paraAudiovox propietarios m dulos de interfaz del bus de datos Estos m dulos se utilizan para acceder a una variedad de caracte...

Страница 23: ...ables hacia arriba y alejados de las piezas m viles y calientes que entre en contacto con debajo del tablero o en las reas del compartimento del motor PRECAUCI N Evite el rea cerca de la direcci n de...

Страница 24: ...128 9239 24 of 24 Page 24 Para soporte t cnico vaya a www prestigecarsecurity com o llame al 1 800 225 6074 2013 Audiovox Electronics Corporation Hauppauge NY 11788 128 9239...

Отзывы: