background image

OptiCam 2 FS133 Termination Tool User Manual

-

30

-

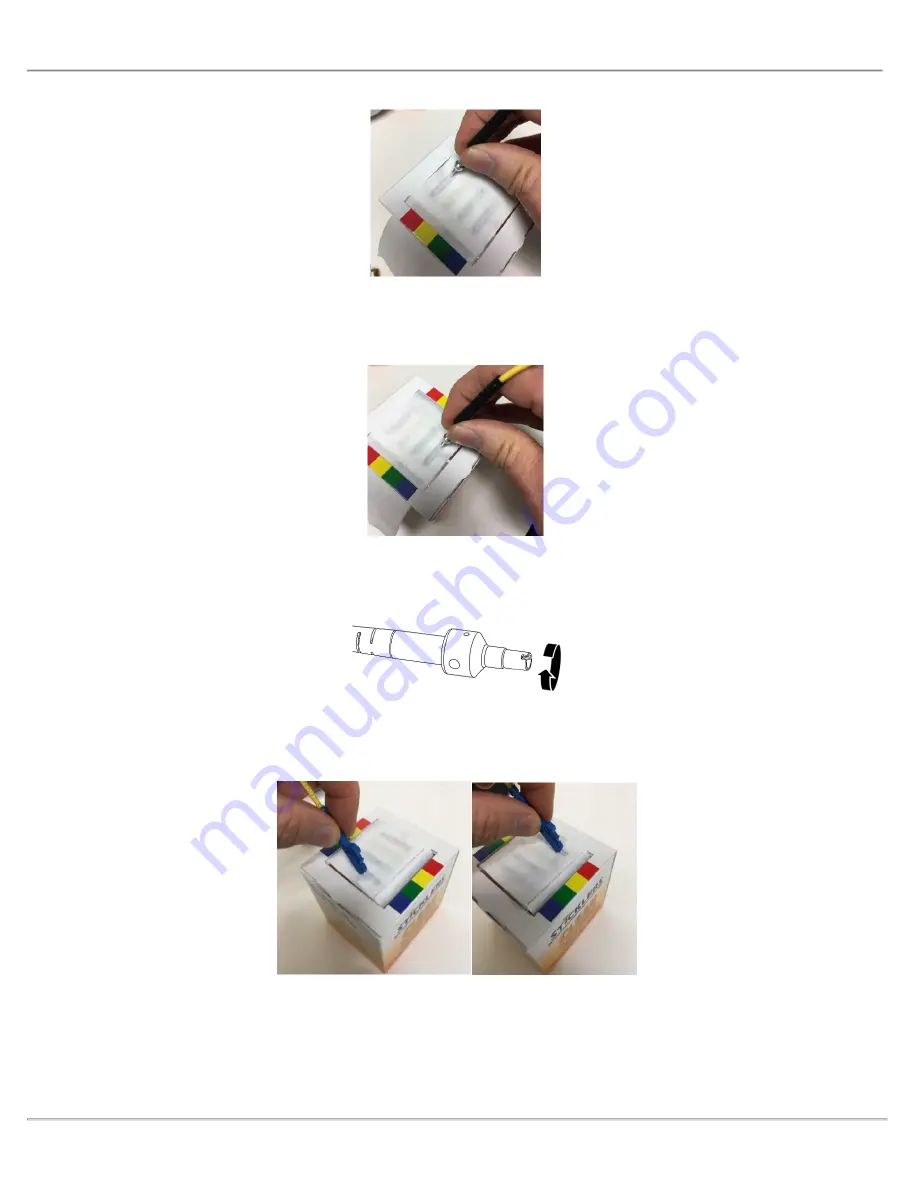
8. If there is stubborn debris on the ends after dry cleaning, use this method: Using the cleaning solution, moisten one end of

a row on the cleaning box. Drag the tip of the fiber along the fiber cleaning row (example shown in blue) from the wet area
to the dry area. Then repeat the wiping procedure with a dry row (example shown in red).

9. To reassemble the Ferrule Adapter, first inspect the split sleeve for chipping or cracks. Thread the Ferrule Adapter onto

the Ferrule Adapter Assembly until the parts make contact. Hold the Cable Crimp Sleeve and turn the Ferrule Adapter
about 5° to tighten the adapter.

10. Always clean the LC connector end of the launch cord before inserting the connector into the tool. Remove the dust cap

and wipe the end face of the fiber, using the same wet/dry procedure. Insert the connector into the tool immediately after
cleaning.

Содержание OptiCam 2 FS133

Страница 1: ...Release 1 Issue 2 OptiCam 2 FS133 Termination Tool User Manual ...

Страница 2: ...hanical photocopying recording or otherwise without written permission from Panduit No patent liability is assumed with respect to the use of the information contained herein Although every precaution has been taken in the preparation of this book Panduit assumes no responsibility for errors or omissions Neither is any liability assumed for damages resulting from the use of the information contain...

Страница 3: ...ight 7 Cable Handling 8 Tool Set Up 9 Component Identification 14 Buffer Stripping Steps 16 250μm Coated Fiber Strip 16 900μm Tight Buffered Fiber Strip 16 Jacketed Cable Strip 17 250μm Coated Fiber Termination Using OptiCom Fanout Kit 17 Buffer Stripping 18 Cleave Fiber Steps 19 Prep Stripped Fiber 19 Score Cleave 19 OptiCam 2 Tool Operation LC 21 Select Connector Options 21 Load Connector 21 Con...

Страница 4: ...User Manual 4 Insert Cleaved Fiber 22 Cam Connector 23 Review Test Results 23 Assemble Connector and Boot 25 LC Connector and Boot 25 SC Connector and Boot 26 ST Connector and Boot 27 Tool Care and Maintenance 28 Connect It App Use 31 ...

Страница 5: ...Supply 2 size AA type L91 1 5volt Lithium Iron Disulfide bat teries Max Discharge 2 5 amp continuous included Size AA alkaline batteries can be used at a reduced rate battery life Tool can also be powered without batteries through the power data 5 VDC 1 amp max port on the side of the tool l Rated Battery Life Approximately 8 hours continuous use l Firmware Updates Use power data port on the side ...

Страница 6: ...h IEC 60825 1 Ed 3 2014 Complies with FDA performance standards for laser products except for deviations pursuant to Laser Notice No 50 dated May 15 2014 This device compiles with Part 15 of the FCC Rules Operation is subject to the following two conditions 1 this device may not cause harmful interference and 2 this device must accept any interference received including any interference that may c...

Страница 7: ...water for at least 15 minutes Always use alcohol with proper levels of ventilation In case of ingestion consult a physician immediately Disposal of Bare Fibers WARNING Pick up and discard all pieces of bare fiber with sticky tabs Do not let cut pieces of fiber stick to clothing or drop in the work area where they are hard to see and can cause injury Laser Light DO NOT VIEW DIRECTLY WITH OPTICAL IN...

Страница 8: ...l on a reflective surface as the laser could be projected into your eyes or the eyes of others Cable Handling WARNING Fiber optic cable can be damaged by excessive pulling twisting crushing or bending stresses Consult the appropriate specification sheets as provided by your cable vendor Any damage may decrease optical performance To Ensure Best Termination l Make sure the batteries are new and fre...

Страница 9: ... 25SM LC cradle black P N FLCC2 LC multimode OM1 OM2 OM3 and OM4 orange cable 1 25mm multimode P N FOLPC 1 25MM LC cradle black P N FLCC2 SC single mode yellow cable 2 5mm single mode P N FOLPC 2 5SM SC cradle gray P N FSCC2 SC multimode OM1 OM2 OM3 and OM4 orange cable 2 5mm multimode P N FOLPC 2 5MM SC cradle gray P N FSCC2 ST single mode yellow cable 2 5mm single mode P N FOLPC 2 5SM ST cradle ...

Страница 10: ...rds disassembled charged crushed or exposed to fire or high temperature 4 The protective film on the Camera Aperture has a removal tab The protective film on the LCD display can be removed by peeling from one corner Note Remove the protective film from the Camera Aperture before operating the tool 5 Before attaching the launch cord first clean the launch cord on both ends Refer to the Tool Care an...

Страница 11: ...or LC terminations the opening on the side of the barrel should be placed facing the tool 9 The cradle attaches to the tool magnetically Position the cradle onto the tool with either a left or right orientation and the magnets will properly align the cradle Right and left orientations are shown below LC launch cord and LC Cradle are shown 10 Power on by using the center of the navigation button Th...

Страница 12: ... become red Click Save Note To ensure proper function of the tool check that settings on the tool match the cord cradle con nector and orientation being used 13 To select the Insertion Loss IL Threshold use the navigation button to navigate to the menus and to Tool Settings then scroll down to IL Threshold The settings window will allow you to select the desired threshold by moving the nav igation...

Страница 13: ... connector A Rotate the ST connector into the cradle B Rotate the retaining clip over the connector C Secure the clip with the audible click D Place the launch cord on the connector end with the split sleeve attaching to the connector ferrule Note ST requires that the user hold the launch cord in place 16 The OptiCam 2 has a data port on the side of the tool which can be used to install firmware u...

Страница 14: ... Launch Cord and Cradle SC Connectors Launch Cord and Cradle ST Connectors Launch Cord and Cradle Alignment Key must be in the alignment tab to cam properly Additionally the flat sides on the back bone will line up into the key slot of the cradle with the etched rounded side facing down ...

Страница 15: ... 2 FS133 Termination Tool User Manual 15 Connector Types with Colors Fiber Type Backbone Color LC SC Boot Color OM3 OM4 50µm Aqua Aqua OM2 50µm Black Black OM1 62 5µm Beige Beige OS1 OS2 Single mode Blue Blue ...

Страница 16: ...tripped coating IMPORTANT 250µm Coated Fiber Stripping Dimensions Due to printing variations use a rigid scale for stripping dimensions or the appropriate Panduit laminated template 6 Slide the leading edge of the build up tube to the start of the coating after cleaving the fiber 900μm Tight Buffered Fiber Strip 1 Insert the fiber end through the small end of the 900μm boot Slide the boot back out...

Страница 17: ...se the marking pen to place a buffer length mark on the buffer at 0 71 18mm for LC and 0 55 14mm for SC ST from the edge of the jacket Place an insertion mark at 0 59 15mm for LC and 0 43 11mm for SC ST back from the first mark IMPORTANT Due to printing variations use a rigid scale for stripping dimensions or the appropriate Pan duit laminated template 6 Use the marking pen to place a mark on the ...

Страница 18: ... LC and 0 43 11mm for SC ST back from the end of the tubing 6 Place a coating removal mark on the coated fiber 3mm from the end of the fanout tubing Strip the coating up to the coat ing removal mark Note The 3mm of coating extending from the end of the tubing is intended to compensate for fiber movement within the fanout tubing during termination Buffer Stripping 1 Remove no more than 1 4 6mm of b...

Страница 19: ...he fiber clamp lever when the end of the buffer is located at the 7mm mark 0 5mm This length is critical to termination Score Cleave 1 This is a critical step for successful termination Gently hold the buffered fiber against the groove in the base plate using thumb and forefinger of your free hand With your other thumb gently push down on the housing until the ceramic blade contacts the fiber only...

Страница 20: ...mination Tool User Manual 20 IMPORTANT Do not clean fiber after cleaving Replace the ceramic blade in the cleaving tool after every 1000 cleaves or if installation yield decreases Replacement blades FJQCVRB are available ...

Страница 21: ...ted text will become red Click Save The orientation of the connector indicates the direction that the fiber is inserted from If Auto is selected the tool will determine this orientation automatically Note To ensure proper function of the tool check that settings on the tool match the cord cradle con nector and orientation being used Load Connector A Insert a connector while the launch cord is tilt...

Страница 22: ... navigation button directly down The tool will perform a background test of the connector After passing the background test the Insert Fiber command will display automatically Note While performing the steps it is important to avoid touching the connector except when camming the connector to get the best results from the tool Insert Cleaved Fiber Insert cleaved fiber and maintain gentle forward pr...

Страница 23: ...connector then select the Next arrow to perform the test SC Camming requires that the key Fin rotates and the rest of the connector remains in place Note This image shows the new metal ferrule adapter for LC launch cords Detail A ST Camming ST Camming is done by rotating the key lever of the cradle which engages the internal camming parts of the connector Review Test Results Verify that the IL val...

Страница 24: ...ect the cancel icon and repeat the fiber termination process for that con nector ID Selecting forward advances the connector ID number for the tool to do another termination In both cases the results will be recorded in the tool for later retrieval The OptiCam connector can be reused up to three times ...

Страница 25: ... ferrule end 3 Optional With a connector held as shown latch on top ferrule facing away insert the connector into one side of the duplex clip as shown clip held with the A B polarity marking upright and facing forward The upper tab of the clip should slide into the pocket underneath the latch of the connector and the lower tab should slide under the connector housing and snap locking it into place...

Страница 26: ...ase from the outer housing Remove outer housing Slide the boot off the backbone Un cam the connector and remove the fiber CAUTION DO NOT push down without a dust cap installed on the ferrule Doing so could damage the pre polished fiber end face 5 Clean the ferrule end face with a dry wipe Place the dust cap over the ferrule end 6 Optional Orient the connector as shown with the connector key facing...

Страница 27: ...the ferrule end 3 Slide the boot back to release the aramid yarn Cut the aramid yarn approximately 0 20 5mm past the flange Flare the aramid yarn evenly around the perimeter of the grooved area of the backbone Use tweezers for best results There will be a slight gap between the cable jacket and the backbone Push the boot forward and thread clockwise onto the grooved area of the backbone until it s...

Страница 28: ...he surface The LC connector port can be cleaned with clean dry air Do not use alcohol 3 The dust caps for both the LC connector tool end and the Ferrule Adapter field con nector end must be installed when the cord is not in use Do not coil the cable to less than one inch diameter at any time to avoid damaging the fiber 4 The fiber tip of the launch cords should be cleaned every 50 connector termin...

Страница 29: ...the same for the 2 5 millimeter cord 5 Twist the split sleeve and pull to remove it from the assembly exposing the tip of the fiber 6 Wet an area of the fiber optic cleaning system wipes with fiber optic cleaning solution 7 Clean the ferrule end faces of any connector or launch cord end using a dry lint free wipe ...

Страница 30: ...a dry row example shown in red 9 To reassemble the Ferrule Adapter first inspect the split sleeve for chipping or cracks Thread the Ferrule Adapter onto the Ferrule Adapter Assembly until the parts make contact Hold the Cable Crimp Sleeve and turn the Ferrule Adapter about 5 to tighten the adapter 10 Always clean the LC connector end of the launch cord before inserting the connector into the tool ...

Страница 31: ...select Tool Settings Wireless On Then select Exit 2 Enter the wireless password given when registering the tool at Panduit com 3 Turn wireless on Note The tool name is found under Menus Tool Settings Tool Name Rename for ease of use 4 To create a new project in Connect It app enter the project credentials and then select Create Project File ...

Страница 32: ...ool name from the list Then select Start Project 6 The app will indicate that the tool has un synced records if terminations were done on the tool without the app and tool being synced Select OK to sync This transfers the records of the termination s to the project file in the app Note The records will no longer be available on the OptiCam 2 tool ...

Страница 33: ...the file c Delete deletes the file from the app 8 To share select the Share option Your mobile device s default email will open with a CSV attachment containing the connector data 9 While the mobile app is connected to the OptiCam 2 tool open a previous project or create a new project Verify the tool settings and connector settings on the Tool Settings tab 10 Properly set the IL threshold with the...

Страница 34: ...ound Test and automatically display Insert Fiber 13 Insert the fiber into the connector When the fiber is fully inserted the graphic on the tool will change to Cam Test 14 Cam the connector per the connector style of camming and maintain pressure on the field fiber at the same time 15 Select Perform Test on the app 16 The test result will display Verify that the IL value meets project requirements...

Страница 35: ...n be reused up to three times 18 To export the connector termination data navigate to the Project Overview and select the current project There are three available options a Share enables the file to be emailed b Select opens the file c Delete deletes the file from the app 19 To share select the Share option Your mobile device s default email will open with a CSV attachment containing the con nect...

Отзывы: