background image

   61

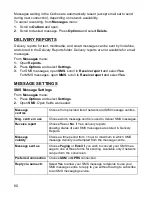
MMS Message Settings

From 

Messages

 menu:

1.

Press 

Options

 and select 

Settings

2.

Open 

MMS

. Open fields as needed: 

Email Message Settings

From 

Messages

 menu:

1.

Press 

Options

 and select 

Settings

2.

Open 

Email

. Open fields as needed: 

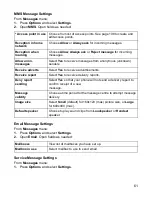
Service Message Settings

From 

Messages

 menu:

1.

Press 

Options

 and select 

Settings

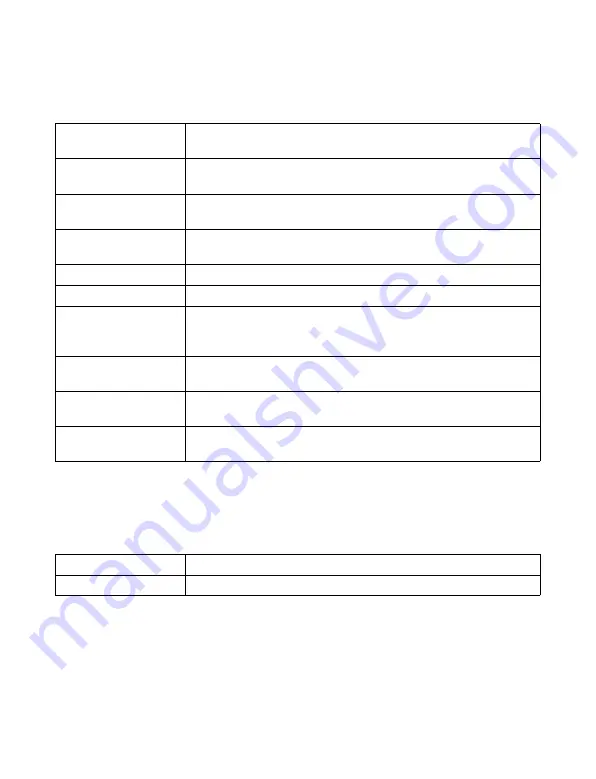
* Access point in use

Choose from list of access points. See page 108 to create and 
edit access points. 

Reception in home 
network

Choose 

Allow 

or 

Always ask

 for incoming messages.

Reception when 
roaming

Choose 

Allow

Always ask

 or 

Reject message

 for incoming 

messages.

Allow anon. 
messages

Select 

Yes

 to receive messages from anonymous (unknown) 

senders.

Receive adverts

Select 

Yes

 to receive advertisements. 

Receive report

Select 

Yes

 to receive delivery reports.

Deny report 
sending

Select 

Yes

 so that your phone will not send a delivery report to 

confirm receipt of a new 
message.

Message 
validity

Choose a time period for the message centre to attempt message 
delivery.

Image size

Select 

Small

 (default) for 160x120 (max) picture size, or 

Large


for 640x480 (max).

Default speaker

Choose to play sound clips from 

Loudspeaker

 or 

Handset


speaker.

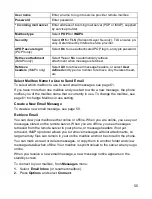
Mailboxes

View list of mailboxes you have set up.

Mailbox in use

Select mailbox to use to send email.

Содержание X701

Страница 1: ......

Страница 2: ...Entering Text 23 Navigating the Menus 25 Menu Map 29 Contacts 30 Organiser 40 Messages 47 Camera 64 My Items 70 VODAFONE LIVE 75 Applications 82 Settings 104 Games 132 Accessories 133 Troubleshooting 135 Specifications 137 Copyrights 139 End user Software License Agreement 142 EU Warranty 146 Index 148 ...

Страница 3: ...yphonic ringtones No more wired headset Use a Bluetooth wireless headset Synchronise your Contacts and Calendar with your other networked devices See who is calling with picture Caller Line ID on the X701 external display Download games pictures themes sounds videos and Java and Series 60 applications View all your media files in one place in My Items Search for your files including games pictures...

Страница 4: ... life will become extremely short To maintain longer battery life set the key backlight to off Do not use this phone without the battery cover attached Switch off your cellular phone when in an aircraft The use of cellular phones in an aircraft may be dangerous to the operation of the aircraft disrupt the cellular network and may be illegal Failure to observe this instruction may lead to the suspe...

Страница 5: ...de but not limited to consequential loss anticipated savings loss of revenues If your phone has an integral or add on camera you are advised to take appropriate care over the use of it It is your responsibility to ensure that you have permission to take photographs of people and objects and that you do not infringe any personal or third party rights when using the camera You must comply with any a...

Страница 6: ...inals are touched with a conductive material i e metal jewellery keys etc Always charge the battery in a well ventilated area not in direct sunlight between 5 C and 35 C It is not possible to recharge the battery if it is outside this temperature range When connecting the phone to an external source read the operating instructions of the equipment for the correct connection and safety precautions ...

Страница 7: ...ean R TTE directive must be shown This directive includes as one essential requirement the protection of the health and the safety for the user and any other person The SAR value for this model phone when tested for use at the ear for compliance against the standard was 0 484 W kg and when worn on the body measured with 1 5 cm air gap was 0 697 W kg While there may be differences between the SAR l...

Страница 8: ... operate on the cellular network Insert SIM card then attach battery and fully charge it INSTALLING AND REMOVING SIM CARD Installing SIM Card 1 Place thumbs at outer edges of battery cover press down then slide off battery cover towards bottom of phone Remove battery see page 7 2 Position SIM card as shown with gold contacts facing phone and notched corner entering phone first Carefully slide the ...

Страница 9: ...gly with no gaps Removing Battery 1 Place thumbs at outer edges of battery cover press down then slide off battery cover towards bottom of phone 2 Use tabs at bottom of battery to lift and remove battery 3 Replace battery cover CHARGING BATTERY 1 Open connector cover Note If you are upgrading your phone and your previous phone did not support new services such as MMS Multimedia Messaging Service y...

Страница 10: ...utomatically switch off Fully recharge the battery If you receive the low battery warning during a conversation finish your call immediately INSTALLING AND REMOVING miniSD CARD The miniSD Card is a memory card used to expand phone memory and a way to transfer files to other devices Installing miniSD Card 1 On top of phone lift up miniSD Card cover 2 Slide miniSD Card with notched corner entering p...

Страница 11: ...niSD Card wait for file saving or copying process to finish 2 On top of phone lift up miniSD Card cover 3 To release miniSD Card gently push bottom edge of miniSD Card forward into pocket 4 After miniSD Card is ejected gently remove it Push down miniSD Card cover until it clicks MiniSD Card ...

Страница 12: ...ilent Mode Key Power Key Zero Key Microphone Clear Key Left Softkey Send Key Asterisk PhotoLight Key Menu Key Edit Key Camera Key Personal Handsfree headset Connector Indicator Light and PhotoLight External Display and Viewfinder Accessory Connector Camera Lens Multibutton Infrared Port miniSD Card Pocket ...

Страница 13: ...to activate voice commands End Key Ends a call Return to standby mode Menu Key Enter the main menu area Press and hold to view currently open menu items Left Softkey Perform action named in lower left of display Shortcut to open Messages in standby mode To lock the keypad in standby mode press then press To unlock the keypad press then press Right Softkey Perform action named in lower right of dis...

Страница 14: ...hift to upper and lower case letters or press twice briefly to turn on off Dictionary for predictive text Multibutton on side of phone For external display press once to switch on backlight then press as needed to toggle between clock and icon views Turns off ringer during incoming call Takes a picture in Camera mode when flip is closed Press Power Key Press Menu key Press outside edges of navigat...

Страница 15: ... message received GPRS service is on hold during voice call Message in Outbox waiting to be sent GPRS connection is active Bluetooth is enabled Multiple GPRS connections are active Bluetooth is active Missed call Infrared is enabled flashes when active Call divert is active if you have 2 lines 1 or 2 also appears USB connection enabled Line selection 2 SIM card dependent if you have 2 phone lines ...

Страница 16: ...ION KEY SHORTCUTS in standby mode Time Network that phone is currently using Battery charge level icon Date Vodafone live Signal strength icon Wallpaper Messages Phone Status icon area Time and date area Battery charge level icon Network that phone is currently using Signal strength icon Network Status icon area Vodafone live Calendar view Top of Contacts list Inbox Open Main Menu ...

Страница 17: ...tion to your Contacts List see page 30 Use a SIM Directory Entry to Dial From Contacts menu 1 Open Contacts List 2 Scroll to SIM directory view 3 Scroll to desired name press To add names and numbers to your SIM directory see page 34 Speak the Name to Dial To dial by saying the name of the person you wish to call 1 Press and hold Note If your SIM card is PIN protected your PIN code will be request...

Страница 18: ... missed 1 From standby mode press 2 From the list of Dialled numbers scroll to desired entry and press to dial Scroll to move to Received calls tab and Missed calls tab to select a number from either of those lists Automatic Redial If you set Automatic redial to On in the Call Settings menu see page 108 your phone will automatically redial the number up to 10 times under certain conditions such as...

Страница 19: ...y and chat 1 First contact Vodafone for the proper service command code 2 Type in the supplied service command code If the phone recognises it as a supplementary service or USSD request press Send service comm ANSWERING CALLS When there is an incoming call the phone rings and flashes green 1 Open flip to answer a call If flip is open press to answer a call Mute Ringing Tone To mute ringing tone pr...

Страница 20: ...call on hold or release the call from hold press Options and select Hold or Unhold If you are connected to 2 calls an active call and a call on hold press Options and select HANDSFREE TALKING To hear the caller s voice from the handsfree loudspeaker press Loudsp Set the phone down nearby so you and several others can have a conversation without holding the phone To go back to the earpiece select H...

Страница 21: ...Replace 2 To end the currently active call press The held call becomes active Or to end both calls at once press Options and select End all calls If you press and hold all calls and data connections are ended To reject the incoming call press Reject The caller receives a busy message or goes to voice mail Send DTMF Touch Tones DTMF touch tones can be transmitted during a call just by pressing the ...

Страница 22: ...with up to 5 different parties at the same time if supported by the network 1 Call the first party 2 After the call is connected press Options and select New call to enter a number or press Find to go to the Contacts List to dial a number and press The first call is put on hold 3 After the new call is answered press Options and select Conference to join the held call and the active call together F...

Страница 23: ...ng held calls waiting calls and multi party calls see Active Call Options starting on page 18 CLOSE THE PHONE DURING A CALL Closing the flip ends the call This is the default setting for Open to answer end in Call settings If you want to close the phone and speak handsfree during a call change the Open to answer end setting to Off This setting switches the caller s voice to the back loudspeaker so...

Страница 24: ... the earpiece into your ear Using the Personal Handsfree Headset To make a call dial as normal then press the Send End button on the headset To answer and to end a call press and hold the Send End button on the headset To dial a call by speaking a name press and hold on the phone See Voice Commands on page 98 During a call adjust volume by scrolling or on navigation key on the phone On the phone a...

Страница 25: ...d of to me press once and the word changes DISPLAY PLANNED WORD MATCHES If the correct word does not display press repeatedly to scroll through an alternate word list To choose from all the word matches press and select Dictionary Matches ADD WORDS TO PREDICTIVE TEXT DICTIONARY To add a word that is not already in the dictionary press and select Dictionary Insert word You can also add the word to ...

Страница 26: ...old to highlight text 3 Release keys to stop highlighting 4 Press and select Cut or Copy 5 In message field move cursor to new desired location press and select Paste Enter space Enter punctuation by pressing repeatedly In dictionary mode press then press repeatedly to scroll to other punctu ation Erase a character Press and hold to switch between text and number modes Press to scroll through uppe...

Страница 27: ...d pages Condensed Instructions in this guide In this guide to condense wording statements are used such as Press Options and select Open This means to press Options highlight Open and press Select You may need to scroll within the menu to reach Open Many menu items are available within Options menus and other menus thus these shortcut statements will be used throughout the guide to indicate the sa...

Страница 28: ...kmark next to the desired file Scroll to mark more items as needed or select Mark all to mark all files 2 Press Options then select desired action such as Delete Send Move To unmark an item or items Open Open the item List view View the menu items in a list form If you select this the option changes to Grid view to view the menu items in a grid form Move Move the item to another place within the m...

Страница 29: ...e than one menu item simultaneously For example you can start creating a new message rename a picture and begin creating a Contacts entry all without losing the data you have already entered To keep a menu item open Press to go to the standby screen Pressing does not close the open menu item Opening and closing menu items There are several ways to open menu items Press Press Options and select Ope...

Страница 30: ...S MMS and email messages Contacts cards video and sound clips ringtones Calendar notes Notes and downloaded applications stored on your phone If you keep more files on the phone then there is less memory available to store new files or run certain applications To decrease the amount of phone memory used 1 store data on your miniSD Card 2 delete data that is old copied elsewhere or not being used 3...

Страница 31: ...What s New Games Ringtones Pictures Themes News Sports Media Album SIM Tool Application optional MMS Postcards Application Mgr Calculator Converter Recorder File Manager Quickoffice PhotoBase Voice Command RealOne Player Shortcuts Messages Camera My Items Create message Inbox Drafts Sent Email Inbox Messenger Voicemail My folders Media Album Outbox Reports Take Picture Record Video PhotoLight Docu...

Страница 32: ...to phone memory a SIM directory entry consists of only one name and one phone number If you select SIM enter the Name and No then press Done 3 Enter information in main fields First name Telephone Last name Mobile Company Fax Job title Email 4 From main fields press Options to 5 Press Done to save entry Contacts Create New Call Log SpeedDial Add picture Place picture from your Pictures folder into...

Страница 33: ...cts menu 1 Open Contacts Highlight desired Contacts card 2 Press Options and select Send message SMS MMS or Email 3 To complete SMS messages see page 49 or MMS messages on page 49 or Email messages on page 50 EDIT CONTACT CARDS From Contacts menu 1 Open Contacts Highlight desired Contacts card 2 Press Options and select Edit 3 Scroll to desired field to edit begin entering data If the field alread...

Страница 34: ... Press Options and select Ringing tone 3 Scroll to desired tone after a brief pause tone will play You can use tones already supplied sent in messages see page 52 downloaded see page 77 or recorded see page 87 To assign a ringing tone to a group scroll to move to Groups tab scroll to desired group and continue with step 3 Assign Speed Dial From Contacts menu 1 Open Contacts Scroll to desired Conta...

Страница 35: ...ddress From Contacts menu 1 Open Contacts Scroll to desired Contact card and open 2 Press Options and select Go to web address MANAGE CONTACTS LIST From Contacts menu 1 Open Contacts Scroll to desired Contact card 2 Press Options and select Edit Delete or Duplicate Memory Used in Contacts To view number of cards groups used and amount of memory used from Contacts menu 1 Open Contacts Press Options...

Страница 36: ...mber fields to copy and press OK If you select All the phone creates a separate SIM directory entry for each phone number stored with that Contact s entry name Create and Manage SIM Directory Entries 1 From the Contacts List scroll to view your SIM directory 2 Press Options and select from Note Email option will appear once you set up an Email Inbox in Messages menu Note To copy SIM entries to you...

Страница 37: ... Select desired Contact cards to add To remove a member from a group scroll to desired name then press Options and select Remove from group Manage Groups From Contacts menu 1 Open Contacts Scroll to Groups tab 2 Scroll to desired group then press Options and select from Open to view group Delete group Rename group add Ringing tone for group To see if a person belongs to a group or add a person to ...

Страница 38: ...CALLS RECEIVED CALLS AND DIALLED NUMBERS When you miss an incoming call a missed call icon and a note displays on the standby screen Press Show to view the details of the missed call From Contacts menu 1 Open Call Log Open Recent calls 2 Open Missed calls Received calls or Dialled numbers 3 List of last 20 calls appears with caller or dialled phone number or name if entered in Contacts date and ti...

Страница 39: ... via GPRS data packets for example WAP pages email messages downloaded ringtones and applications From Contacts menu 1 Open Call Log Open GPRS counter 2 All sent data and All receiv data amounts display in kilobytes To clear the GPRS counter press Options and select Clear counters Enter the phone lock code and press OK See Security Settings on page 111 Call Dial the number Create message Select Vi...

Страница 40: ...ndicates incoming or received events 3 Press Options and select Log duration Choose from No log 1 day 10 days or 30 days to store call informa tion in the logs Show call duration Select Yes to switch on a time elapsed counter to display during a call View details Scroll to desired event to view details such as direction in out type voice data etc duration for calls Clear log Clear all events from ...

Страница 41: ...to a number press Options and select Assign 4 Scroll to the desired Contacts card and press Select 5 Scroll to the desired number and press Select CALL A SPEED DIAL NUMBER To call a preset speed dial number choose a method From standby mode press the corresponding number key and press From the Speed Dial menu scroll to desired number and press or press Options and select Call CHANGE REMOVE OR VIEW...

Страница 42: ...keep track of your schedule CREATE CALENDAR NOTES From Organiser menu 1 Open Calendar 2 Press Options and select Add note Meeting events with a start and end time Memo events such as trips or vacations or Anniversary single day events such as birthdays and anniversaries 3 Enter information in most fields by entering numbers or letters 4 Press Done to save event Calendar Alarm To Do Notes Meeting M...

Страница 43: ...e the note Set to None if you do not wish to synchronise the note with your PC calendar See Synchronisation on page 123 BROWSE CALENDAR View the calendar by day by month or by week To change view press Options and select Month view or Week view CALENDAR ICONS Day and Week views Memo Anniversary Month view Scheduled note Triangle in the lower right corner of a date Red private synchronisation Blue ...

Страница 44: ...or the week dates of the current week depending on Calendar setting Day View To view a certain day scroll to the date and open Scheduled notes are listed EDIT CALENDAR EVENTS From Organiser menu 1 Open Calendar 2 Scroll to desired date in any view and open 3 Scroll to scheduled event and open Edit desired fields 4 Press Done when finished DELETE EVENTS From Organiser menu 1 Open Calendar 2 Scroll ...

Страница 45: ...pear in standby mode Set alarm clock and alarm tone to remind you of events If the phone is off when alarm time is reached the phone switches on and the alarm tone sounds SET TIME AND DATE From Organiser menu 1 Open Alarm 2 Press Options and select Settings 3 Scroll to the desired setting and open or press Options and select Change Calendar alarm tone Scroll to select desired tone after a brief pa...

Страница 46: ...ate separator Choose from symbols Time format Choose 12 hour or 24 hour Time separator Choose symbols or Clock type Choose Analogue or Digital Clock alarm tone To choose a tone scroll through list of ringing tones To hear the tone highlight the tone name and wait To stop the tone press any key To select a tone highlight the tone name and press Select Auto time update Select On to update time from ...

Страница 47: ...ter information in fields 4 Press Done to save Edit and Mark To do Tasks From Organiser menu 1 Open To Do 2 Scroll to the desired task To edit open task and edit information in fields as desired To mark the task as completed or to restore task press Options and select Mark as done or Mark as undone Caution Do not press Yes to switch phone on when you are in an aircraft near sensitive medical equip...

Страница 48: ... and select Add note To send a note From Organiser menu 1 Open Notes 2 Press Options and select Create message Via SMS Via MMS Via Email Via Bluetooth or Via Infrared 3 To complete SMS messages see page 49 or MMS messages on page 49 or Email messages on page 50 or Bluetooth on page 120 or Infrared on page 118 Note Email option will appear once you set up an Email Inbox in Messages menu ...

Страница 49: ...Outbox Reports Create message Create new messages Inbox Stores received messages except email and cell broadcast Drafts Stores unfinished messages Sent Stores sent messages Email Inbox Receives and stores email messages Messenger Chat service Voicemail Listen to voice messages My folders Stores moved messages and templates Media Album Stores personal pictures on your online photo album Outbox Temp...

Страница 50: ...essages containing data such as electronic business cards ringing tones Java applications or configuration data such as WAP and multimedia settings These services do not work by sending messages directly to the recipient instead they store and forward messages through specifically designated network servers Before Using Messaging Services Before you can use multimedia or email messaging your conne...

Страница 51: ...d type in recipient s phone number or email address To retrieve from Contacts card press or Options and select Add recipient Scroll to desired name and press OK Select desired number if entry has several numbers Card must have a phone number or email address to be visible To separate multiple recipients enter a semicolon by pressing 4 Scroll to move to text entry field enter text 5 If desired pres...

Страница 52: ...s Options and select Insert 7 To send press or press Options and select Send To view add or remove attachments before sending press Options and select Attachments If phone is set to send email during next connection to mailbox then pending email will be stored in Outbox Change setting by pressing Options and selecting Sending options Video clip Video clip from your Videos folder New picture New pi...

Страница 53: ... them to My folders or delete them Unread messages have incoming arrow appearing with icon that identifies type of message Read messages have no arrow with icon Read or Play Inbox Messages From Messages menu 1 Scroll to Inbox and open 2 A list of message headers displays indicating type of message sender MMS Bluetooth etc and icon Scroll to desired message header and open The message may first nee...

Страница 54: ...ges you can find a phone number email or web address in the message text and use it to call write access a service or create a Contacts card From Messages menu 1 Open Inbox or My folders 2 Scroll to desired message and open 3 Press Options and select Find Phone number Email address or Web address 4 Text and numbers are highlighted when found If more than one is found scroll to highlight desired it...

Страница 55: ...elect desired folder and press OK View or Delete Sent Messages To view or delete sent messages and objects or attachments from Messages menu 1 Open Sent 2 Scroll to desired message and open Send Send message Add recipient Send to more than one address Insert Insert items such as Picture Sound clip Video clip or Template depending on what type of file the message type supports Attachments Email Obj...

Страница 56: ...s 2 Scroll to Email and open 3 Highlight Mailboxes and open 4 Press Options and select New mailbox 5 Enter information in fields Fields marked in the phone with a red asterisk must have an entry Attachments Email Objects MMS Open save or send attachments or objects Delete Delete message object or attachment Message details View details such as message size Note Before you can send or retrieve emai...

Страница 57: ...essages or copy them to another folder and view message details when offline Your mailbox is synchronised to the server when you go online When you receive a new email message a new message notice appears on the standby screen To connect to your mailbox from Messages menu 1 Select Email Inbox or renamed mailbox 2 Press Options and select Connect User name Enter a name to log into service provider ...

Страница 58: ...y To sender or To all Copy Email Messages From Messages menu 1 Select Email Inbox or renamed mailbox 2 Highlight desired message 3 Press Options and select Copy to folder 4 Choose from the appropriate folders and press OK Sort Message List From Messages menu 1 Select Email Inbox or renamed mailbox 2 Press Options and select Sort by Date Sender or Subject Save Attachment or Data You can save attach...

Страница 59: ...Delete MESSENGER Chat with your friends and family using Vodafone Messenger Chat or Instant Messaging allows you to exchange messages online with another party Contact Vodafone for more information on this service CONNECT TO MESSENGER From Messages menu 1 Open Messenger 2 Follow the screen prompts VOICEMAIL Voicemail service stores voice messages from callers who could not reach you The messages a...

Страница 60: ... folders 2 Scroll to desired folder press Options and select Rename folder or Delete Templates Templates are short sentences in which you fill in the blank then send the message Template sentences can also be inserted into longer messages From Messages menu 1 Open My folders 2 Select Templates 3 Scroll to desired text Press Options and select Create message Via SMS Via MMS or Via Email 4 Press and...

Страница 61: ...ores Bluetooth and Infrared messages that are waiting for connection to the receiving device If the connection fails Outbox does not keep the message The Outbox icon appears on the standby screen when there are messages in the Outbox Status of Outbox messages Send View and Manage Outbox Messages From Messages menu 1 Open Messages 2 Scroll to Outbox and open 3 Scroll to desired message Press Option...

Страница 62: ...ge Settings From Messages menu 1 Press Options and select Settings 2 Open SMS Open fields as needed Message centres Choose from provided list of network and SIM message centres Msg centre in use Choose which message centre is used to deliver SMS messages Receive report Choose Yes or No If Yes delivery reports showing status of sent SMS messages are stored in Delivery Reports Message validity Choos...

Страница 63: ...ow Always ask or Reject message for incoming messages Allow anon messages Select Yes to receive messages from anonymous unknown senders Receive adverts Select Yes to receive advertisements Receive report Select Yes to receive delivery reports Deny report sending Select Yes so that your phone will not send a delivery report to confirm receipt of a new message Message validity Choose a time period f...

Страница 64: ... desired messages to perform copying at one time Press Options and select Copy 4 Choose the desired folder to place the copy and press OK 5 If desired press Options and select Delete to delete messages from the SIM card Service messages Select On to receive service messages Download messages Select Manually to allow only authorised senders to send service messages Reception Select On to receive ce...

Страница 65: ...e prepay and chat Contact Vodafone for the proper service command statement From Messages menu 1 Press Options and select Service command 2 Enter the service command then press Note Leaving Cell broadcast set to On reduces battery life Open Open topic Subscribe or Unsubscribe Subscribe to selected topic to receive related messages Select Unsubscribe to stop receiving related messages Hotmark or Re...

Страница 66: ...rared on page 118 If you do not want to save it either Press and select Yes Press Options and select Delete Change Capture Modes To choose different picture capture modes scroll to select Standard regular size landscape pictures 640x480 pixels VGA Portrait smaller pictures that use much less memory and can be placed in Contacts cards 80X96 pixels Red number in upper right corner indicates the numb...

Страница 67: ... press Options and select Go to My Items See My Items on page 69 To send the picture immediately see Send Pictures on page 66 If you do not want to save it press Options and select Delete SAVE PICTURES Pictures are automatically saved in the Pictures folder in My Items in Phone memory You can also save pictures to a folder in DCIM folder in miniSD Card as DCF Exif format JPEG To save pictures to t...

Страница 68: ...ture pictures from Camera menu 1 Open Picture 2 Press Options and select Settings 3 Open Image quality 4 Select High Normal or Basic The higher image quality you choose the larger the file size will be If you plan to view pictures on a computer use High or Normal image quality so the quality will be better maintained when enlarged on a computer screen Basic image quality is best when the pictures ...

Страница 69: ...o see Video Recorder Settings on page 68 From Camera menu 1 Open Video 2 The main display acts as a viewfinder Move the phone around to frame your subject 3 Press Options and select Record to begin recording Watch the screen then move the phone as needed to keep the scene in view Scroll to zoom in scroll to zoom out if zoomed in Press Pause to pause recording press Resume to resume recording 4 The...

Страница 70: ...nu 1 Open Video 2 Press Options and select Settings 3 Select from Note The quality of display images may vary depending on the object or environment Display images may distort when shooting moving objects especially in a fast moving environment Note Email option will appear once you set up an Email Inbox in Messages menu Resolution Choose the size of the display on the screen to be Low or High Aud...

Страница 71: ... flash the PhotoLight does not flash PhotoLight remains on until you switch it off Use PhotoLight as a Flashlight The PhotoLight can be switched on to use as a small flashlight 1 In standby mode press and hold The PhotoLight switches on To switch off the PhotoLight return to standby mode then press and hold Whether or not you close the flip the PhotoLight remains on until you switch it off The Pho...

Страница 72: ...ed below From My Items menu 1 Phone icon tab shows data stored in phone memory or scroll to view data stored on miniSD Card 2 Open Pictures 3 Scroll to and open desired picture 4 Press Options and select Documents Pictures Sounds Videos Documents See File Manager on page 89 to view your Quickoffice documents Pictures Scroll to desired picture or open Wallpapers folder to view wallpaper files Open ...

Страница 73: ...and original size view If picture is not zoomed scroll to go to next picture in the current folder Zoom in Zoom out Zoom in or out in steps from 12 5 to 800 Full screen Removes status bar and softkey text to see more of the picture Normal screen When viewing full screen press then select Normal screen to view status bar and softkey text Rename Rename the picture View details View details such as f...

Страница 74: ...o increase volume scroll to decrease volume note bar scale near top of screen To mute the sound in a video clip scroll until muted speaker icon appears To turn sound back on scroll When playing sound clips the lowest volume setting is level 1 PICTURES SOUNDS AND VIDEOS OPTIONS From My Items menu Note For streaming media after the phone successfully connects to the link web address of streaming med...

Страница 75: ...Web address Move to folder Move file to Menu level or to Pictures Sounds or Videos folder Export to miniSD pictures only Copy or move file to miniSD Card The file is copied or moved to the DCIM folder on the miniSD Card The DCIM folder which has a sub folder can be accessed by other devices such as TVs and printers This command creates Exif under SD Picture DCF specification from any image format ...

Страница 76: ...en highlight desired file 4 Press Options and select Create message Via MMS Via Email Via Bluetooth or Via Infrared 5 To complete MMS messages see page 49 or Email messages on page 50 or Bluetooth on page 120 or Infrared on page 118 Settings Adjust multimedia settings see RealOne Player Settings on page 101 Note Receive via infrared feature may not be available Note The Create message option is no...

Страница 77: ...be accessed by wireless phones Your phone browser can access WAP 2 0 sites and download games sound software WBMP pictures vCard and vCalendar events and more SETUP TO CONNECT TO VODAFONE LIVE Before starting 1 You need a subscription for data services from Vodafone and 2 you must configure an Internet link Vodafone has already completed the Internet link connection settings which cannot be modifi...

Страница 78: ...d with caution when downloading files and content or entering sensitive information Online Options During an Internet connection you can add and refresh bookmarks reload pages and view active session details Press Options and select Scroll up down left or right by pressing outer edges of navigation key through the page content Select a highlighted item or launch an underlined web page Press and ho...

Страница 79: ...e begins connection process 3 After connecting to the site scroll to desired link containing the file and open Save as bookmark Save the web address to your Bookmarks View image If there are images on the page open a list of images To view a specific image scroll to the image and press OK Navigation options Go to web address History to select a previously viewed page during current session Clear c...

Страница 80: ...other content Default access point Change default access point for connecting to the Internet Show images For faster Internet surfing select No to stop pictures from auto matically loading When online press Options and select Show images on a specific page to load a picture Font size Select a font size for web page text to appear Default encoding For the Browser pages to display text characters co...

Страница 81: ...te Mark Unmark Select Mark or Mark all to perform actions to multiple items Navigation options Clear cache to delete content in cache memory Advanced options Add to Shortcuts to create shortcut to page from Shortcuts menu Settings See Vodafone Live Settings on page 78 Download Connect to selected bookmark Bookmark manager Move to folder New folder Edit bookmark Add bookmark Delete Mark Unmark Sele...

Страница 82: ... RINGTONES From Vodafone live menu 1 Open Ringtones All the latest music sounds to download to your phone Choose from Chart hits soundtracks and many more PICTURES From Vodafone live menu 1 Open Pictures Great choice of pictures to set as background wallpaper or for sending as MMS picture messages THEMES From Vodafone live menu 1 Open Themes Personalise your phone with a different theme to make it...

Страница 83: ... and coverage visit the Sports category for all your favourite Sports MEDIA ALBUM From Vodafone live menu 1 Open Media Album Your own online storage area to create your own photo albums and share them with friends and family You can also create and send picture messages ...

Страница 84: ...her information POSTCARDS Send a picture and a note via MMS then Vodafone will have it printed into a real postcard and have it delivered to a postal address Some Vodafone networks allow delivery to foreign countries SEND A POSTCARD From Applications menu 1 Open Postcards 2 To take a new picture select Take Picture To send an existing picture select Select Picture Scroll to desired picture located...

Страница 85: ... edit a draft from Applications menu 1 Open Postcards 2 Open Drafts 3 Highlight desired draft Press Options and select Edit The current details will be shown 4 Press Options and select SENT POSTCARDS To view and forward previously sent postcards from Applications menu 1 Open Postcards 2 Open Sent Postcards 3 Highlight the desired postcard 4 Press Options and select 5 To continue with an open postc...

Страница 86: ... 1 Open App Mgr 2 Scroll to desired application installation file Files with extension sis are device software installation files Files with extensions jad or jar are Java applications 3 Press Options and select View details A list displays with details such as name version type certificate and signature details trust status for MIDlets application size application supplier View Certificate From A...

Страница 87: ...ocess If the installation process is cancelled for some reason such as the phone runs out of memory then the installation is not complete or only partial To complete the partial installation either delete the partially installed application or reinstall the application If there are problems with installation you can view the installation log or send the installation log to a help desk for troubles...

Страница 88: ...t a variety of measurements such as world currencies area length volume temperature power and velocity Set the Base Currency From Applications menu 1 Open Converter 2 If the Type field is not set to Currency open and change to Currency 3 Press Options and select Currency rates A list of world currencies 3 letter currency codes appears with the base currency if set noted at the top of the screen Mo...

Страница 89: ...mount field press to erase zero Type in desired unit amount to convert To enter a decimal press To enter and for temperature and E exponent symbols press Converted amount automatically displays in second Amount field RECORDER Record voice memos up to 1 minute in length You can also record a two way phone conversation Recorded sound clips are stored in amr format Record a Sound Clip From Applicatio...

Страница 90: ...Record a Conversation 1 During a phone conversation press and follow steps 1 to 3 in Record a Sound Clip on page 87 2 The conversation records 3 Press Stop to stop recording Send a Sound Clip If sound clip was just recorded go to step 4 Or from Applications menu 1 Open Recorder 2 Press Options and select Go to My Items 3 Open desired folder then scroll to desired sound clip 4 Press Options and sel...

Страница 91: ...ave sub folders for example Pictures folder has two sub folders Picture msgs and Wallpapers Files that have not been stored in a folder are listed after the folder names Scroll to view folders and files stored on the miniSD Card 3 Scroll to desired folder or file and open Find Folders and Files Type letters or keywords in a search box to find a folder or file From Applications menu 1 Open File Mgr...

Страница 92: ...folder Mark Unmark Mark or unmark several files at once Not available for folders Rename Change name of item Default folders cannot be renamed Receive via infrared To receive a file via infrared see page 73 View details View name format type date and time modified size in bytes or kilobytes if item is a folder size is total of all files and folders inside the folder whether it is a default folder ...

Страница 93: ...move one page at a time Go to shortcuts percentage through the document Press for 20 for 30 etc to go to beginning Note For customer support and more information on Quickoffice visit www quickoffice com Open Open highlighted file New Create a new document Browse Select the memory to browse Open folders as needed to view documents File management Sort files to sort by name size date or ext or Scan ...

Страница 94: ...Autoscroll Automatically scroll document line by line Scroll to increase speed scroll to decrease speed Print Print document by sending it via Multimedia Bluetooth or infrared View mode Go to View mode Font Choose a font name and size to apply to highlighted text Style Choose bold italic or underline to apply to highlighted text Alignment Choose left centre or right alignment to apply to highlight...

Страница 95: ... worksheets Toggle Full Screen Toggle between full screen and reduced screen Zoom Choose a size to zoom document Freeze Freeze Row Column or Both for the highlighted cell Adjust Column Width Scroll to adjust column width Clipboard Choose Cut Copy Paste or Select All to apply to highlighted cells Search Choose Find Find Next or Replace Enter text to be located in Find field In other fields scroll t...

Страница 96: ... Select All to apply to highlighted cells Clear Clears highlighted cell formatting formula content or both Print Print document by sending it via Multimedia Bluetooth or infrared Note Macros pictures graphs or embedded objects in Microsoft Excel documents cannot be displayed on the phone If a file containing macros pictures graphs or embedded objects is edited and saved on the phone then the non t...

Страница 97: ...tline view you can edit the entry insert and delete slides In notes view you can edit the entry Outline In outline view expand and collapse one or all slides Navigate In all views move to next or previous page or slide Goto Go to another view Pitch Start or stop pitch device Print In outline or notes view print document by sending it via Multimedia Bluetooth or infrared Exit In thumb view choose C...

Страница 98: ...r out press Options and select Zoom In or Zoom Out Scroll or to pan in zoomed pictures Scroll to view previous photo scroll to view next photo Slide Show To see a slide show of the photos in your Pictures folder from Applications menu 1 Open PhotoBase 2 Open Album 3 Press Options and select Slide show 4 Select a time interval between slides and select a transition effect for example Top to Bottom ...

Страница 99: ...he box size again 5 To apply the crop press Options and select Crop it 6 To save the cropped photo as a new photo press Options and select Save as Enter a name for the new photo ADD CLIP ART FRAMES TO PHOTOS 1 With opened photo on screen scroll to go to Workshop screen 2 Select Clip Art to add clip art or Frame to add frames 3 Scroll to desired clip art or frame and select Save Save edited photo i...

Страница 100: ...red To edit text press Options and select Edit current line Delete current line Change text colour Change text size or Edit previous next line 3 Press Options and select Save Save as or Create message for desired option Community If available Community will link to a website to download more clip art and frames and provide more information from PhotoBase From Applications menu 1 Open PhotoBase 2 O...

Страница 101: ...he prompt to Say the name or number say the digits of the phone number you wish to dial without pausing between digits 2 If the phone recognises the number it is repeated and the phone will begin dialling If the phone is not sure of the number it displays a list of choices and prompts did you say and states the first choice If the number is correct say Yes If the number is not correct say No to he...

Страница 102: ...ay a name say a name that you will say each time you wish to call this person 4 The phone will repeat the name Press Yes to confirm or press No to record it again 5 After you have confirmed enter the number to dial by pressing to then press OK Dial a Number using a Voice Tag 1 Press and hold 2 After the text prompt asking who you would like to call say a name of a voice tag you have recorded 3 The...

Страница 103: ...enu 1 Open RealOne 2 Press Options and select Open Most recent clips for the last several opened media files or Saved clip to locate existing files and links in the phone memory or miniSD Card 3 Open desired folder s then scroll to and open desired video or sound clip When choosing a link to streaming media the phone begins connecting to the Internet or to your network See Player Controls on page ...

Страница 104: ...d stops when the auto disconnect time period is reached See RealOnePlayer Settings on page 101 SHORTCUTS Shortcuts serves as a bulletin board storing shortcuts to your frequently used menu items or documents stored in phone memory or miniSD Card Default access point Choose one of the access points you have set up See Access Point Settings on page 108 Online time Select Unlimited or select User def...

Страница 105: ... to the desired shortcut 3 Press Options and select To change the wallpaper of the Shortcuts screen see Change Wallpaper or Screensaver on page 106 Edit shortcut name Change the name of the shortcut Shortcut icon When this option appears choose a different icon picture by scrolling through grid Move A checkmark appears on the shortcut icon Scroll or to move to desired location press OK List view G...

Страница 106: ...modified to suit your situation You can use ringtones sent in a message sent by Bluetooth or infrared connections recorded with the Recorder menu item or downloaded The active profile name is displayed in the standby screen except when General is active ACTIVATE A PROFILE From Settings menu 1 Open Profiles 2 Scroll to the desired profile 3 Press Options and select Activate CHANGE RINGTONES ALERT T...

Страница 107: ...ed theme name 3 Press Options and select Preview ACTIVATE A THEME From Settings menu 1 Open Themes Ringing tone Scroll through list of tones To hear the tone highlight the tone name and wait To stop the tone press any key To select a tone highlight the tone name and press Select If you have subscribed to 2 lines then a setting appears for each line Ringing type Choose Ringing Ascending Ring once B...

Страница 108: ...ng links to content provider web pages You can add your own links to the folder 4 Open the folder scroll to and open desired link 5 Connection to the Internet will begin Note The appearance of some icons may change when you apply a different theme Wallpaper Standby screen picture Choose from Default User defined your own picture from My Items or downloaded other themes or None Colour palette Choos...

Страница 109: ...d Writing language Choose a language in which the texts you are writing will appear for example writing a text message Dictionary Select On to use the predictive text dictionary to speed up text entry Welcome note or logo Default uses the welcome note or picture supplied with the phone dis played when the phone is switched on Select Text to enter your own welcome note Select Picture to place a pic...

Страница 110: ...the second call See Call Waiting on page 19 Automatic redial Select On to redial if the call is not connecting Press to stop auto matic redialling Summary after call Select On to display a brief summary of duration of last call Speed dialling Select On to start dialling by a press and hold of preset number key in standby mode First set up Speed dial keys see Speed Dial on page 39 Anykey answer Sel...

Страница 111: ...dit or add new access points first you must obtain the configurations from both Vodafone and Internet service provider to be entered into the phone From Settings menu 1 Open General 2 Scroll to Connection and open 3 Open Access points to view a list of existing access points icon indicates data call icon indicates GPRS packet data connection 4 To add a new access point press Options and select New...

Страница 112: ...y name server Type in primary domain name server IP address Second name server Type in secondary domain name server IP address Proxy serv address Enter the proxy server address for access point Proxy port number Type in proxy port number for access point Use callback Data call only Select Yes to use dial back servers Callback type Data call only Select Use server no for callback or Use other no Ca...

Страница 113: ...pproved use If you set PIN code request to On then the PIN code must be entered each time the phone is turned on The PIN2 code is required to access certain network operator services such as Fixed dialling and Call costs If the PIN2 code is blocked use the PUK2 code to unblock GPRS connection Choose When needed to connect to GPRS service only when you open a menu item that uses GPRS After you clos...

Страница 114: ...the phone is switched on Requires PIN code to activate PIN code To change PIN code enter current PIN code then new PIN code twice Press OK PIN2 code To change PIN2 code enter current PIN2 code then new PIN2 code twice Press OK Note If PIN or PIN2 code is entered incorrectly 3 times the SIM card locks Contact Vodafone for PUK or PUK2 code PIN unblock key code If the PUK or PUK2 code is entered inco...

Страница 115: ...secure networks such as email servers or the Internet Two types of certificates your phone stores are authority and personal Authority certificates are downloaded to your phone and are used to check server certificate signatures and to guarantee that the certificate is issued by a certification authority CA Personal certificates are issued to you by a certification authority Caution If you change ...

Страница 116: ...d fingerprint Authority and personal certificates will show different information If the personal certificate is on an outside server it will have different details 5 Scroll to view personal certificates if available Trust Settings Check whether certain menu items can use a selected certificate From Settings menu 1 Open General 2 Scroll to Security and open 3 Scroll to Certif Management and open 4...

Страница 117: ...barring restricts certain types of incoming and or outgoing calls using a password furnished by Vodafone Network dependent service Check Status of Call Barring From Settings menu 1 Open General 2 Scroll to Call barring and open 3 Press Options and select Check status Network will send current status message Activate Call Barring From Settings menu 1 Open General 2 Scroll to Call barring and open 3...

Страница 118: ...twork When the phone is using a micro cellular network MCN it can display an MCN indicator in standby mode Set Cell info display to On to switch on this indicator if you enter an MCN ENHANCEMENT SETTINGS When you attach a headset or Bluetooth headset enhancement to the phone you can set the profile General Silent Meeting Outdoor Pager that the phone will use when the enhancement is attached See Pr...

Страница 119: ...e infrared connections for GSM data services and access the Internet and email via other devices Prepare for Infrared Connection Place your phone and the other device within the effective range of the infrared connection about 20 cm Verify there are no obstructions between the two devices Ensure that the infrared ports of the devices point at each other On the receiving device activate the Infrare...

Страница 120: ...en Infrared 3 Flashing icon displays meaning phone is ready to receive data 4 Sender can begin transfer of data A tone sounds when transfer is complete 5 Press Show to accept the incoming message containing the data The message is placed in the Inbox 6 Open the message press Options and select Save to save data to supporting menu item You can rename the file If transfer does not begin within 40 se...

Страница 121: ...lls or other nearby barriers may cause interference Check with local authorities before using Bluetooth wireless technology as some countries may restrict the use of Bluetooth devices Battery note Keeping Bluetooth setting On consumes battery power more rapidly To conserve battery power switch off Bluetooth setting when not in use Switch Bluetooth on or off in Settings Bluetooth Select On or Off V...

Страница 122: ...cts to send a business card 2 Highlight the desired item to send 3 Press Options and select Create Via Bluetooth If Bluetooth setting is switched off press Yes to switch on Bluetooth setting 4 The phone automatically searches for Bluetooth devices nearby Devices appear one by one If device has already been paired icon appears with device name Press Stop to stop search when intended device name pop...

Страница 123: ...n Prerequisites Set up a dial up account with an Internet Service Provider ISP From your ISP you need the installation CD or your account details i e dial up number user name password DNS server addresses to configure Dial Up Networking Note Confirmation is required first if the paired device is not set as authorised New paired device Search for nearby Bluetooth devices Assign short name Change na...

Страница 124: ...ter 4 Select Connect via infrared which opens the infrared connection To use Bluetooth you must start the Bluetooth connection from the computer or device to which you are connecting To prepare your phone to connect via Bluetooth see Set up Bluetooth on page 119 To use USB data cable you must start the connection from the computer or device to which you are connecting 5 The phone confirms when a c...

Страница 125: ...atus creating connection idle active on hold closing connection or closed received and sent data amount in bytes duration downlink and uplink transfer speed in kb sec dial up number data call only GPRS access point name GPRS only sharing End Connections From Settings menu 1 Open Connect 2 Open Conn Mgr 3 A list of currently active network connections appears sorted according to starting time of co...

Страница 126: ... the Messages Inbox When you open the message you are asked if you wish the server to begin the synchronisation process If you accept the process automatically begins To begin synchronising from the phone from Settings menu 1 Open Connect 2 Open SyncML 3 Highlight desired profile press Options and select Synchronise During synchronisation from either direction you can follow the process on the pho...

Страница 127: ...ession A configuration session can be started either from the Device Manager menu in the phone or from the service provider s server If your service provider intends to start a session your phone will show a server alert message Before the session can begin your phone asks to activate the server connection and the profile if they are off Then the phone asks you to accept that the server is ready t...

Страница 128: ...ession Log To view the results of a selected server s last configuration session from Settings menu 1 Open Connect 2 Open Dev Mgr 3 Scroll to desired profile press Options and select View log Server name Use suggested name or enter your own Server ID Server s unique ID identifies the remote server Server password Server password supplied by service provider so your phone can verify server Access p...

Страница 129: ... be done again press Options and select Enable config USB Connect to PC Software Suite over your USB cable using USB menu item Connect to PC Software Suite 1 Plug USB cable into the phone 2 From the Connect menu open USB 3 USB icon appears indicating that USB connectivity has started 4 On your computer begin desired task such as backup or sync Connect to Modem 1 Plug in USB cable into the phone 2 ...

Страница 130: ...miniSD Card that contains important software as this destroys all data on the miniSD Card Remove miniSD Card Saves data and closes menus and applications before ejecting miniSD Card Backup phone mem Backup the phone contents to the miniSD Card Restore from card Restore earlier backed up miniSD Card data to the phone memory Format miniSD Card Format other brand miniSD Cards if needed before first u...

Страница 131: ... data Write protect miniSD Card To protect important data move write protect switch to Lock position The miniSD Card is write protected and you cannot write save or delete data or format the card To write data to the miniSD Card move write protect switch to unlocked position VOICE COMMANDS SETTINGS Voice Commands allows you to press and hold say Voice Dial then say a name in your Contacts list and...

Страница 132: ...hoose whether the phone presents choices when the phone does not recognise your command Sound Switch on or off the playback of prompts names and digits Select Name Settings to change the speed or volume of name playback Language Choose from the list of languages that the software will use for audio prompts text screens and your voice recognition Application Launcher Check to select menu items from...

Страница 133: ...Configure Select from 4 After the printer is configured scroll press Options and select ABOUT View copyright information about the phone and software used on the phone From Settings menu 1 Open About Communications Select the method to send data to the printer Paper Size Choose a paper size Left Margin Choose desired left margin measurement Test Print Send a test print Bluetooth Select Find Printe...

Страница 134: ...wnload more games from the Games menu 1 Click on More Games 2 The phone will begin connecting to the Vodafone live Games section Also see Download Files from Vodafone live on page 77 For customer support of downloaded content visit the respective supplier s website Note Panasonic is not responsible for the performance of downloaded content or possible corruption of phone software ...

Страница 135: ...D ADAPTER This adapter allows you to use your miniSD Card in a standard SD socket See Using miniSD Card and miniSD Adapter on page 129 CAR CHARGER DC ADAPTER EB CDX70 Recharge the battery using your vehicle s cigarette lighter socket CAR HOLDER EB KAX700 Mounted in your vehicle to store your phone Use with personal handsfree headset for handsfree operation CARRY CASE EB YKX700 Clip your case to yo...

Страница 136: ...res Place the headset on your ear and the phone in your pocket with no wires connecting the two BLUETOOTH CAR KIT Parrot model CK3000 or Parrot model DriveBlue Made by Parrot these Bluetooth enabled handsfree car kits allow you to use your phone handsfree in your car Model CK3000 requires installation model DriveBlue plugs into your car cigarette lighter How to identify a genuine Panasonic accesso...

Страница 137: ...switching on Battery may have been fully discharged Battery fails to charge Do not connect the Travel Charger until after the battery has been installed Display looks faded Check the Brightness setting see Display Settings on page 107 Emergency calls cannot be made Check that the antenna symbol is displayed move to a coverage area and operate your phone when the antenna symbol appears Calls cannot...

Страница 138: ...ork busy Connection error Network is overloaded with calls or there was an error trying to connect to the network Unable to send message Maximum message size is xxx File size of object attached to message is too large to send The xxx will be replaced by a file size You may be able to send the file by infrared Bluetooth or transfer by PC Software Suite Unable to connect No network coverage Cannot c...

Страница 139: ...xternal display 64 x 96 pixels CSTN LCD 56k colours Camera Type VGA CMOS Photolight Range 1 2 m Video H 263 Encode and Decode MPEG4 Decode 3GPP OMA compliant streaming Other features Superbright Photolight up to 4X Zoom Frames Crop Connectivity Bluetooth Serial port Dial up networking Object push File transfer Headset and Handsfree profiles v1 1 Infrared SIR slow infrared USB v1 1 Note Talk and St...

Страница 140: ...l and PowerPoint documents Image Editing Crop slide show panorama frames Predictive text Tegic T9 predictive text input Voice Recognition Speaker independent name continuous digit dial command and control Content and file formats supported Still Imaging JPEG TIFF WMF GIF BMP WBMP PNG EXIF MBM SMS OTA ICO Video playback 3GPP MPEG4 RealVideo7 and RealVideo8 Video record 3GPP Audio RealAudio Voice Re...

Страница 141: ...12 miniSD Memory Card Java and all Java based trademarks and logos are trademarks or registered trademarks of Sun Microsystems Inc in the U S and other countries This Product Includes Software Licensed from Symbian Ltd 1998 2004 this product is based on Symbian OS This software is based in part of the work of the FreeType Team This product is covered by one or more of the following patents United ...

Страница 142: ...uding all intellectual property and confidential information relating to it are owned or licensed by Licensor and are protected by United States copyright laws by laws of other nations and by international treaties Grant Of License Licensor grants to you the non exclusive right to use one copy of the Software on a single computer or handheld device Device You may load one copy into storage memory ...

Страница 143: ...if failure of the Software has resulted from modification accident abuse or misapplication IN NO EVENT WILL LICENSOR BE LIABLE TO YOU FOR DAMAGES INCLUDING ANY LOSS OF PROFITS LOST SAVINGS OR OTHER INDIRECT INCIDENTAL OR CONSEQUENTIAL DAMAGES ARISING OUT OF YOUR USE OR INABILITY TO USE THE SOFTWARE Because some states countries or regions do not allow the exclusion or limitation of liability for c...

Страница 144: ... OF LIABILITY DISCLAIMER OF WARRANTIES TO THE MAXIUM EXTENT PERMITTED BY APPLICABLE LAW IN NO EVENT SHALL PMC ITS AFFILIATES AND THEIR LICENSORS BE LIABLE FOR INCIDENTAL INDIRECT SPECIAL OR CONSEQUENTIAL DAMAGES OR ANY DAMAGES WHATSOEVER RESULTING FROM LOSS OF USE DATA OR PROFITS ARISING OUT OF OR IN CONNECTION WITH THE USE OR PERFORMANCE OF THE EMBEDDED SOFTWARE EXCEPT AS EXPRESSLY STATED IN THE ...

Страница 145: ...umber of your telephone and its phone number Your full address and post code A copy of your original invoice receipt or bill of sale for the purchase of the telephone 5 If the problem cannot be resolved over the telephone arrangements will be made to repair the telephone Remove the SIM from the telephone and store it in a safe place Please pack the telephone suitable for transit Including in the p...

Страница 146: ...ice provider or air time retailer cannot resolve the problem please contact the Panasonic Helpline on 08705 159159 The Helpline operates 9 00 AM 5 30 PM Monday Friday excluding Bank Holidays If faulty arrangements will be made to repair the telephone and return it to you We will use reasonable endeavours to ensure this is within a maximum of 5 workings days See over for full terms and conditions K...

Страница 147: ...iods of respectively 12 and 3 months if these conditions are more favourable to him than the local guarantee conditions applicable in such country of use Conditions of Guarantee When requesting guarantee service the purchaser should present the warranty card together with proof of purchase to an authorised service centre The guarantee covers breakdowns due to manufacturing or design faults it does...

Страница 148: ...the country where used the sales company or national distributor may be able to have the guarantee repair service executed by obtaining spare parts from the country where the appliance was originally marketed or it may be necessary to have the guarantee repair service executed the sales company or national distributor in the country where the appliance was originally marketed In either case the pu...

Страница 149: ...s the necessary adjustments or adaptations to local voltage requirements and technical or safety standards properly made any subsequent guarantee repair service will be provided as above indicated provided the purchaser discloses the nature of the adjustment or adaptation if relevant to the repair It is recommended that the purchaser should not send adapted or adjusted equipment for repair to the ...

Страница 150: ... Settings 43 Views 41 Call Answer or end by opening or closing phone 108 Answering 17 Duration 37 Ending 21 Handsfree talking 18 Hold or unhold 18 Making 15 Mute or unmute 19 Options 18 Volume 19 Call barring 115 Call divert 114 Call log 36 Call settings 108 Call waiting 19 Calls Dialled 36 Emergency 17 Missed 36 Multi party conference 20 Received 36 Camera 63 69 PhotoLight 69 Picture quality 66 R...

Страница 151: ...ages 49 Create SMS message 49 Create text message 49 D Data call Access points 109 Definition 109 Device manager 125 Dictionary 23 E Eject miniSD Card 9 11 Email inbox 54 Emergency calls 17 Ending calls 21 End user Software License Agreement 142 Enhancement settings 116 EU Warranty 146 EU EEA Wide guarantee 145 F File manager 89 Fixed dialling 113 Flashlight 69 Frames add to pictures 97 G Games 13...

Страница 152: ... See Messenger 57 Media album 59 My folders 58 Outbox 59 Receive new 51 Sent 53 Service command 63 Settings 60 SIM 62 Types 48 Messenger 57 miniSD Card Eject 128 Installing 8 Menu 127 Removing 9 11 Missed calls 36 Moving in the menus 25 Multi party calls 20 Multitasking 27 My items 69 74 Create messages with pictures video sound clips 73 Pictures 70 Play video sound clips and streaming media 72 Pl...

Страница 153: ...0 Send data via infrared 118 Send DTMF touch tones 19 Send pictures 66 Service numbers 35 Set time and date 43 Settings 104 131 About 131 Access point 108 Alarm 44 Call 108 Call barring 115 Call divert 114 Certificate management 113 Connection 108 Connectivity 117 Enhancement 116 General 107 miniSD 127 Network 116 Profiles 104 Security 111 Themes 105 Voice commands 129 Shortcuts 102 SIM card Insta...

Страница 154: ...kmarks 79 Connect 75 Download files from Internet 77 Enter URL 79 Online options 76 Saved pages 78 Settings 78 Voice commands 98 Voice commands settings 129 Voice dial 99 Voice recorder 87 Voice Tags 100 Voicemail 57 Volume Call 19 Player 72 Ringtone 104 Sound clip 72 Video clip 72 W Wallpaper change 106 Z Zoom Camera 64 My items 71 Video recorder 67 ...

Отзывы: