manualshive.com logo in svg
background image

15

 2.  Press the CAM (SET) button. 
    This will display the scene file setting menu.
    The  following  items  can  be  set  on  the  Scene  file 

settings  menu.  See  camera  settings  for  details  on 
each setting. 


•  SHUTTER (page 10)


•  AGC (page 10)


•  SENS UP (page 10) 


•  WHITE BAL (page 11)


•  VMD (page 22) 

l

  Preset Speed Setting (PRESET SPEED)

Set the speed the camera moves to the various preset 
positions  for  the  sequence  and  sort  operations  (page 
16). 
 1.  Move the cursor to PRESET SPEED, and then tilt the 

joystick left or right to change the speed setting. 

    Shifting the setting towards the L side decreases the 

speed, while shifting towards the H side increase it. 

    The factory default setting is 255.

l

  Deleting a Preset Position (DEL) 

 1.  Move  the  cursor  to  DEL,  and  then  press  the  CAM 

(SET) button. 

    This  deletes  the  contents  of  the  currently  selected 

position number and displays the position selection 
menu. 

l

 Auto Focus (AF MODE)

 1.  Move  the  cursor  to  AF  MODE,  and  then  tilt  the 

joystick  left  or  right  to  select  an  auto-focus  function 
setting.


MANUAL S.M.L  : 

Auto  focus  does  not  operate 
after moving to a preset position. 


AUTO S.M.L 

Auto  focus  operates  after 
moving to a preset position. 

    The factory default setting is MANUAL L.

l

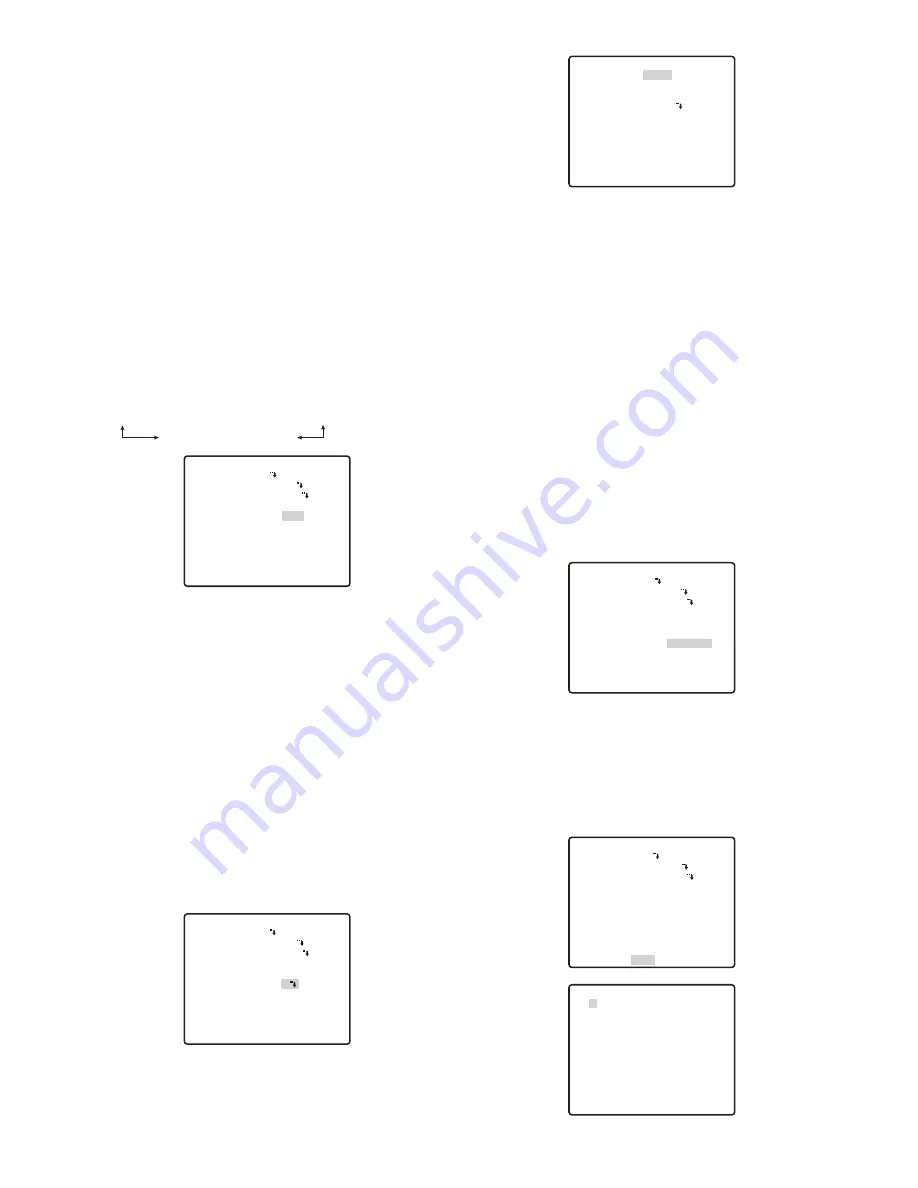
  Sequence/Sort DWELL Time (DWELL TIME)

This section explains how to set the length of time the 
camera  stops  (time  it  stops  rotating)  and  tapes  the 
scene  while  in  the  various  preset  positions  for  the 
sequence and sort operations (page 16). 
 1.  Move  the  cursor  to  DWELL  TIME,  and  then  tilt  the 

joystick left or right to select a DWELL time setting. 

    Tilting  the  joystick  cycles  through  the  stop  time 

display in the sequence shown below. (unit: sec, min)

    The factory default setting is 10S.

l

 Scene File Setting (SCENE FILE) 

Up  to  10  scene  files,  each  of  which  contains  camera 

settings  for  a  specific  location  (scene),  can  be  stored 

in  memory.  Scene  files  are  managed  using  scene  file 

numbers  from  1  through  10  (scene  file  number),  and 

can  be  selected  when  configuring  preset  position 

settings.

The  following  procedures  explain  how  to  select  a 

scene file and how to configure scene file settings. 

(1) Selecting a Scene File 
Use  this  procedure  when  you  want  to  apply  the 

settings of a previously stored scene file when you are 

configuring the settings of a preset position. 
 1.  Move the cursor to SCENE FILE, and then tilt it left 

and right to select the number of the scene file you 
want to select. 

    The factory default setting is OFF.

(2) Configuring Scene File Settings
 1.  Move the cursor to SCENE FILE, and then tilt it left 

and  right  to  select  the  number  of  the  scene  file 
whose settings you want to configure (1 to 10). 

     PRESET NO.   1 

POSITION SET

PRESET ID

ALC/MANUAL

AF MODE

DWELL TIME

SCENE FILE

PRESET SPEED

 RET TOP DEL

ON 

ALC 

MANUAL L

10S

••••••

I255

L     H

   **SCENE FILE  1**

SHUTTER

AGC

SENS UP

WHITE BAL

VMD

 RET TOP

AUTO

ON(MID) 

OFF

ATW1

OFF

     PRESET NO.   1 

POSITION SET

PRESET ID

ALC/MANUAL

AF MODE

DWELL TIME

SCENE FILE

PRESET SPEED


 RET TOP DEL

ON 

ALC 

MANUAL L

10S

OFF

••••••

I255

L     H

2S  

↔  

3S  

↔  

5S  

↔  

10S  

↔  

30S  

↔  

1MIN

               4MIN   

↔   

3MIN   

↔   

2MIN 

     PRESET NO.   1 

POSITION SET

PRESET ID

ALC/MANUAL

AF MODE

DWELL TIME

SCENE FILE

PRESET SPEED


 RET TOP DEL

ON 

ALC 

MANUAL L

10S

OFF

••••••

I255

L     H

     PRESET NO.   1 

POSITION SET

PRESET ID

ALC/MANUAL

AF MODE

DWELL TIME

SCENE FILE

PRESET SPEED

 RET TOP DEL

ON 

ALC 

MANUAL L

10S

OFF 

••••••

I255

L     H

   **PRESET POSITION**

  2*

  6*

 10*

 14*

 18*

 22*

 26*

 30*

  3*

  7*

 11*

 15*

 19*

 23*

 27*

 31*

  4*

  8*

 12*

 16*

 20*

 24*

 28*

 32*

  1

  5*

  9*

 13*

 17*

 21*

 25*

 29*

  ID:

 033-064 225-256

 RET TOP

Содержание WV-CS580

Страница 1: ...these instructions carefully and save this manual for future use The model number is abbreviated in some descriptions in this manual Operating Instructions Color CCTV Camera Model No WV CW590 G WV CW594E WV CS580 G WV CS584E WV CS580 G WV CS584E WV CW590 G WV CW594E ...

Страница 2: ...eset Position Settings 6 n Language Setting 8 n Advanced Menu Settings 8 Camera settings 9 n Using the Camera Setup Menu 9 Pan tilt settings 14 n Using the Pan Tilt Setup Menu 14 Alarm settings 22 n Using the Alarm Setup Menu 22 Special settings 25 n Using the Special Setup Menu 25 Password settings 27 n Password Lock Settings 27 Shortcuts 29 ...

Страница 3: ...talled on the PC download the latest Adobe Reader from the Adobe web site and install it The model number is abbreviated in some descriptions in this manual The screens used in these operating instructions show the case of WV CW590 G About notations The following notations are used when describing the functions limited for specified models The functions without the notations are supported by all m...

Страница 4: ...ing is 1 7 Move the cursor to XON XOFF and then tilt the joystick left or right to select an XON XOFF setting NOT USE Disables XON XOFF data flow control USE Enables XON XOFF data flow control The factory default setting is NOT USE 8 Move the cursor to WAIT TIME and then tilt the joystick left or right to select a wait time setting The wait time is the time that the camera should wait before resen...

Страница 5: ...ft or right to toggle camera ID display ON and OFF 2 Select ON or OFF and then press the CAM SET button The factory default setting is OFF 3 Use the joystick to move the cursor the character you want to input and then press the CAM SET button This will cause the selected character to appear in the camera ID input area Repeat step 3 as many times as necessary to input all of the characters for the ...

Страница 6: ...e CAM SET button 2 Move the cursor to the number you want to select and then press the CAM SET button This registers the position number setting and displays the preset setting menu this page To select a position number in the range of 033 to 064 move the cursor to 33 64 in the lower left corner of the menu and then press the CAM SET button Preset numbers set subsequently are the same Notes An ast...

Страница 7: ...d then upload it to the camera with the damaged data l Preset ID Setting PRESET ID The preset ID is a series of alphanumeric characters that indicate the location of the camera 1 Move the cursor to PRESET ID and then tilt the joystick left or right to toggle preset ID display ON and OFF 2 Select ON or OFF and then press the CAM SET button The factory default setting is ON This will display the pre...

Страница 8: ...ing Instructions show English display messages 3 Move the cursor to SET and then press the CAM SET button The item that was set flashes when the language is being changed and stops flashing when the language has been changed Do not operate the system controller when changing settings The LANGUAGE display remains in English even when the language setting is changed n Advanced Menu Settings The adva...

Страница 9: ...ter area to become washed out SUPER D6 digitally combines an image that is set up for a clear view of bright areas with an image that is set up for a clear view of dark areas creating a final image that preserves overall detail Notes SUPER D6 is supported only when ALC is selected for light control ALC MANUAL Camera settings are limited to the following when SUPER D6 is turned on SHUTTER OFF AUTO ...

Страница 10: ...nd down and left and right to move the cursor to a cell you want to mask 2 Press the CAM SET button to mask the cell Moving the cursor to a cell that is already masked causes the blinking pattern of the cursor to alternate between horizontal stripes and white Pressing the CAM SET button while the cursor is located at a masked cell cancels the masking of the cell To cancel all masking areas press t...

Страница 11: ...emain highlighted on the display If this happens it could mean that the color temperature is outside the supported range or that illumination is too low 2 Select ATW1 ATW2 and AWC then press the CAM SET button either the ATW setting menu or the AWC setting menu appears and you can fine tune the white balance Move the cursor to R or B and then tilt the joystick left or right to fine tune the level ...

Страница 12: ...AUTO in step 1 move the cursor to LEVEL and then tilt the joystick left to select the threshold illuminace level for switching between the color mode and the black and white mode The illuminace shown below is based on the assumption that the camera is used in an area lit by halogen lamps and that AGC on the menu is set to MID LOW Switches to the black and white mode when illuminance around the cam...

Страница 13: ...erate This is the factory default setting The factory default setting is OFF Notes The stabilizer may not be effective for the following subjects Example Objects illuminated with low lighting Single color objects white walls etc Fast moving periodic action such as mechanical vibration may not be tracked The stabilizer does not work during PAN TILT ZOOM FOCUS or when the camera setup menu is open W...

Страница 14: ... position number in the range of 033 to 064 move the cursor to 33 64 in the lower left corner of the menu and then press the CAM SET button Preset numbers set subsequently are the same l Position Setting POSITION SET See pages 6 and 7 for information on the setting method l Adjusting Camera Position When Changing Cameras PAN OFFSET SET See page 7 for information on the setting method l Preset ID S...

Страница 15: ...the sequence shown below unit sec min The factory default setting is 10S l Scene File Setting SCENE FILE Up to 10 scene files each of which contains camera settings for a specific location scene can be stored in memory Scene files are managed using scene file numbers from 1 through 10 scene file number and can be selected when configuring preset position settings The following procedures explain h...

Страница 16: ...y automatic return to a particular mode if a certain amount of time elapses without any operation being performed 1 Move the cursor to SELF RETURN and then tilt the joystick left or right to select a self return trigger setting Tilting the joystick cycles through the self return display in the sequence shown below unit sec min The factory default setting is OFF 2 If you selected any setting other ...

Страница 17: ...actory default setting is 1 2 MIN Notes The auto mode is exited automatically whenever manual PAN TILT or ZOOM FOCUS is performed if AUTOPAN is operating and PAN TILT does SEQ SORT PATROL or AUTOTRACK movement Note however that that the contents of the setting menu do not change To return to the auto mode open the setup menu and then close it again The auto mode will also activate when the self re...

Страница 18: ...e reaches 0S Notes Selecting LEARN to teach the camera a patrol routine causes the following parameters to be stored along with the camera movements 1 Parameters at the Beginning of the Routine PAN TILT ZOOM and FOCUS positions IRIS level Shutter speed SHUTTER Gain AGC setting Electronic sensitivity enhancement SENS UP setting White balance WHITE BAL setting 2 During Camera Movement PAN TILT ZOOM ...

Страница 19: ...vacy zone setting ON 1 Turns on the privacy zone function Grey ON 2 Turns on the privacy zone function Mosaic OFF Turns off the privacy zone function The factory default setting is OFF Use the following steps to configure privacy zones 2 When the camera is set to ON 2 after accessing the zone setting menu by following the instructions in step 3 to 5 move the cursor to ZONE LEVEL and then tilt the ...

Страница 20: ...e to track objects passing directly under the camera more smoothly The picture is flipped vertically and horizontally when the camera is at an angle of around 135 1 Move the cursor to DIGITAL FLIP and then tilt the joystick left or right to toggle it ON and OFF ON Turns on digital flip Note that the tilt range becomes 0 to 90 when ON is selected for the PAN LIMIT setting OFF Turns off digital flip...

Страница 21: ...uploads or downloads the preset data This protects against the download or upload failure due to start up of the cleaning process 5 Move the cursor to POSI and then press the CAM SET button This will display the ID position setting menu 6 Use the joystick to select an area title display position and then press the MON ESC button This registers the area title display position and returns to the are...

Страница 22: ...n detector to monitor for movement To mask screen areas use the same procedure as step 5 under SUPER D6 Super Dynamic 6 on page 9 After configuring mask settings press the MON ESC button to return to the motion detector setting menu 3 Move the cursor to ALARM and then tilt the joystick left or right to toggle demo mode see step 5 alarm output ON and OFF ON Turns on alarm output in the demo mode OF...

Страница 23: ...ny accidents that occur or any losses incurred while this product is being used When in the preset position the preset position settings are in effect 2 Preset Alarm Setting PRESET ALM Turning on the preset alarm will output an alarm from the video output port or alarm output connector when the camera completes a move to a preset position An alarm is output in the following cases When the self ret...

Страница 24: ...e the picture quality settings according to alarm input for PATROL 1 S to 4 S the settings are applied to the camera settings and are kept even after the camera is turned on again PATROL1 S 4 S displays only the set number of patrol routines page 17 6 Move the cursor to CNT CLS 1 and then tilt the joystick left and right to select the alarm output that should be performed over ALARM OUT 1 when an ...

Страница 25: ... The factory default setting is ALARM The names and types of displays for the alarm display are shown in the table below Notes Use a shortcut page 29 to switch between displaying or not displaying the pan tilt zoom positions during pan tilt and zoom operation and type of alarm on the monitor screen The tilt position is displayed ranging from 5 to 90 to 5 3 Compensating for Blemishes PIX OFF 1 Move...

Страница 26: ...press the F3 button The refresh function corrects the camera position when it starts to deviate from the preset positions 5 Returning Camera Settings to Their Defaults CAMERA RESET 1 To reset the camera to its initial default settings move the cursor to PUSH SET to the right of CAMERA RESET and then press the F4 button This resets the camera to it initial factory default settings Note however that...

Страница 27: ...The factory default password is 123 4 Press the CAM SET button This returns to the setup menu and toggles PASSWORD LOCK on or off The password input screen will reappear if you press the CAM SET button after inputting the wrong password If this happens perform step 3 again l Changing the Password After turning on password lock it is recommended that you use the following procedure to change the fa...

Страница 28: ...gain for verification Note that you cannot register the new password by pressing the MON ESC button 6 Input the new 3 digit password again by moving the cursor to each of the applicable numbers along the top of the screen 0 to 9 and pressing the CAM SET button for each digit Move the cursor to OK 7 Press the CAM SET button This completes the password change operation and returns to the setup menu ...

Страница 29: ...L FLIP OFF 8 0 CAM FUNCTION PROPO P T ON 8 1 CAM FUNCTION PROPO P T OFF 8 4 CAM FUNCTION SUPER D6 ON 8 5 CAM FUNCTION SUPER D6 OFF 8 6 CAM FUNCTION AF MODE AUTO 8 8 CAM FUNCTION Performs auto focus 8 9 CAM FUNCTION Moves to home position 9 0 CAM FUNCTION BW ON 9 1 CAM FUNCTION BW OFF 9 2 CAM FUNCTION BW AUTO 9 3 CAM FUNCTION CAMERA ID ON 9 4 CAM FUNCTION CAMERA ID OFF 9 5 CAM FUNCTION AREA TITLE O...

Страница 30: ... AUTO switching time 10 seconds 1 9 2 CAM FUNCTION BW AUTO switching time 30 seconds 1 9 3 CAM FUNCTION BW AUTO switching time 60 seconds 1 9 4 CAM FUNCTION PATROL2 PLAY 1 9 5 CAM FUNCTION PATROL3 PLAY 1 9 6 CAM FUNCTION PATROL4 PLAY 1 9 7 CAM FUNCTION PATROL2 LEARN start 1 9 8 CAM FUNCTION PATROL3 LEARN start 1 9 9 CAM FUNCTION PATROL4 LEARN start 2 0 0 CAM FUNCTION Turns on auto tracking 2 0 1 C...

Страница 31: ...porter s name and address to follow EU rules Panasonic Testing Centre Panasonic Marketing Europe GmbH Winsbergring 15 22525 Hamburg F R Germany Panasonic System Networks Co Ltd 2011 sC1011 1101 3TR006805BZB Printed in China ...

Отзывы: