


56
Recording Video
Once you have installed the recorder following the instructions in “Chapter 2 -- Installation”, it is ready to
record. The recorder will start recording based on the settings you made in the “Record” setup screen. See
“Chapter3 -- Configuration”.
“Overwrite On” or “Overwrite Off”. The factory default is “Overwrite On”. It does this by recording over the
oldest video once the hard disk is full. Setting the recorder to “Overwrite Off” causes it to stop recording once
the hard disk is full.
“Standard” (CIF), “High” (Half D1) or “Very High” (D1). The factory default resolution is “Standard”. When set
to “Standard”, the recorder has a maximum recording speed of 200 ips(4-channel model:100 ips). When set
to “High”, the recorder has a maximum recording speed of 100 ips(4-channel model:50 ips). When set to
“Very High”, the recorder has a maximum recording speed of 50 ips(4-channel model:25 ips).
Note: The recording speed would be down than the set speed by operating on Web browser while
recording.
Although you will be able to record without changing the unit from its original factory settings, you will want to
take advantages of the recorder’s many tools. See “Chapter 3 -- Configuration” for detailed descriptions of
the recording mode options.
Panic Recording
Selecting “ ” (Panic) in the Live Monitoring menu or pressing the [PANIC] button starts panic recording of all
cameras, and selecting “ ” or pressing the button again stops panic recording. If you set the Panic
Recording Duration in the Panic Record setup screen, panic recording will stop automatically according to
the preset duration as long as “ ” is not selected or the [PANIC] button is not pressed.
Note: When the recorder is not in the Overwrite mode and all available storage space has been
used, panic recording will not operate.
Recording Audio
If the recorder was set up to record audio, it will record audio from up to four inputs when video is recording.
Note: Make certain you comply with all local and federal laws and regulations when recording
audio.
Playing Recorded Video
If a user who has “Search” authority logs into the system, the user can view recorded image. Once video has
been recorded, you can view it by pressing the [PLAYBACK] button.
The recorder supports the Triplex function: monitoring, recording and playing back at the same time.
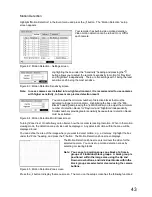
Pressing the [PLAYBACK] button when in one of the multi-view formats enters the Triplex mode and displays
the Select Playback Camera menu.
Selecting “All Channels” plays back video of all cameras. The recorder maintains the same
display format as it does in the live mode except for the PIP format. You can also change the
screen layout in the same way as you do in the live mode.
Selecting the camera number under “Triplex” enters the Triplex mode and plays back video of
the selected camera. When in the single-screen display format, the camera currently
displayed on the screen will be selected and when in the PIP display format, the camera
displayed on the PIP screen will be selected for the search channel. During the Triplex mode,
the recorder maintains the same display format as it does in the live mode. A red outline
surrounding the video and the camera title indicates the search channel.
Figure 91 : Select Playback Camera menu
Содержание WJ-HL204/G
Страница 77: ...76 Map of Screens ...


