


3.3 Setting the language, date and
time
When you use the main monitor for the first time, you will
be prompted to set the display language, date, and time
settings.
R
The notification indicator flashes if these settings are
not configured.
R
The language setting is available for EX and FX
models only.
1
Press the
M
N
button to turn on the display.
2
Use the navigator key (
) to select the desired
language.
3
Press the soft key under the
soft key icon.
4
Press
again.
5
Set the date and time.
R
Press the left or right side of the navigator key
(
) to select an item (i.e., year, month, day,
etc.).
R
Press the top or bottom side of the navigator key
(
) to change the setting.
6
When finished, press
.
R
A beep sounds and the display turns off.
Changing the language, date and time
You change the language, date, and time settings later
if desired. From the top menu, use the navigator key and
to navigate to
“
Change settings
”
®
“
Initial settings
”
.
Note:
R
The date and time settings may be deleted when
there is a power outage. In this case, reconfigure the
settings.
R
The time may become out of sync over time (about
60 seconds per month).
3.4 Wide/zoom settings and zoom
position settings
You can configure how doorphone images are initially
displayed on the main monitor. Images can be displayed
in wide mode or in zoom mode. You can choose different
settings for when visitors call you, and for when you are
monitoring.
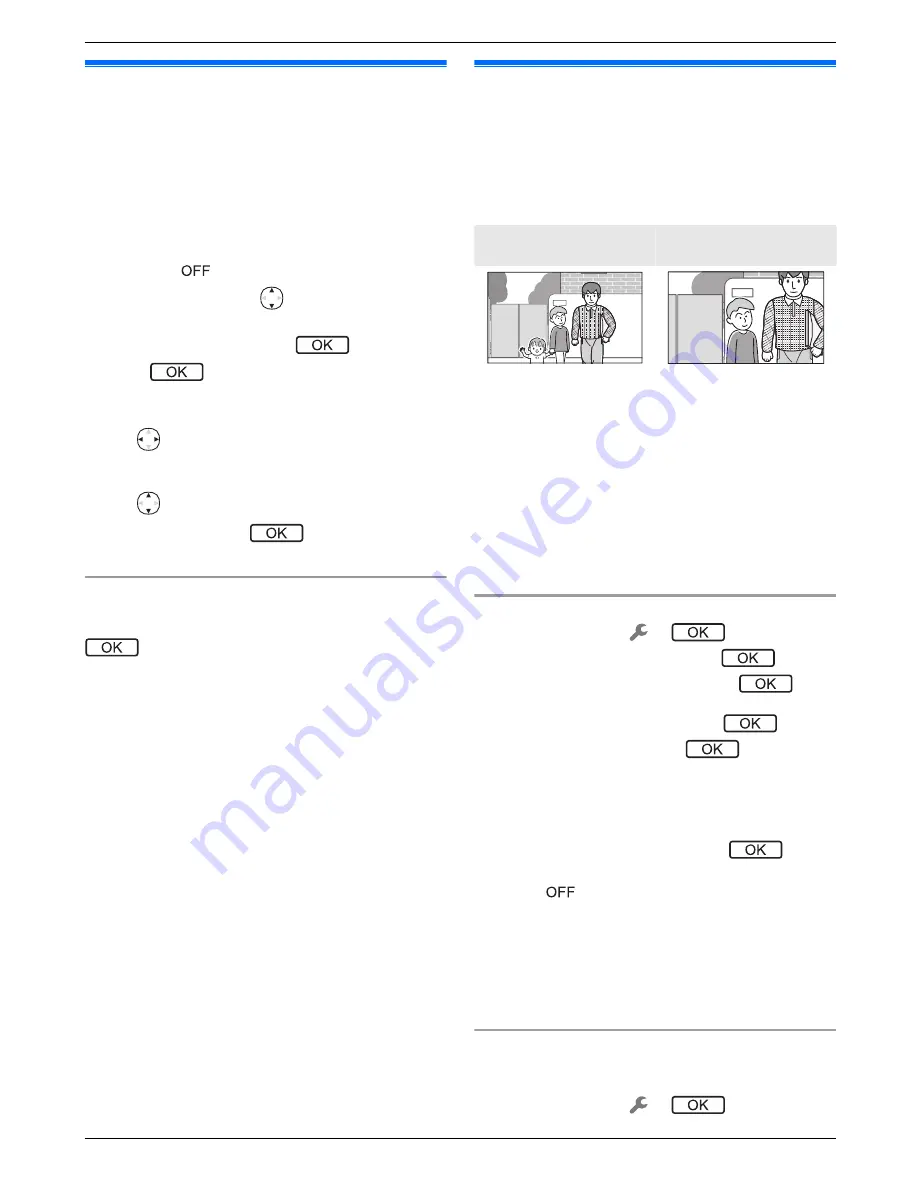
Wide mode
(default setting)
Zoom mode
Images are not zoomed.
The full camera image is
displayed.
Images are zoomed.
Images are displayed 2
times larger than wide
display.
Note:
R
The zoom feature uses a digital zoom. As a result,
the image quality of zoomed images is lower than
wide display images.
R
You can switch between wide and zoom modes and
adjust the zoom position while monitoring or on a call.
See page 18.
Selecting wide or zoom
1.
Top menu
®
select
®
.
2.
Select
“
Initial settings
”
®
.
3.
Select
“
Wide/Zoom settings
”
®
.
R
If there are multiple doorphones, select the
doorphone to be configured
®
.
4.
Select the desired setting
®
.
–
“
When visitors come
”
: Your settings will be
used when you answer calls from visitors.
–
“
When monitoring
”
: Your settings will be used
when you are monitoring.
5.
Select the desired display mode
®
.
R
A beep sounds and the settings are changed.
6.
Press
M
N
.
Note:
R
If you select
“
Zoom
”
, adjust the zoom position so that
people or objects that you want to view are displayed
centrally in the screen.
R
When images are recorded in zoom mode, only the
zoomed area is recorded.
Selecting the zoom position (pan/tilt position)
You can select which area of the image is displayed
when displaying zoomed images.
1.
Top menu
®
select
®
.
11
3. Preparation
Содержание VL-SVN511 Series
Страница 34: ...34 Notes ...
Страница 35: ...35 Notes ...


