background image

 Advanced Picture Settings

68

 Menu

 Item

 Adjustments / Configurations (alternatives)

 Picture

 Advanced Settings

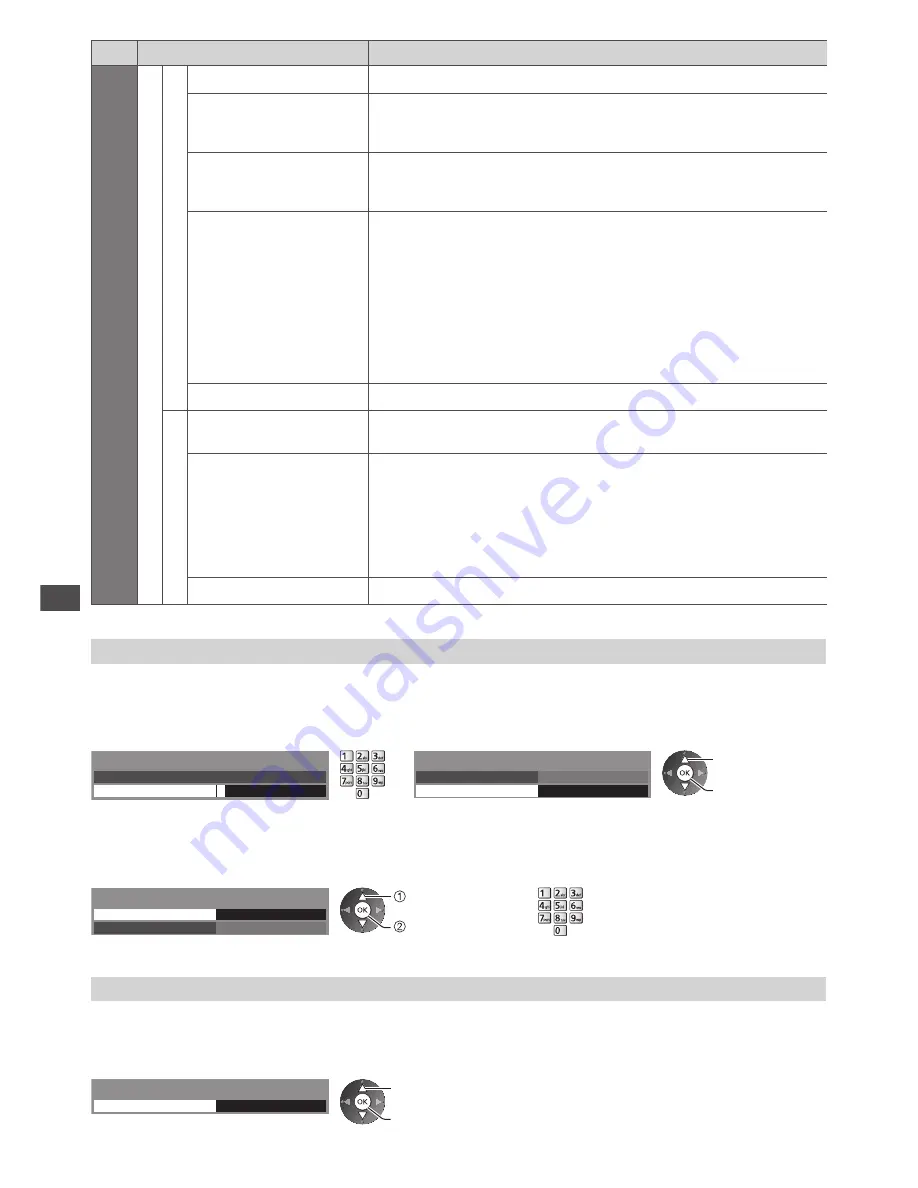
 Colour Management

 R-Hue, G-Hue, B-Hue

 Adjusts the picture hue of red / green / blue area

 R-Saturation, 
G-Saturation, 
B-Saturation

 Adjusts the saturation of red / green / blue area

 R-Luminance, 
G-Luminance, 
B-Luminance

 Adjusts the luminance of red / green / blue area

 More Detailed 
Adjustment

 Adjusts more detailed Colour Management items

 [Y-Hue] / [C-Hue] / [M-Hue]:

 Adjusts the picture hue of yellow / cyan / magenta area.

 [Y-Saturation] / [C-Saturation] / [M-Saturation]:

 Adjusts the saturation of yellow / cyan / magenta area.

 [Y-Luminance] / [C-Luminance] / [M-Luminance]:

 Adjusts the luminance of yellow / cyan / magenta area.

 [Reset to Defaults]:

 Press the OK button to reset to the default detailed Colour 
Management.

 Reset to Defaults

 Press the OK button to reset to the default Colour Management

 Gamma

 Gamma

 Switches the gamma curve 

[S Curve] / [1.8] / [2.0] / [2.2] / [2.4] / [2.6]


 Please note the numerical values are reference for the adjustment.

 More Detailed 
Adjustment

 Adjusts more detailed Gamma items

 [Input Signal Level]:

 Adjusts the input signal level.

 [Gain]:

 Adjusts the gain of gamma for selected signal level.

 [Reset to Defaults]:

 Press the OK button to reset to the default detailed Gamma.

 Reset to Defaults

 Press the OK button to reset to the default Gamma

 Lock the picture setting [Lock Settings]

 [White Balance] and [Gamma] can be locked for each Viewing Mode and each input.
 Additionally, [Contrast], [Brightness], [Colour], [Sharpness], [Tint], [Colour Gamut], [Colour Management] and [Reset 
to Defaults] in the Picture Menu can be locked for [Professional1] and [Professional2].

 1

  Enter the PIN number (4 digits)

 2

  Select [Adjustment Lock] and set to [On]


 *  *  *

 Please enter new PIN

 PIN

 Lock Settings-PIN Entry


 Change PIN

 On

 Adjustment Lock

 Lock Settings


 select

 access / store


 Enter the PIN number twice at first setting.


 Make a note of the PIN number in case you forget it.


 To change the PIN number

 1.  Select [Change PIN]

 2.  Enter a new PIN number twice


 Change PIN

 On

 Access

 Adjustment Lock

 Lock Settings


   select

   access


 Copy the settings to the other input [Copy Adjustment]

 You can copy the selected [Professional1] or [Professional2] settings to that of the other input.
 The settings of [Contrast], [Brightness], [Colour], [Sharpness], [Tint], [Colour Gamut], [White Balance], [Colour 
Management] and [Gamma] will be copied.

 Select the destination to copy to


 Destination

 All

 Copy Adjustment


 select

 access / store


 You cannot copy to the locked mode.

Содержание Viera TX-P42GT50B

Страница 1: ...GT50B TX P50GT50B Thank you for purchasing this Panasonic product Please read these instructions carefully before operating this product and retain them for future reference The images shown in this manual are for illustrative purposes only English UK and Ireland model ...

Страница 2: ...able DVB T2 broadcasts will be tuned automatically when you perform DVB Auto Setup Wireless connection This TV can be connected to the network with the built in wireless LAN Also can be connected to the specific devices supporting Bluetooth wireless technology 3D Eyewear Keyboard Audio devices Using USB devices Enjoy recording and playback the digital TV programmes to the USB HDD p 69 78 Enjoy the...

Страница 3: ...or ii decode AVC Video that was encoded by a consumer engaged in a personal and non commercial activity and or was obtained from a video provider licensed to provide AVC Video No license is granted or shall be implied for any other use Additional information may be obtained from MPEG LA LLC See http www mpegla com Rovi Corporation and or its subsidiaries and related affiliates are not in any way l...

Страница 4: ...truction shall be connected to a mains socket outlet with a protective earthing connection IMPORTANT THE MOULDED MAINS PLUG FOR YOUR SAFETY PLEASE READ THE FOLLOWING TEXT CAREFULLY This TV is supplied with a moulded three pin mains plug for your safety and convenience A 10 amp fuse is fitted in this mains plug Shall the fuse need to be replaced please ensure that the replacement fuse has a rating ...

Страница 5: ...d by young children accidentally Keep the dangerous parts out of reach of young children Do not allow children to handle SD Card As with any small object the SD Card could be swallowed by young children Please remove SD Card immediately after use and store out of reach of young children Radio waves Do not use the TV in any medical institutions or locations with medical equipment Radio waves from t...

Страница 6: ...cess SSID is a name for identifying a particular wireless network for transmission Do not subject the built in wireless LAN to high temperatures direct sunlight or moisture Data transmitted and received over radio waves may be intercepted and monitored The built in wireless LAN uses 2 4 GHz and 5 GHz frequency bands To avoid malfunctions or slow response caused by radio wave interference keep the ...

Страница 7: ... manual of the optional accessories Wall hanging bracket TY WK4P1RW Tilting angle for this TV 0 vertical to 20 degrees TX P42GT50B 10 degrees TX P50GT50B Rear of the TV Holes for wall hanging bracket installation 400 mm Depth of screw minimum 10 mm maximum 16 mm Diametre M8 300 mm View from the side Screw for fixing the TV onto the wall hanging bracket not supplied with the TV Warning Using other ...

Страница 8: ...estal Otherwise the TV may fall over and become damaged and personal injury may result Caution Do not use any pedestal other than the one provided with this TV Otherwise the TV may fall over and become damaged and personal injury may result Do not use the pedestal if it becomes warped or physically damaged If you use the pedestal while it is physically damaged personal injury may result Contact yo...

Страница 9: ... base over and fix the neck securely with assembly screws Do not hold the neck when turning over the base B F Back of the base Screw hole F D Tabs bottom 3 Attach the bracket to the tabs of the neck and fix with assembly screws 4 Attach the cover and fix securely with assembly screw B C D Tabs top E A Securing the TV Use the assembly screws to fasten securely Tighten the four assembly screws loose...

Страница 10: ...t 5 Remove the assembly screws from the back of the base and pull out the neck Adjusting the panel to your desired angle Do not place any objects within the full rotation range View from the top TX P42GT50B 15 TX P50GT50B 10 Preventing the TV from falling over Using the fall prevent screw hole and a screw commercially available securely fix the body of the pedestal to the installation surface The ...

Страница 11: ... for the selection navigation and operation of various functions 10 Sound Mute Switches sound mute on or off 11 Teletext p 30 Switches to teletext mode 12 Volume Up Down 13 Numeric buttons Changes channel and teletext pages Sets characters When in Standby mode switches TV on Press for about 1 second 14 Surround p 43 Switches surround sound setting 15 Light Lights the buttons for about 5 seconds ex...

Страница 12: ... Touch Recording Rear side of the TV 1 Function select Volume Contrast Brightness Colour Sharpness Tint NTSC signal Bass Treble Balance Auto Setup p 52 53 Music or Speech mode in the Sound Menu 2 Channel Up Down Value change when using the F button Switching the TV on press either button for about 1 second when in Standby mode 3 Changes the input mode 4 Mains power On Off switch Use to switch the ...

Страница 13: ...RT p 14 11 AV2 COMPONENT VIDEO p 100 Connections Mains lead satellite dish and aerial DVB Analogue AC 220 240 V 50 60 Hz Mains lead RF cable Mains lead Push until both side tabs click Make sure that the mains lead is securely fixed To remove from the TV tabs Press both tabs and pull on mains connector to release freesat Other Sat Satellite Satellite cable Satellite dish Terrestrial aerial Aerial i...

Страница 14: ...l RF cable RF Cable Supplied with this TV Aerial input terminal RF Cable Cable Note Connect to the TV s AV1 for a DVD Recorder VCR supporting Q Link p 94 Q Link and VIERA Link connection p 92 93 Please also read the manual of the equipment being connected Keep the TV away from electronic equipment video equipment etc or equipment with an infrared sensor Otherwise distortion of image sound may occu...

Страница 15: ...ielded Use the Unshielded Twist Pair UTP LAN cable Ferrite core Large size supplied Installing the Ferrite core Pull back the tabs in two places Wind the cable twice Close Wireless connection Internet environment Access point Built in wireless LAN Using clamper Clamper Standard accessory Attach the clamper Bundle the cables hole Insert the clamper in a hole hooks Set the tip in the hooks To remove...

Страница 16: ...ll take up to 5 minutes 0 100 6 7 8 100 100 ETV BBC TES 2 BBC TES 3 9 100 BBC FOUR 10 100 CBBC Channel 11 100 CBeebies 100 Searching Satellite Auto Setup Satellite Astra1 Progress This will take up to 30 minutes No Channel Name Type Free TV Free TV Free TV Free TV Free TV Free TV Quality Free TV 11 Pay TV 0 Radio 0 CH 5 69 62 62 62 100 100 CBBC Channel BBC Radio Wales E4 100 62 100 Cartoon Nwk CH2...

Страница 17: ...ceeded The test is successful and the TV is connected to the network failed Check the settings and connections And then select Retry Acquire IP Address Auto Manual select access Automatically setup is done and the test of the network connection starts To set manually select Manual and set each item For details p 86 2 Go to the next step Press twice Wireless Access points found automatically are li...

Страница 18: ... the access point until its light flashes 2 When the light is flashing select Connect on TV If you are unsure please check the instruction manual of the access point WPS Push button Connect Ensure that your access point supports WPS for this setup WPS Wi Fi Protected Setup If the connection has failed check the settings and positions of your access point And then follow the on screen instructions ...

Страница 19: ...op viewing environment for shop display only Shop viewing environment is the demonstration mode to explain main features of this TV Select Home viewing environment to use in your home environment You can return to viewing environment selection screen at the stage of Shop confirmation screen 1 Return to viewing environment selection screen 2 Select Home Please select your viewing environment Home S...

Страница 20: ...CK To return to VIERA Connect home screen To exit from VIERA Connect To set the VIERA Connect introduction banner display off VIERA Connect Banner p 46 Setup Help menu Items in Setup Help may change without notice Customize HomeScreen Changes the position of each services on VIERA Connect home screen My Account Confirms or removes the account information of the TV you entered on VIERA Connect Lock...

Страница 21: ...modes vary depending on the selected country and stored channels p 16 3 Select a channel up down or freesat channel position numbers run in the ranges 100 999 and 0100 0999 To select a three or four digit channel position number e g 0246 DVB and Other Sat Satellite channel position numbers run from 1 onwards Analogue channel position numbers run in the ranges 0 99 To select a more than two digit c...

Страница 22: ...e available This function can aid visually impaired viewers by adding an additional audio track to describe events on screen For settings p 44 STTL Subtitle service available TEXT Teletext service available Multi Audio Multiple audio available Stereo Mono NICAM Audio mode 1 90 Off Timer remaining time For settings p 23 To confirm another tuned channel name To watch the channel listed in the banner...

Страница 23: ... available This setting is not memorised and it will return to the default setting once you exit the current programme Sub Channel Other Sat Satellite Selects the multifeed programme sub channel if available Subtitle Language except Analogue Selects the language in which subtitles should appear if available This setting is not memorised and it will return to the default setting once you exit the c...

Страница 24: ... Displays a 16 9 letterbox or 4 3 image without distortion 14 9 Zoom2 Displays the image at the standard 14 9 without distortion Displays a 16 9 letterbox anamorphic image full screen without distortion 4 3 Zoom3 Displays the image at the standard 4 3 without distortion Displays a 2 35 1 letterbox anamorphic image full screen without distortion At 16 9 displays the image at its maximum with slight...

Страница 25: ...he Battersbys 1 BBC ONE BBC 2W BBC NEWS BBCi BBC THRE BBC FOUR BBC Radio BBC ONE 101 102 103 104 105 106 107 Coronation Street Time TV Guide Wed 27 Oct 2010 10 46 Wed 27 Oct 2010 Search All Channels Also in Example 2 4 5 6 1 3 There might be some programmes displayed as greyed out in TV Guide These are the Off Air programmes non running programmes 1 Current date and time 2 TV Guide time 3 Channel ...

Страница 26: ... 1 Select the mode p 21 2 View TV Guide Das Erste DIY SOS Holiday News 19 30 20 00 20 30 21 00 21 30 The Bill Good bye Hot Wars Holiday Program Pepsi Char Emmerdal 10 O clock News BBC Coast Spring watch Panorama News Pop Idol I m A Celebrity Sports 15 To 1 Rugby D D D D D D D BBC ONE 20 00 20 30 DIY SOS We open in the Battersbys 1 BBC ONE BBC THREE E4 BBC FOUR BBC 2W BBCi BBC Radi 1 7 14 70 72 105...

Страница 27: ...elect Search Titles 2 Set characters maximum 19 characters 3 Start Search green All the programme titles including the word you set will be listed Searching without any characters will list all programmes including current programmes select access select set To use numeric buttons Characters table for numeric buttons p 110 Timer Programming freesat or DVB The Timer Programming menu allows you to c...

Страница 28: ...d end times are changed by the broadcaster the timer programming event will follow the change A Split Programme programming is a Guide link programming which is interrupted by one or more other programmes Note that Guide link programming including Split Programme programming only works reliably if correct information is received from broadcasters Timer Programming screen 7 BBC ONE DIY SOS The Bill...

Страница 29: ...llite Channels p 58 1 Select Other Sat Satellite p 21 2 Display the Channel List Example Example 2 freesatHome 3 freesatSSU 4 Brit Shorts 5 HINRG LOWNRG 6 WELL Class 7 GROOVE 8 All Other Sat Channels 2 freesatHome 3 freesatSSU 4 Brit Shorts 5 HINRG LOWNRG 6 WELL Class 7 GROOVE 8 Satellite Channel List 3 Select the channel select watch To return to TV or ...

Страница 30: ... Switch to Teletext 17 51 28 Feb Example How to operate services In all cases it is possible to navigate the pages using buttons on the remote control but because the commands available must apply to all manufacturers of digital equipment some on screen commands may not correspond exactly to the remote control buttons Select go Symbol Back key Coloured characters When options with numbers are disp...

Страница 31: ...tuated at the bottom of the screen Each of these numbers can be altered and stored in the TV s memory Store frequently viewed pages p 32 To change mode Teletext p 46 1 Switch to Teletext Displays the index page content varies depending on the broadcasters 01 02 03 04 05 06 07 TELETEXT INFORMATION 17 51 28 Feb Time date Sub page number Colour bar Current page number 2 Select the page or up down or ...

Страница 32: ...umber press and hold Coloured button you want to change View sub page View sub page Only when Teletext is more than one page Appears at top of the screen The number of sub pages varies depending on the broadcasters up to 79 pages It may take some time for searching during which time you can watch TV To view specific sub page blue Enter the 4 digit number Example P6 Watch TV while waiting for updat...

Страница 33: ...using the AV button on the remote control or the TV except SD Card USB Press the button repeatedly until the desired input is selected To switch between COMPONENT and VIDEO in AV2 move the indicator by pressing left and right cursor button SD Card USB Switches to Media Player Using Media Player p 72 You can label or skip each input mode except SD Card USB Input Labels p 46 Skipped inputs will not ...

Страница 34: ...ure rapidly forward DVD video content Search forward Pause Pause Resume DVD Press and hold to play at slow speed Direct TV Rec p 94 96 One Touch Recording p 71 How to change the code Each type of the Panasonic equipment has its own remote control code Change the code according to the equipment you want to operate Press and hold Standby On Off switch during the following operations Enter the approp...

Страница 35: ...es view the screen at a distance at least 3 times of the height of the actual image That makes the distance closer than above recommended figure 3D Eyewear Use Pay special attention when children are using the 3D Eyewear 3D Eyewear should not be used by children younger than about 5 6 years old as a guideline All children must be fully supervised by parents or guardians who must ensure their safet...

Страница 36: ...message again Turn off the 3D Eyewear after using it Note 3D Eyewear is not included Please purchase as necessary p 8 For more detail about using and wearing the 3D Eyewear read the manual of the 3D Eyewear The 3D image or 3D effect may not be available in the following conditions VIERA Connect home screen p 20 is displayed Ext Rec or LT1 LT2 of Timer Programming p 60 is in progress LT1 LT2 of One...

Страница 37: ...nto 3D Please note the 3D images appear slightly different from the originals Using this function for profit making purposes or publically showing images converted from 2D to 3D in places such as shops or hotels etc may infringe on the rights of the copyright holder protected under copyright law Table of images that can be seen for each 3D Mode Selection Manual and the source image format If the p...

Страница 38: ...s the BACK RETURN button to go to Effect setting Effect Adjusts the 3D depth according to the contents or to your preference Picture Sequence Select Reverse if you feel that the sense of depth is unusual except in 2D 3D mode Normal Reverse Edge Smoother Set to On if you feel the contoured parts of an image are not smooth enough except in 2D 3D mode Off On 3D Detection Automatically detects the 3D ...

Страница 39: ... or music data on it and insert it into the SD Card slot or USB port properly Using Media Player p 72 1 Display icons of the feature 2 Select a feature VIERA Link select access To return to TV or Follow the operations of each feature VIERA Link p 97 Photo p 74 Video p 77 Recorded TV p 78 Music p 81 Media Server p 88 When two or more available devices are connected a selection screen will be displa...

Страница 40: ...return to TV at any time To return to the previous screen To change menu pages up down Enter characters by free input menu You can enter names or numbers freely for some items 1 2 abc 3 def 4 ghi 5 jkl 6 mno 7 pqrs 8 tuv 9 wxyz 0 A B C D E F G H I J K L M N O P Q R S T U V W X Y Z 0 1 2 3 4 5 6 7 8 9 a b c d e f g h i j k l m n o p q r s t u v w x y z _ User input Name Set characters one by one St...

Страница 41: ...ivid Colour Colour Remaster C A T S P NR and 3D COMB can be adjusted and stored for each input Additionally you can adjust and setup the detailed settings when Advance isfccc in the Setup Menu is set to On p 47 You can set Viewing Mode in 2D and 3D mode for each THX modes are used to mirror the picture settings used by professional filmmakers faithfully reproducing the image quality of THX Certifi...

Страница 42: ...fresh Rate Reduces juddering and flicker noises of the 3D images when using the 3D Eyewear Auto 100Hz 120Hz 100Hz If light appears to flicker under fluorescents or dimmers of 50 Hz 120Hz If light appears to flicker under fluorescents or dimmers of 60 Hz Side Panel Adjusts the brightness of the side panel Off Low Mid High The recommended setting is High to prevent panel image retention 16 9 Oversca...

Страница 43: ...e improved spatial effects V Audio Surround Provides a dynamic enhancer of width and depth to simulate improved spatial effects Switching is also possible by the SURROUND button on the remote control p 11 Auto Gain Control Automatically regulates large sound level differences between channels and inputs Off On Volume Correction Adjusts the volume of individual channel or input mode Speaker Distanc...

Страница 44: ...Defaults Press the OK button to reset the current Sound Mode Balance Headphone Volume and Surround to the default settings Network Connection Test Network Connection Wireless Network Settings IP DNS Settings Sets the network setting to use in your network environment p 85 Network Link Settings Sets to control the TV with the devices connected to the network p 85 Software Update Checks for availabl...

Страница 45: ...everal seconds when this function works AV1 out Chooses the signal to be transmitted from the TV to Q Link TV AV2 Monitor Monitor Image displayed on screen Component and HDMI signals cannot be output Standby Power Save Controls the connected equipment to reduce power consumption in Standby Off On p 96 This function is available when VIERA Link is set to On Intelligent Auto Standby Makes non watche...

Страница 46: ...t1 Czech English Estonian Lettish Rumanian Russian Ukrainian etc East2 Czech Hungarian Lettish Polish Rumanian etc Preferred Subtitles Selects the preferred language for digital channel subtitles depending on the broadcaster English Welsh Gaelic Irish To display subtitles p 24 provides aids in understanding and enjoyment with DVB subtitles depending on the broadcaster Input Labels Accesses the inp...

Страница 47: ... selects the input when the TV is turned on TV AV Set to TV to view picture from TV tuner Set to AV to view input from the external equipment connected to the AV1 or HDMI1 terminal e g satellite receiver The external equipment must be switched on and sending a control signal for automatic switching at power on to occur Power on Channel List Automatically selects All Channels or Favourites list in ...

Страница 48: ...tup Network Connection Wired Access Wireless Network Settings IP DNS Settings Connection Test Software Update Network Link Settings Access Access Access Access On Network Status New Software Message Access p 85 88 1 2 Mode Music Bass Treble Balance Headphone Volume Surround Equaliser Auto Gain Control Volume Correction Speaker Distance to Wall Over 30cm Off Off Access 2 2 Preferred Multi Audio Eng...

Страница 49: ...Wed 26 Oct Thu 27 Oct TIMER TIMER p 60 Access Timer Programming Off Timer Auto Standby Off Off p 44 VIERA Link TV On On No reminder Access HDMI Content Detection AV1 out Standby Power Save Intelligent Auto Standby Q Link Download Link Settings Off On p 45 0 100 Sending Preset Data Please wait Remote control unavailable p 45 1 2 TV Guide Settings Access Access Access Access Access Access Access Acc...

Страница 50: ...nd Network Timer Setup Favourites Edit Access Access Channel List Auto Setup Channel Sorting by Region Manual Tuning Update Channel List New Channel Message Signal Condition On DVB Tuning Menu Access Access Access Access Access For DVB p 53 57 Channel List Access Auto Setup Manual Tuning Analogue Tuning Menu Access Access For Analogue p 53 57 Favourites Edit Access Access Channel List Regional Cha...

Страница 51: ...isplay Timeout VIERA Connect Banner Radio Mode Display Settings West FASTEXT On Playing Time Display Preferred Subtitle Type Standard On Channel Transition Effect p 46 101 BBC 1 Scotland 102 BBC 2 Scotland 103 stv 104 stv 108 BBC THREE 109 BBC FOUR 110 BBC HD freesat Channel List p 54 1 BBC One Wales 7 BBC THREE 14 E4 CBBC Channel 70 72 Cartoon Nwk 105 719 720 BBCi BBC Radio Wales BBC Radio Cymru ...

Страница 52: ...ode 4 Select Auto Setup Auto Setup Access freesat Tuning Menu select access 5 Start Auto Setup Settings are made automatically freesat Auto Setup All freesat tuning data will be erased 10 10 0 0 8 2 1 freesat Auto Setup Signal Quality Searching Signal Strength TV Channels Found Radio Channels Found Data Channels Found Channels found creating channel list 6 Enter your postcode Enter Postcode for lo...

Страница 53: ...inutes CH Channel Name Type Free TV Free TV Free TV Free TV Quality Free TV 4 Pay TV 0 Data 0 Radio 0 Searching Example Analogue Analogue Auto Setup All analogue tuning data will be erased 29 30 CH 21 68 CH Channel Name Analogue Auto Setup Scan This will take about 3 minutes Analogue 2 Searching The analogue settings are downloaded to a Q Link compatible equipment connected to the TV in Analogue m...

Страница 54: ...el 2 Add it to the Favourites list 1 BBC One Wales 7 BBC THREE 14 E4 CBBC Channel 70 72 Cartoon Nwk 105 719 720 BBCi BBC Radio Wales BBC Radio Cymru freesat Favourites Editor freesat Channels Favourites 1 BBC One Wales 7 BBC THREE 14 E4 CBBC Channel 70 72 Cartoon Nwk 105 719 720 BBCi BBC Radio Wales BBC Radio Cymru 1 BBC One Wales freesat Favourites Editor freesat Channels Favourites 1 BBC One Wal...

Страница 55: ...hannel DVB Analogue You can retune channels or make your favourite channel lists skip unwanted channels etc 1 Select the mode p 21 2 Display the menu and select Setup Setup select access 3 Select DVB Tuning Menu or Analogue Tuning Menu DVB Tuning Menu Analogue Tuning Menu Access Access select access 4 Select one of the following functions Favourites Edit Access Access Channel List Auto Setup Chann...

Страница 56: ...position number logical channel number DVB Example Analogue 1 CH23 SC1 ITV 23 35 All Analogue Channels Channel position Channel name Enter the new position number Store green green To retune each channel Manual Tuning p 57 only for the revealed channels red To rename the channel name Analogue Set characters maximum 5 characters Store blue Edit channel name Name To use numeric buttons p 110 select ...

Страница 57: ... select store Update DVB channel automatically Update Channel List You can add new channels delete removed channels update channel name and position automatically to the channel list Example CH 21 68 DVB Update Channel List Progress This will take about 3 minutes CH Channel Name Type Quality The channel list is updated while keeping your settings in Favourites Edit Channel List Child Lock etc Depe...

Страница 58: ...ble satellites are Astra2 Eurobird Astra1 and Hotbird If you want to tune from all available satellites select Any Satellite 2 Check the signal condition and the message Astra2 Eurobird 0 0 10 10 Other Satellite Auto Setup Satellite Selection freesat and other channels Satellite Selection Signal Quality Signal Strength Signal Lock Locked Other Satellite Auto Setup All Other Satellite tuning data w...

Страница 59: ...nuous block of channels to the list at once blue yellow make the block add As for the other operations refer to List favourite DVB channels p 55 Create the channel list of Other Sat Satellite Channel List Create your channel list of Other Sat Satellite for viewing from all the found channels to exclude the duplicated channels or to reduce the number of channels And then you can select your desired...

Страница 60: ...hnologies make timer programming of the recorder For preparations of a recorder read the manual of the recorder For more information of the USB HDD Recording p 69 107 Recording to the external equipment via SCART is always in standard definition composite video even if the original programme is in high definition 1 Select the tuner you want to use p 21 2 Display the menu and select Timer Timer sel...

Страница 61: ...bly if correct information is received from broadcasters To edit a timer programming event Select the event To change a timer programming event Correct as necessary p 60 To delete a timer programming event red To record with subtitles if available yellow Each time pressed auto off To cancel a timer programming event temporarily blue Each time pressed cancel stop cancelling To unlock the tuner and ...

Страница 62: ... lock items will appear freesat Adult Channels Select Hide to hide channels of the adult genre in TV Guide and Channel List All the Timer Programming events of the adult genre will be cancelled freesat Players Locks freesat content supplied through the internet Unlock With this setting selected you will not be required to enter your 4 digit child lock PIN when viewing freesat Player content This i...

Страница 63: ...p Setup select access 2 Select System Menu System Menu Access select access 3 Select Shipping Condition System Menu Shipping Condition Access select access Restore Settings Shipping Condition 1 Check the message and initialise 2 Follow the on screen instructions Shipping Condition All tuning data will be erased Are you sure Are you sure 1 Confirm 2 Confirm 3 Start Shipping Condition Reset to Facto...

Страница 64: ...the PIN number twice at first setting Make a note of the PIN number in case you forget it The PIN number cannot be reset 2 Select the item NAME HOUSE NO POSTCODE and set characters PIN NAME HOUSE NO POSTCODE Owner ID Data Entry User input NAME Return to select other items Select the next item and repeat the operations select access select set To use numeric buttons p 110 3 Exit the menu To check t...

Страница 65: ...ot CI module Rear of the TV Insert the CI module optional The features that appear on screen are dependent on the contents of the selected CI module Follow the instructions that came with the viewing card to tune in the encrypted channels If encrypted channels do not appear perform the below to verify the card is recognised by the TV For more details read the manual of the CI module or check with ...

Страница 66: ...Automatically performs a search in standby and downloads an update if any software updates are available The automatic updating is performed at night under the following conditions Standby TV turned off with the remote control Recording of Timer Programming Direct TV Recording or One Touch Recording is not in progress If System Update is performed the software will be updated it may change TV func...

Страница 67: ...ettings select adjust access store Colour Management is available when Viewing Mode in the Picture Menu is set to Professional1 or Professional2 Menu Item Adjustments Configurations alternatives Picture Colour Gamut Reproduces image colour precisely according to the colour gamut standards Remaster Rec 709 SMPTE C EBU Remaster Displays deep colours by expanding the colour gamut at a maximum Rec 709...

Страница 68: ...he gain of gamma for selected signal level Reset to Defaults Press the OK button to reset to the default detailed Gamma Reset to Defaults Press the OK button to reset to the default Gamma Lock the picture setting Lock Settings White Balance and Gamma can be locked for each Viewing Mode and each input Additionally Contrast Brightness Colour Sharpness Tint Colour Gamut Colour Management and Reset to...

Страница 69: ...r PC For details read the manual of the USB HDD The data recorded on the USB HDD with this TV can only be played back on this TV You cannot play back its contents with another TV including the TV of the same model number or any equipment Do not turn the TV off pull out the mains plug or remove the USB HDD during operation formatting recording etc It may cause malfunction of the device or damage th...

Страница 70: ...atted and all contents deleted Are you sure USB HDD Formatting Yes No select Yes set select Yes set select Yes set 3 Confirmation of USB HDD name USB HDD Formatting Edit name Yes No Name USB Drive A select set The name for the USB HDD is created automatically If you want to edit the name select Yes Set characters Store USB HDD 1 USB HDD Name select set You can set characters by using numeric butto...

Страница 71: ...rrent programme constantly Confirm the code of the remote control is 73 p 34 Select Auto to start Rewind LIVE TV Recording Setup Rewind LIVE TV Auto select access store When you select Auto the recording will start automatically This recording will not start if the other recording is in progress TV signal condition is bad or any images are not displayed To operate Rewind LIVE TV To pause To search...

Страница 72: ...n p 93 and set to use theatre speakers p 99 Date shows the date on which the recording was made by the recording equipment The file without record of the date is shown The picture may not appear correctly on this TV depending on the recording equipment used Display may take some time when there are many files and folders Partly degraded files might be displayed at a reduced resolution Picture sett...

Страница 73: ... the information of the highlighted content 1 48 p1010001 JPG 23 10 2011 1600X1200 File name Date Size File number Total file number Note You can also access each mode directly by using VIERA TOOLS p 39 Recorded TV is available for contents recorded with this TV on the USB HDD Select the appropriate device and content for playing back each file You can use the following buttons during playback Con...

Страница 74: ...bnail To operate Single view To the previous photo Slideshow Stop return to thumbnail To the next photo To rotate 90 blue Slideshow Slideshow completes when all photos are viewed within the current thumbnail 1 Select the file from the thumbnail of photos for the first view 2 Start Slideshow red To display hide the operation guide To pause return to Single view To return to thumbnail To change the ...

Страница 75: ...nly select photos of the same recorded date and same pixels You may not be able to view the created 3D photo properly if you select the photos for L and R oppositely 4 Create the 3D photo If your selected photos are not suitable for the 3D photo the error message will be displayed and will return to the photo selection screen step 3 To save the 3D photo in the SD Card The 3D image will be saved on...

Страница 76: ... available when Frame is set to Collage Drift Gallery or Cinema or when Transition Effect is set to Motion Depending on the photo size it may not be fully enlarged to fill the screen e g portrait style picture Burst Playback Selects whether to display burst photos in a fast paced slideshow mode Off On This function is not available when Frame is set to Drift Gallery or Cinema or when Transition Ef...

Страница 77: ...creen is displayed to select whether to start from where you stopped last time or from the beginning Playback from the selected scene in the title SD Video or AVCHD Playback of the selected scene will start to the end of the title 1 Select the title 2 Select the scene 3 Start playback select access red Note The structure of titles and scenes may vary depending on the digital video camera used To r...

Страница 78: ... original size You can also change the aspect using the ASPECT button Aspect change may not work depending on the content Only available during playback Repeat Playback repeat within the title or selected file depending on the content Off On Title Selects from a group of titles if available Recorded TV mode For exclusive USB HDD Contents list of the selected device will be displayed BBC 1 12 00 IT...

Страница 79: ...s the OK button to display the grouped contents To exclude only the specific content from the group tick it and then select Exclude from Group To exclude several contents at once tick all the desired contents Change Protect Status Select the content to protect from deletion and then select Change Protect Status Perform the same way to cancel the protection To change the status of several contents ...

Страница 80: ...rive Select Option Menu Create Group Release Group Drive Select Contents Select Change Protect Status select access 3 Select the device to access USB HDD1 USB Flash Drive Select USB HDD1 EXIT Select RETURN Access SD Card select access If you select the device to play back photos videos or music change to the appropriate content To change the content select Contents Select access Audio output Setti...

Страница 81: ...t the folder 2 Select the file 3 Start playback select access red How to operate in the playback Example Playback My Song_9 My Favourite My Music_1 00 02 43 00 05 44 EXIT RETURN Operation guide To display hide the operation guide To operate the playback Rewind Pause Playback Stop Fast forward To the previous track red To the next track green To return to thumbnail Music Setup Setup the setting for...

Страница 82: ...Media server visit the website of TwonkyMedia Additional fees may be charged to obtain server software Note For more information about the server software please consult each software company When server software for the media server is installed on the PC the data may be at risk of being accessed by other people Please take care of the settings and connections under the network circumstances at t...

Страница 83: ...nd audio VIERA Connect VIERA Connect is a gateway to the internet services unique to Panasonic VIERA Connect allows you to access some specific websites supported by Panasonic and enjoy internet contents such as videos games EPG communication tools etc from VIERA Connect home screen To enable this function connect this TV to a broadband network environment Network connections p 84 Network Setup p ...

Страница 84: ...up and connect any equipment required for the network environment You cannot make settings for the equipment on this TV Read the manual of the equipment If your modem has no broadband router functions use a broadband router If your modem has broadband router functions but there are no vacant ports use a hub Ensure that the broadband routers and hubs are compatible with 10BASE T 100BASE TX If you u...

Страница 85: ...A Remote Volume Enables to control the volume of the TV using Windows 7 via the network Off On Network Remote Control Enables to control the TV from the network equipment smartphone etc Off On For more information of this function http panasonic jp support global cs tv DLNA Server Settings DLNA Server Enables to share the TV programme or contents of this TV with the network equipment DLNA Certifie...

Страница 86: ...Proxy 2 Enter the address Proxy Host select set You can set characters by using numeric buttons 3 Store 0 Proxy Proxy Port Proxy Settings select access Proxy Port Sets Proxy port number This number is also specified by the provider with the Proxy address 1 Select Proxy Port 0 Proxy Proxy Port Proxy Settings 2 Move the cursor and enter the number 4 Select Connection Test and access to test Connecti...

Страница 87: ...onfirmation screen will be displayed It is recommended to select the encrypted access point 5 Enter the encryption key of the access point 1 2 abc 3 def 4 ghi 5 jkl 6 mno 7 pqrs 8 tuv 9 wxyz 0 A B C D E F G H I J K L M N O P Q R S T U V W X Y Z 0 1 2 3 4 5 6 7 8 9 a b c d e f g h i j k l m n o p q r s t u v w x y z _ Wireless Network Settings Encryption key Set characters Store select set You can ...

Страница 88: ...ettings are completed p 82 88 1 Display VIERA TOOLS and select Media Server Media Server select access 2 Select one of the media servers to access Example Media server list SERVER1 SERVER2 SERVER3 DIGA 4 Select EXIT RETURN Access Media Server Info Option Menu Available media servers Total listed number select access For the operations to access the other TV select a name or MAC Address of the othe...

Страница 89: ...st playback on the way the confirmation screen is displayed to select whether to start from where you stopped last time or from the beginning Example Playback 19 02 2011 11 21 00 15 39 00 02 05 MEDIASERVER Operation guide Information banner EXIT RETURN Manual skip To display hide the operation guide and information banner To the previous content red To the next content green To return to list To o...

Страница 90: ...ext photo Motion Each photo is displayed with an effect of enlarging reducing moving up or moving down Random Each transition is selected at random Interval Selects slideshow interval 5 10 15 30 60 90 120 seconds This function is not available when Transition Effect is set to Motion Repeat Slideshow repeat Off On Back Ground Music Selects the back ground music during Photo mode Off Type1 Type2 Typ...

Страница 91: ...lect SPDIF Selection and set 2 2 SPDIF Selection Reset to Defaults Auto Reset select access store Menu Item Adjustments Configurations alternatives Sound SPDIF Selection SPDIF A standard audio transfer file format Selects the initial setting for digital audio output signal from DIGITAL AUDIO OUT and HDMI2 ARC function terminals Auto PCM Auto Dolby Digital Plus Dolby Digital and HE AAC multi channe...

Страница 92: ...HD Video Camera LUMIX Camera with VIERA Link function Analogue channel download Easy playback Power on link Power off link Reduce unnecessary power consumption in Standby 3 3 Auto standby for unnecessary equipment 3 3 Pause Live TV programme 3 4 Direct TV Recording 3 Control the menu of the connected equipment by VIERA remote control 1 1 1 Speaker control Connection DIGA Recorder DVD Player Blu ra...

Страница 93: ...pment supporting VIERA Link to the TV s AV1 terminal and set AV1 out to Monitor in the Setup Menu p 45 Use the optical digital audio cable or SCART cable for audio output from the TV 1 Available with the equipment which has HDAVI Control 2 or later function 2 Available with the equipment which has HDAVI Control 3 or later function 3 Available with the equipment which has HDAVI Control 4 or later f...

Страница 94: ...ons Picture source Mode Recording from Analogue TV TV monitor out AV Recorder s tuner freesat DVB Other Sat Satellite USB HDD for recording is not connected TV TV monitor out AV watching recorder s tuner AV Recorder s tuner AV watching recorder s external input AV Recorder s external input AV watching TV s external input AV TV monitor out When Direct TV Recording is performed the recorder is autom...

Страница 95: ...ipment Read the manual of the equipment For optimal recording the settings of the recorder may need to be changed For details read the manual of the recorder Download Analogue channel setting Analogue channel download see below Set VIERA Link to On in the Setup Menu VIERA Link p 45 Set up the TV After connection turn the equipment on and then switch the TV on Select the input mode from HDMI1 HDMI2...

Страница 96: ...operly depending on the connected equipment If required set to Off Direct TV Recording What you see is What you record Direct TV Rec Records the current programme in the DIGA Recorder immediately If you connect a variety of recorders including other manufacturers recorders at the same time connect the DIGA Recorder to the TV s lower HDMI terminal number For example if you use HDMI1 and HDMI2 for t...

Страница 97: ...ded on HDD from where it was paused If the paused TV picture disappears after a few minutes press OPTION button to restore the pause picture Follow the operation guide to operate Pause Live TV function To operate Pause Live TV Search backward Playback Stop If you stop playback the recorded programme will be deleted from HDD Search forward Pause Operations may vary depending on the recorder In this...

Страница 98: ...de If other manufacturers equipment is accessed Setup Contents Selection menu may be displayed Available VIERA remote control buttons depend on the connected equipment Note Some operations may not be available depending on the equipment In this case use its own remote control to operate the equipment If multiple recorders or players are connected VIERA Link Menu Pause Live TV Direct TV Rec VIERA L...

Страница 99: ... speakers is mute When the equipment is turned off TV speakers will be active TV TV speakers are active Multi channel sound If you want to enjoy the multi channel sound e g Dolby Digital 5 1ch via an Amplifier connect it with HDMI cable and Optical digital audio cable p 93 and then select Home Cinema If your Amplifier has HDAVI Control 5 function you only need to connect it with HDMI cable to the ...

Страница 100: ...table p 102 and the specifications p 121 123 Check the type of terminals and cable plugs are correct when connecting To use the specific devices supporting Bluetooth wireless technology Bluetooth Setup p 108 Rear of the TV AV2 COMPONENT VIDEO adaptor supplied To watch DVDs DVD Player Listening Viewing USB devices USB cable USB HDD Communication Camera HDMI equipment Fully wired HDMI compliant cabl...

Страница 101: ...ulti channel sound e g Dolby Digital 5 1ch connect the equipment to the amplifier For the connections read the manuals of the equipment and amplifier Headphones Less than 10 cm M3 stereo mini plug Ferrite core Small size supplied Installing the Ferrite core Pull back the tab Wind the cable twice Close To adjust volume Headphone Volume p 43 Camcorder Game equipment Viewing Listening Camcorder Game ...

Страница 102: ...s Video camera To play games Game equipment To use amplifier with speaker system 3 To use network services 4 USB HDD Recording 5 Q Link VIERA Link with HDMI Direct TV Recording Recommended Connection 1 To connect the equipment the terminal adaptor supplied is necessary 2 Use HDMI1 for automatic input switching 3 Use HDMI2 for connecting an amplifier This connection is applicable when using an ampl...

Страница 103: ... 60i 50i HDMI1 HDMI2 HDMI3 HDMI4 525 480 60i 60p 625 576 50i 50p 750 720 60p 50p 1 125 1 080 60i 50i 1 125 1 080 60p 50p 24p Auto mode Auto mode determines the best aspect ratio to fill the screen using a four step process WSS Control signal through SCART HDMI terminal Letterbox detection or Justify to fill the screen This process may take several minutes depending on the darkness of the image Let...

Страница 104: ...MOV mov qt DivX3 DivX4 DivX5 DivX6 H 264 BP MP HP Motion JPEG MPEG1 MPEG2 MPEG4 SP ASP AAC Dolby Digital Dolby Digital Plus DTS core HE AAC LPCM MPEG Audio MP3 This TV supports Motion JPEG recorded by Panasonic LUMIX Camera 1 This TV is not available for playing back Motion JPEG with the media server 1 Some products of before the year 2004 may not be available The compatibility with future product...

Страница 105: ...SP ASP AAC HE AAC PS mpg mpeg vob vro H 264 2 MPEG1 MPEG2 VC 1 2 AAC 2 Dolby Digital Dolby Digital Plus 2 HE AAC 2 LPCM MPEG Audio MP3 2 2 This codec can be played back only in Media Player TS m2ts tp trp ts H 264 MPEG1 MPEG2 VC 1 3 AAC Dolby Digital Dolby Digital Plus DTS core 3 HE AAC MPEG Audio MP3 3 3 This codec can be played back only in Media Player Music Codec File extension Restrictions MP...

Страница 106: ...ABOUT DIVX VIDEO ON DEMAND This DivX Certified device must be registered in order to play purchased DivX Video on Demand VOD movies To obtain your registration code locate the DivX VOD section in the Setup Menu Go to vod divx com for more information on how to complete your registration To show DivX VOD registration code DivX VOD p 47 If you want to generate the new registration code you have to d...

Страница 107: ...an damage device or TV Do not touch the pins on the device Do not subject the device to a high pressure or impact Insert the device in the correct direction Otherwise this can damage device or TV Electrical interference static electricity or erroneous operation may damage the data or device Back up the recorded data at regular intervals in case of deteriorated or damaged data or erratic operation ...

Страница 108: ... USB HDD USB Flash Memory or Communication Camera to the TV s USB ports directly Some USB devices or USB HUB may not be used with this TV You cannot connect any devices by using USB card reader You cannot use two or more same kind of USB devices simultaneously except USB Flash Memory or USB HDD Additional information for the devices may be on the following website http panasonic jp support global ...

Страница 109: ...obal cs tv Some of the keys of gamepads correspond to the operation of the remote control Select Start 10 11 1 7 6 9 8 2 3 4 5 Example Remote Control Remote Control 1 Volume Up Down 7 VIERA TOOLS 2 Channel Up Down 8 EXIT 3 GUIDE 9 INPUT AV 4 OK 5 BACK RETURN 10 MENU 6 INTERNET 11 Cursor buttons Input signal that can be displayed COMPONENT Y PB PR from AV2 terminal HDMI Signal name COMPONENT HDMI 5...

Страница 110: ...s table 1 _ d e f 3 D E F g h i 4 G H I j k l 5 J K L m n o 6 M N O p q r s 7 P Q R S t u v 8 T U V w x y z 9 W X Y Z Space 0 a b c 2 A B C Numeric buttons Numeric buttons Characters Characters SCART and HDMI terminal information AV1 SCART terminal RGB VIDEO Q Link Socket Earth 21 CVBS out video 19 CVBS earth 17 Red in 15 Red earth 13 Green in 11 Green earth 9 Blue in 7 Blue earth 5 Audio out L 3 ...

Страница 111: ...d click Save changes if necessary Then select Choose media streaming options property window 3 In Name your media library text box enter a name that will identify your PC on VIERA On the Show devices drop bar select All networks to display all the available devices in the list VIERA Name stored in Network Link Settings p 85 will be displayed Select the VIERA Name and click Allowed so that VIERA ca...

Страница 112: ...he dish needs to be pointing at Astra 2 at 28 2 East and Eurobird 1 at 28 5 East If the problem persists consult your freesat registered retailer or call Freesat UK Ltd on 08450 990 990 or visit www freesat co uk Neither image nor sound is produced Check the TV is turned on Check the mains lead is plugged into the TV and the socket outlet Check the TV is in AV mode Check the correct input mode is ...

Страница 113: ...oximately 3 2 m from the TV Check that there are no obstacles between the TV and the 3D Eyewear For some people the 3D images may be difficult to see or cannot be seen especially in users who have a different level of eyesight between the left and right eyes Take the necessary steps wearing glasses etc to correct your eyesight before use 3D Eyewear is turned off automatically Check that there are ...

Страница 114: ...nt the remote control directly at the front of the TV within about 7 m and a 30 degree angle of the front of the TV Situate the TV away from sunshine or other sources of bright light not to shine on the TV s remote control signal receiver Parts of the TV become hot Even when the temperature of parts of the front top and rear panels has risen these temperature rises do not cause any problems in ter...

Страница 115: ...ramming events is 15 New channels found Press OK to update channel list Press EXIT to ignore There may be new channels available This message will appear each time a change is made by the broadcasters This message can be deactivated by setting New Channel Message to Off in DVB Tuning Menu Selecting OK will perform Update Channel List No channel found Please check aerial or local signal availabilit...

Страница 116: ...ress OK to keep RETURN to edit Timer programming events are overlapped Press the OK button to keep the overlapped setting Ext Rec and USB HDD Rec are given priority over Reminder When two or more Ext Rec USB HDD Rec overlap the first timer programming event starts and finishes as programmed The next timer programming event can then start Tuner Locked Press EXIT to unlock and stop recording If you ...

Страница 117: ...rmat Top and Bottom One of the types of 3D format available for broadcasts USB Universal Serial Bus An interface specification to connect devices VCR Video Cassette Recorder 24p Progressive images recorded at a rate of 24 frames per second film source Maintenance First remove the mains plug from the socket outlet Display panel Cabinet Pedestal Regular care Gently wipe the surface of the display pa...

Страница 118: ...kype Limited DLNA the DLNA Logo and DLNA CERTIFIED are trademarks service marks or certification marks of the Digital Living Network Alliance Windows is a registered trademark of Microsoft Corporation in the United States and other countries HDMI the HDMI Logo and High Definition Multimedia Interface are trademarks or registered trademarks of HDMI Licensing LLC in the United States and other count...

Страница 119: ...e no more than our cost of physically performing source code distribution a complete machine readable copy of the corresponding source code covered under LGPL Contact Information cdrequest am linux jp Source code covered under LGPL is also freely available to you and any other member of the public via our website below http www am linux jp dl EUIDTV12 For the software categorized as 5 and 6 please...

Страница 120: ...edia Player 72 81 Menu Functions 40 47 Monaural Audio 23 Multi Audio 23 Music mode 81 N Network connections 84 Network Setup 85 88 New Channel Message 57 NICAM 43 NTSC 41 122 O Off Timer 23 44 One Touch Recording 71 Optional accessories 7 Other Sat Satellite Tuning Menu 58 Owner ID 18 64 P PAL 122 Pedestal 8 Photo mode 74 PIN number 18 62 64 Pixel Orbiter 42 Playing Time Display 46 P NR 41 Power a...

Страница 121: ...ption 2 0 30 W Off mode power consumption 0 25 W Display resolution 1 920 W 1 080 H Other information Model No TX P42GT50B TX P50GT50B Power source AC 220 240 V 50 60 Hz Panel Plasma panel Dimensions W H D 993 mm 653 mm 320 mm With Pedestal 993 mm 603 mm 47 mm TV only 1 170 mm 754 mm 335 mm With Pedestal 1 170 mm 704 mm 47 mm TV only Mass 21 0 Net With Pedestal 17 5 Net TV only 27 0 Net With Pedes...

Страница 122: ...V Horizontal 18 V Current Max 500 mA overload protection 22 kHz Tone Frequency 22 kHz 2 kHz Amplitude 0 6 V 0 2 V Symbol Rate Max 30 MS s FEC Mode 1 2 3 5 2 3 3 4 4 5 5 6 8 9 9 10 Demodulation QPSK 8PSK Not available for DiSEqC control DVB T Digital terrestrial services PAL I VHF A J CATV S1 S20 UHF E21 E69 CATV S21 S41 Hyperband PAL 525 60 Playback of NTSC tape from some PAL Video recorders VCR o...

Страница 123: ...nnel differ depending on the country 4 Not all the Bluetooth compatible devices are available with this TV Note Design and Specifications are subject to change without notice Mass and Dimensions shown are approximate This equipment complies with the EMC standards listed below EN55013 EN61000 3 2 EN61000 3 3 EN55020 EN55022 EN55024 Plasma Television Declaration of Conformity DoC Hereby Panasonic Co...

Страница 124: ... Note for the battery symbol bottom two symbol examples This symbol might be used in combination with a chemical symbol In this case it complies with the requirement set by the Directive for the chemical involved Sales and Support Information Customer Communications Centre For customers within the UK 0844 844 3899 For customers within Ireland 01 289 8333 For further support on your product please ...

Отзывы: